标签:路由 mod mask mkdir 实现 master fst mys mount -a
Haproxy和Keepalived简介可以针对HTTP请求添加cookie,进行路由后端服务器
可平衡负载至后端服务器,并支持持久连接
支持基于cookie进行调度
支持所有主服务器故障切换至备用服务器
支持专用端口实现监控服务
支持不影响现有连接情况下停止接受新连接请求
可以在双向添加,修改或删除HTTP报文首部
支持基于pattern实现连接请求的访问控制
通过特定的URI为授权用户提供详细的状态信息
基于vrrp协议完成地址流动
为vip地址所在的节点生成ipvs规则(在配置文件中预先定义)
为ipvs集群的各RS做健康状态检测
基于脚本调用接口通过执行脚本完成脚本中定义的功能,进而影响集群事务,以此 支持nginx、haproxy等服务
OS:centos7.6x86_64
keepalived:keepalived-1.3.5-6.el7.x86_64
haproxy:haproxy-1.5.18-8.el7.x86_64
Apache:httpd-2.4.6-88.el7.centos.x86_64
php-fpm:php-fpm-5.4.16-46.el7.x86_64
mysql:mariadb-server-1:5.5.60-1.el7_5.x86_64
wordpross:wordpress-4.9.4-zh_CN.tar.gz
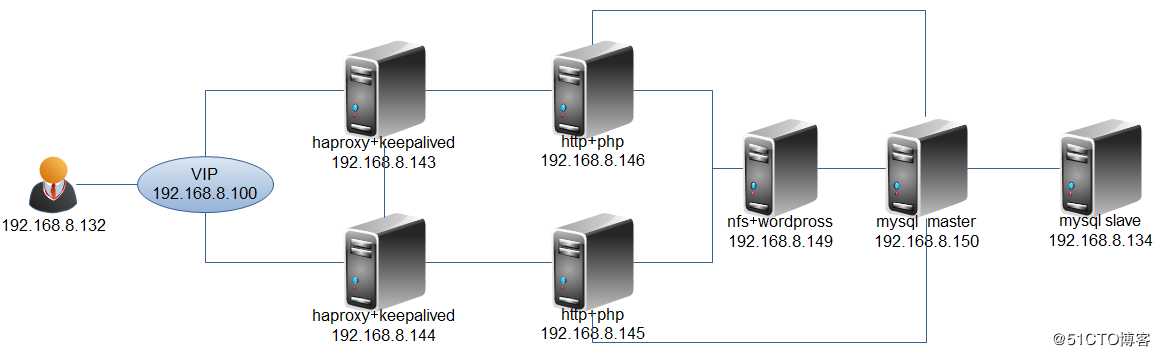
Haproxy+Keepalived主从高可用,keepalived为Haproxy主从提供高可用保证,主调度器若挂掉,从调度器能无缝接管,haproxy为后端web提供检测功能,实现WEB站点负载均衡+高可用性
IP:192.168.8.143
IP:192.168.8.144
[root@centos7 ~]#yum -y install haproxy
[root@centos7 ~]#cp /etc/haproxy/haproxy.cfg /etc/haproxy/haproxy.cfg.bak
[root@centos7 ~]#vim /etc/haproxy/haproxy.cfg.bak
#在配置文件末尾添加要监听的web服务器的地址
......
listen web_http
    mode http
    bind 192.168.2.100:80
    server web1 192.168.8.146:80 check inter 3000 fall 3 rise 5
    server web2 192.168.8.145:80 check inter 3000 fall 3 rise 5
#在调度器上打开内核路由转发功能,和地址监听功能
[root@centos7 ~]#vim /etc/sysctl.d/99-sysctl.conf #编辑配置文件,添加如下两行
net.ipv4.ip_forward = 1
net.ipv4.ip_nonlocal_bind = 1
#使配置文件生效
[root@centos7 ~]#sysctl -p
#启动haproxy服务,并且查看地址是否监听
[root@centos7 ~]#systemctl start haproxy.service
[root@centos7 ~]#systemctl enable haproxy.service
#查看是否已监听VIP地址
[root@centos7 ~]#ss -ntl
State      Recv-Q Send-Q             Local Address:Port               Peer Address:Port
LISTEN 0 128 192.168.8.100:80 *:* keepalived master IP:192.168.8.143
[root@centos7 ~]#yum -y install keepalived
[root@centos7 ~]#yum -y install ipvsadm
[root@centos7 ~]#cp /etc/keepalived/keepalived.conf /etc/keepalived/keepalived.conf.bak
[root@centos7 ~]#vim /etc/keepalived/keepalived.conf
global_defs {
   notification_email {
        root@localhost
   }
   notification_email_from Alexandre.Cassen@firewall.loc
   smtp_server 192.168.200.1
   smtp_connect_timeout 30
   router_id lvs1
   vrrp_skip_check_adv_addr
   vrrp_strict
   vrrp_iptables #关闭防火墙,否则当VIP转移时会自动打开防火墙,拦截所有的连接
   vrrp_garp_interval 0
   vrrp_gna_interval 0
}

vrrp_instance VI_1 {
    state MASTER
    interface eth0
    virtual_router_id 51
    priority 70
    advert_int 1
    authentication {
        auth_type PASS
        auth_pass 1111
    }
    virtual_ipaddress {
        192.168.8.100 dev eth0 label eth0:0
    }
}

virtual_server 192.168.8.100 80 {
        delay_loop 3
        lb_algo wrr
        lb_kind DR
        protocol TCP

        sorry_server 192.168.8.149 80
        real_server 192.168.8.145 80 {
                weight 2
                TCP_CHECK {
                        connect_timeout 5
                        nb_get_retry 3
                        delay_befor_retry 3
                        connect_port 80
                }
        }

        real_server 192.168.8.146 80 {
                weight 2
                TCP_CHECK {
                        connect_timeout 5
                        nb_get_retry 3
                        delay_befor_retry 3
                        connect_port 80
                }
        }
}
#启动keepalived服务
[root@centos7 ~]#systemctl start keepalived.service
[root@centos7 ~]#systemctl enable keepalived.service
keepalived slave IP:192.168.8.144(大部分配置文件一样,只需改动少许配置)
[root@centos7 ~]#yum -y install keepalived
[root@centos7 ~]#yum -y install ipvsadm
[root@centos7 ~]#cp /etc/keepalived/keepalived.conf /etc/keepalived/keepalived.conf.bak
[root@centos7 ~]#vim /etc/keepalived/keepalived.conf
global_defs {
   notification_email {
       root@localhost
   }
   notification_email_from Alexandre.Cassen@firewall.loc
   smtp_server 192.168.200.1
   smtp_connect_timeout 30
   router_id lvs1
   vrrp_skip_check_adv_addr
   vrrp_strict
   vrrp_iptables
   vrrp_garp_interval 0
   vrrp_gna_interval 0
}

vrrp_instance VI_1 {
    state BACKUP #改为从模式
    interface eth0
    virtual_router_id 51
    priority 70 #改动优先级为70,要比主服务器优先级小
    advert_int 1
    authentication {
        auth_type PASS
        auth_pass 1111
    }
    virtual_ipaddress {
        192.168.8.100 dev eth0 label eth0:0
    }
}

virtual_server 192.168.8.100 80 {
        delay_loop 3
        lb_algo wrr
        lb_kind DR
        protocol TCP

        sorry_server 192.168.8.149 80
        real_server 192.168.8.145 80 {
                weight 2
                TCP_CHECK {
                        connect_timeout 5
                        nb_get_retry 3
                        delay_befor_retry 3
                        connect_port 80
                }
        }

        real_server 192.168.8.146 80 {
                weight 2
                TCP_CHECK {
                        connect_timeout 5
                        nb_get_retry 3
                        delay_befor_retry 3
                        connect_port 80
                }
        }
}
 #启动keepalived服务
[root@centos7 ~]#isystemctl start keepalived.service
[root@centos7 ~]#isystemctl enable keepalived.servicenfs server IP:192.168.8.149
[root@centos7 ~]#yum -y install nfs-utils
[root@centos7 ~]#tar xf wordpress-4.9.4-zh_CN.tar.gz
[root@centos7 ~]#mkdir /wordpross #创建挂载目录
[root@centos7 ~]#mv wordpress/* /wordpross/ #移动配置文件到创建的目录中
......
define( ‘DB_NAME‘, ‘wordpross‘ ); #数据库名称
/** MySQL database username */
define( ‘DB_USER‘, ‘user1‘ ); #管理账号用户名
/** MySQL database password */
define( ‘DB_PASSWORD‘, ‘centos‘ ); #管理账号密码
/** MySQL hostname */
define( ‘DB_HOST‘, ‘www.test.com‘ ); #数据库IP或域名
......
[root@centos7 ~]#vim /etc/exports
/wordpross  192.168.8.0/24(rw,no_root_squash)
#启动nfs服务
[root@centos7 ~]#systemctl start nfs.service
[root@centos7 ~]#systemctl enable nfs.servicemysql master IP:192.168.8.150
[root@centos7 ~]#yum -y install mariadb-server
[root@centos7 ~]#vim /etc/my.cnf #编辑配置文件,添加如下几行
[mysqld]
datadir=/var/lib/mysql
socket=/var/lib/mysql/mysql.sock

server_id=1
skip_name_resolve
innodb_file_per_table
log_bin
#启动mariadb服务
systemctl start mariadb
systemctl enable mariadb
#进入数据库查看二进制文件的位置
MariaDB [(none)]> show master logs;
+------------------+-----------+
| Log_name         | File_size |
+------------------+-----------+
| mariadb-bin.000001 |     245 |
#添加复制账号
MariaDB [(none)]> grant replication slave on *.* to test@‘192.168.8.134‘ identified by ‘centos‘;
mysql slave IP:192.168.8.134
[root@centos7 ~]#yum -y install mariadb-server
[root@centos7 ~]#vim /etc/my.cnf #编辑配置文件,添加如下几行
[mysqld]
datadir=/var/lib/mysql
socket=/var/lib/mysql/mysql.sock

server_id=2
read_only
skip_name_resolve
innodb_file_per_table
#启动数据库服务
[root@centos7 ~]#systemctl start mariadb
[root@centos7 ~]#systemctl enable mariadb
#进入数据库,添加同步账号
MariaDB [(none)]> CHANGE MASTER TO
    ->   MASTER_HOST=‘192.168.8.150‘,
    ->   MASTER_USER=‘test‘,
    ->   MASTER_PASSWORD=‘centos‘,
    ->   MASTER_PORT=3306,
    ->   MASTER_LOG_FILE=‘mariadb-bin.000001‘,
    ->   MASTER_LOG_POS=245;
#开始进行同步
MariaDB [(none)]> start slave;
#查看同步信息
MariaDB [(none)]> show slave status\G;
Slave_IO_Running: Yes #同步线程以开启
Slave_SQL_Running: Yes
在masyql主服务器上添加wordpross数据库
MariaDB [(none)]> create database wordpross;
MariaDB [(none)]> grant all on wordpross.* to user1@‘192.168.8.%‘ identified by ‘centos‘;web1 IP:192.168.8.145
web2 IP:192.168.8.146
[root@centos7 ~]# yum -y install httpd
[root@centos7 ~]# yum -y install php-fpm
[root@centos7 ~]# yum -y install nfs-utils
#启动httpb服务
[root@centos7 ~]# systemctl start httpd
[root@centos7 ~]# systemctl enable httpd
[root@centos7 ~]# vim /etc/php-fpm.d/www.conf
#注释掉这一行
;listen.allowed_clients = 127.0.0.1
#启动php-fpm服务
[root@centos7 ~]#systemctl restart php-fpm
[root@centos7 ~]#systemctl enable php-fpm
#查看9000端口是否监听
[root@centos7 ~]#iss -ntl
State       Recv-Q Send-Q   Local Address:Port                  Peer Address:Port
LISTEN      0      128          127.0.0.1:9000                  *:*
#挂载nfs设备
[root@centos7 ~]#ivim /etc/fstab
192.168.8.149:/wordpross /var/www/html nfs defaults 0 0
#使配置文件生效
[root@centos7 ~]#mount -a
#查看挂载是否成功
[root@centos7 ~]#df
192.168.8.149:/wordpross 151967360  1462528 150504832    1% /var/www/html
#在回环网卡上绑定VIP地址,并关闭网卡的广播功能,需要脚本来实现
[root@centos7 ~]#vim lvs_dr_rs.sh
#!/bin/bash
vip=192.168.8.100 #写入VIP的地址
mask=‘255.255.255.255‘
dev=lo:1
rpm -q httpd &> /dev/null || yum -y install httpd &>/dev/null
service httpd start &> /dev/null && echo "The httpd Server is Ready!"
case $1 in
start)
    echo 1 > /proc/sys/net/ipv4/conf/all/arp_ignore
    echo 1 > /proc/sys/net/ipv4/conf/lo/arp_ignore
    echo 2 > /proc/sys/net/ipv4/conf/all/arp_announce
    echo 2 > /proc/sys/net/ipv4/conf/lo/arp_announce
    ifconfig $dev $vip netmask $mask #broadcast $vip up
    #route add -host $vip dev $dev
    echo "The RS Server is Ready!"
    ;;
stop)
    ifconfig $dev down
    echo 0 > /proc/sys/net/ipv4/conf/all/arp_ignore
    echo 0 > /proc/sys/net/ipv4/conf/lo/arp_ignore
    echo 0 > /proc/sys/net/ipv4/conf/all/arp_announce
    echo 0 > /proc/sys/net/ipv4/conf/lo/arp_announce
    echo "The RS Server is Canceled!"
    ;;
*)
    echo "Usage: $(basename $0) start|stop"
    exit 1
    ;;
esac
#执行脚本并查看是否绑定成功
[root@centos7 ~]#bash lvs_dr_rs.sh start
[root@centos7 ~]#ifconfig
lo:1: flags=73<UP,LOOPBACK,RUNNING>  mtu 65536
        inet 192.168.8.100  netmask 255.255.255.255
        loop  txqueuelen 1000  (Local Loopback)
#编辑host文件,将解析指向mysql服务器的地址
[root@centos7 ~]#vim /etc/hosts
192.168.8.150 www.test.comclient IP :192.168.8.132
MariaDB [(none)]> use wordpross;
MariaDB [wordpross]> select * from wp_users\G;
*************************** 1. row ***************************
                 ID: 1
         user_login: admin
          user_pass: $P$BV98wIJbUmTzsprC6v7Dea1VGKUFIU/
      user_nicename: admin
         user_email: 1058498224@qq.com
           user_url:
    user_registered: 2019-06-09 06:36:37
user_activation_key:
        user_status: 0
display_name: admin标签:路由 mod mask mkdir 实现 master fst mys mount -a
原文地址:https://blog.51cto.com/14163901/2406480