标签:private man info art 中文 odi enable ram password
1, 建立配置文件工程,git地址为:http://gitlab.xxx.com/xx/xx_configuration
2, 建立config服务工程
@EnableConfigServer
@SpringBootApplication
public class ConfigServiceApplication {

    public static void main(String[] args) {
        SpringApplication.run(ConfigServiceApplication.class, args);
    }
}
server.port=8888

# 配置git仓库地址
spring.cloud.config.server.git.uri=http://Gitlab.xxx.com/xx/xx_configuration.git
spring.cloud.config.server.git.username=xxx
spring.cloud.config.server.git.password=xxxx
#Git分支
spring.cloud.config.label=master
#spring.cloud.config.server.git.search-paths=src/main/resources/config

<?xml version="1.0" encoding="UTF-8"?>
<project xmlns="http://maven.apache.org/POM/4.0.0" xmlns:xsi="http://www.w3.org/2001/XMLSchema-instance"
    xsi:schemaLocation="http://maven.apache.org/POM/4.0.0 https://maven.apache.org/xsd/maven-4.0.0.xsd">
    <modelVersion>4.0.0</modelVersion>

    <groupId>com.example</groupId>
    <artifactId>marketing-config</artifactId>
    <version>0.0.1-SNAPSHOT</version>
    <packaging>jar</packaging>

    <parent>
        <groupId>org.springframework.boot</groupId>
        <artifactId>spring-boot-starter-parent</artifactId>
        <version>2.1.6.RELEASE</version>
        <relativePath /> <!-- lookup parent from repository -->
    </parent>

    <properties>
        <project.build.sourceEncoding>UTF-8</project.build.sourceEncoding>
        <java.version>1.8</java.version>
    </properties>

    <dependencies>
        <dependency>
            <groupId>org.springframework.cloud</groupId>
            <artifactId>spring-cloud-config-server</artifactId>
        </dependency>

        <dependency>
            <groupId>org.springframework.boot</groupId>
            <artifactId>spring-boot-starter-test</artifactId>
            <scope>test</scope>
        </dependency>
    </dependencies>

    <dependencyManagement>
        <dependencies>
            <dependency>
                <groupId>org.springframework.cloud</groupId>
                <artifactId>spring-cloud-dependencies</artifactId>
                <version>Finchley.SR2</version>
                <type>pom</type>
                <scope>import</scope>
            </dependency>
        </dependencies>
    </dependencyManagement>

    <build>
        <plugins>
            <plugin>
                <groupId>org.springframework.boot</groupId>
                <artifactId>spring-boot-maven-plugin</artifactId>
            </plugin>
        </plugins>
    </build>

</project>
3, 配置Client工程
@SpringBootApplication
public class ConfigClientApplication {

    public static void main(String[] args) {
        SpringApplication.run(ConfigClientApplication.class, args);
    }
}

@RefreshScope
@RestController
class MessageRestController {

    @Value("${message1:Hello default}")
    private String message;

    @RequestMapping("/message")
    String getMessage() {
        return this.message;
    }
}
server.port=8889
#对应仓库中yml
spring.application.name=client1

management.endpoints.web.exposure.include=*

spring.cloud.config.profile=dev
spring.cloud.config.label=master
spring.cloud.config.uri=http://localhost:8888
<?xml version="1.0" encoding="UTF-8"?>
<project xmlns="http://maven.apache.org/POM/4.0.0" xmlns:xsi="http://www.w3.org/2001/XMLSchema-instance"
    xsi:schemaLocation="http://maven.apache.org/POM/4.0.0 https://maven.apache.org/xsd/maven-4.0.0.xsd">
    <modelVersion>4.0.0</modelVersion>

    <groupId>com.example</groupId>
    <artifactId>configuration-client</artifactId>
    <version>0.0.1-SNAPSHOT</version>
    <packaging>jar</packaging>

    <parent>
        <groupId>org.springframework.boot</groupId>
        <artifactId>spring-boot-starter-parent</artifactId>
        <version>2.1.6.RELEASE</version>
        <relativePath/> <!-- lookup parent from repository -->
    </parent>

    <properties>
        <project.build.sourceEncoding>UTF-8</project.build.sourceEncoding>
        <java.version>1.8</java.version>
    </properties>

    <dependencies>
        <dependency>
            <groupId>org.springframework.cloud</groupId>
            <artifactId>spring-cloud-starter-config</artifactId>
        </dependency>
        <dependency>
            <groupId>org.springframework.boot</groupId>
            <artifactId>spring-boot-starter-actuator</artifactId>
        </dependency>
        <dependency>
            <groupId>org.springframework.boot</groupId>
            <artifactId>spring-boot-starter-web</artifactId>
        </dependency>
        <dependency>
            <groupId>org.springframework.boot</groupId>
            <artifactId>spring-boot-starter-test</artifactId>
            <scope>test</scope>
        </dependency>
    </dependencies>

    <dependencyManagement>
        <dependencies>
            <dependency>
                <groupId>org.springframework.cloud</groupId>
                <artifactId>spring-cloud-dependencies</artifactId>
                <version>Finchley.SR2</version>
                <type>pom</type>
                <scope>import</scope>
            </dependency>
        </dependencies>
    </dependencyManagement>

    <build>
        <plugins>
            <plugin>
                <groupId>org.springframework.boot</groupId>
                <artifactId>spring-boot-maven-plugin</artifactId>
            </plugin>
        </plugins>
    </build>

</project>
3,验证
先启动Service工程,访问 http://localhost:8888/client1/dev/master,如果能看到配置的属性说明服务启动成功。
再启动Client工程,访问:http://localhost:8889/message
Config Server启动以后,我们可以通过它暴露的端点获取配置文件内容,http请求地址与配置文件映射关系如下:
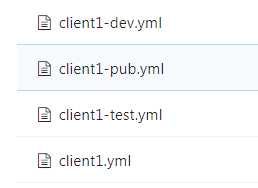
# 映射{application}-{profile}.properties文件
/{application}/{profile}/[{label}]
/{label}/{application}-{profile}.properties
/{application}-{profile}.properties
/{label}/{application}-{profile}.yml
/{application}-{profile}.yml
{application}通常使用微服务名称,对应Git仓库中文件名的前缀;
{profile}对应{application}-后面的dev、pro、test等;
{label}对应Git仓库的分支名,默认为master。
4,自动刷新
修改client-dev.yml的属性,然后再用postman以post方式请求http://localhost:8889/actuator/refresh。
再次访问http://localhost:8889/message, 可以看到内容变化。
参考资料:https://blog.csdn.net/zzzgd_666/article/details/84322947
https://www.jianshu.com/p/55e92b06a7fd
标签:private man info art 中文 odi enable ram password
原文地址:https://www.cnblogs.com/season2009/p/11163083.html
