标签:proc classes ini pass html property uil 表名 取数据
SpringMVC:简单易用,上手快,项目配置部分很少,注重代码开发层面
Hibernate:ORM(对象关系映射,英语:Object Relation Mapping,简称ORM,或O/RM,或O/R mapping)框架,轻量级的数据库封装
下面直接上项目:
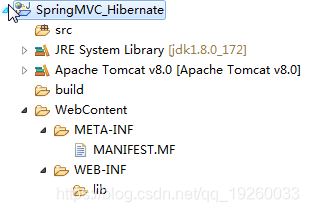
![]() ?
?
如图,缺少web.xml文件,如下图示,加入:

![]() ?
?
下载地址:SpringMVC下载

![]() ?
?
<?xml version="1.0" encoding="UTF-8"?>
<web-app xmlns:xsi="http://www.w3.org/2001/XMLSchema-instance"
	xmlns="http://xmlns.jcp.org/xml/ns/javaee"
	xsi:schemaLocation="http://xmlns.jcp.org/xml/ns/javaee http://xmlns.jcp.org/xml/ns/javaee/web-app_3_1.xsd"
	version="3.1">
	<display-name>SpringMVC_Hibernate</display-name>

	<servlet>
		<servlet-name>springMVC</servlet-name>
		<servlet-class>org.springframework.web.servlet.DispatcherServlet</servlet-class>
		<init-param>
			<param-name>contextConfigLocation</param-name>
			<param-value>classpath:springMVC.xml</param-value>
		</init-param>
	</servlet>
	<servlet-mapping>
		<servlet-name>springMVC</servlet-name>
		<url-pattern>/</url-pattern>
	</servlet-mapping>
</web-app><?xml version="1.0" encoding="UTF-8"?>
<beans xmlns="http://www.springframework.org/schema/beans"
xmlns:xsi="http://www.w3.org/2001/XMLSchema-instance"
xmlns:context="http://www.springframework.org/schema/context"
xmlns:mvc="http://www.springframework.org/schema/mvc"
xsi:schemaLocation="http://www.springframework.org/schema/mvc http://www.springframework.org/schema/mvc/spring-mvc-4.0.xsd
http://www.springframework.org/schema/beans http://www.springframework.org/schema/beans/spring-beans.xsd
http://www.springframework.org/schema/context http://www.springframework.org/schema/context/spring-context-4.0.xsd">
<!-- 只扫描控制器 -->
<context:component-scan base-package="com.fzx.Controller" use-default-filters="false">
<context:include-filter type="annotation" expression="org.springframework.stereotype.Controller"/>
</context:component-scan>
<!-- 视图解析器 -->
<bean class="org.springframework.web.servlet.view.InternalResourceViewResolver">
<property name="prefix" value="/WEB-INF/jsp/"></property>
<property name="suffix" value=".jsp"></property>
</bean>
<mvc:annotation-driven></mvc:annotation-driven>
<mvc:default-servlet-handler/>
</beans>
5.1 写一个controller类
package com.fzx.Controller;

import org.springframework.web.bind.annotation.RequestMapping;
import org.springframework.web.bind.annotation.RestController;
import org.springframework.web.servlet.ModelAndView;

@RestController
public class HelloController {
	@RequestMapping(value = "/hello")
	public ModelAndView hello() {
		ModelAndView mv = new ModelAndView();
		mv.setViewName("index");
		return mv;
	}
}
5.2 写一个jsp页面
<%@ page language="java" contentType="text/html; charset=UTF-8"
pageEncoding="UTF-8"%>
<!DOCTYPE html PUBLIC "-//W3C//DTD HTML 4.01 Transitional//EN" "http://www.w3.org/TR/html4/loose.dtd">
<html>
<head>
<meta http-equiv="Content-Type" content="text/html; charset=UTF-8">
<title>Insert title here</title>
</head>
<body>
hello!!!
</body>
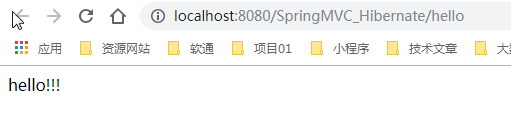
</html>5.3测试下,测试成功
![]() ?
?
6.1 加入hibernate的jar包 + mysql的jar包,我使用的是:hibernate-release-4.2.21.Final
下载地址:hibernate_4.2.21的jar包 MySQL的jar包
6.2 创建表
CREATE TABLE `people` (
  `id` int(11) NOT NULL AUTO_INCREMENT,
  `name` varchar(10) DEFAULT NULL,
  `age` int(11) DEFAULT NULL,
  PRIMARY KEY (`id`)
) ENGINE=InnoDB DEFAULT CHARSET=utf8
6.3 创建hibernate.cfg.xml文件,该文件名称是系统默认获取的hibernate配置文件
<?xml version="1.0" encoding="UTF-8"?>
<!DOCTYPE hibernate-configuration PUBLIC
"-//Hibernate/Hibernate Configuration DTD 3.0//EN"
"http://www.hibernate.org/dtd/hibernate-configuration-3.0.dtd">
<hibernate-configuration>
<session-factory>
<property name="hibernate.connection.driver_class">com.mysql.jdbc.Driver</property>
<property name="hibernate.connection.url">jdbc:mysql://127.0.0.1:3306/test?characterEncoding=utf-8&useSSL=false&serverTimezone=UTC</property>
<property name="hibernate.connection.username">root</property>
<property name="hibernate.connection.password">root</property>
<!-- 可以将向数据库发送的SQL语句显示出来 -->
<property name="hibernate.show_sql">true</property>
<!-- 格式化SQL语句 -->
<property name="hibernate.format_sql">true</property>
<!-- hibernate的方言 -->
<property name="hibernate.dialect">org.hibernate.dialect.MySQLDialect</property>
<!-- hibernate缓存设置 <property name="cache.use_second_level_cache">true</property>
<property name="hibernate.cache.region.factory_class">org.hibernate.cache.ehcache.EhCacheRegionFactory</property>
<property name="hibernate.cache.use_query_cache">true</property> -->
<!-- 配置hibernate的映射文件所在的位置 -->
<mapping resource="com/fzx/domain/People.hbm.xml" />
<!-- 配置缓存类型 -->
<!-- <class-cache usage="read-write" class="com.fzx.domain.Customer"/> -->
</session-factory>
</hibernate-configuration>6.4 创建以实体类,后面会与数据库的表字段映射,实现hibernate对数据库表的封装
package com.fzx.Domain;

public class People {
	private int id;
	private String name;
	private int age;

	public int getId() {
		return id;
	}

	public void setId(int id) {
		this.id = id;
	}

	public String getName() {
		return name;
	}

	public void setName(String name) {
		this.name = name;
	}

	public int getAge() {
		return age;
	}

	public void setAge(int age) {
		this.age = age;
	}

}
6.5 创建People.hbm.xml文件,写入表与People实体类的映射关系
<?xml version="1.0" encoding="UTF-8"?>
<!DOCTYPE hibernate-mapping PUBLIC
    "-//Hibernate/Hibernate Mapping DTD 3.0//EN"
    "http://www.hibernate.org/dtd/hibernate-mapping-3.0.dtd">
<hibernate-mapping package="com.fzx.Domain">
	<class name="People" table="people" catalog="test">
		<!-- 主键 -->
		<id name="id" column="id">
			<!-- 自增长配置 -->
			<generator class="identity"></generator>
		</id>

		<!-- 其他字段 -->
		<property name="name" column="name"></property>
		<property name="age" column="age"></property>
	</class>
</hibernate-mapping>
6.6 写入测试,查看数据库,测试成功
package com.fzx.test;

import org.hibernate.Session;
import org.hibernate.SessionFactory;
import org.hibernate.Transaction;
import org.hibernate.cfg.Configuration;
import org.hibernate.service.ServiceRegistry;
import org.hibernate.service.ServiceRegistryBuilder;
import org.junit.jupiter.api.Test;

import com.fzx.Domain.People;

public class JunitTest {
	@Test
	public void save() {
		// 自动加载hibernate.cfg.xml内容,返回Configuration对象
		Configuration configuration = new Configuration().configure();
		// 创建服务注册对象
		ServiceRegistry serviceRegistry = new ServiceRegistryBuilder().applySettings(configuration.getProperties())
				.buildServiceRegistry();
		// 创建会话工厂对象
		SessionFactory sessionFactory = configuration.buildSessionFactory(serviceRegistry);
		// 创建会话对象
		Session session = sessionFactory.openSession();
		// 开启事务
		Transaction transaction = session.beginTransaction();

		// 准备数据
		People people = new People();
		people.setName("哇咔咔");
		people.setAge(10);
		// 插入数据
		session.save(people);

		// 准备数据
		people = new People();
		people.setName("哇咔咔");
		people.setAge(20);
		// 插入数据
		session.save(people);

		// 提交事务
		transaction.commit();

		// 关闭会话
		session.close();
		sessionFactory.close();

	}

}
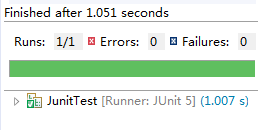
最喜欢看到这个东西了哦,其他的:查询、更新、删除,可以自己摸索下,看看咋写咯~
![]() ?
?
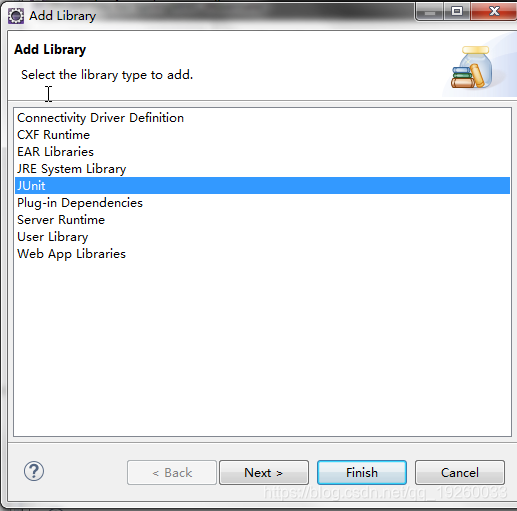
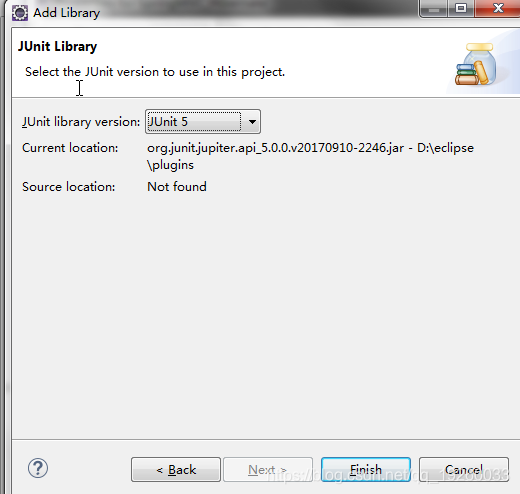
提示:需要加入junit包
![]() ?
?
![]() ?
?
7.1 先写一个会话工厂对象获取的公共类
package com.fzx.Util;

import org.hibernate.Session;
import org.hibernate.SessionFactory;
import org.hibernate.cfg.Configuration;
import org.hibernate.service.ServiceRegistry;
import org.hibernate.service.ServiceRegistryBuilder;

public class SessionUtil {
	private static Configuration configuration;
	private static ServiceRegistry serviceRegistry;

	static {
		// 自动加载hibernate.cfg.xml内容,返回Configuration对象
		configuration = new Configuration().configure();
		// 创建服务注册对象
		serviceRegistry = new ServiceRegistryBuilder().applySettings(configuration.getProperties())
				.buildServiceRegistry();
	}

	public static Session getSession() {
		return configuration.buildSessionFactory(serviceRegistry).openSession();
	}

	public static SessionFactory getSessionFactory() {
		return configuration.buildSessionFactory(serviceRegistry);
	}
}
7.2 在HelloController类里面再写入一个方法,获取数据库中所有数据值
    @RequestMapping(value = "/listAll")
	public ModelAndView listAll() {
		ModelAndView mv = new ModelAndView();
		Session session = SessionUtil.getSession();

		// createQuery里面写入HSQL,其中People是表名,里面的字段都得写People里面对应的属性
		Query query = session.createQuery("from People");
		mv.addObject("list", query.list());
		mv.setViewName("listAll");

		return mv;
	}
7.3 再写一个listAll.jsp页面
<%@ page language="java" contentType="text/html; charset=UTF-8"
	pageEncoding="UTF-8"%>
<%@ taglib prefix="c" uri="http://java.sun.com/jsp/jstl/core"%>
<!DOCTYPE html PUBLIC "-//W3C//DTD HTML 4.01 Transitional//EN" "http://www.w3.org/TR/html4/loose.dtd">
<html>
<head>
	<meta http-equiv="Content-Type" content="text/html; charset=UTF-8">
	<title>Insert title here</title>

	<style type="text/css">
		table, td, th {
			border: 1px solid
		}
	</style>
</head>
<body>
	<table>
		<thead>
			<tr>
				<th>编号</th>
				<th>姓名</th>
				<th>年龄</th>
			</tr>
		</thead>
		<tbody>
			<c:forEach items="${list }" var="item">
				<tr>
					<td>${item.id }</td>
					<td>${item.name }</td>
					<td>${item.age }</td>
				</tr>
			</c:forEach>
		</tbody>
	</table>
</body>
</html>
7.4 用Tomcat启动项目,浏览器地址栏输入:http://localhost:8080/SpringMVC_Hibernate/listAll
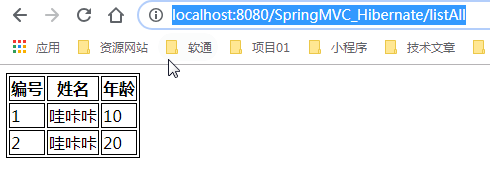
![]() ?
?
OK,大功告成,over......
最后附送完整项目一只
SpringMVC+Hibernate框架整合,构建一个简单项目
标签:proc classes ini pass html property uil 表名 取数据
原文地址:https://www.cnblogs.com/fuzhixuan/p/11387490.html