标签:web环境 Servle version ping art end schema bmc res
springmvc工程还是传统的spring工程,只是多了对web的支持
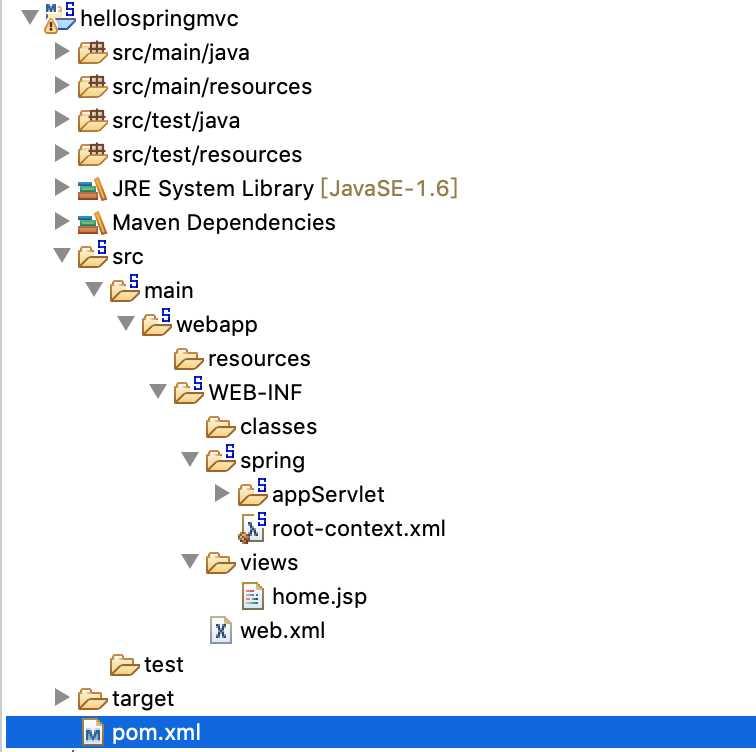
1、sts创建springmvc工程 file-new-Spring Legacy Project- Spring Mvc Project创建后目录如下
2、web.xml文件介绍
<?xml version="1.0" encoding="UTF-8"?>
<web-app version="2.5" xmlns="http://java.sun.com/xml/ns/javaee"
    xmlns:xsi="http://www.w3.org/2001/XMLSchema-instance"
    xsi:schemaLocation="http://java.sun.com/xml/ns/javaee http://java.sun.com/xml/ns/javaee/web-app_2_5.xsd">
    <!-- Processes application requests spring 对servlet 集成封装-->
    <servlet>
        <servlet-name>appServlet</servlet-name>
        <servlet-class>org.springframework.web.servlet.DispatcherServlet</servlet-class>
        <init-param>
            <param-name>contextConfigLocation</param-name>
            <param-value>/WEB-INF/spring/appServlet/servlet-context.xml</param-value>
        </init-param>
        <load-on-startup>1</load-on-startup>
    </servlet>

    <servlet-mapping>
        <servlet-name>appServlet</servlet-name>
        <url-pattern>/</url-pattern>
    </servlet-mapping>

    <!-- 系统环境变量 -->
    <context-param>
        <param-name>contextConfigLocation</param-name>
        <param-value>/WEB-INF/spring/root-context.xml</param-value>
    </context-param>

    <!-- 监听web启动,加载spring对象加载到web环境 (tomcat ,jetty) -->
    <listener>
        <listener-class>org.springframework.web.context.ContextLoaderListener</listener-class>
    </listener>

</web-app>
spring对servlet做了继承封装 <url-pattern>元素的值改为 / ,表示要拦截所有的请求,并交由Spring MVC的后台控制器来处理
<param-value>写明了拦截的规则,写明了spring的规范
        <init-param>
            <param-name>contextConfigLocation</param-name>
            <param-value>/WEB-INF/spring/appServlet/servlet-context.xml</param-value>
        </init-param>
servlet-context.xml文件
<?xml version="1.0" encoding="UTF-8"?>
<beans:beans xmlns="http://www.springframework.org/schema/mvc"
    xmlns:xsi="http://www.w3.org/2001/XMLSchema-instance"
    xmlns:beans="http://www.springframework.org/schema/beans"
    xmlns:context="http://www.springframework.org/schema/context"
    xsi:schemaLocation="http://www.springframework.org/schema/mvc http://www.springframework.org/schema/mvc/spring-mvc.xsd
        http://www.springframework.org/schema/beans http://www.springframework.org/schema/beans/spring-beans.xsd
        http://www.springframework.org/schema/context http://www.springframework.org/schema/context/spring-context.xsd">

    <!-- DispatcherServlet Context: defines this servlet‘s request-processing infrastructure -->

    <!-- 支持 @Controller 开启 -->
    <annotation-driven content-negotiation-manager="contentNegotiationManager" />

    <!-- 静态资源位置 -->
    <resources mapping="/resources/**" location="/resources/" />

    <!-- jsp支持 -->
    <beans:bean class="org.springframework.web.servlet.view.InternalResourceViewResolver">
        <beans:property name="prefix" value="/WEB-INF/views/" />
        <beans:property name="suffix" value=".jsp" />
    </beans:bean>

    <!-- json 支持 -->
    <beans:bean id="messageAdapter" class="org.springframework.web.servlet.mvc.method.annotation.RequestMappingHandlerAdapter">
       <beans:property name="messageConverters">
           <beans:list>
               <!-- Support JSON -->
               <beans:bean class="org.springframework.http.converter.json.MappingJackson2HttpMessageConverter"/>
           </beans:list>
       </beans:property>
   </beans:bean>

   <!-- 默认支持json -->
   <beans:bean id="contentNegotiationManager"
      class="org.springframework.web.accept.ContentNegotiationManagerFactoryBean">
    <beans:property name="defaultContentType" value="application/json" />
  </beans:bean>

   <!-- 文件上传支持 -->
 <beans:bean id="multipartResolver" class="org.springframework.web.multipart.commons.CommonsMultipartResolver">
    <beans:property name="defaultEncoding" value="UTF-8"/>
    <!-- 指定所上传文件的总大小不能超过200KB。注意maxUploadSize属性的限制不是针对单个文件,而是所有文件的容量之和 -->
    <beans:property name="maxUploadSize" value="20000000"/>
    <!-- 最大内存大小 (10240)-->
    <beans:property name="maxInMemorySize" value="40960" />
</beans:bean>

 <!-- 异常支持 -->
<beans:bean id="exceptionResolver" class="org.springframework.web.servlet.handler.SimpleMappingExceptionResolver">
    <beans:property name="exceptionMappings">
        <beans:props>
            <!-- 遇到MaxUploadSizeExceededException异常时,自动跳转到配置页面 -->
            <beans:prop key="org.springframework.web.multipart.MaxUploadSizeExceededException">upload/error_fileupload</beans:prop>
        </beans:props>
    </beans:property>
</beans:bean>

    <context:component-scan base-package="com.test.spring" />


</beans:beans>
配置包的扫描,同spring通过注解的方式做依赖注入和控制反转
</beans:bean>
    <context:component-scan base-package="com.test.spring" />
</beans:beans>
在com.test.spring包下可以用@controller配置一个servlet 通过@RequestMapping(value = "/", method = RequestMethod.GET)配置路由
(以前servlet方式是:@WebServlet(name = "loginServlet",urlPatterns = "/loginServlet")写doget方法)
package test.test.test;

import java.text.DateFormat;
import java.util.Date;
import java.util.Locale;

import org.slf4j.Logger;
import org.slf4j.LoggerFactory;
import org.springframework.stereotype.Controller;
import org.springframework.ui.Model;
import org.springframework.web.bind.annotation.RequestMapping;
import org.springframework.web.bind.annotation.RequestMethod;

/**
 * Handles requests for the application home page.
 */
@Controller
public class HomeController {

    private static final Logger logger = LoggerFactory.getLogger(HomeController.class);

    /**
     * Simply selects the home view to render by returning its name.
     */
    @RequestMapping(value = "/", method = RequestMethod.GET)
    public String home(Locale locale, Model model) {
        logger.info("Welcome home! The client locale is {}.", locale);

        Date date = new Date();
        DateFormat dateFormat = DateFormat.getDateTimeInstance(DateFormat.LONG, DateFormat.LONG, locale);

        String formattedDate = dateFormat.format(date);

        model.addAttribute("serverTime", formattedDate );

        return "home";
    }

}
跳转:
  如果访问/就可以跳转到home.jsp页面 home访问的路径在servlet-context.xml文件中配置<beans:property name="prefix" value="/WEB-INF/views/" />见上面代码
  以前的跳转方式   request.getRequestDispatcher("/flag_jstl.jsp").forward(request, response);
参数:
  直接写在方法的参数上
  以前的参数获取:request.getParameter()
  参数的传递:request.setAttribute()
标签:web环境 Servle version ping art end schema bmc res
原文地址:https://www.cnblogs.com/ysmdbk/p/11436303.html