标签:ada obj line 分配 基本用法 根据 object 计算 none
一、概述
在整个 Java.io 中最重要的就是5个类和一个接口。5个类指的是 File、InputStream、OutputStream、Reader、Writer,一个接口指的是Serializable。掌握了这些IO的核心操作那么对于Java中的IO体系也就有了一个初步的认识了。
二、File 类
从定义看,File类是Object的直接子类,同时它继承了Comparable接口可以进行数组的排序。File 类的操作包括文件的创建、删除、重命名、得到路径、创建时间等,以下是文件操作常用的函数。
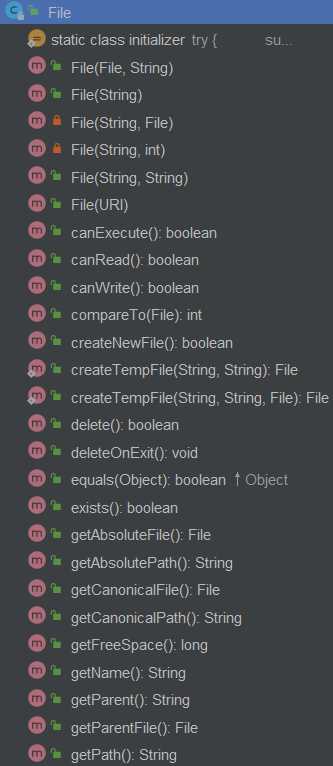
File类是对文件系统中文件以及文件夹进行封装的对象,可以通过对象的思想来操作文件和文件夹。File类保存文件或目录的各种元数据信息,包括文件名、文件长度、最后修改时间、是否可读、获取当前文件的路径名,判断指定文件是否存在、获得当前目录中的文件列表,创建、删除文件和目录等方法。

private static void demo01() {
  File file = new File("/course/test.log");

  boolean canRead = file.canRead();
  System.out.println("canRead = " + canRead);

  boolean canWrite = file.canWrite();
  System.out.println("canWrite = " + canWrite);

  boolean canExecute = file.canExecute();
  System.out.println("canExecute = " + canExecute);

  file.setReadable(true);

  canRead = file.canRead();
  System.out.println("canRead = " + canRead);
}

private static void demo02() {
  File file = new File("/course/test.log");
  String fileName = file.getName();
  System.out.println("fileName = " + fileName);

  File fileAbsoluteFile = file.getAbsoluteFile();
  System.out.println("fileAbsoluteFile = " + fileAbsoluteFile);

  String fileAbsolutePath = file.getAbsolutePath();
  System.out.println("fileAbsolutePath = " + fileAbsolutePath);

  String fileParent = file.getParent();
  System.out.println("fileParent = " + fileParent);

  File fileParentFile = file.getParentFile();
  System.out.println("fileParentFile = " + fileParentFile);

  String filePath = file.getPath();
  System.out.println("filePath = " + filePath);
}

private static void demo03() {
  File file = new File("/course");
  System.out.println("file.isFile() = " + file.isFile());
  System.out.println("file.isDirectory() = " + file.isDirectory());
}

private static void demo04() {
  File file = new File("/course/test.log");

  final boolean exists = file.exists();
  System.out.println("exists = " + exists);

  boolean canRead = file.canRead();
  System.out.println("canRead = " + canRead);

  boolean canWrite = file.canWrite();
  System.out.println("canWrite = " + canWrite);

  boolean canExecute = file.canExecute();
  System.out.println("canExecute = " + canExecute);

  boolean isFile = file.isFile();
  System.out.println("isFile = " + isFile);

  boolean isDir = file.isDirectory();
  System.out.println("isDir = " + isDir);
}
/**
 * 遍历本地一个目录下.找到后缀名是.log的,且占用空间最大的那个文件删除之
 * 目录下还有目录,使用递归实现
 */
public class Case1 {
    public static void main(String[] args) {

        deleteLog("D:\\TestDir",".log");
    }

    /**
     * 遍历目下下的文件,删除指定后缀且文件大小最大的文件
     * @param path   遍历目录的路径
     * @param endstr 文件后缀
     */
    public static void deleteLog(String path,String endstr){

        // 定位文件描述
        File dir = new File(path);

        // 列出该目录下所有的文件对象,存入一个文件对象数组当中
        File[] files = dir.listFiles();

        // 初始化最大文件对象和最大文件大小
        long maxFileSize = 0;
        File maxFile = null;

        // 遍历文件对象数组
        for (File file:files) {
            // 如果是文件,则找出指定后缀且大小最大的文件
            if (file.isFile()){
                long len = file.length();
                String fileName = file.getName();
                if (fileName.endsWith(endstr)){
                    if (len >maxFileSize ){
                        maxFileSize = len;
                        maxFile = file;
                    }
                }
            }
            // 如果是目录,则递归调用deleteLog
            if (file.isDirectory()){
                path =file.getAbsolutePath();
                deleteLog(path,endstr);
            }
        }
        if (maxFile != null){
            System.out.println("删除"+maxFile.getAbsolutePath()+"文件");
            maxFile.delete();
            System.out.println("删除成功");
        }
        else {
            System.out.println("未找到目标文件");
        }
    }
}
/**
 * case1: 实现文件复制,从指定位置复制到目标位置.
 * 思考,若指定文件不存在?
 * 若目标位置文件已存在?
 * 若目标位置目录不存在?
 * 其他请自行发挥
 */
public class Case3 {

    public static void main(String[] args) {

        String initialFile = "D:\\TestDir\\1.log";
        String targetDir = "D:\\TestDir\\subdir\\1.log";

        BufferedReader br = null;
        BufferedWriter bw = null;
        try {
            // 读文件
            br = new BufferedReader(new FileReader(initialFile));
            String value;
            String data = "";

            while ((value = br.readLine()) != null){
                data += value + "\n";
            }

            // 写文件
            bw = new BufferedWriter(new FileWriter(targetDir));
            bw.write(data);
            bw.flush();

        // 捕获异常
        }catch (FileNotFoundException ex){
            ex.printStackTrace();
        }catch (IOException ix) {
            ix.printStackTrace();
        }finally {
            try {
                if (null != br && null != bw){
                    br.close();
                    bw.close();
                }
            } catch (IOException e) {
                e.printStackTrace();
            }
        }
    }
}
三、IO流的分类
1、流的概念和作用
Java 中将输入输出抽象称为流,就好像水管,将两个容器连接起来。流是一组有顺序的,有起点和终点的字节集合,是对数据传输的总称或抽象。即数据在两设备间的传输称为流。
2、 IO流的分类
根据数据流向不同分为:输入流和输出流。
根据处理数据类型的不同分为:字符流和字节流。
四、IO流体系结构
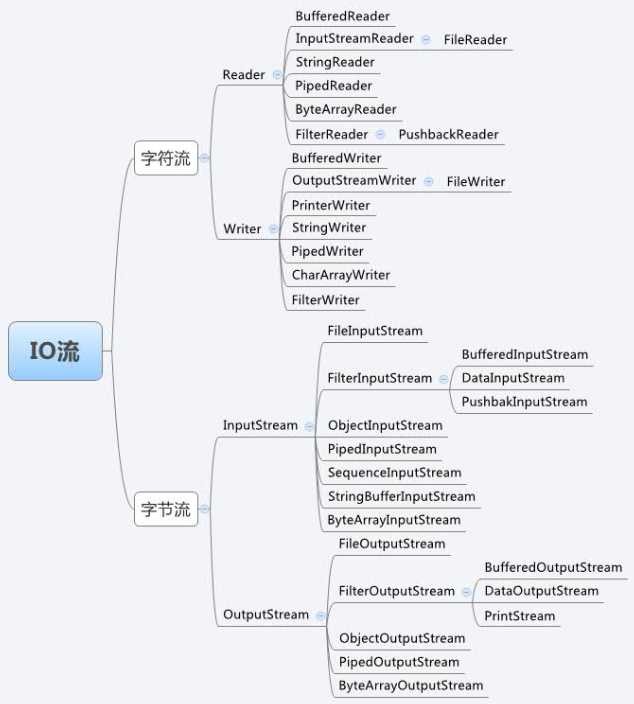
如上图所示,正如我们文章开篇讲到的,Java 的 IO 体系最重要的 5 个类,除了 File 类以外,整个 IO 体系将近 50 个类,都是由其余四个类(InputStream、OutputStream、Reader、Writer)派生出来的。但是这四个类都是抽象类,他们当中的绝大部分方法需要通过他们的子类来实现。
1、文件操作流

这四个类是专门操作文件流的,用法高度相似,区别在于前面两个是操作字节流,后面两个是操作字符流。它们都会直接操作文件流,直接与OS底层交互。因此他们也被称为节点流。注意使用这几个流的对象之后,需要关闭流对象,因为java垃圾回收器不会主动回收。
下面演示这四个流对象的基本用法:
public class App {

  public static void main(String[] args) {

    File file = new File("test.log");
    try (InputStream ins = new FileInputStream(file)) {
      byte[] buf = new byte[512];

      int len = 0;

      while ((len = ins.read(buf)) != -1) {
        String val = new String(buf, 0, len);
        System.out.println(val);
      }
    } catch (IOException ex) {
      throw new IllegalStateException(ex);
    }
  }
}
public class App {

  public static void main(String[] args) {
    OutputStream outputStream = null;
    try {
      // 1.定位文件描述
      File file = new File("test.log");

      // 2.实例化要写文件的基本类FileOutputStream
      outputStream = new FileOutputStream(file);

      // 3.写数据
      String str = "hello world!";
      outputStream.write(str.getBytes());
    } catch (FileNotFoundException ffe) {
      ffe.printStackTrace();
    } catch (IOException ioe) {
      ioe.printStackTrace();
    } finally {
      try {
        // 4.关流,千万要记得关闭
        if (null != outputStream) {
          outputStream.close();
        }
      } catch (IOException e) {
        e.printStackTrace();
      }
    }
  }
}
public class App {

  public static void main(String[] args) {
    FileReader reader = null;
    try {
      // 1.文件描述
      File file = new File("test.log");

      // 2.定义文件读取流
      reader = new FileReader(file);

      // 3.文件读取
      char[] buf = new char[4];
      // 标准的写法
      int len = 0;
      while ((len = reader.read(buf)) != -1) {
        System.out.println("len=" + len);
        // 这里要注意,String的构造,要注意边界
        String val = new String(buf, 0, len);
        System.out.println(val);
      }

      // 这里的读取,如果不使用len来进行标识会有问题
      // while (reader.read(buf) != -1) {
      //   String val = new String(buf, 0, buf.length);
      //   System.out.println(val);
      // }

      // 理解的读取过程
      // while (len != -1) {
      //   len = reader.read(buf);
      //   if (len != -1) {
      //     String val = new String(buf, 0, len);
      //     System.out.println(val);
      //   }
      // }
    } catch (FileNotFoundException fnfe) {
      fnfe.printStackTrace();
    } catch (IOException ioe) {
      ioe.printStackTrace();
    } finally {
      // 4.关流
      if (null != reader) {
        try {
          reader.close();
        } catch (IOException e) {
          e.printStackTrace();
        }
      }
    }
  }
}
public class App {

  public static void main(String[] args) {
    FileWriter fileWriter = null;
    try {
      // 1.定位文件描述
      File file = new File("test.log");

      // 2.实例化要写文件的基本类FileWriter
      fileWriter = new FileWriter(file);

      // 3.写数据
      String str = "hello world!";
      fileWriter.write(str);
    } catch (FileNotFoundException ffe) {
      ffe.printStackTrace();
    } catch (IOException ioe) {
      ioe.printStackTrace();
    } finally {
      try {
        // 4.关流,千万要记得关闭
        if (null != fileWriter) {
          fileWriter.close();
        }
      } catch (IOException e) {
        e.printStackTrace();
      }
    }
  }
}
2、缓冲操作流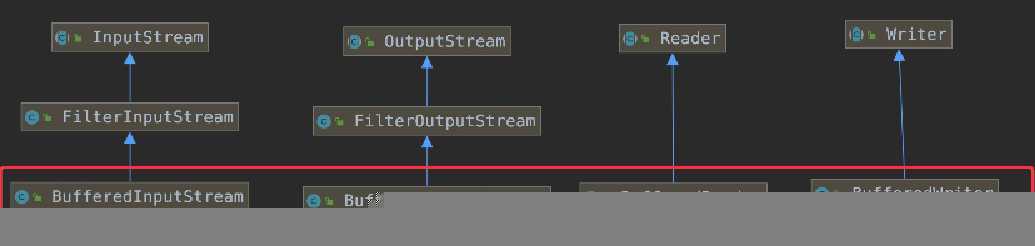
计算机访问外部设备非常耗时。访问的频率越高,造成CPU闲置的概率就越大。为了减少访问外部存储的次数,应该在一次对外部设备的访问中,读写更多的数据。为此,除了程序和流节点间交换数据必需的读写机制外,还应该增加缓冲机制。缓冲流就是每一个数据流分配一个缓冲区,一个缓冲区就是一个临时存储数据的内存。这样可以减少访问硬盘的次数,提高传输效率。
同样,我们来演示一下基本用法:
public class BufferedReaderDemo {

  public static void main(String[] args) {

    test01("test.log");
    test02("test.log");

  }

  private static void test02(String fileName) {

    BufferedReader reader = null;
    try {
      // 1.文件描述
      File file = new File(fileName);

      // 2.定义文件读取流
      // 使用BufferedReader时,就这里与FileReader不同
      reader = new BufferedReader(new FileReader(file));

      // 3.文件读取
      String val = null;
      // 一行一行读取文件内容
      while ((val = reader.readLine()) != null) {
        System.out.println(val);
      }
    } catch (IOException ie) {
      ie.printStackTrace();
    } finally {
      // 4.关流
      if (null != reader) {
        try {
          reader.close();
        } catch (IOException e) {
          e.printStackTrace();
        }
      }
    }
  }

  private static void test01(String fileName) {
    Reader reader = null;
    try {
      // 1.文件描述
      File file = new File(fileName);

      // 2.定义文件读取流
      // 使用BufferedReader时,就这里与FileReader不同
      reader = new BufferedReader(new FileReader(file));

      // 3.文件读取
      char[] buf = new char[4];
      // 标准的写法
      int len = 0;
      while ((len = reader.read(buf)) != -1) {
        System.out.println("len=" + len);
        // 这里要注意,String的构造,要注意边界
        String val = new String(buf, 0, len);
        System.out.println(val);
      }
    } catch (IOException ie) {
      ie.printStackTrace();
    } finally {
      // 4.关流
      if (null != reader) {
        try {
          reader.close();
        } catch (IOException e) {
          e.printStackTrace();
        }
      }
    }
  }
}
public class BufferedWriterDemo {

  public static void main(String[] args) {

    File file = new File("test.log");

    Writer writer = null;

    try {
      writer = new BufferedWriter(new FileWriter(file));
      String str = "Hello,world!!";
      writer.write(str);
    }catch (IOException e) {
      e.printStackTrace();
    } finally {
      if (null != writer) {
        try {
          writer.close();
        } catch (IOException e) {
          e.printStackTrace();
        }
      }
    }
  }
}
public class BufferedInputStreamDemo {

  public static void main(String[] args) {

    InputStream inputStream = null;

    try {
      File file = new File("test.log");
      inputStream = new BufferedInputStream(new FileInputStream(file));

      byte[] bytes = new byte[128];
      int len = 0;

      while ((len =inputStream.read(bytes)) != -1) {
        String val = new String(bytes,0,len);
        System.out.println("val = " + val);
      }
    } catch (IOException e) {
      e.printStackTrace();
    }finally {
      if (null != inputStream) {
        try {
          inputStream.close();
        } catch (IOException e) {
          e.printStackTrace();
        }
      }
    }
  }
}
public class BufferedOutputStreamDemo {

  public static void main(String[] args) {
    OutputStream outputStream = null;
    try {
      // 1.定位文件描述
      File file = new File("test.log");

      // 2.实例化要写文件的基本类BufferedOutputStream
      // outputStream = new FileOutputStream(file);
      // 唯一的区别就在这里,把FileOutputStream作为构造的参数传递进去了
      outputStream = new BufferedOutputStream(new FileOutputStream(file));

      // 3.写数据
      String str = "hello world";
      outputStream.write(str.getBytes());
    } catch (IOException ie) {
      ie.printStackTrace();
    } finally {
      try {
        // 4.关流,千万要记得关闭
        if (null != outputStream) {
          outputStream.close();
        }
      } catch (IOException e) {
        e.printStackTrace();
      }
    }
  }
}
3、总结
流的基本操作过程:
结论:
五、读取properties文件
Java 中有个比较重要的类 Properties(Java.util.Properties),主要用于读取 Java 的配置文件,各种语言都有自己所支持的配置文件,配置文件中很多变量是经常改变的,这样做也是为了方便用户,让用户能够脱离程序本身去修改相关的变量设置。在Java中,其配置文件常为.properties文件,格式为文本文件,文件的内容的格式是“键=值”的格式,文本注释信息可以用"#"来注释。下面来看一下它的用法:
public class PropDemo {

  @Test
  public void demo1() throws IOException {

    Properties prop = new Properties();

    // 这里是需要是绝对路径,否则会报错
    // File propFile = new File("E:\\Java_Project\\MyProject\\resources\\config.properties");
    // prop.load(new FileInputStream(propFile));

    // 使用ClassLoader来读取,文件放在resources目录下,路径就可写相对路径
    prop.load(PropDemo.class.getClassLoader().getResourceAsStream("config.properties"));

    // get:返回的是对象
    // getProperty:返回的是字符串
    Object driver = prop.get("driver");
    String url = prop.getProperty("url");

    System.out.println(url);
    System.out.println(driver);
  }

  @Test
  public void demo02() throws IOException {

    Properties prop = new Properties();

    // 使用ClassLoader来读取
    prop.load(PropDemo.class.getClassLoader().getResourceAsStream("config.properties"));

    prop.setProperty("name", "jim");

    String property1 = prop.getProperty("name");

    String property2 = prop.getProperty("YY", "abc");

    System.out.println(property1);
    System.out.println(property2);
  }
}
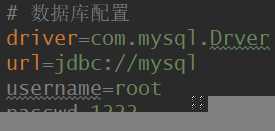
配置文件内容如下:
标签:ada obj line 分配 基本用法 根据 object 计算 none
原文地址:https://www.cnblogs.com/L-Test/p/11477483.html
