标签:main create ping lse csharp try 切换 forward site
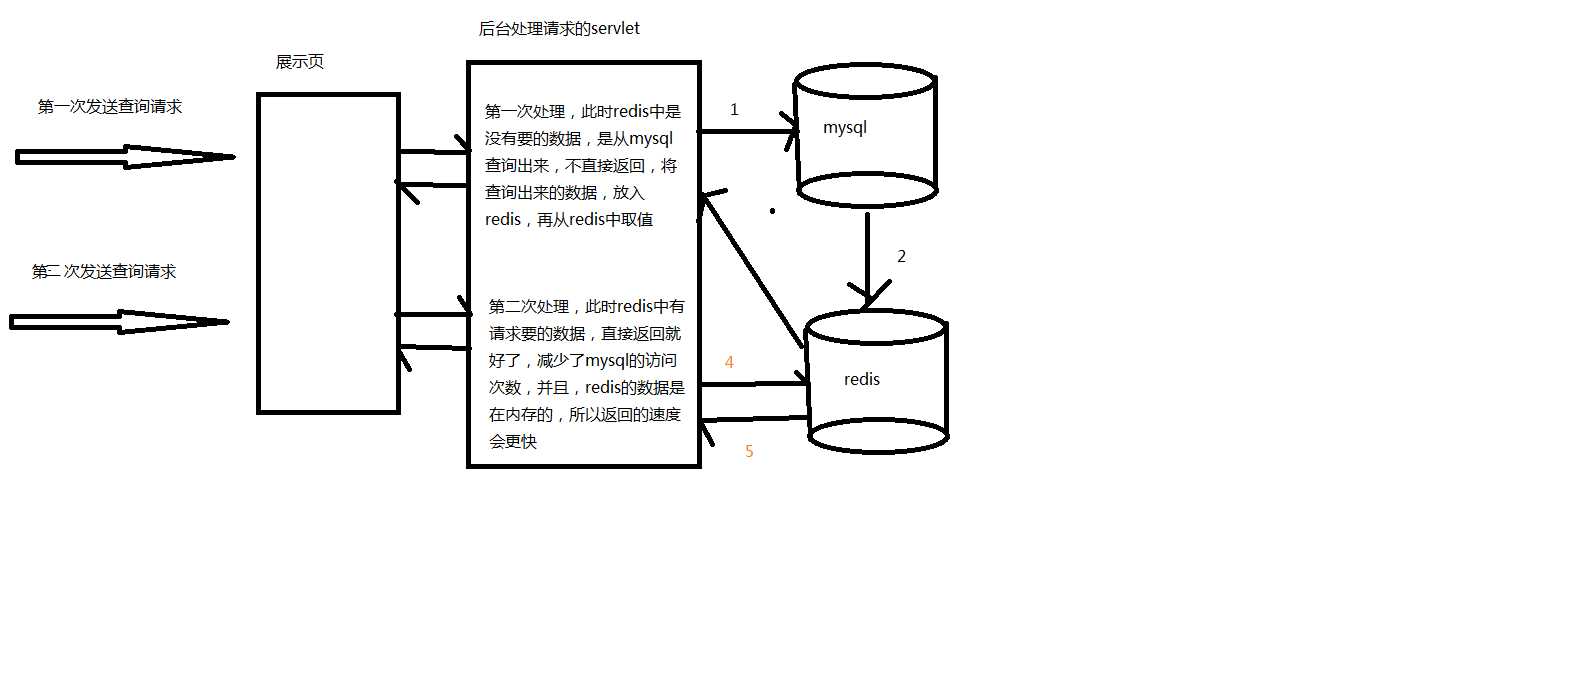
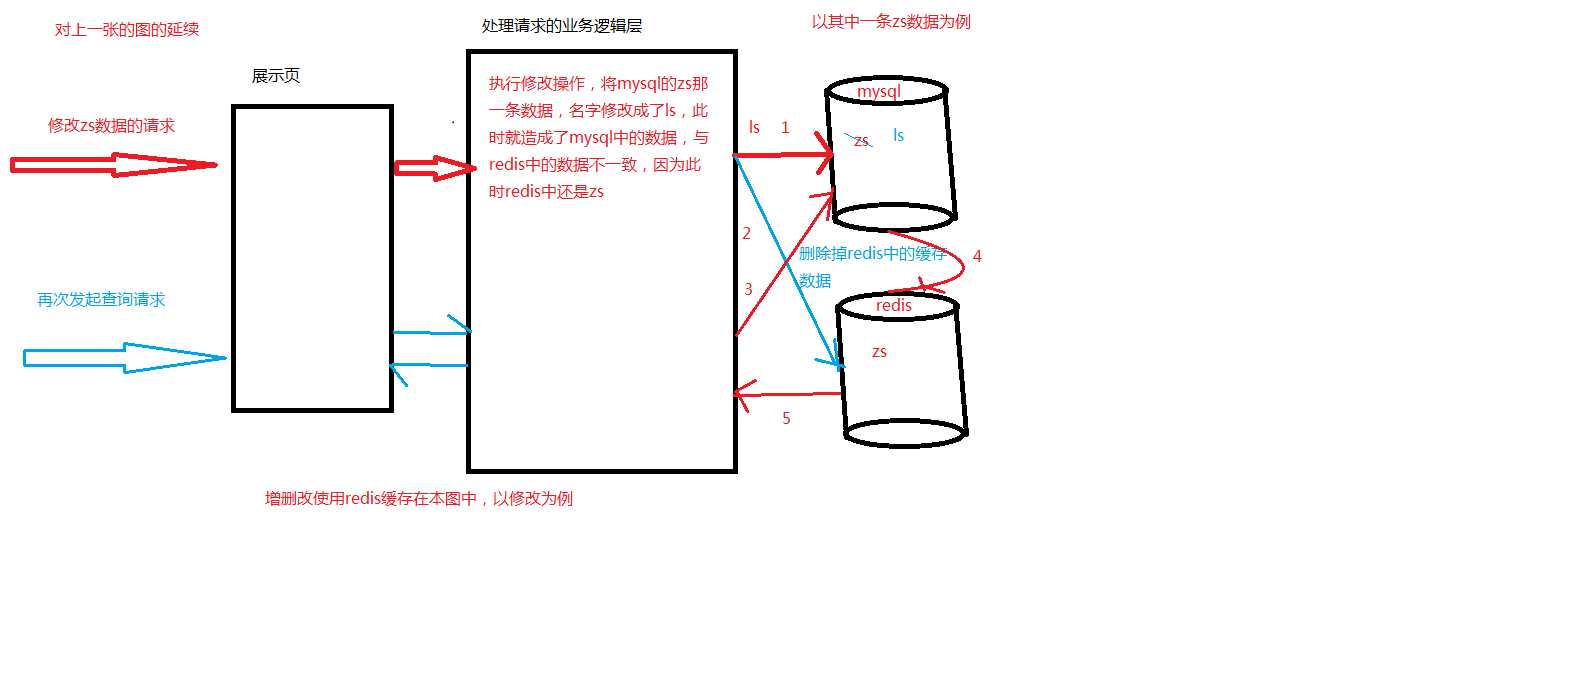
查询中使用redis逻辑
2.1 添加依赖
<dependency>
<groupId>redis.clients</groupId>
<artifactId>jedis</artifactId>
<version>2.9.0</version>
</dependency>
Jedis jedis = new Jedis(ip, port);
jedis.auth("123456");//权限认证
jedis.ping();
jedis.select(0);//切换数据库
Demo01
package com.zl;

import redis.clients.jedis.Jedis;

/**
 * @author zhuling
 * @site www.xiaomage.com
 * @company xxx公司
 * @create  2019-10-13 19:25
 *
 *
 * 讲解java代码操作redis
 * 包括string、hash、list
 *
 * 1、加载驱动
 * 2、建立连接(url、uname、pwd)
 * 3、prepatestatement
 * 4、执行sql
 * 5、处理结果
 * 6、关闭资源
 *
 *
 * redis连接步骤
 * 1、建立连接、连接后授权
 * 2、使用redis
 *
 */
public class Demo1 {
    public static void main(String[] args) {
        Jedis jedis=new Jedis("192.168.142.128",6379);
        jedis.auth("123456");
        System.out.println(jedis.ping());
        /**
         * string
         */
//        jedis.set("name","zs");
//        jedis.set("age","22");
//        System.out.println(jedis.get("name"));
        /**
         * hash
         */
//        jedis.hset("user1","uname","ls");
//        jedis.hset("user1","pwd","123456");
//        jedis.hset("user1","set","nv");
//        System.out.println(jedis.hget("user1", "uname"));
//        Map<String, String> user1 = jedis.hgetAll("user1");
//        for (Map.Entry<String, String> entry : user1.entrySet()) {
//            System.out.println("key:" + entry.getKey() + ",value:" + entry.getValue());
//        }
        /**
         * list  left
         */
//        jedis.lpush("hobby","a","b","c","d","e","f","g");
//        System.out.println(jedis.lpop("hobby"));


    }

}
DemoServerlet
package com.zl;

import redis.clients.jedis.Jedis;

import javax.servlet.ServletException;
import javax.servlet.annotation.WebServlet;
import javax.servlet.http.HttpServlet;
import javax.servlet.http.HttpServletRequest;
import javax.servlet.http.HttpServletResponse;
import java.io.IOException;

/**
 * @author zhuling
 * @site www.xiaomage.com
 * @company xxx公司
 * @create  2019-10-13 23:08
 *
 *
 * redis 在项目中的使用
 *          查询
 *          增删改
 */
@WebServlet("/list")
public class DemoServlet extends HttpServlet {
    @Override
    protected void doGet(HttpServletRequest req, HttpServletResponse resp) throws ServletException, IOException {
        doPost(req, resp);
    }
    @Override
    protected void doPost(HttpServletRequest req, HttpServletResponse resp) throws ServletException, IOException {
        Jedis jedis=new Jedis("192.168.142.128",6379);
        jedis.auth("123456");

        String bookList = jedis.get("bookList");
        if(null==bookList ||"".equals(bookList)){
            //查询数据库
         String mysqlData="data";
         //将mysqldata转成json数组串
         jedis.set("booList",mysqlData);
         bookList = jedis.get("bookList");
         req.setAttribute("msg","走了数据库拿数据");
         req.setAttribute("bookList","boohList");
         req.getRequestDispatcher("/bookList.jsp").forward(req,resp);
        }else{
            req.setAttribute("msg","直接聪redis中取数据");
            req.setAttribute("bookList","boohList");
            req.getRequestDispatcher("/bookList.jsp").forward(req,resp);
        }
        }


}
bookList
注意这一段
<%@ page isELIgnored="false" %>
<%--
  Created by IntelliJ IDEA.
  User: 2018111801
  Date: 2019/10/13
  Time: 23:33
  To change this template use File | Settings | File Templates.
--%>
<%@ page contentType="text/html;charset=UTF-8" language="java" %>
<%@ page isELIgnored="false" %>
<html>
<head>
    <title>Title</title>
</head>
<body>
${msg}:${bookList}
</body>
</html>
标签:main create ping lse csharp try 切换 forward site
原文地址:https://www.cnblogs.com/BAYOUA/p/11669173.html