标签:sping bsp tab 配置文件 compile grails pre ESS atl
今天来简单介绍一下Spring Security安全框架
简介
Spring Security 提供了基于javaEE的企业应有个你软件全面的安全服务。这里特别强调支持使用SPring框架构件的项目,Spring框架是企业软件开发javaEE方案的领导者。如果你还没有使用Spring来开发企业应用程序,我们热忱的鼓励你仔细的看一看。熟悉Spring特别是一来注入原理两帮助你更快更方便的使用Spring Security。
人们使用Spring Secruity的原因有很多,单大部分都发现了javaEE的Servlet规范或EJB规范中的安全功能缺乏典型企业应用场景所需的深度。提到这些规范,重要的是要认识到他们在WAR或EAR级别无法移植。因此如果你更换服务器环境,这里有典型的大量工作去重新配置你的应用程序员安全到新的目标环境。使用Spring Security 解决了这些问题,也为你提供许多其他有用的,可定制的安全功能。
正如你可能知道的两个应用程序的两个主要区域是“认证”和“授权”(或者访问控制)。这两个主要区域是Spring Security 的两个目标。“认证”,是建立一个他声明的主题的过程(一个“主体”一般是指用户,设备或一些可以在你的应用程序中执行动作的其他系统)。“授权”指确定一个主体是否允许在你的应用程序执行一个动作的过程。为了抵达需要授权的店,主体的身份已经有认证过程建立。这个概念是通用的而不只在Spring Security中。
在身份验证层,Spring Security 的支持多种认证模式。这些验证绝大多数都是要么由第三方提供,或由相关的标准组织,如互联网工程任务组开发。另外Spring Security 提供自己的一组认证功能。具体而言,Spring Security 目前支持所有这些技术集成的身份验证:
HTTP BASIC 认证头 (基于 IETF RFC-based 标准)
HTTP Digest 认证头 ( IETF RFC-based 标准)
HTTP X.509 客户端证书交换 ( IETF RFC-based 标准)
LDAP (一个非常常见的方法来跨平台认证需要, 尤其是在大型环境)
Form-based authentication (用于简单的用户界面)
OpenID 认证
Authentication based on pre-established request headers (such as Computer Associates Siteminder) 根据预先建立的请求有进行验证
JA-SIG Central Authentication Service (CAS,一个开源的SSO系统 )
Transparent authentication context propagation for Remote Method Invocation (RMI) and HttpInvoker (Spring远程协议)
Automatic "remember-me" authentication (你可以勾选一个框以避免预定的时间段再认证)
Anonymous authentication (让每一个未经验证的访问自动假设为一个特定的安全标识)
Run-as authentication (在一个访问应该使用不同的安全标识时非常有用)
Java Authentication and Authorization Service (JAAS)
JEE container autentication (所以如果愿你以可以任然使用容器管理的认证)
Kerberos
Java Open Source Single Sign On (JOSSO) *
OpenNMS Network Management Platform *
AppFuse *
AndroMDA *
Mule ESB *
Direct Web Request (DWR) *
Grails *
Tapestry *
JTrac *
Jasypt *
Roller *
Elastic Path *
Atlassian Crowd *
Your own authentication systems (see below)
表示由第三方提供
很多独立软件供应商,因为灵活的身份验证模式二选择Spring Security。这样做允许他们快速的集成到他们的终端客户需求的解决方案而不用进行大量工程或者改变客户的环境。如果上面的验证机制不符合你的需求,Spring Security 是一个开放的平台,要实现你 自己的验证机制检查。Spring Security 的许多企业用户需要与不遵循任何安全标准的“遗留”系统集成,Spring Security可以很好的与这类系统集成。
无论何种身份验证机制,Spring Security提供一套的授权功能。这里有三个主要的热点区域,授权web请求、授权方法是否可以被调用和授权访问单个域对象的实例。为了帮助让你分别了解这些差异,认识在Servlet规范网络模式安全的授权功能,EJB容器管理的安全性和文件系统的安全。
简单的来说 Spring Security框架可以为我们提供安全权限认证 这是一种基于 Spring AOP 和 Servlet 过滤器的安全框架。它提供全面的安全性解决方案,同时在 Web 请求级和方法调用级处理身份确认和授权。他可以给我们带来很多方便
sping这个组织中生产出来一个安全框架 ------权限安全框架
作用
将spring Security集成到我们的系统中 我们可以用它来完成系统的权限管理
a 用户名 密码认证(判断用户名是否正确)
b 授权 给予登录用户对应的访问权限
使用注意
1 登录页面提交用户名 密码表单路径 必须是 /login
入门Demo
我们先创建一个Maven工程 导入相关的POM.xml文件
<properties>
        <project.build.sourceEncoding>UTF-8</project.build.sourceEncoding>
        <maven.compiler.source>1.7</maven.compiler.source>
        <maven.compiler.target>1.7</maven.compiler.target>
        <spring.version>4.2.4.RELEASE</spring.version>
    </properties>

    <dependencies>
        <dependency>
            <groupId>junit</groupId>
            <artifactId>junit</artifactId>
            <version>4.11</version>
            <scope>test</scope>
        </dependency>

        <dependency>
            <groupId>org.springframework</groupId>
            <artifactId>spring-core</artifactId>
            <version>${spring.version}</version>
        </dependency>
        <dependency>
            <groupId>org.springframework</groupId>
            <artifactId>spring-web</artifactId>
            <version>${spring.version}</version>
        </dependency>
        <dependency>
            <groupId>org.springframework</groupId>
            <artifactId>spring-webmvc</artifactId>
            <version>${spring.version}</version>
        </dependency>
        <dependency>
            <groupId>org.springframework</groupId>
            <artifactId>spring-context-support</artifactId>
            <version>${spring.version}</version>
        </dependency>
        <dependency>
            <groupId>org.springframework</groupId>
            <artifactId>spring-test</artifactId>
            <version>${spring.version}</version>
        </dependency>
        <dependency>
            <groupId>org.springframework</groupId>
            <artifactId>spring-jdbc</artifactId>
            <version>${spring.version}</version>
        </dependency>
        <dependency>
            <groupId>org.springframework.security</groupId>
            <artifactId>spring-security-web</artifactId>
            <version>4.1.0.RELEASE</version>
        </dependency>
        <dependency>
            <groupId>org.springframework.security</groupId>
            <artifactId>spring-security-config</artifactId>
            <version>4.1.0.RELEASE</version>
        </dependency>
        <dependency>
            <groupId>javax.servlet</groupId>
            <artifactId>servlet-api</artifactId>
            <version>2.5</version>
            <scope>provided</scope>
        </dependency>

    </dependencies>
web.xml文件
<?xml version="1.0" encoding="UTF-8"?>
<web-app xmlns:xsi="http://www.w3.org/2001/XMLSchema-instance"
         xmlns="http://java.sun.com/xml/ns/javaee"
         xsi:schemaLocation="http://java.sun.com/xml/ns/javaee http://java.sun.com/xml/ns/javaee/web-app_2_5.xsd"
         version="2.5">
  <context-param>
    <param-name>contextConfigLocation</param-name>
    <param-value>classpath:spring-security.xml</param-value>
  </context-param>
  <listener>
    <listener-class>
      org.springframework.web.context.ContextLoaderListener
    </listener-class>
  </listener>
  <filter>
    <filter-name>springSecurityFilterChain</filter-name>
    <filter-class>org.springframework.web.filter.DelegatingFilterProxy</filter-class>
  </filter>
  <filter-mapping>
    <filter-name>springSecurityFilterChain</filter-name>
    <url-pattern>/*</url-pattern>
  </filter-mapping>
</web-app>
spring-security.xml文件:
<?xml version="1.0" encoding="UTF-8"?>
<beans:beans xmlns="http://www.springframework.org/schema/security"
             xmlns:beans="http://www.springframework.org/schema/beans" xmlns:xsi="http://www.w3.org/2001/XMLSchema-instance"
             xsi:schemaLocation="http://www.springframework.org/schema/beans http://www.springframework.org/schema/beans/spring-beans.xsd
http://www.springframework.org/schema/security http://www.springframework.org/schema/security/spring-security.xsd">

    <!--页面拦截规则   use-expressions属性设置 false   禁用spel 表达式 默认值true
       haseROLE(‘ROLE_USER‘)
    -->
    <http use-expressions="false">
        <!--配置拦截路径   /**拦截所有的路径
        access 设置访问这个路径所具有的 的权限   权限的写法必须以“ROLE”
-->
        <intercept-url pattern="/**" access="ROLE_USER" />
        <form-login/>
    </http>

    <!-- 认证管理器 -->
    <authentication-manager>
        <authentication-provider>
            <user-service>
                <user name="admin" password="123456" authorities="ROLE_USER"/>
            </user-service>
        </authentication-provider>
    </authentication-manager>
</beans:beans>
然后启动tomcat 直接访问路径
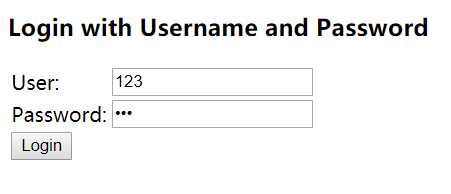
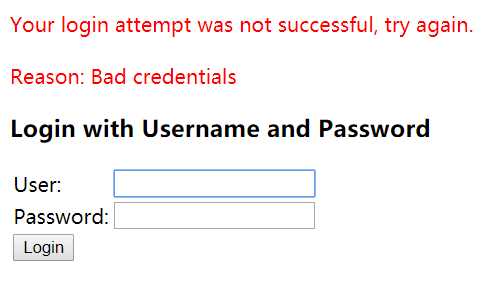
这是官方给我们提供的页面 当我们输入错误的user和password时:
当我们输入配置文件中配置的user和password时
我们也可以配置自己的登录页面和错误跳转页面和登录成功跳转页面
<?xml version="1.0" encoding="UTF-8"?>
<beans:beans xmlns="http://www.springframework.org/schema/security"
             xmlns:beans="http://www.springframework.org/schema/beans" xmlns:xsi="http://www.w3.org/2001/XMLSchema-instance"
             xsi:schemaLocation="http://www.springframework.org/schema/beans http://www.springframework.org/schema/beans/spring-beans.xsd
http://www.springframework.org/schema/security http://www.springframework.org/schema/security/spring-security.xsd">

    <!--以下页面不拦截 -->
    <http pattern="/login.html" security="none"></http>
    <http pattern="/login_error.html" security="none"></http>

    <!--页面拦截规则 -->
    <http use-expressions="false">
        <!--拦截所有的路径   只有用户ROLE_USER权限才可以放行-->
        <intercept-url pattern="/**" access="ROLE_USER" />
         <!--login-page :指定登录的页面   default-target-url指定登录成功后  访问的页面   authentication-failure-url:指定登录失败的页面-->
        <form-login login-page="/login.html" default-target-url="/index.html" authentication-failure-url="/login_error.html"/>

        <csrf disabled="true"/>
    </http>


<!--认证管理器-->
    <authentication-manager>
        <authentication-provider>
            <user-service>
                <user name="admin" password="123456" authorities="ROLE_USER"/>
            </user-service>
        </authentication-provider>
    </authentication-manager>
</beans:beans>
标签:sping bsp tab 配置文件 compile grails pre ESS atl
原文地址:https://www.cnblogs.com/hank-hush/p/12062576.html