标签:不能 解析 内部函数 文件 catch ext frame info j2ee
FreeMarker是一个用Java语言编写的模板引擎,它基于模板来生成文本输出。FreeMarker与Web容器无关,即在Web运行时,它并不知道Servlet或HTTP。它不仅可以用作表现层的实现技术,而且还可以用于生成XML,JSP或Java 等。目前企业中:主要用Freemarker做静态页面或是页面展示。
以下都是网上摘要,感觉很有用,适合初学者了解
把freemarker的jar包添加到工程中
<dependency>
  <groupId>org.freemarker</groupId>
  <artifactId>freemarker</artifactId>
  <version>2.3.23</version>
</dependency>
首先需要添加freemarker.jar到项目,如果项目中有spring或者spirngmvc,需要整合,首先配置freemarkerConfig,代码结构如下:
<!-- 设置freeMarker的配置文件路径 -->
    <bean id="freemarkerConfiguration"
        class="org.springframework.beans.factory.config.PropertiesFactoryBean">
        <property name="location" value="classpath:freemarker.properties" />
    </bean>


        <bean id="freemarkerConfig"
        class="org.springframework.web.servlet.view.freemarker.FreeMarkerConfigurer">
        <property name="freemarkerSettings" ref="freemarkerConfiguration" />

        <property name="templateLoaderPath">
            <value>/WEB-INF/freemarker/</value>
        </property>
        <property name="freemarkerVariables"><!--设置一些常用的全局变量-->
            <map>
            <entry key="xml_escape" value-ref="fmXmlEscape" />
            <entry key="webRoot" value="/shop"></entry>
                        <entry key="jsRoot" value="/shop/js"></entry>
            </map>
        </property>
    </bean>
其中一下代码是用来扫描.ftl的模板文件,在/web-info/freemarker目录中
<property name="templateLoaderPath">
    <value>/WEB-INF/freemarker/</value>
</property>
然后freemarker用ftl文件来呈现视图,这时候就需要配置freemarker的视图解析器,代码如下:
<!-- 配置freeMarker视图解析器 -->
    <bean id="freemarkerViewResolver"
        class="org.springframework.web.servlet.view.freemarker.FreeMarkerViewResolver">
        <property name="viewClass" value="org.springframework.web.servlet.view.freemarker.FreeMarkerView"
            />
        <property name="viewNames" value="*.ftl" />
        <property name="contentType" value="text/html; charset=utf-8" />
        <property name="cache" value="true" />
        <property name="suffix" value="" />
    <!--     <property name="exposeRequestAttributes" value="true" />
        <property name="exposeSessionAttributes" value="true" />
        <property name="exposeSpringMacroHelpers" value="true" /> -->
        <property name="order" value="0" />
    </bean>
    <!-- 对模型视图名称的解析,即在模型视图名称添加前后缀 通用解析器 -->
    <bean id="viewResolver"
        class="org.springframework.web.servlet.view.InternalResourceViewResolver">
        <property name="prefix" value="" />
        <property name="viewNames" value="*.html,*.jsp" />
        <property name="suffix" value="" />
        <property name="viewClass"
            value="org.springframework.web.servlet.view.InternalResourceView" />
        <property name="order" value="1"></property>
    </bean>
其中:<property name="order" value="0">代表了第一个匹配的是freemarker的视图解析器,如果匹配不成功,则自动选择order=1的其他解析器,目前的通用解析器可以解析.html跟.jsp的视图,如果需要其他视图的解析器,可以自行添加。
其中的exposeRequestAttributes exposeSessionAttributes两个属性都被设置为true。结果是请求和会话属性都被复制到模板的属性集中,可以使用FreeMarker的表达式语言来访问并显示。
使用这些宏,必须设置FreeMarkerViewResolver的exposeSpringMacroHelpers属性为true
以上是freemarker与springmvc整合需要配置的xml文件。
下面来介绍一下在Java 代码中如何使用:
首先编写Freemarker的工具类,用来生成HTML文件的方法:
package com.hc.shop.common.tools;

import java.io.File;
import java.io.FileNotFoundException;
import java.io.FileOutputStream;
import java.io.IOException;
import java.io.OutputStreamWriter;
import java.io.UnsupportedEncodingException;
import java.io.Writer;
import java.util.HashMap;
import java.util.Map;

import javax.servlet.http.HttpServletRequest;

import org.springframework.web.servlet.view.freemarker.FreeMarkerConfig;

import freemarker.template.Template;
import freemarker.template.TemplateException;

/**
 * @author HuifengWang 静态化方法
 **/
public class FreeMarkerUtil {
    /**
     *
     * 生成HTML静态页面的公公方法
     * @param fmc
     * @param templateName 模板的名称
     * @param request
     * @param map 生成模板需要的数据
     * @param filePath 相对于web容器的路径
     * @param fileName 要生成的文件的名称,带扩展名
     * @author HuifengWang
     *
     */
    public static void createHtml(FreeMarkerConfig fmc, String templateName,
            HttpServletRequest request, Map<?, ?> map, String filePath,
            String fileName) {
        Writer out = null;
        try {
            Template template = fmc.getConfiguration()
                    .getTemplate(templateName);
            String htmlPath = request.getSession().getServletContext()
                    .getRealPath(filePath)
                    + "/" + fileName;
            File htmlFile = new File(htmlPath);
            if (!htmlFile.getParentFile().exists()) {
                htmlFile.getParentFile().mkdirs();
            }
            if (!htmlFile.exists()) {
                htmlFile.createNewFile();
            }
            out = new OutputStreamWriter(new FileOutputStream(htmlPath),"UTF-8");
            template.process(map, out);
            out.flush();
        } catch (UnsupportedEncodingException e) {
            e.printStackTrace();
        } catch (FileNotFoundException e) {
            e.printStackTrace();
        } catch (IOException e) {
            e.printStackTrace();
        } catch (TemplateException e) {
            e.printStackTrace();
        } finally {
            try {
                out.close();
                out = null;
            } catch (IOException e) {
                e.printStackTrace();
            }
        }
    }


    /**
     * @param request
     * @param filePath  文件存放的路径
     * @param fileName 文件的名称,需要扩展名
     * @author HuifengWang
     * @return
     */
    public static Map<String,Object> htmlFileHasExist(HttpServletRequest request,String filePath,
            String fileName) {
        Map<String,Object> map = new HashMap<String,Object>();
        String htmlPath = request.getSession().getServletContext()
                .getRealPath(filePath)
                + "/" + fileName;
        File htmlFile = new File(htmlPath);
        if(htmlFile.exists()){
            map.put("exist", true);
        }else{
            map.put("exist",false);
        }
        return map ;
    }
}
以上就是要生成HTML文件的工具类,参数注解都有,应该很好理解。
如何在Controller中调用??下面来看一个很简单的demo
@Autowired
    private FreeMarkerConfig freeMarkerConfig;//获取FreemarkerConfig的实例

    @RequestMapping("/ttt")
    public String ttt(HttpServletRequest request,HttpServletResponse response,ModelMap mv) throws IOException, TemplateException, ServletException{
        String fileName ="ttt.html";
        Boolean flag =(Boolean)FreeMarkerUtil.htmlFileHasExist(request, FREEMARKER_PATH, fileName).get("exist");
        if(!flag){//如何静态文件不存在,重新生成
            Map<String,Object> map = new HashMap<String,Object>();
            map.put("user", "xiaowang小王");//这里包含业务逻辑请求等
            mv.addAllAttributes(map);
            FreeMarkerUtil.createHtml(freeMarkerConfig, "demo.ftl", request, map, FREEMARKER_PATH, fileName);//根据模板生成静态页面
        }
        return FREEMARKER_PATH+"/"+fileName;//始终返回生成的HTML页面
    }
以上就是如何在springmvc中使用Freemarker的具体实现方式
那在springboot项目中如何整合呢
搭建springboot的web项目可以用idea搭建
<dependency>
    <groupId>org.springframework.boot</groupId>
    <artifactId>spring-boot-starter-freemarker</artifactId>
</dependency>
server.port=8080
spring.freemarker.allow-request-override=false
spring.freemarker.cache=true
spring.freemarker.check-template-location=true
spring.freemarker.charset=UTF-8
spring.freemarker.content-type=text/html
spring.freemarker.expose-request-attributes=false
spring.freemarker.expose-session-attributes=false
spring.freemarker.suffix=.html
spring.freemarker.templateEncoding=UTF-8
spring.freemarker.templateLoaderPath=classpath:/templates/
spring.freemarker.expose-spring-macro-helpers=false
1) 控制层代码
import java.text.SimpleDateFormat;
import java.util.ArrayList;
import java.util.Date;
import java.util.HashMap;
import java.util.List;
import java.util.Map;
import org.springframework.stereotype.Controller;
import org.springframework.web.bind.annotation.RequestMapping;

/**
 * ClassName:StudentController
 * Date:     2017年11月6日 下午4:27:40
 * @author   Joe
 * @version
 * @since    JDK 1.8
 */
@Controller
public class StudentController {
/**
     * freemarker:(跳转到 freemarker.ftl).
     * @author Joe
     * Date:2017年11月6日下午4:52:19
     *
     * @param map
     * @return
     */
    @RequestMapping("/freemarker")
    public String freemarker(Map<String, Object> map){
        map.put("name", "Joe");
        map.put("sex", 1);    //sex:性别,1:男;0:女;

        // 模拟数据
        List<Map<String, Object>> friends = new ArrayList<Map<String, Object>>();
        Map<String, Object> friend = new HashMap<String, Object>();
        friend.put("name", "xbq");
        friend.put("age", 22);
        friends.add(friend);
        friend = new HashMap<String, Object>();
        friend.put("name", "July");
        friend.put("age", 18);
        friends.add(friend);
        map.put("friends", friends);
        return "freemarker";
    }
}
2)在main\resources\templates 目录下 新建 freemarker.ftl 文件,也可以是html的后缀,内容如下:
<!DOCTYPE html>
<html xmlns="http://www.w3.org/1999/xhtml" xmlns:th="http://www.thymeleaf.org"
      xmlns:sec="http://www.thymeleaf.org/thymeleaf-extras-springsecurity3">
    <head>
        <title>Hello World!</title>
    </head>
    <body>
       <center>
       <p>
           welcome ${name} to freemarker!
       </p>

       <p>性别:
           <#if sex==0>
                  女
           <#elseif sex==1>
                  男
           <#else>
                  保密
           </#if>
        </p>

       <h4>我的好友:</h4>
       <#list friends as item>
               姓名:${item.name} , 年龄${item.age}
           <br>
       </#list>
       </center>
    </body>
</html>
通过freemarker生成word文件
<!--添加freeMarker-->
        <dependency>
            <groupId>org.freemarker</groupId>
            <artifactId>freemarker</artifactId>
            <version>2.3.20</version>
        </dependency>
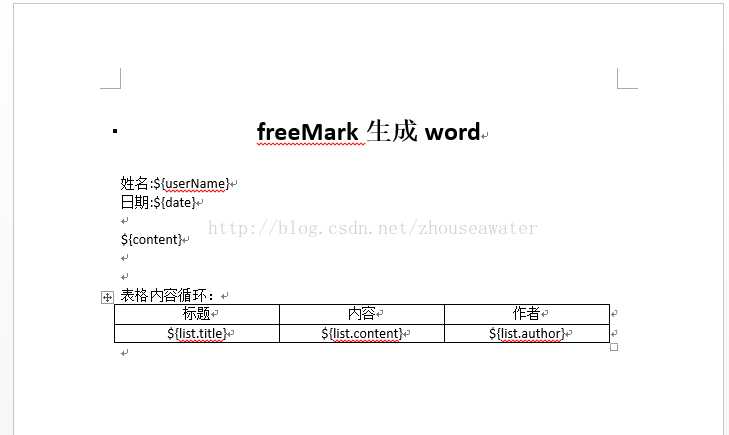
下一步我们要做的是先好我们的word模板然后将模板转换为xml文件。在word模板中需要定义好我们的占位符哦,使用${string}的方式。“string”根据自己的爱好定义就好了。
过程如下:
word文档:
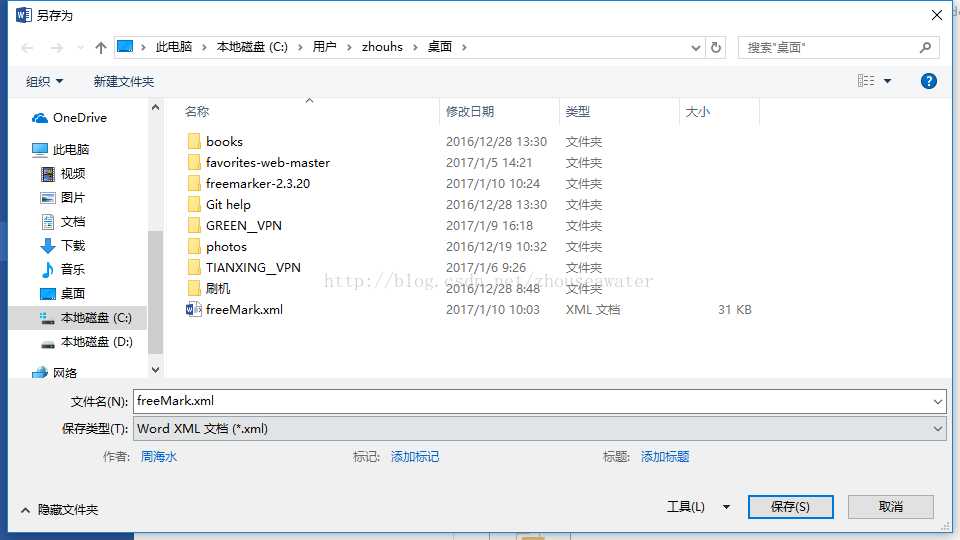
然后将我们的word文档另存为xml文档。
将我们的xml文档的后缀改为ftl,然后用可以打开ftl文件的软件打开我们的ftl文件。在这里我们有几个需要注意的地方。
第一,定义的占位符可能会被分开了。就像下面这样:
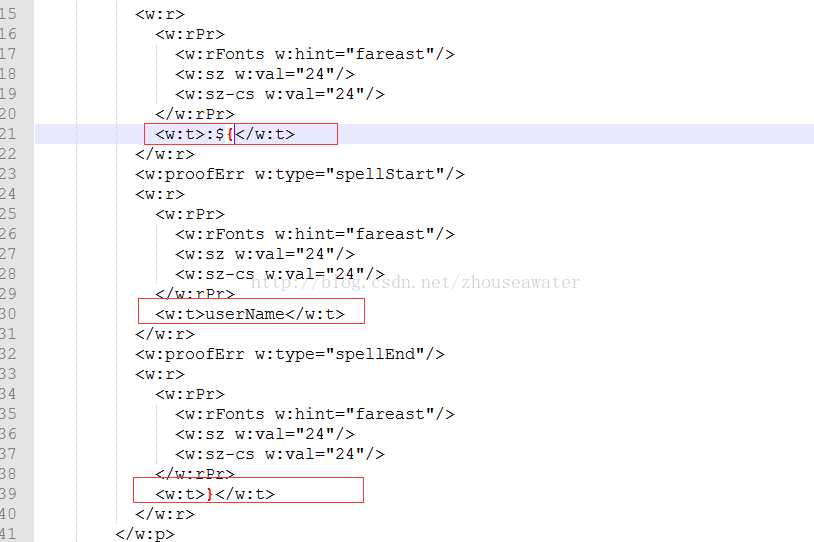
我们需要做的就是删掉多余的部分,图中我定义的是${userName}.所以我就把多余的删掉,变成${userName}就可以了。
第二,我们需要注意的就是在我们的表格部分需要自己添加freeMarker标签。在表格代码间用自定的标签括起来。定义的参数要和我们在方法中定义的一致,否则无法取到值。
表格开始:
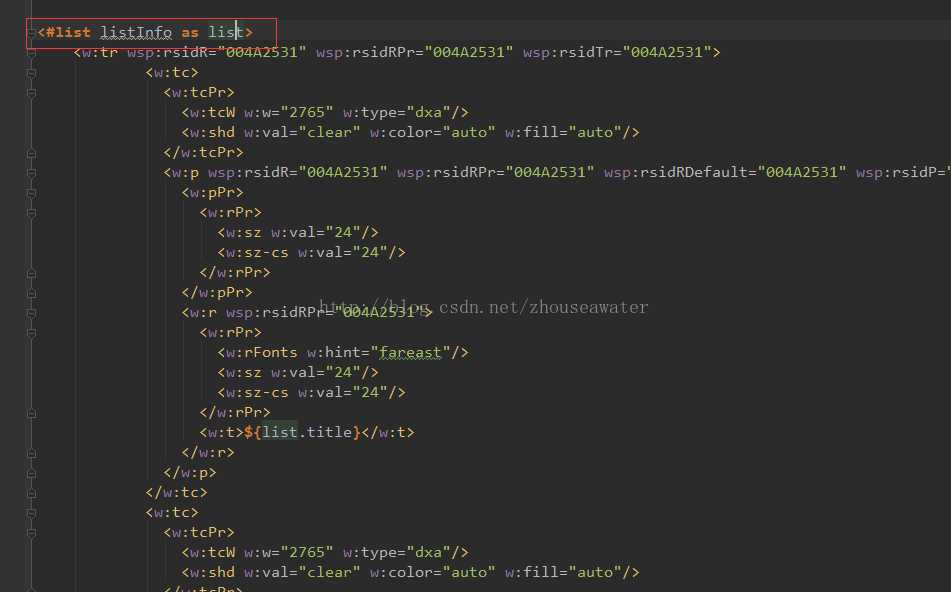
结束:</list>
package czc.sup.system.model.six;


import freemarker.template.Configuration;
import freemarker.template.Template;

import java.io.*;
import java.util.Map;

public class WordUtil {

    /**
     * 生成word文件
     * @param dataMap word中需要展示的动态数据,用map集合来保存
     * @param templateName word模板名称,例如:test.ftl
     * @param filePath 文件生成的目标路径,例如:D:/wordFile/
     * @param fileName 生成的文件名称,例如:test.doc
     */
    @SuppressWarnings("unchecked")
    public static void createWord(Map dataMap,String templateName,String filePath,String fileName){
        try {
            //创建配置实例
            Configuration configuration = new Configuration();

            //设置编码
            configuration.setDefaultEncoding("UTF-8");

            //ftl模板文件
            configuration.setClassForTemplateLoading(WordUtil.class,"/");

            //获取模板
            Template template = configuration.getTemplate(templateName);

            //输出文件
            File outFile = new File(filePath+File.separator+fileName);

            //如果输出目标文件夹不存在,则创建
            if (!outFile.getParentFile().exists()){
                outFile.getParentFile().mkdirs();
            }

            //将模板和数据模型合并生成文件
            Writer out = new BufferedWriter(new OutputStreamWriter(new FileOutputStream(outFile),"UTF-8"));


            //生成文件
            template.process(dataMap, out);

            //关闭流
            out.flush();
            out.close();
        } catch (Exception e) {
            e.printStackTrace();
        }
    }
}
public static void main(String[] args) {
         /** 用于组装word页面需要的数据 */
        Map<String, Object> dataMap = new HashMap<String, Object>();
        DataWord dataWord = new DataWord("model", "name", "designCode", "code", "met", "date", "temp", "humi", "hly");
        List<Object> datas = new ArrayList<>();
        for(int i=0;i<10;i++){
            Data data = new Data("1","检测名"+i, "norm", "result", "remark");
            datas.add(data);
        }
        dataMap.put("product",dataWord);
        dataMap.put("datas",datas);
        String filePath = "";
        if (IsWhatSystem.whatSystem()) {
            //文件路径
            filePath = "D:/doc_f/";
        }else {
            filePath = "/doc_f/";
        }
        //文件唯一名称
        String fileOnlyName = "生成Word文档.doc";
        /** 生成word  数据包装,模板名,文件生成路径,生成的文件名*/
        WordUtil.createWord(dataMap, "quality.ftl", filePath, fileOnlyName);
    }
然后就在相应的目录下导出word文档了
通过freemarker生成excel文件
第一步:添加依赖
<dependency>
   <groupId>org.freemarker</groupId>
   <artifactId>freemarker</artifactId>
   <version>2.3.20</version>
</dependency>
第二步:把excel另存为xml
在这里我要说一下,excel在另存为xml时里面的图片会丢失,它并不会像word那样生成一个占位符。所以我这个导出的excel是没有图片的。言归正传,这就是我另存为的xml的样例,其中row为行,cell为单元格
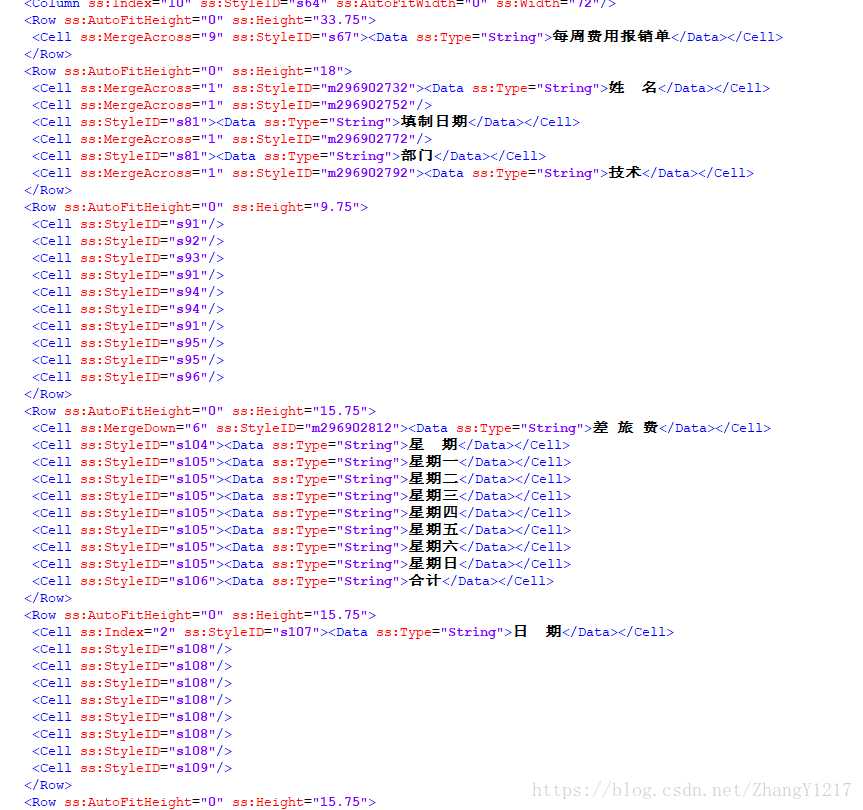
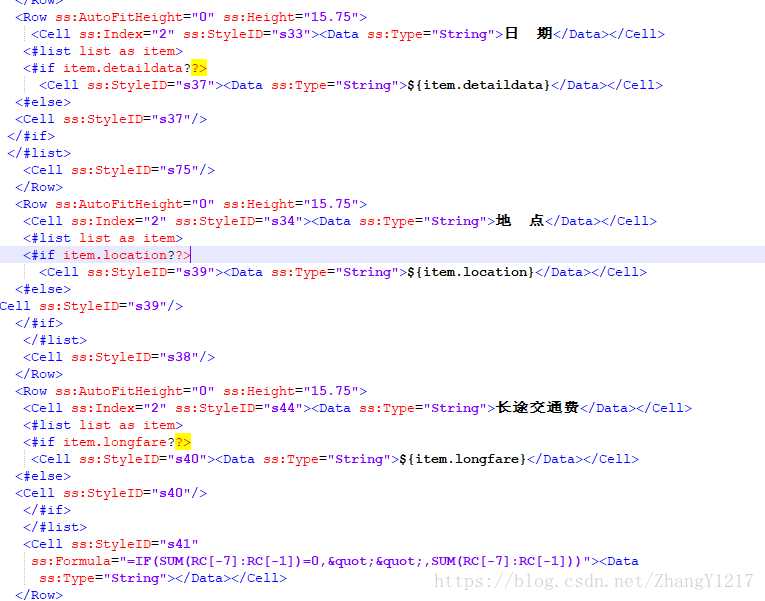
第三步:把要插入的数据使用freemarker的标签----${}替换
看到这里的${},是不是觉得它很像jstl标签,它的用法确实和jstl差不多,jstl是获取session中的值,而他是获取dataMap中的值;而且都是可以循环的便利的,它的便利标签就是
<#list list as item><#--其中list为你后台在dataMap中的key-->
    <#if item.detaildata??><#--判断是否为空,如果不为空则显示内容-->

<#--${item.detaildata}是获取list的子元素的值-->
 <Cell ss:StyleID="s37"><Data ss:Type="String">${item.detaildata}</Data></Cell>
   <#else><#--否则显示空的单元格-->
   <Cell ss:StyleID="s37"/>
  </#if>
  </#list>
如图
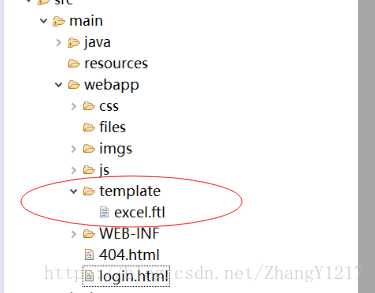
第四步:把xml的后缀名改成ftl,并且在webapp中新建template,把xxx.ftl,放到里面
好了基本的操作已经做完了,下面就是后台代码了。因为我的项目是MVC的设计理念并没有使用任何框架,所以把后台分为了四个层面:数据库对象序列化(dto),数据库访问层(DAO),数据处理层(service),控制层(servlet),算了还是用一个简单的例子吧,我开发的项目可能就要从头讲了。废话不多说先上service的代码,是一个封装好的类,可以直接调用的:
public class ExportExcelService {
public static void export(String templatePath, Map<String, Object> dataMap,
String buildFile, String newName,HttpServletRequest request,HttpServletResponse response) {
try {
ServletContext application = request.getSession().getServletContext();
Configuration configuration = new Configuration();
configuration.setDefaultEncoding("utf-8");
String path = application.getRealPath("template");
// 此处是本类Class.getResource()相对于模版文件的相对路径
configuration.setDirectoryForTemplateLoading(new File(path));
Template template = null;
File outFile = new File(buildFile);
Writer writer = null;
template = configuration.getTemplate(templatePath);
template.setEncoding("utf-8");
writer = new BufferedWriter(new OutputStreamWriter(
new FileOutputStream(outFile), Charset.forName("utf-8")));// 此处为输
template.process(dataMap, writer);
writer.flush();
writer.close();
// return true;
// 设置response的编码方式
response.setContentType("application/x-msdownload");
// 设置附加文件名
response.setHeader("Content-Disposition", "attachment;filename="
+ new String(newName.getBytes("utf-8"), "iso-8859-1"));
// 读出文件到i/o流
FileInputStream fis = new FileInputStream(outFile);
BufferedInputStream buf = new BufferedInputStream(fis);
byte[] b = new byte[1024];// 相当于我们的缓存
long k = 0;// 该值用于计算当前实际下载了多少字节
// 从response对象中得到输出流,准备下载
OutputStream myout = response.getOutputStream();
// 开始循环下载
while (k < outFile.length()) {
int j = buf.read(b, 0, 1024);
k += j;
// 将b中的数据写到客户端的内存
myout.write(b, 0, j);
}
// 将写入到客户端的内存的数据,刷新到磁盘
myout.flush();
myout.close();
} catch (Exception e) {
e.printStackTrace();
// return false;
}
}
}
然后我们在servlet中调用这个类中的方法,重点就看我标黄的代码,这个是自己生成的list,而不是通过其他代码生成的,标蓝色的则是单一的键值对,红色代码为如果导出的数据不是模板的7天数据,则自动补充不足的空数据,以完成模板显示空单元格如下:
@WebServlet("/excelExport")
public class exportExcelServlet extends HttpServlet {
private static final long serialVersionUID = 1L;
@Override
protected void doGet(HttpServletRequest req, HttpServletResponse resp) throws ServletException, IOException {
String uz=new String(URLDecoder.decode(req.getParameter("uz"),"utf-8"));
ReimburseService res=new ReimburseService();
String[] data=uz.split(",");
String uname=uz.split(",")[1];
String weeknumber=uz.split(",")[0];
Model model=res.querydetail(uname, weeknumber);
Map<String, Object> dataMap = new HashMap<String, Object>();
dataMap.put("username",uz.split(",")[2]);
dataMap.put("writedata",uz.split(",")[3]);
dataMap.put("appartment",uz.split(",")[4]);
List list=(List) model.getData();
for(int i=list.size();i<7;i++){
ReimburseDetail rd=new ReimburseDetail();
rd.setDetaildata("");
rd.setHotelfare("");
rd.setLocation("");
rd.setLongfare("");
rd.setOtherfare("");
rd.setShortfare("");
rd.setProject("");
rd.setFaredescription("");
list.add(rd);
}
//对list进行排序
for(int i=0;i<list.size();i++){
ReimburseDetail rdl=(ReimburseDetail)list.get(i);
try {
if(!rdl.getDetaildata().equals("")){
int b=dayForWeek(rdl.getDetaildata());
if(b-1!=i){
Object objA= list.get(i);
list.set(i, list.get(b-1));
list.set(b-1, objA);
}
}
} catch (Exception e) {
// TODO Auto-generated catch block
e.printStackTrace();
}
}
dataMap.put("list",list);
List ls=new ArrayList();
String[] num={"A","B","C","D","E","F","G"};
String[] Formula={"-9","-10","-11","-12","-13","-14","-15"};
for(int i=0;i<num.length;i++){
Map<String,Object> map = new HashMap<String,Object>();
map.put("num",num[i]);
ReimburseDetail r=(ReimburseDetail)list.get(i);
map.put("faredescription",r.getFaredescription());
map.put("Formula", Formula[i]);
map.put("col", i+1);
ls.add(map);
}
dataMap.put("ls",ls);
ServletContext application = req.getSession().getServletContext();
/*********输出图片未解决********************/
String a=application.getRealPath("imgs");
String img = getImageStr(a+"/ceit.png");
dataMap.put("image", img);
/***********************************/
String templateName = "excel.ftl"; //模板名称
java.text.DateFormat format1 = new java.text.SimpleDateFormat("yyyy-MM-dd");
String exportexcel = application.getRealPath("template")+format1.format(new Date())+ ".xls";
ExportExcelService.export(templateName, dataMap, exportexcel, "每周报销单("+format1.format(new Date())+").xls",req,resp);
}
/***************获取日期是星期几*************************/
public static int dayForWeek(String pTime) throws Exception {
SimpleDateFormat format = new SimpleDateFormat("yyyy-MM-dd" );
Calendar c = Calendar.getInstance();
c.setTime(format.parse(pTime));
int dayForWeek = 0 ;
if (c.get(Calendar.DAY_OF_WEEK) == 1 ){
dayForWeek = 7 ;
}else {
dayForWeek = c.get(Calendar.DAY_OF_WEEK) - 1 ;
}
return dayForWeek;
}
/**************将图片转成base64********************/
public String getImageStr(String imgFile) {
InputStream in = null;
String da="";
byte[] data = null;
try {
in = new FileInputStream(imgFile);
data = new byte[in.available()];
in.read(data);
in.close();
da=new String(Base64.encodeBase64(data),"UTF-8");
} catch (FileNotFoundException e) {
// TODO Auto-generated catch block
e.printStackTrace();
} catch (IOException e) {
// TODO Auto-generated catch block
e.printStackTrace();
}
return da;
}
}
注意:使用freemaker,要求所有标签必须闭合,否则会导致freemaker无法解析。
freemaker注释:<#– 注释内容 –>格式部分,不会输出
${emp.name?if_exists}        // 变量存在,输出该变量,否则不输出
${emp.name!}              // 变量存在,输出该变量,否则不输出
${emp.name?default("xxx")}        // 变量不存在,取默认值xxx
${emp.name!"xxx"}            // 变量不存在,取默认值xxx
常用内部函数:
${"123<br>456"?html}      // 对字符串进行HTML编码,对html中特殊字符进行转义
${"str"?cap_first}        // 使字符串第一个字母大写
${"Str"?lower_case}        // 将字符串转换成小写
${"Str"?upper_case}        // 将字符串转换成大写
${"str"?trim}              // 去掉字符串前后的空白字符
字符串的两种拼接方式拼接:
$ { “你好$ {emp.name!}”} //输出你好+变量名
$ {“hello”+ emp.name!} //使用+号来连接,输出你好+变量名
可以通过如下语法来截取子串:
<#assign str =“abcdefghijklmn”/>
//方法1
$ {str?substring(0,4)} //输出abcd
//方法2
$ { str [ 0 ] } $ {str [4]} //结果是ae
$ {str [1..4]} //结果是bcde
//返回指定字符的索引
$ {str?index_of("n")}
$ {emp.date?string(‘yyyy -MM-dd‘)} //日期格式
$ {emp.name?string.number} //输出20
$ {emp.name?string.currency} //¥20.00
$ {emp.name?string.percent} // 20%
$ {1.222?int} //将小数转为int,输出1

<#setting number_format =“percent”/> //设置数字默认输出方式(‘percent‘,百分比)
<#assign answer = 42 /> //声明变量回答42
#{answer} //输出4,200%
$ {answer?string} //输出4,200%
$ {answer?string.number} //输出42
$ {answer?string.currency} //输出¥42.00
$ {answer?string.percent} //输出4,200%
#{answer} //输出42

数字格式化插值可采用#{expr; format}形式来格式化数字,其中格式可以是:
mX:小数部分最小X位
MX:小数部分最大X位
如下面的例子:
<#assign x = 2.582 /> <#assign y = 4 />
# {x; M2} //输出2.58
# {y; M2} //输出4
# {x; m2} //输出2.58
#{Y; m2} //输出4.0
# {x; m1M2} //输出2.58
# {x; m1M2} //输出4.0
<#assign foo = false /> //声明变量,插入布尔值进行显示,注意不要用引号
$ {foo?string(“yes”,“no”)} //当为真时输出“yes”,否则输出“no”
申明变量的几种方式
<#assign name = value>
<#assign name1 = value1 name2 = value2 ... nameN = valueN>
<#assign same as above... in namespacehash>

<#assign name>
 capture this
</#assign>

<#assign name in namespacehash>
capture this
</#assign>
表达式中支持的比较运算符符如下几个:
=或==:判断两个值是否相等。
!=:判断两个值是否不等。
>或gt:判断左边值是否大于右边值>
<=或lte:判断左边值是否小于等于右边值
FreeMarker表达式中完全支持算术运算,
FreeMarker支持的算术运算符包括:+, - ,*,/,%
注意:
(1)运算符两边必须是数字
(2)使用+运算符时,如果一边是数字,一边是字符串,就会自动将数字转换为字符串再连接,
     如:$ {3 +“5”},结果是:35
逻辑运算符有如下几个:
逻辑与:&&
逻辑或:||
逻辑非:!
逻辑运算符只能作用于布尔值,否则将产生错误
①,一元运算符:!
②,内建函数:
③,乘除法:*,/,%
④,加减法: - ,+
⑤,比较:>,<,> =,<=(lt,lte,gt,gte)
⑥,相等:==,=, !=
⑦,逻辑与:&&
⑧,逻辑或:||
⑨,数字范围:.. 实际上,我们在开发过程中应该使用括号来严格区分,这样的可读性好,出错少
<#if condition>
...
<#elseif condition2>
...
<#elseif condition3>
...
<#else>
...
</#if>
if 空值判断

// 当 photoList 不为空时
<#if photoList??>...</#if>

值得注意的是,${..}只能用于文本部分,不能用于表达式,下面的代码是错误的:
<#if ${isBig}>Wow!</#if>
<#if "${isBig}">Wow!</#if>

// 正确写法
<#if isBig>Wow!</#if>
<#switch value>
<#case refValue1>
....
<#break>
<#case refValue2>
....
<#break>
<#case refValueN>
....
<#break>
<#default>
....
</#switch>
// 遍历集合:
<#list empList! as emp>
    ${emp.name!}
</#list>

// 可以这样遍历集合:
<#list 0..(empList!?size-1) as i>
    ${empList[i].name!}
</#list>

// 与jstl循环类似,也可以访问循环的状态。

empList?size    // 取集合的长度
emp_index:     // int类型,当前对象的索引值
emp_has_next:     // boolean类型,是否存在下一个对象

// 使用<#break>跳出循环
<#if emp_index = 0><#break></#if>

// 集合长度判断
<#if empList?size != 0></#if> // 判断=的时候,注意只要一个=符号,而不是==

<#assign l=0..100/>    // 定义一个int区间的0~100的集合,数字范围也支持反递增,如100..2
<#list 0..100 as i>   // 等效于java for(int i=0; i <= 100; i++)
  ${i}
</#list>

// 截取子集合:
empList[3..5] //返回empList集合的子集合,子集合中的元素是empList集合中的第4-6个元素

// 创建集合:
<#list ["星期一", "星期二", "星期三", "星期四", "星期五", "星期六", "星期天"] as x>

// 集合连接运算,将两个集合连接成一个新的集合
<#list ["星期一","星期二","星期三"] + ["星期四","星期五","星期六","星期天"] as x>

// 除此之外,集合元素也可以是表达式,例子如下:
[2 + 2, [1, 2, 3, 4], "whatnot"]

// seq_contains:判断序列中的元素是否存在
<#assign x = ["red", 16, "blue", "cyan"]>
${x?seq_contains("blue")?string("yes", "no")}    // yes
${x?seq_contains("yellow")?string("yes", "no")}  // no
${x?seq_contains(16)?string("yes", "no")}        // yes
${x?seq_contains("16")?string("yes", "no")}      // no

// seq_index_of:第一次出现的索引
<#assign x = ["red", 16, "blue", "cyan", "blue"]>
${x?seq_index_of("blue")}  // 2

// sort_by:排序(升序)
<#list movies?sort_by("showtime") as movie></#list>

// sort_by:排序(降序)
<#list movies?sort_by("showtime")?reverse as movie></#list>

// 具体介绍:
// 不排序的情况:
<#list movies as moive>
  <a href="${moive.url}">${moive.name}</a>
</#list>

//要是排序,则用
<#list movies?sort as movie>
  <a href="${movie.url}">${movie.name}</a>
</#list>

// 这是按元素的首字母排序。若要按list中对象元素的某一属性排序的话,则用
<#list moives?sort_by(["name"]) as movie>
  <a href="${movie.url}">${movie.name}</a>
</#list>

//这个是按list中对象元素的[name]属性排序的,是升序,如果需要降序的话,如下所示:
<#list movies?sort_by(["name"])?reverse as movie>
  <a href="${movie.url}">${movie.name}</a>
</#list>
// 创建map
<#assign scores = {"语文":86,"数学":78}>

// Map连接运算符
<#assign scores = {"语文":86,"数学":78} + {"数学":87,"Java":93}>

// Map元素输出
emp.name       // 全部使用点语法
emp["name"]    // 使用方括号
循环//遍历集合:<#list empList!as emp>     $ {emp.name!}
\" :双引号(u0022)
\‘ :单引号(u0027)
\\ :反斜杠(u005C)
\n :换行(u000A)
\r :回车(u000D)
\t :Tab(u0009)
\b :退格键(u0008)
\f :Form feed(u000C)
\l :<
\g :>
\a :&
\{ :{
\xCode :直接通过4位的16进制数来指定Unicode码,输出该unicode码对应的字符.

如果某段文本中包含大量的特殊符号,FreeMarker提供了另一种特殊格式:可以在指定字符串内容的引号前增加r标记,在r标记后的文件将会直接输出.看如下代码:
${r"${foo}"} // 输出 ${foo}
${r"C:/foo/bar"} // 输出 C:/foo/bar
// include指令的作用类似于JSP的包含指令:
<#include "/test.ftl" encoding="UTF-8" parse=true>

// 在上面的语法格式中,两个参数的解释如下:
encoding="GBK"  // 编码格式
parse=true    // 是否作为ftl语法解析,默认是true,false就是以文本方式引入
注意:在ftl文件里布尔值都是直接赋值的如parse=true,而不是parse="true"
// 类似于jsp里的import,它导入文件,然后就可以在当前文件里使用被导入文件里的宏组件
<#import "/libs/mylib.ftl" as my>
// 上面的代码将导入/lib/common.ftl模板文件中的所有变量,交将这些变量放置在一个名为com的Map对象中,"my"在freemarker里被称作namespace
// 用来压缩空白空间和空白的行
<#compress>
    ...
</#compress>
<#t> // 去掉左右空白和回车换行

<#lt>// 去掉左边空白和回车换行

<#rt>// 去掉右边空白和回车换行

<#nt>// 取消上面的效果
// escape指令导致body区的插值都会被自动加上escape表达式,但不会影响字符串内的插值,
    只会影响到body内出现的插值,使用escape指令的语法格式如下:
<#escape x as x?html>
  First name: ${firstName}
<#noescape>Last name: ${lastName}</#noescape>
  Maiden name: ${maidenName}
</#escape>

// 相同表达式
First name: ${firstName?html}
Last name: ${lastName}
Maiden name: ${maidenName?html}
<#global name=value>

<#global name1=value1 name2=value2 ... nameN=valueN>

<#global name>
  capture this
</#global>

// 利用这个语法给变量赋值,那么这个变量在所有的namespace中是可见的,
    如果这个变量被当前的assign语法覆盖如<#global x=2><#assign x=1>
    在当前页面里x=2将被隐藏,或者通过${.globals.x} 来访问
// 用来设置整个系统的一个环境
locale // zh_CN 中文环境
number_format
boolean_format
date_format , time_format , datetime_format
time_zone
classic_compatible
// 例1:
<#setting number_format="percent"/>    // 设置数字默认输出方式(‘percent‘,百分比)

// 例2:
// 假如当前是匈牙利的设置,然后修改成美国
${1.2} // 输出1,2
<#setting locale="en_US">
${1.2} // 输出1.2,因为匈牙利是采用", "作为十进制的分隔符,美国是用". "
例子1:
<#-- 定义宏 -->
<#macro test foo bar="Bar" baaz=-1>
  Text: ${foo}, ${bar}, ${baaz}
</#macro>

<#-- 使用宏 -->
<@test foo="a" bar="b" baaz=5*5/>  // 输出:Text: a, b, 25
<@test foo="a" bar="b"/>        // 输出:Text: a, b, -1
<@test foo="a" baaz=5*5-2/>     // 输出:Text: a, Bar, 23
<@test foo="a"/>                   // 输出:Text: a, Bar, -1
例子2:
<#-- 定义一个循环输出的宏 -->
<#macro list title items>
  ${title}
  <#list items as x>
    *${x}
  </#list>
</#macro>

<#-- 使用宏 -->
<@list items=["mouse", "elephant", "python"] title="Animals"/>
// 输出Animals *mouse *elephant *python
例子3:
<#-- 嵌套宏 -->
<#macro border>
  <table>
    <#nested>
  </table>
</#macro>

<#-- 嵌套宏使用 -->
<@border>
  <tr><td>hahaha</td></tr>
</@border>
输出结果:
<table>
  <tr><td>hahaha</td></tr>
</table>
例子4:在nested指令中使用循环变量时,可以使用多个循环变量,看如下代码
<#-- 循环嵌套宏 -->
<#macro repeat count>
  <#list 1..count as x>
    <#nested x, x/2, x==count> // 使用nested指令时指定了三个循环变量
  </#list>
</#macro>

<#-- 使用宏 -->
<@repeat count = 4; c, halfc, last>
  ${c}. ${halfc}<#if last> Last!</#if>
</@repeat>
// 输出结果:
// 1. 0.5
// 2. 1
// 3. 1.5
// 4. 2 Last!
freemarker 宏嵌套nested 的使用:
http://blog.sina.com.cn/s/blog_7e5699790100z59g.html
// return指令用于结束macro指令
<#-- 创建宏 -->
<#macro book>
  spring
  <#return>
  j2ee
</#macro>

<#-- 使用宏 -->
<@book />
// 上面的代码输出:spring,而j2ee位于return指令之后,不会输出.
工具类http://files.cnblogs.com/files/duke-cui/FreeMarkerUtil.rar
标签:不能 解析 内部函数 文件 catch ext frame info j2ee
原文地址:https://www.cnblogs.com/h-c-g/p/11876039.html