标签:prope character write 并发 oge img 表单 配置文件 service
接下来做一下,用户的认证登陆以及权限验证,在这里使用shiro,首先来看一下shiro
Apache Shiro是一个强大且易用的Java安全框架,执行身份验证、授权、密码和会话管理。使用Shiro的易于理解的API,您可以快速、轻松地获得任何应用程序,从最小的移动应用程序到最大的网络和企业应用程序。
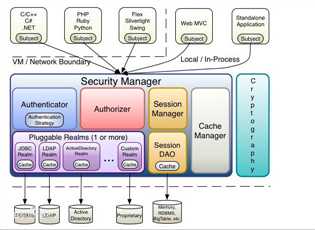
通过上图可以大概看出shiroe的架构,shiro的架构主要为:
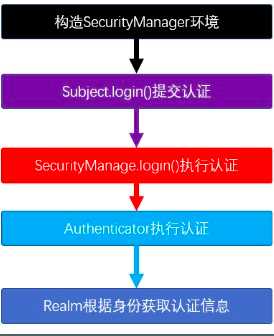
认证的流程图大致如下
接下来,我们直接在项目中进行配置
首先在pom中引入需要的jar包,shiro1.5的使maven自动下载还不能下载,可以自己下载放到本地仓库,或者修改为1.4.2的
<!--第三方日志库-->
    <dependency>
      <groupId>commons-logging</groupId>
      <artifactId>commons-logging</artifactId>
      <version>1.2</version>
    </dependency>

    <!--Commons Collections增强了Java集合框架。 它提供了几个功能来简化收集处理。 它提供了许多新的接口,实现和实用程序-->
    <dependency>
      <groupId>commons-collections</groupId>
      <artifactId>commons-collections</artifactId>
      <version>3.2.2</version>
    </dependency>
    <!--shiro核心-->
    <dependency>
      <groupId>org.apache.shiro</groupId>
      <artifactId>shiro-core</artifactId>
      <version>${org.apache.shiro.version}</version>
    </dependency>
    <!--shiro整合web-->
    <dependency>
      <groupId>org.apache.shiro</groupId>
      <artifactId>shiro-web</artifactId>
      <version>${org.apache.shiro.version}</version>
    </dependency>
    <!--shiro应用缓存-->
    <dependency>
      <groupId>org.apache.shiro</groupId>
      <artifactId>shiro-ehcache</artifactId>
      <version>${org.apache.shiro.version}</version>
    </dependency>
    <!--整合spring-shiro-->
    <dependency>
      <groupId>org.apache.shiro</groupId>
      <artifactId>shiro-spring</artifactId>
      <version>${org.apache.shiro.version}</version>
    </dependency>
首先需要在web.xml中配置过滤器,帮助我们拦截请求
  <!--配置shiro过滤器,拦截所有请求-->
  <filter>
    <filter-name>shiroFilter</filter-name>
    <filter-class>org.springframework.web.filter.DelegatingFilterProxy</filter-class>
    <init-param>
      <param-name>targetFilterLifecycle</param-name>
      <param-value>true</param-value>
    </init-param>
  </filter>
  <!--配置shiro的过滤路径-->
  <filter-mapping>
    <filter-name>shiroFilter</filter-name>
    <url-pattern>/*</url-pattern>
  </filter-mapping>
接下来配置application-shiro.xml文件
<?xml version="1.0" encoding="UTF-8"?>
<beans xmlns="http://www.springframework.org/schema/beans"
       xmlns:xsi="http://www.w3.org/2001/XMLSchema-instance" xmlns:aop="http://www.springframework.org/schema/aop"
       xsi:schemaLocation="http://www.springframework.org/schema/beans
        http://www.springframework.org/schema/beans/spring-beans.xsd http://www.springframework.org/schema/aop https://www.springframework.org/schema/aop/spring-aop.xsd">
    <!--配置realm数据源-->
    <bean id="employeeRealm" class="com.yang.web.realm.EmployeeRealm">
        <property name="credentialsMatcher" ref="credentialsMatcher" />
    </bean>
    <!--配置shiro过滤器-->
    <bean id="formFilter" class="com.yang.web.filter.FormFilter" />

    <!--配置shiro安全管理器-->
    <bean id="securityManage" class="org.apache.shiro.web.mgt.DefaultWebSecurityManager">
        <property name="realm" ref="employeeRealm" />
        <!--配置缓存-->
        <property name="cacheManager" ref="ehCache" />
    </bean>

    <!--使用第三方去扫描shiro的注解-->
    <bean class="org.apache.shiro.spring.security.interceptor.AuthorizationAttributeSourceAdvisor">
        <property name="securityManager" ref="securityManage" />
    </bean>

    <!--配置shiro过滤器-->
    <bean id="shiroFilter" class="org.apache.shiro.spring.web.ShiroFilterFactoryBean">
        <!--
            配置登陆认证的路径
            如果没有配置该路径,对于没有认证过的请求,会跳转到login.jsp
            如果配置了该路径:
            如果请求是loginUrl的路径,那就会去做认证
            其他请求,会去执行对应login的请求
        -->
        <property name="loginUrl" value="/login" />
        <!--重新配置表单监听的过滤器-->
        <property name="filters">
            <map>
                <entry key="authc" value-ref="formFilter" />
            </map>
        </property>
        <property name="securityManager" ref="securityManage"/>
        <!--配置shiro的过滤器pattern-->
        <property name="filterChainDefinitions">
            <value>
                /static/** = anon  <!--不需要进行登陆验证-->
                /login.jsp = anon  <!--不需要进行登陆验证-->
                /logout = logout   <!--配置注销接口-->
                /** = authc   <!--除了上述请求外,都需要进行登陆验证-->
            </value>
        </property>
    </bean>

    <!--
        配置代理
        true:使用cglib的方式
        false:使用jdk接口动态代理
    -->
    <aop:config proxy-target-class="true" />
    <!--凭证匹配器-->
    <bean id="credentialsMatcher" class="org.apache.shiro.authc.credential.HashedCredentialsMatcher">
        <!--散列算法-->
        <property name="hashAlgorithmName" value="md5" />
        <!--散列算法-->
        <property name="hashIterations" value="2" />
    </bean>
    <!--缓存管理器-->
    <bean id="ehCache" class="org.apache.shiro.cache.ehcache.EhCacheManager">
        <property name="cacheManagerConfigFile" value="classpath:shiro-ehcache.xml" />
    </bean>
</beans>
需要在springMvc的配置文件中导入这个包
<!--导入shiro的配置-->
    <import resource="classpath:application-shiro.xml" />
我们在配置shiro是,配置了缓存管理器,需要创建配置文件
<ehcache xmlns:xsi="http://www.w3.org/2001/XMLSchema-instance"
         xsi:noNamespaceSchemaLocation="http://ehcache.org/ehcache.xsd">
    <defaultCache
            maxElementsInMemory="1000"
            maxElementsOnDisk="10000000"
            eternal="false"
            overflowToDisk="false"
            diskPersistent="false"
            timeToIdleSeconds="120"
            timeToLiveSeconds="120"
            diskExpiryThreadIntervalSeconds="120"
            memoryStoreEvictionPolicy="LRU">
    </defaultCache>
</ehcache>
我们在shiro中配置了loginUrl,因此需要在控制层实现对应的url
package com.yang.web;

import org.springframework.stereotype.Controller;
import org.springframework.web.bind.annotation.RequestMapping;


/**
 * 配置了loginUrl,需要设置对应的函数
 */
@Controller
public class LoginController {
    @RequestMapping("/login")
    public String login() {
        return "redirect:login.jsp";
    }
}
接下来需要配置验证以及授权的realm
package com.yang.web.realm;

import com.yang.domain.Employee;
import com.yang.service.EmployeeService;
import org.apache.shiro.authc.AuthenticationException;
import org.apache.shiro.authc.AuthenticationInfo;
import org.apache.shiro.authc.AuthenticationToken;
import org.apache.shiro.authc.SimpleAuthenticationInfo;
import org.apache.shiro.authz.AuthorizationInfo;
import org.apache.shiro.authz.SimpleAuthorizationInfo;
import org.apache.shiro.realm.AuthorizingRealm;
import org.apache.shiro.subject.PrincipalCollection;
import org.apache.shiro.util.ByteSource;
import org.springframework.beans.factory.annotation.Autowired;

import java.util.ArrayList;
import java.util.List;

/**
 * 设置员工权限realm,需要继承authorizingRealm
 */
public class EmployeeRealm extends AuthorizingRealm {

    /*注入*/
    @Autowired
    private EmployeeService employeeService;

    /*认证*/
    @Override
    protected AuthenticationInfo doGetAuthenticationInfo(AuthenticationToken token) throws AuthenticationException {
        System.out.println("认证,来啦");

        // 获取身份信息
        String username = (String) token.getPrincipal();
        System.out.println(username);
        // 根据当前用户名查看当前是否存在当前用户
        Employee employee = employeeService.getEmployeeByName(username);
        // 如果没有查询到employee、,就返回为空
        if (employee == null) {
            return null;
        }
        // 进行认证
        // 认证的参数,主体,正确的密码,盐,还有当前realm的名称
        return new SimpleAuthenticationInfo(employee, employee.getPassword(), ByteSource.Util.bytes("!@#QAZwsx"), this.getName());
    }

    /*授权*/
    @Override
    protected AuthorizationInfo doGetAuthorizationInfo(PrincipalCollection principalCollection) {
        // 获取客户主体
        Employee employee = (Employee) principalCollection.getPrimaryPrincipal();
        // 声明角色集合
        List<String> roles = null;
        // 声明权限集合
        List<String> permissions = null;
        // 判断该角色是否是管理员
        if (employee.getAdmin()) {
            // 是管理员,增加所有权限
            permissions = new ArrayList<>();
            roles = new ArrayList<>();
            // 获取所有权限
            permissions.add("*:*");
        } else {
            // 查询该员工所拥有的角色集合
            roles = employeeService.getRoleByEmployeeId(employee.getId());
            // 查询该员工所有的权限集合
            permissions = employeeService.getPermissionByEmployeeId(employee.getId());
        }
        // 添加授权信息
        SimpleAuthorizationInfo info = new SimpleAuthorizationInfo();
        info.addRoles(roles);
        info.addStringPermissions(permissions);
        return info;
    }
}
为了获取验证结果,我们需要配置form表单过滤器
package com.yang.web.filter;

import com.fasterxml.jackson.databind.ObjectMapper;
import com.yang.domain.AjaxRes;
import org.apache.shiro.authc.AuthenticationException;
import org.apache.shiro.authc.AuthenticationToken;
import org.apache.shiro.authc.IncorrectCredentialsException;
import org.apache.shiro.authc.UnknownAccountException;
import org.apache.shiro.subject.Subject;
import org.apache.shiro.web.filter.authc.FormAuthenticationFilter;

import javax.servlet.ServletRequest;
import javax.servlet.ServletResponse;
import java.io.IOException;

/**
 * 这个等登陆成功会调用,为了通知web,在这里面重写方法,重写表单监听的过滤器成功以及失败的方法
 */
public class FormFilter extends FormAuthenticationFilter {
    /*当认证成功的时候,会进行调用*/
    protected boolean onLoginSuccess(AuthenticationToken token, Subject subject, ServletRequest request, ServletResponse response) throws Exception {
        System.out.println(subject);
        // 因为回传信息包含中文,先设置字节码
        response.setCharacterEncoding("utf-8");
        AjaxRes ajaxRes = new AjaxRes();
        ajaxRes.setSuccess(true);
        ajaxRes.setMsg("登陆成功!");
        // 把对象转化为json字符串
        String resString = new ObjectMapper().writeValueAsString(ajaxRes);

        // 将字符串写入响应对象
        response.getWriter().print(resString);
        // return false 才会往下走,否则就组织了
        return false;
    }

    /*当认证失败的时候,就会调用,e就是抛出异常*/
    protected boolean onLoginFailure(AuthenticationToken token, AuthenticationException e, ServletRequest request, ServletResponse response) {

        // 设置响应数据
        AjaxRes ajaxRes = new AjaxRes();
        ajaxRes.setSuccess(false);
        if (e != null) {
            // 获取异常类的名称
            String name = e.getClass().getName();
            // 没有账号
            if (name.equals(UnknownAccountException.class.getName())) {
                ajaxRes.setMsg("账号不正确");
            } else if (name.equals(IncorrectCredentialsException.class.getName())) {
                ajaxRes.setMsg("密码不正确");  // 密码有误异常
            } else {
                ajaxRes.setMsg("不确认错误");  // 其他错误
            }
        }
        // 序列化返回结果并且放置到响应对象中
        try {
            String resString = new ObjectMapper().writeValueAsString(ajaxRes);
            response.setCharacterEncoding("utf-8");
            response.getWriter().print(resString);
        } catch (IOException ex) {
            ex.printStackTrace();
        }
        System.out.println(ajaxRes.getMsg());
        // return false 才会往下走,否则就阻止了
        // return true;  // 默认是返回true
        return false;
    }
}
同时对于授权的使用,前端
<shiro:hasPermission name="employee:add">
        <a href="#" class="easyui-linkbutton" data-options="iconCls:‘icon-add‘,plain:true" id="add">添加</a>
    </shiro:hasPermission>
后端
    /*编辑员工*/
    @RequestMapping("/employee/update")
    @ResponseBody
    @RequiresPermissions("employee:update")  // 配置权限
    public AjaxRes employeeUpdate(Employee employee){
        return employeeService.updateEmployee(employee);
    }
为了处理异常,比如没有权限。一般在该类下写一个方法捕捉异常并处理
    /*
        设置异常处理
        参数method就是发生异常的方法
    */
    @ExceptionHandler(AuthorizationException.class)
    public void handleShiroException(HandlerMethod method, HttpServletResponse response)throws Exception{
        /*如果授权异常,则跳转授权页面*/
        // 获取异常方法中的是否是json请求
        ResponseBody methodAnnotation = method.getMethodAnnotation(ResponseBody.class);
        if(methodAnnotation != null){
            // 这个就是ajax的请求
            AjaxRes ajaxRes = new AjaxRes();
            ajaxRes.setSuccess(false);
            ajaxRes.setMsg("没有权限操作");
            String res = new ObjectMapper().writeValueAsString(ajaxRes);
            response.setCharacterEncoding("utf-8");
            response.getWriter().print(res);
        }else{
            response.sendRedirect("error-permission.jsp");
        }
    }
标签:prope character write 并发 oge img 表单 配置文件 service
原文地址:https://www.cnblogs.com/yangshixiong/p/12307098.html