标签:dba 照片 编写 turn 端口 not etc add 预处理
JDBC
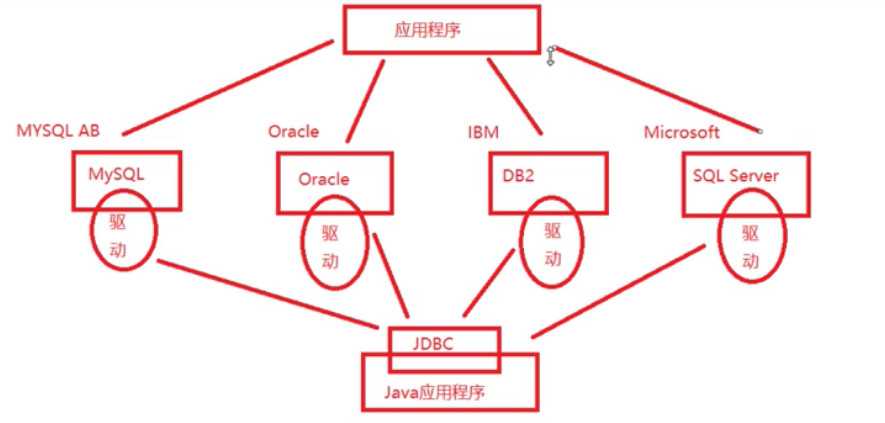
一、概述:JDBC(java database connection),使用java语言连接数据库,是java提供一套操作数据库的接口(标准),实现对数据库的统一访问,是一个java引用应用程序与数据库交互的桥梁。
二、组成:
DriverManager类:驱动管理类,用户注册驱动,获取连接对象
Connection接口:数据库的连接对象
Statement接口:执行SQL语句,操作数据
PreparedStatement接口:执行SQL语句,操作数据
ResultSet接口:接收SQL查询结果(一张虚拟的表)

三、通过JDBC实现Query操作
第一步:在数据库中创建数据库、新建表等一系列操作。
第二步:在myeclipse中新建Web Project,创建与数据库中数据表相对应的实体类
第三步:引入数据库厂商提供的数据库对应的驱动包(.jar格式...)到项目文件夹中的WebContent/WEB INF/lib/
第四步:写代码
使用JDBC访问数据库的步骤:
1.加载数据库驱动(推荐方式二)
import java.sql.DriverManager;
方式一:DriverManager.registerDriver(new com.mysql.jdbc.Driver());//不推荐
方式二:Class.forName("驱动类全称:包名+类名"); //通过反射加载驱动,此处JDBC4.0后自动加载,可不用写,但建议写。
Class.forName("com.mysql.jdbc.Driver");
2.获取数据库的连接对象(三种方式)
import java.sql.Connection;
Connection conn = DriverManager.getConnection("url","user","password");
url:1)统一资源定位符,标识网络上的一个具体资源(一个网页,一张照片,一个视频等)
2)url格式是 协议+ip地址+端口+资源名称
jdbc:mysql :// localhost : 3306 / 数据库名称
jdbc:mysql :// 127.0.0.1 : 3306 / 数据库名称
jdbc:mysql :/// 数据库名称 (此种写法默认本机)
user:数据库用户名
password:数据库用户密码
Connection conn = DriverManager.getConnection("Path");//path等于url+user+password
path:jdbc:mysql://localhost:3306/数据库名称?user = ...&password = ...
Connection conn = DriverManager.getConnection("url",properties);
properties:属性对象
Properties p = new Properties();
p.setProperty("user","...");
p.setProperty("password","...");
3.编写SQL语句
import java.sql.Statement;
import java.sql.ResultSet;
1)获取SQL语句对象
Statement st = conn.CreateStatement();
2)执行SQL语句,返回结果
ResultSet rs = st.executeQuery("select * from student");//执行查询SQL语句,将查询结果返回到结果集中
String sql = "delete ....";
int num = st.executeUpdate(sql);//执行更新(增删改)SQL语句,返回的是int型的成功执行语句条数
4.处理结果集
方式一:不建议使用
while(rs.next()){//next()获取的一张表的一行,也称一条记录
Object id = rs.getObject(1);//获取的是一张表的第一列,也称一个字段
Object name = rs.getObject(2);//第二列
Object age = rs.getObject(3);//第三列
}
方式二:方法中的参数名称需要和数据表中的字段名称一致,并且建议创建数据库中数据表的字段时不要使用中文!!!
while(rs.next()){//next()获取的一张表的一行,也称一条记录
int id = rs.getInt("学号");//获取的是一张表的第一列,也称一个字段
String name = rs.getString("姓名");//第二列
int age = rs.getInt("年龄");//第三列
//如果数据库中的Date类型,建议使用String接收
}
5.释放连接资源。
import java.sql.SQLException;
finally{ //finally意思是在结尾无论前面发生了啥,程序总会执行这段代码
if(conn != null){
try{ conn.close();
}catch(SQLException e){
e.printStackTrace();
}}
if(st != null){
try{ st.close();
}catch(SQLException e){
e.printStackTrace();
} }
if(rs != null){
try{ rs.close();
}catch(SQLException e){
e.printStackTrace();
} }//所有对象通通关闭
}
四、注意:
1.JDBC使用Statement会存在数据库注入问题,因此需用PrepareStatement对象来解决
String username = "1‘ or 1 = ‘1‘";//设用户名
String password = "1‘ or 1 = ‘1‘";//设密码
PrepareStatement pre = conn.prepareStatement("select * from student where username = ? and password = ?");//将SQL语句进行预处理,采用问号占位符的形式
pre.setString(1,username);//给第一个问号的位置赋值
pre.setString(2,password);//给第二个问号的位置赋值
ResultSet rs = pre.executeQuery();//执行赋值后的SQL语句
五、封装并调用JDBC工具类
封装工具类的代码:
 1 public class JDBCfunction{
 2       //静态块 优先执行,并且只执行一次
 3      static{
 4           try{
 5                //加载驱动
 6                Class.forName("com.mysql.jdbc.Driver");
 7            }catch(ClassNotFoundExcption e){
 8                 e.printStackTrack();
 9            }
10       }
11       //连接对象
12       public static Connection getConnection(){
13             Connection conn = null;
14             try{
15                  conn = getConnection("jdbc:mysql://localhost:3306/databasename","username","password");
16             }catch(SQLExcption e){
17                  e.printStackTrack();
18            }
19            return conn;
20       }
21       //释放连接资源
22       public static void close(Connection conn,Statement st,ResultSet rs){
23             if(conn != null){
24                   try{
25                      conn.close();
26                   }catch(SQLExcption e){
27                       e.printStackTrack();
28                   }
29             }
30             if(st != null){
31                   try{
32                      st.close();
33                   }catch(SQLExcption e){
34                       e.printStackTrack();
35                   }
36             }
37             if(rs != null){
38                   try{
39                      rs.close();
40                   }catch(SQLExcption e){
41                       e.printStackTrack();
42                   }
43             }
44       }
45 }
调用工具类的代码:(使用时需导入Import JDBCfunction所在的文件包)
 1 public class UseJDBCfunction(){
 2       public static void main(String[] args) throws SQLException{
 3             //加载驱动,建立连接
 4             Connection conn = JDBCfunction.getConnection();
 5             //创建预处理对象
 6             PrepareStatement pre = conn.prepareStatement("select * from student");
 7             //查询
 8             ResultSet rs = pre.executeQuery();
 9             //遍历输出
10             while(rs.next()){
11                    int uid = rs.getInt("uid");
12                    String username = rs.getString("username");
13                    String password = rs.getString("password");
14                    User user = new User(uid,username,password);
15                    System.out.println(user);
16             }
17             //释放资源
18             JDBCfunction.close(conn,pre,rs);
19       }
20 }
六、JDBC批量操作
1.jdbc设置事务自动提交,处理异常
在连接对象conn与数据库通过用户名和密码建立连接了之后,如果后续操作有catch异常,则不让其conn对象最终对数据库进行修改。
conn.setAutoCommit(false);//设置事务是否自动提交,默认为ture,自动提交。
conn.commit();//立即提交事务,对数据库进行修改。
conn.rollback();//如果异常,事务回滚
 1 public class UseJDBCfunction(){
 2         public static void main(String[] args) throws SQLException{
 3               Connection conn = null;
 4               PrepareStatement pre = null;
 5               try{
 6                   //加载驱动,建立连接
 7                   conn = JDBCfunction.getConnection();
 8                   conn.setAutoCommit(false);//禁止自动提交事务
 9                   //创建预处理对象
10                   pre = conn.prepareStatement("insert into user(username,password) value(?,?)");
11                   pre.setString(1,"xiaoming");
12                   pre.setString(2,"123");
13                   //更新
14                   int update = pre.executeUpdate();
15                   if(update > 0){
16                         System.out.println("添加成功");
17                         conn.commit();//提交事务
18                   }
19              }catch(SQLException e){
20                     e.printTrackTrace();
21                     try{
22                          conn.rollback();//出现异常,事务回滚
23                      }catch(SQLException e){
24                          e.printTrackTrace();26                      }
27             }
28              //释放资源
29              JDBCfunction.close(conn,pre,rs);
30        }
31  }
2.jdbc批量添加
在给预处理对象赋值时,采用pre.addBatch();的方式,对数据库语句中的问号进行批量添加操作
 1 public class UseJDBCfunction(){
 2         public static void main(String[] args) throws SQLException{
 3               Connection conn = null;
 4               PrepareStatement pre = null;
 5               try{
 6                   //加载驱动,建立连接
 7                   conn = JDBCfunction.getConnection();
 8                   conn.setAutoCommit(false);//禁止自动提交事务
 9                   //创建预处理对象
10                   pre = conn.prepareStatement("insert into user(username,password) value(?,?)");
11                   pre.addBatch();
12                   pre.setString(1,"m1");
13                   pre.setString(2,"123");
14
15                   pre.addBatch();
16                   pre.setString(1,"m2");
17                   pre.setString(2,"1234");
18
19                   pre.addBatch();
20                   pre.setString(1,"m3");
21                   pre.setString(2,"12345");
22                   //......
23
24                   //更新(这是没用批量操作的写法)
25                   //int update = pre.executeUpdate();
26                   //更新(用批量操作的写法,返回的是一个数组,因为数据库添加了多条数据)
27                   int[]  executeBatch = pre.executebatch();
28                   if(executeBatch.length > 0){
29                         System.out.println("添加成功");
30                         conn.commit();//提交事务
31                   }
32              }catch(SQLException e){
33                     e.printTrackTrace();
34                     try{
35                          conn.rollback();//出现异常,事务回滚
36                      }catch(SQLException e){
37                          e.printTrackTrace();26                      }
38             }
39              //释放资源
40              JDBCfunction.close(conn,pre,rs);
41        }
42  }

标签:dba 照片 编写 turn 端口 not etc add 预处理
原文地址:https://www.cnblogs.com/qinqin-me/p/12293613.html