标签:操作 syntax ++ select conf bytes 查看 bsp 设置
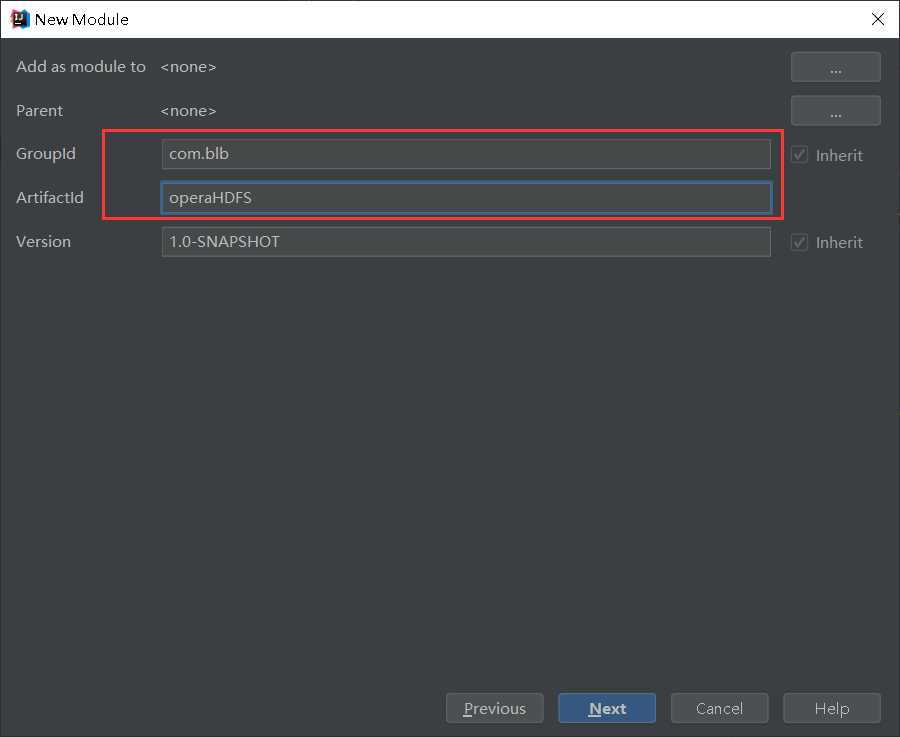
创建的是maven项目,操作linux环境
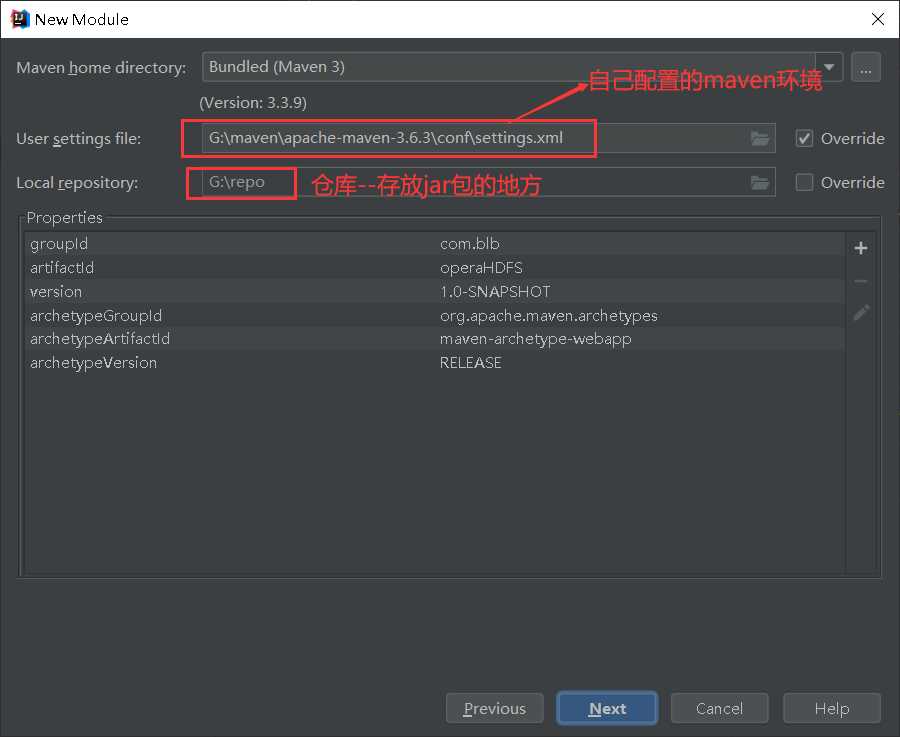
首先需要配置好Maven环境,如果下载jar包下的慢,可以将镜像站换为阿里云的镜像【配置maven环境参考:...............(待完成)】
准备工作完成即可开始编写代码

pom.xml中所使用到的jar包【自行去maven仓库找jar包,认准下载量最多的。https://mvnrepository.com/】
如果网站加载的太慢,可以去阿里云的maven仓库找:https://maven.aliyun.com/
hadoop-common,hadoop-hdfs,hadoop-client【3个版本保持一致】
 1   <dependencies>
 2     <!--测试用-->
 3     <dependency>
 4       <groupId>junit</groupId>
 5       <artifactId>junit</artifactId>
 6       <version>4.11</version>
 7       <scope>test</scope>
 8     </dependency>
 9     <!--COMMON是hadoop一切的核心,不是具体的功能,操作HDFS需要导入COMMON的依赖-->
10     <!-- https://mvnrepository.com/artifact/org.apache.hadoop/hadoop-common -->
11     <dependency>
12       <groupId>org.apache.hadoop</groupId>
13       <artifactId>hadoop-common</artifactId>
14       <version>2.7.3</version>
15     </dependency>
16     <!--hadoop也是基于客户端服务器的-->
17     <!-- https://mvnrepository.com/artifact/org.apache.hadoop/hadoop-client -->
18     <dependency>
19       <groupId>org.apache.hadoop</groupId>
20       <artifactId>hadoop-client</artifactId>
21       <version>2.7.3</version>
22     </dependency>
23     <!--操作MapReduce需要HDFS的依赖-->
24     <!-- https://mvnrepository.com/artifact/org.apache.hadoop/hadoop-hdfs -->
25     <dependency>
26       <groupId>org.apache.hadoop</groupId>
27       <artifactId>hadoop-hdfs</artifactId>
28       <version>2.7.3</version>
29     </dependency>
30   </dependencies>
    //连接HDFS
    @Test //测试
    public void connectHDFS(){
        //先添加一个配置文件--和core-site.xml的配置一样[相当于服务器的端口]
        Configuration conf = new Configuration();
        //配置服务器的地址和端口
        conf.set("fs.defaultFS","hdfs://192.168.0.10:9000");
        try {
            //加载我们的配置文件,然后连接到服务上去【前提,hadoop的环境配好,启动起来】
            FileSystem fileSystem = FileSystem.get(conf);
            //如何判断是否已经连上?
            //getFileStatus是获取当前某个路径的状态
            FileStatus status = fileSystem.getFileStatus(new Path("/test.txt"));
            System.out.println(status.isFile()); //判断是不是一个文件
            System.out.println(status.isDirectory()); //判断是不是一个目录
            System.out.println(status.getPath()); //获取文件的路径
            System.out.println(status.getLen()); //获取文件的大小
            //关闭连接
            fileSystem.close();
        } catch (IOException e) {
            e.printStackTrace();
        }
    }
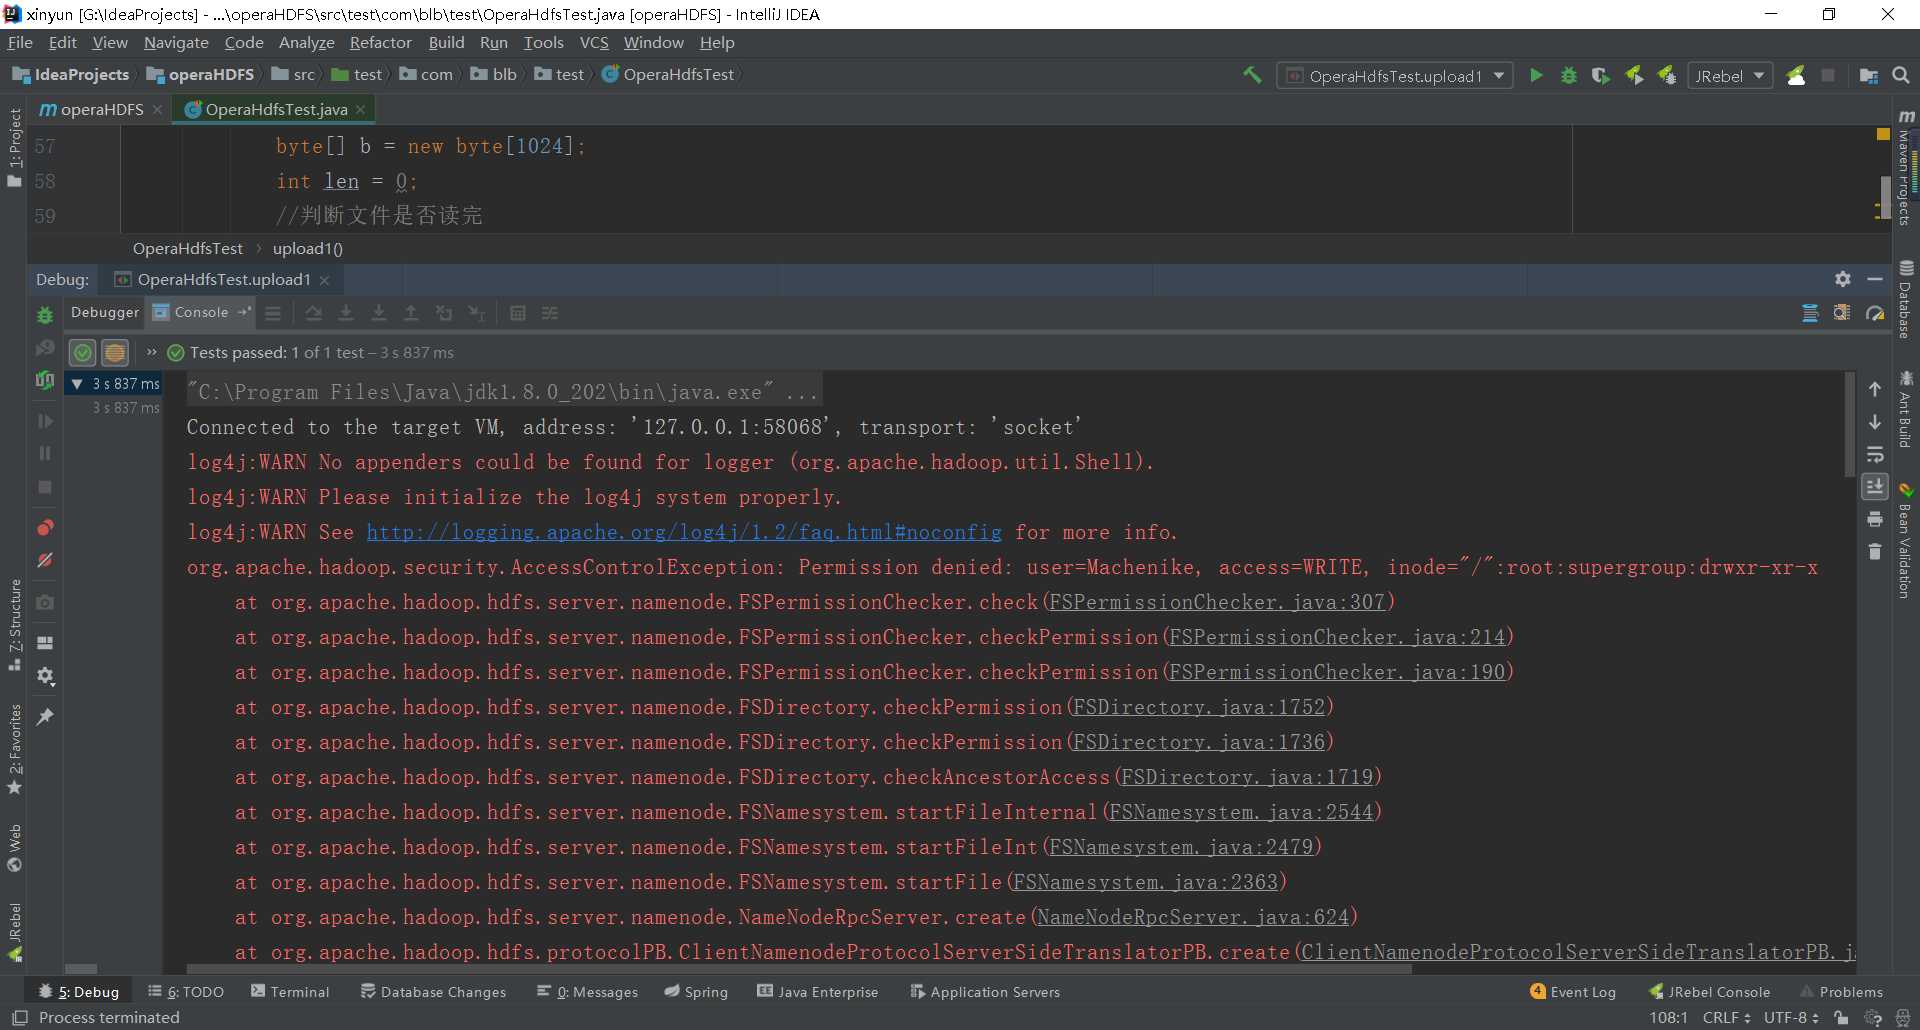
    //上传文件到HDFS
    @Test //测试
    public void  upload1(){
        //添加配置文件
        Configuration conf = new Configuration();
        //如果报一个错误:
        //user=Machenike, access=WRITE, inode="/":root:supergroup:drwxr-xr-x
        //解决1:直接添加System.setProperty("HADOOP_USER_NAME", "root"); 设置为root用户
        //解决2:在环境变量中添加 HADOOP_USER_NAME 值为root
        System.setProperty("HADOOP_USER_NAME", "root");
        try {
            //加载配置文件
            FileSystem fileSystem = FileSystem.get(new URI("hdfs://192.168.0.10:9000"), conf);
            //获取一个输出流
            FSDataOutputStream out = fileSystem.create(new Path("/upload.txt"));
            //获取本地文件的一个输入流
            FileInputStream in = new FileInputStream(new File("F:\\upload.txt"));
            //先定义一个byte类型的数组,数组长度1024
            //该数组的大小表示每次从文件中读取出来的数据量
            byte[] b = new byte[1024];
            int len = 0;
            //判断文件是否读完
            while((len=in.read(b))!=-1){
                //对这些数据量进行输出
                //b-表示要写的数据,0-表示从0开始,len-表示写的字节数
                out.write(b,0,len);
            }
            //将输入流和输出流关闭
            in.close();
            out.close();
        } catch (IOException e) {
            e.printStackTrace();
        } catch (URISyntaxException e) {
            e.printStackTrace();
        }
    }

    //文件上传方式2-直接使用hadoop提供的一个工具类IOUtils
    @Test //测试
    public void  upload2(){
        //添加配置文件
        Configuration conf = new Configuration();
        try {
            //加载配置文件
            FileSystem fileSystem = FileSystem.get(new URI("hdfs://192.168.0.10:9000"), conf);
            //获取一个输出流
            FSDataOutputStream out = fileSystem.create(new Path("/upload1.txt"));
            //获取本地文件的一个输入流
            FileInputStream in = new FileInputStream(new File("F:\\upload.txt"));
            //执行上传操作
            IOUtils.copyBytes(in,out,conf);
        } catch (IOException e) {
            e.printStackTrace();
        } catch (URISyntaxException e) {
            e.printStackTrace();
        }
    }
可能会遇到如下错误:如何解决?
解决办法:
1.直接在代码中设置属性->System.setProperty("HADOOP_USER_NAME", "root");
2.在环境变量中添加HADOOP_USER_NAME 值为root即可【如果不行,重启idea,再不行就重启电脑就OK了】
    //文件下载
    @Test
    public void download(){
        //添加配置文件
        Configuration conf = new Configuration();
        try {
            //加载配置文件
            FileSystem fileSystem = FileSystem.get(new URI("hdfs://192.168.0.10:9000"), conf);
            //获取输入流的数据
            FSDataInputStream in = fileSystem.open(new Path("/upload.txt"));
            //获取本地文件的输出流
            FileOutputStream out = new FileOutputStream(new File("F:\\download.txt"));

            //下载的方式同样有两种【下载就是拷贝】
            //方式1:工具类操作
//            IOUtils.copyBytes(in,out,conf);

            //方式2:
            byte[] b = new byte[1024];
            int len = 0;
            while((len=in.read(b))!=-1){
                out.write(b,0,len);
            }

            //关闭连接
            in.close();
            out.close();
        } catch (IOException e) {
            e.printStackTrace();
        } catch (URISyntaxException e) {
            e.printStackTrace();
        }
    }
    //重命名
    @Test //测试
    public void rename(){
        //添加配置文件
        Configuration conf = new Configuration();
        try {
            //加载配置文件
            FileSystem fileSystem = FileSystem.get(new URI("hdfs://192.168.0.10:9000"), conf);
            //重命名
            boolean rename = fileSystem.rename(new Path("/upload.txt"), new Path("/upload3.txt"));
            System.out.println(rename?"修改成功":"修改失败");
        } catch (IOException e) {
            e.printStackTrace();
        } catch (URISyntaxException e) {
            e.printStackTrace();
        }
    }
    //创建文件夹
    @Test //测试
    public void mkdirs(){
        //添加配置文件
        Configuration conf = new Configuration();
        try {
            //加载配置文件
            FileSystem fileSystem = FileSystem.get(new URI("hdfs://192.168.0.10:9000"), conf);
            //创建多级目录
            boolean mkdirs = fileSystem.mkdirs(new Path("/test/test1/hello.txt"));
            System.out.println(mkdirs?"城建成功":"创建失败");
        } catch (IOException e) {
            e.printStackTrace();
        } catch (URISyntaxException e) {
            e.printStackTrace();
        }
    }
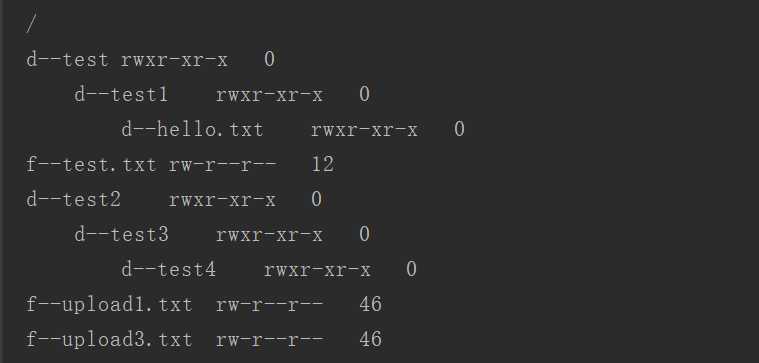
    //查看所有文件夹
    @Test //测试
    public void selectAll(){
        //添加配置文件
        Configuration conf = new Configuration();
        try {
            //加载配置文件
            FileSystem fileSystem = FileSystem.get(new URI("hdfs://192.168.0.10:9000"), conf);
            //查询该路径下所有的文件信息
            FileStatus[] status = fileSystem.listStatus(new Path("/"));
            //遍历所有的文件的状态
            System.out.println("/");
            for (FileStatus f:status){
                //判断是否是文件
                //f.getPath().getName() 获取文件或文件夹的名字
                //f.getPermission() 获取文件或文件夹的权限
                //f.getLen() 获取文件或文件夹的大小
                if (f.isFile()){
                    System.out.println("f--"+f.getPath().getName()+"\t"+f.getPermission()+"\t"+f.getLen());
                }else{
                    System.out.println("d--"+f.getPath().getName()+"\t"+f.getPermission()+"\t"+f.getLen());
                    getNodes(f.getPath().getName(), 1);
                }
            }
        } catch (IOException e) {
            e.printStackTrace();
        } catch (URISyntaxException e) {
            e.printStackTrace();
        }
    }

    //递归遍历出所有的文件和文件夹【index主要就是为了打印出来的好看些,强迫症】
    public void getNodes(String dir, int index){
        //添加配置文件
        Configuration conf = new Configuration();
        try {
            //加载配置文件
            FileSystem fileSystem = FileSystem.get(new URI("hdfs://192.168.0.10:9000"), conf);
            //得到之后新目录的绝对路径
            String path = "/"+dir;
            //使其具有层次感的制表符
            String tab = "\t";
            if(index > 1){
                for(int i = 1; i < index; i++){
                    tab += "\t";
                }
            }
            //获取该路径下的所有文件信息
            FileStatus[] status = fileSystem.listStatus(new Path(path));
            //设置让其退出的条件【如果该路径下没有文件或文件夹即退出】
            if(status.length==0){
                return;
            }
            //遍历所有的文件信息
            for (FileStatus f : status){
                if (f.isFile()){
                    System.out.println(tab+"f--"+f.getPath().getName()+"\t"+f.getPermission()+"\t"+f.getLen());
                }else{
                    System.out.println(tab+"d--"+f.getPath().getName()+"\t"+f.getPermission()+"\t"+f.getLen());
                    getNodes(dir +"/"+f.getPath().getName(), index +1);
                }
            }
        } catch (IOException e) {
            e.printStackTrace();
        } catch (URISyntaxException e) {
            e.printStackTrace();
        }
    }
结果如下:
需要自己导入jar包。jar包如何找?【将hadoop-2.7.7.tar.gz包解压即可】
jar包 -- 操作hdfs,需要导入Common下的jar包
share/hadoop/common/lib下面作者引用别人的jar包
share/hadoop/common下面自己写的jar包
-- 操作MapReduce,还需要导入HDFS下的jar包
share/hadoop/hdfs/lib 下面作者引用别人的jar包
share/hadoop/hdfs 下面作者自己写的包
代码部分和idea一样的操作
标签:操作 syntax ++ select conf bytes 查看 bsp 设置
原文地址:https://www.cnblogs.com/IT_CH/p/12344968.html