标签:des style http io ar os 使用 for sp
文件的调用顺序为isolinux/vmlinuz--->isolinux/initrd.img--->/init--->/sbin/loader--->imagaes/install.img--->/usr/bin/anaconda。以最新的Fedora 15使用的Anaconda 15.31版本号为例(注意RHEL 6.0使用的是比这老的版本号,为了跟踪前沿,这里使用比較新的版本号),Anaconda主程序的启动流程例如以下:
/init (loader/init.c)
	--->setupEnv()		环境变量设置
	--->mount("/proc", "/proc", "proc",...)		挂载/proc文件系统
	--->mount("/dev", "/dev", "tmpfs",...)		创建/dev文件系统
	--->execl("/sbin/udevd", "/sbin/udevd",...)		启动udev
	--->mount("/sys", "/sys", "sysfs",...)		挂载/sys文件系统
	--->open("/dev/console", O_WRONLY)		打开控制台设备
	--->open("/dev/tty1", O_RDWR, 0)		打开tty1控制台,用于执行安装
	--->禁用Ctrl+Z、Ctrl+C等
	--->mount("/", "/", "ext2",...)		尝试又一次挂载rootfs
	--->mount("none", "/tmp", "tmpfs",...)		挂载/tmp文件系统
	--->execve("/sbin/loader", argvc, env)	  依据选项參数执行loader程序,替换init进程

/sbin/loader (loader/loader.c:main())
	--->解析执行loader的选项參数
	--->pyanaconda/isys/log.c:openLog()		打开log
		--->fopen("/dev/tty3","a")		在tty3上显示硬件相关消息
		--->fopen("/tmp/anaconda.log", "a")
		--->fopen("/tmp/program.log", "a")
	--->loader.c:parseCmdLineFlags()	解析/proc/cmdline中的内核命令行參数,以获取ks文件的nfs路径
		--->readNetInfo()		读取/tmp/s390net文件里的网络配置信息(假设存在的话)
	--->driverdisk.c:readModuleInfo(arg, modInfo,...)		读取/lib/modules/module-info中的模块信息
	--->loader.c:checkForRam(-1)		检查内存容量是否足够
		--->pyanaconda/isys/mem.c:totalMemory()
			--->open("/proc/meminfo", O_RDONLY)	获取meminfo中"MemTotal"一行中的数据(kB为单位)
	--->loader.c:loadScsiDhModules()	载入SCSI模块
					(读取/lib/modules/<ver>/kernel/drivers/scsi/device_handler/下的模块)
		--->modules.c:mlLoadModuleSet(modNames)		载入用:分隔的模块列表
			--->modules.c:_doLoadModule()
	--->modules.c:mlSaveModuleState()		保存预载入的模块状态
		--->modules.c:processModuleLines()		一行一行地处理每一个模块
			--->fopen("/proc/modules", "r")		读取/proc/modules中的全部模块信息
			--->modules.c:cb_savestate()		保存当前模块状态
	--->hardware.c:busProbe()		探測总线以载入全部知道的硬件设备
		--->hardware.c:detectHardware()
			-->execv("/sbin/udevadm", args)		执行udevadm来载入设备
	--->driverdisk.c:loadDriverDiskFromPartition()	  载入自己主动检測到的第三方Driver Disk(假设有的话)
		--->loadDriverDisk(loaderData, "/tmp/drivers")		载入DD
	--->pyanaconda/isys/iface_start_NetworkManager()		启动NetworkManager
		--->execl(NETWORKMANAGER, NETWORKMANAGER,...)
	--->kickstart.c:getKickstartFile(&loaderData)		获取Kickstart文件并拷贝到/tmp/ks.cfg
        	################################### NFS 方式 #####################################
		--->nfsinstall.c:kickstartFromNfs(c+4, loaderData)		从NFS获取ks文件
			--->nfsinstall.c:getFileFromNfs()
				--->net.c:kickstartNetworkUp()		启动网卡
				--->pyanaconda/isys/iface.c:iface_ip2str()		获取系统IP
				--->nfsinstall.c:parseNfsHostPathOpts()		解析NFS的url路径
				--->拷贝kickstart文件到本地
        	################################## CD 方式 #######################################
		--->cdinstall.c:kickstartFromCD()		从光盘上获取ks文件ks.cfg
			--->kickstart.c:getKickstartFromBlockDevice()
				--->method.c:getFileFromBlockDevice()
					--->pyanaconda/isys/imount.c:doPwMount()	挂载光盘
						--->pyanaconda/isys/imount.c:mountCommandWrapper()
							--->execl("/bin/mount",...)
       	 	######################################################################################
	--->kickstart.c:runKickstart()		执行Kickstart
		--->导入一些python库,如pykickstart.parser
		--->getObject()		创建KickstartParser对象
		--->preprocessKickstart()  预处理,执行与pykickstart.parser.preprocessKickstart相似的任务
		--->readKickstart()
			-->PyObject_CallMethodObjArgs()	  处理kickstart文件,解析各个属性并设置到parser对象上
		--->处理Kickstart数据
			--->loadKickstartModule()		载入kickstart模块
			--->setKickstartNfs()		解析NFS路径中的主机IP、路径名、及选项參数
			--->setDisplayMode()		解析安装模式(文本、命令行、或图形模式)
			--->处理其它各项数据
	--->net.c:kickstartNetworkUp()		再次启动网卡
		--->chooseNetworkInterface(loaderData)		选择并启动可使用的网卡(假设有多个网卡)
		--->writeEnabledNetInfo()	把网卡信息写入/etc/tsysconfig/network-scripts/ifcfg-DEVICE
	--->loader.c:doLoaderMain()
		--->cdinstall.c:findInstallCD()		挂载光盘,载入images/install.img等(光盘安装情况)
			--->pyanaconda/isys/imount.c:doPwMount("/mnt/source","iso9660",...)
		--->STEP_LANG和STEP_KBD		设置安装语言和键映射(若从CD/DVD安装则跳过这两步)
			--->lang.c:setLanguage()和pyanaconda/isys/lang.c:isysLoadKeymap()
		--->STEP_METHOD和STEP_DRIVER等	  命令行模式下设置安装方法、驱动等(若为图形安装模式则跳过)
	--->selinux.c:loadpolicy()		载入SELinux策略
		--->execl("/sbin/load_policy",...)
	--->loader.c:spawnShell()		在tty2上打开Shell,这样在安装时可在tty2上登录
		--->open("/dev/tty2",...)
		--->execl("/bin/sh",...)
	--->execv(anacondaArgs[0], anacondaArgs)	開始执行/usr/bin/anaconda,替换当前进程
执行到/usr/bin/anaconda,就是安装程序的主体了,这是一个python脚本。可见/init程序会初始化console,/dev文件系统,mount对应的文件夹等等。然后调用loader程序,就開始了安装过程。loader程序中会打开log、进行network interface的配置等相关工作,假设指定了网络上的kickstart文件,他也会下载下来保存为/tmp/ks.cfg ,然后从kickstart配置文件里获取到install.img所在的位置(如光盘或者NFS上)。假设install.img是在光盘上的话,会被挂载到/mnt/source文件夹下。
install.img里面的anaconda程序执行所须要的非常多python支持库、*.so文件等也都是在这时mount过来,通常是拷贝到/lib 文件夹下,然后配置好LD_LIBRARY_PATH环境变量,这样主安装程序执行时候就能够找到库了。当然硬盘也会被mount到一个文件夹下,这样安装程序才干把OS文件及各个软件包都写到这个文件夹去。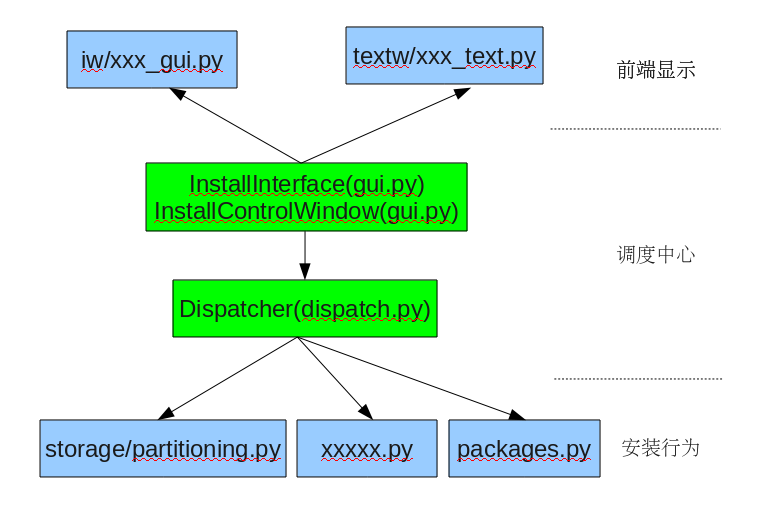
installSteps = [
    ("language", ),
    ("keyboard", ),
    ("betanag", betaNagScreen, ),
    ("filtertype", ),
    ("filter", ),
    ("storageinit", storageInitialize, ),
    ("findrootparts", findRootParts, ),
    ("findinstall", ),
    ("network", ),
    ("timezone", ),
    ("accounts", ),
    ("setuptime", setupTimezone, ),
    ("parttype", ),
    ("cleardiskssel", ),
    ("autopartitionexecute", doAutoPartition, ),
    ("partition", ),
    ("upgrademount", upgradeMountFilesystems, ),
    ("restoretime", restoreTime, ),
    ("upgradecontinue", queryUpgradeContinue, ),
    ("upgradeswapsuggestion", upgradeSwapSuggestion, ),

    # ......

    ]
installSteps中记录了有序排列的整个安装过程中全部可能的安装步骤,在生成详细的Dispatcher实例时,会依据安装类型制定对此进行对应裁减。installSteps中的条目(item)有两种格式,即( name )或( name, Function )。name代表安装步骤的名称,Function指安装操作的详细运行函数,这个函数会直接由Dispatcher调用。全部的安装步骤都把anaconda对象作为唯一的參数,当我们调用这个Function时,这个參数就会传进去。def doAutoPartition(anaconda):
# ......
if anaconda.storage.doAutoPart:
(disks, devs) = _createFreeSpacePartitions(anaconda)
if disks == []:
if anaconda.ksdata:
msg = _("Could not find enough free space for automatic "
"partitioning. Press ‘OK‘ to exit the installer.")
else:
msg = _("Could not find enough free space for automatic "
"partitioning, please use another partitioning method.")
anaconda.intf.messageWindow(_("Error Partitioning"), msg,
custom_icon=‘error‘)
if anaconda.ksdata:
sys.exit(0)
anaconda.storage.reset()
return DISPATCH_BACK
_schedulePartitions(anaconda, disks)
# sanity check the individual devices
log.warning("not sanity checking devices because I don‘t know how yet")
# run the autopart function to allocate and grow partitions
try:
doPartitioning(anaconda.storage
if anaconda.storage.doAutoPart:
_scheduleLVs(anaconda, devs)
# grow LVs
growLVM(anaconda.storage)
except PartitioningWarning as msg:
if not anaconda.ksdata:
anaconda.intf.messageWindow(_("Warnings During Automatic "
"Partitioning"),
_("Following warnings occurred during automatic "
"partitioning:\n\n%s") % (msg,),
custom_icon=‘warning‘)
else:
log.warning(msg)
except PartitioningError as msg:
# restore drives to original state
anaconda.storage.reset()
if not anaconda.ksdata:
extra = ""
if anaconda.displayMode != "t":
anaconda.dispatch.skipStep("partition", skip = 0)
else:
extra = _("\n\nPress ‘OK‘ to exit the installer.")
anaconda.intf.messageWindow(_("Error Partitioning"),
_("Could not allocate requested partitions: \n\n"
"%(msg)s.%(extra)s") % {‘msg‘: msg, ‘extra‘: extra},
custom_icon=‘error‘)
if anaconda.ksdata:
sys.exit(0)
else:
return DISPATCH_BACK
# now do a full check of the requests
(errors, warnings) = anaconda.storage.sanityCheck()
if warnings:
for warning in warnings:
log.warning(warning)
if errors:
errortxt = "\n".join(errors)
if anaconda.ksdata:
extra = _("\n\nPress ‘OK‘ to exit the installer.")
else:
extra = _("\n\nPress ‘OK‘ to choose a different partitioning option.")
anaconda.intf.messageWindow(_("Automatic Partitioning Errors"),
_("The following errors occurred with your "
"partitioning:\n\n%(errortxt)s\n\n"
"This can happen if there is not enough "
"space on your hard drive(s) for the "
"installation. %(extra)s")
% {‘errortxt‘: errortxt, ‘extra‘: extra},
custom_icon=‘error‘)
#
# XXX if in kickstart we reboot
#
if anaconda.ksdata:
anaconda.intf.messageWindow(_("Unrecoverable Error"),
_("The system will now reboot."))
sys.exit(0)
anaconda.storage.reset()
return DISPATCH_BACK 主要执行的步骤包含创建空暇分区,执行autopart分配或增长分区容量,分区完整性检查等。标签:des style http io ar os 使用 for sp
原文地址:http://www.cnblogs.com/bhlsheji/p/4073082.html