标签:new for 开始 过程 pyw fonts 固定 插入图片 current
? 在我们进行web页面开发的过程中,如何与用户进行友好、有趣的交互,是我们必须考虑的问题。 比如:导航条中滑动的动画特效、点击加入购物车按钮通过抛物线加入右侧购物车的动画特效,当然还有一些网页游戏的开发:微信打飞机、打砖块等。 那么我们要实现这些好玩又有趣的动画,就需要我们对动画的基础【运动】炉火纯青.

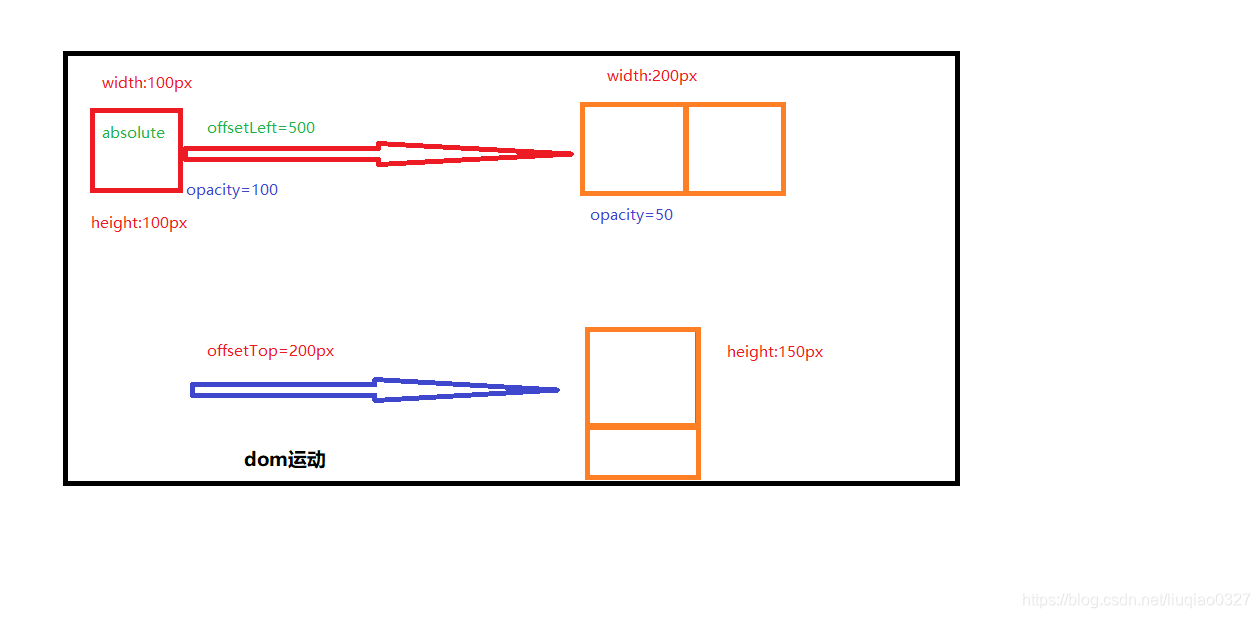
? 运动原理,其实从实际上来说,就是页面上的元素,在dom页上动起来,要想让元素动起来,那有哪些方式呢,比如我们通过改变元素自身的offsetLeft和offsetTop属性,以及,自身的宽高,上下左右的边距和透明度等等.动画的原理就是把不同的画面,通过一定的速度运转,串起来,形成动画,js动画也一样,不同状态的DOM,用定时器控制,就能得到动画效果.
? 方法:
? 1.运动的物体使用绝对定位
? 2.通过改变定位物体的属性(left、right、top、bottom)值来使物体移动。例如
? 向右或左移动可以使用offsetLeft (速度为负值可以控制向左移动)来控制左右移动。
? 步骤:
? 1、开始运动前,先清除已有定时器 (因为:是连续点击按钮,物体会运动越
? 来越快,造成运动混乱)
? 2、开启定时器,计算速度
? 3、把运动和停止隔开(if/else),判断停止条件,执行运动
? 
?
? 我这里直接用的是ES6的语法,虽然呢使用ES6的语法会带来一些IE的兼容性问题,但是呢,我这里只是对于运动的原理进行剖析.后面我会出一个兼容IE的封装好的运动框架.在接下来给大家展现的代码中,我会通过关键性的注释,给大家说清楚,讲明白,毕竟身为一个程序员,注释是非常有必要的,好了,话不多说了,直接撸代码了.那现在就来带着大家一起探究js运动.
       //新建一个运动的类
        class startMove {
            // 构造方法
            constructor(speed, node) {
                //固定速度,频率不变,进行匀速运动
                this.speed = speed;
                this.node = node;
            }

            //元素移动的方法
            move() {
                let timer = null;
                //删除上一个定时器,防止频繁操作按钮,使运动加速
                clearInterval(timer);
                //这里使用ES6语法中的箭头函数,不用考虑this指向的改变
                timer = setInterval(() => {
                    //元素移动到500像素的位置停止,即清除定时器
                    if (this.node.offsetLeft >= 500) {
                        clearInterval(timer);
                    } else {
                     //运动的元素,不断的增大offsetLeft值(前提是必须是有定位的属性)
                     this.node.style.left =this.node.offsetLeft +this.speed +'px';
                    }
                }, 30);
            }
        }

        let oDiv = document.querySelector("#div1");
        let oBtn = document.querySelector("#btn");
        oBtn.onclick = function () {
            //es6实例化对象,调用运动方法
            let sm = new startMove(7, oDiv);
            sm.move();
        }
上面呢我们使用ES6的语法做了一个初步认识运动的探究,总结一下:其实就是元素设置了定位属性的情况下,我们通过定时器,不断的去改变向左的距离,且是匀速运动,所以点击按钮代码运行起来就会看到,元素向右匀速在移动,在500像素的位置停了下来,当然500可以自由设置,说到这里,应该都明白js运动是怎么回事了吧,其实这就是运动.下面我通过一个分享到的菜单案例给大家延伸一下.
 <script>
        //注意,这个定时器变量一定要定义在类外,若定义在方法之类,定时器会互相影响
        let timer = null;
        //新建一个运动的类
        class startMove {
            // 构造方法
            constructor(speed, node) {
                //固定速度,匀速运动
                this.speed = speed;
                this.node = node;
            }

            //元素移动的方法
            move(target) {
                //当元素的offsetLeft值小于目标值的时候,速度为正值,否则为负值
                if (this.node.offsetLeft < target) {
                    this.speed = Math.abs(this.speed);
                } else {
                    this.speed = -Math.abs(this.speed);
                }

                //1、每次启动定时器,将上一次定时器关闭
                clearInterval(timer);
                timer = setInterval(() => {
                 //2、运动和停止分开
                 if (this.node.offsetLeft == target) {
                   clearInterval(timer);
                 } else {
                   this.node.style.left = this.node.offsetLeft + this.speed + 'px';
                 }
                }, 30);
            }
        }

        let oMenu = document.querySelector("#menu");

        let sm = new startMove(5, oMenu);

        // 当鼠标移入菜单上时
        oMenu.onmouseover = function () {
            sm.move(0);
        }
        // 当鼠标移出菜单时
        oMenu.onmouseout = function () {
            sm.move(-100);
        }

    </script>

    html:

    <div id='menu'>
        <span>分享到</span>
    </div>

    样式:
        #menu {
            width: 100px;
            height: 200px;
            background-color: gray;
            position: absolute;
            top: 300px;
            left: -100px;
        }

        #menu span {
            width: 20px;
            height: 60px;
            line-height: 20px;
            background-color: yellow;
            position: absolute;
            left: 100px;
            top: 70px;
        }
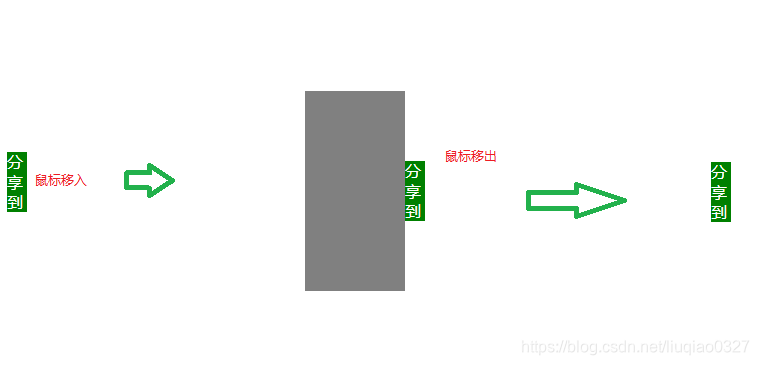
上面介绍的是一个我们在实际web应用中常用的一个分享到菜单的案例,最后的效果就是:默认情况下,会看到页面左侧有个"分享到"的菜单栏,当我们鼠标移入的时候,菜单内容出现,当鼠标移出的时候,菜单隐藏在侧边栏,这里的隐藏不是真正的display:none,而是我将绝对定位的left值改为了 -100,所以会有这种效果.其原理也是利用了通过定时器使元素匀速移动实现的.
? 那除了这种通过元素的移动来实现js运动的案例,我们还有常见的,淡入淡出效果,现在我们一起来揭晓一下.
 <script>
        //注意,这个定时器变量一定要定义在类外,若定义在方法之类,定时器会互相影响
        let timer = null;
        //新建一个运动的类
        class startMove {
            // 构造方法
            constructor(speed, node) {
                //固定速度,匀速运动
                this.speed = speed;
                this.node = node;
                //固定值设置为30,与默认图片一致
                this.alpha = 30;
            }

            //元素移动的方法(目标值,透明度)
            move(target) {
                clearInterval(timer);
                //根据目标值和固定透明度对比,判断速度的正负
                if (this.alpha  < target) {
                    this.speed = Math.abs(this.speed);
                }
                else {
                    this.speed = -Math.abs(this.speed);
                }

                /*
                *这里的淡入淡出虽然不是元素位置的改变,但是元素的属性变化
                *也是运动的一种,透明度的改变
                */
                timer = setInterval(() => {
                    //透明度到大目标值之后,关闭定时器
                    if (this.alpha == target) {
                        clearInterval(timer);
                    } else {
                        //累加透明度的值,直到等于目标值
                        this.alpha = this.alpha + this.speed;
                        //css中opacity值是0-1之间,所以除以100
                        this.node.style.opacity = this.alpha / 100;
                        //这里是兼容IE,虽然es6不兼容低版本的IE,但是这里还是做了兼容操作
                        this.node.style.filter = `alpha(opacity = ${this.alpha})`;
                    }
                }, 30);

            }
        }

        let oBox = document.querySelector(".box");

        let sm = new startMove(2, oBox);

        // 当鼠标移入图片时
        oBox.onmouseover = function () {
            sm.move(100);
        }
        // 当鼠标移出图片时
        oBox.onmouseout = function () {
            sm.move(30);
        }

    </script>

    html:
    <div class="box">
        <img src="images/yulian.jpeg" alt="">
    </div>

    css:
        .box {
            width: 640px;
            height: 359px;
            opacity: 0.3;
            filter: alpha(opacity=30);
            margin: 0 auto;
        }

        img {
            width: 100%;
            height: 100%;
        }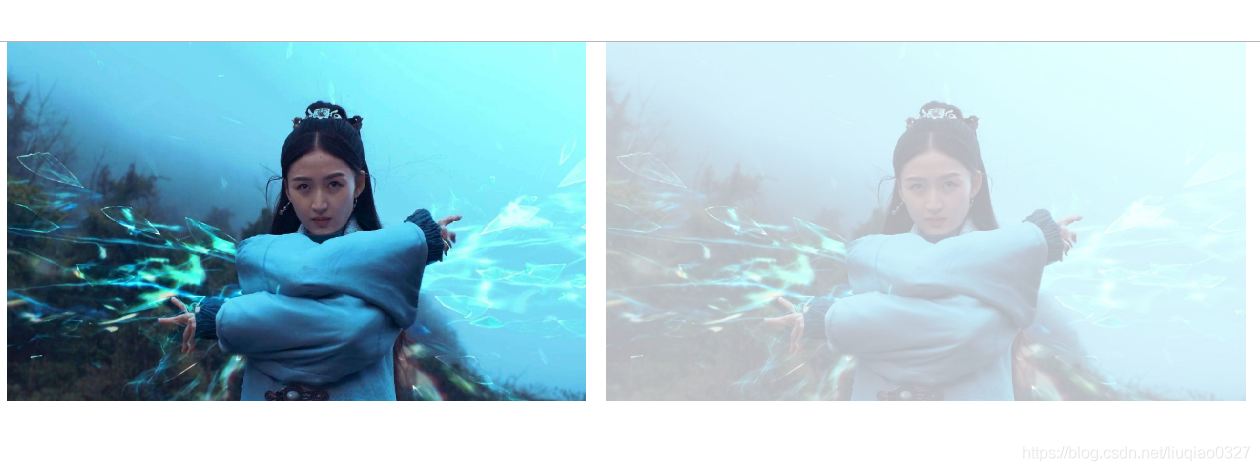
上述淡入淡出效果也是我们在实际开发中常用到的案例,原理就是通过定时器不断改变图片的透明度实现,代码其实相比上面的认识运动和分享到的案例没有相差多少,因为要考虑是淡入淡出,变得 是透明度,而透明度在我们css中是有IE兼容性的.所以这里我们需要设置2个值,一个是图片的opacity属性值,从0-1不断变化,毕竟需要看到效果,所以我这里设置的初始透明度是0.3,而考虑IE兼容性则需要设置filter=alpha(opacity =30),这里的opacity 0-100,实际上是30-100进行变化.
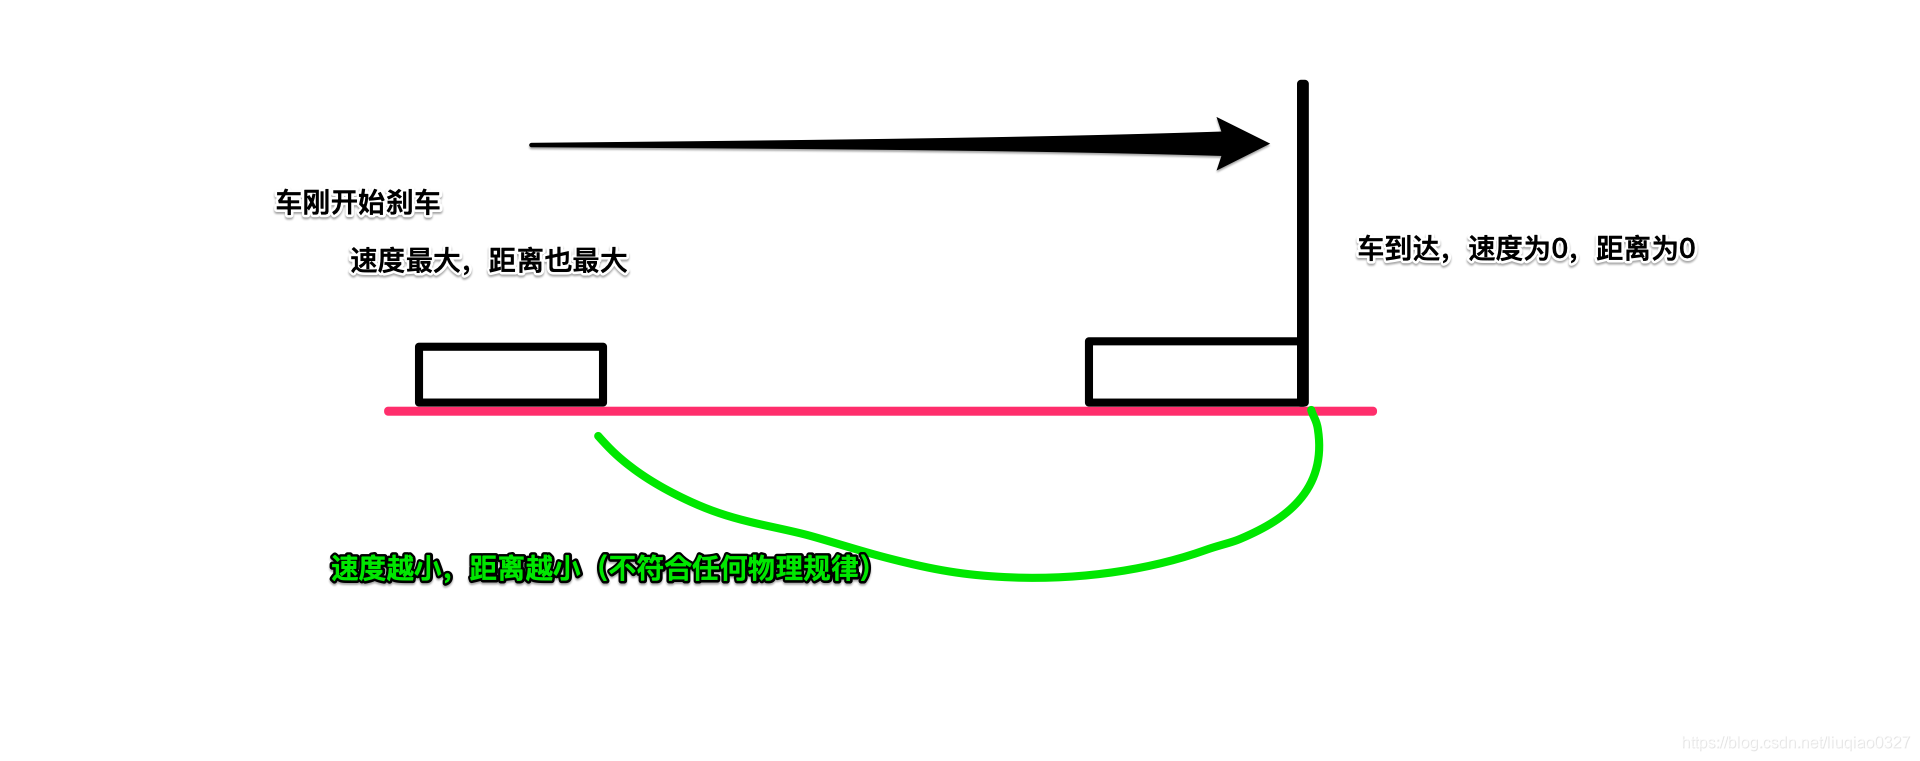
上面我们一直说的匀速运动,那其实运动还分好几种,物理学中有匀速运动,加速运动,减速运动对吧,那其实我们js里也有,我们常用到的和减速运动很相似,就是缓冲运动,那什么是缓冲运动呢?在我们生活中其实有很多缓冲运动,比如刹车.刹车特点是什么呢,就是速度越来越慢,最后停止.那我们缓冲运动也是这样.
缓冲运动:越接近目标点速度越慢,抵达目标点的时候速度为0,也就是运动速度发生变化,由快到慢.
那现在用代码来说说缓冲运动的两个关键:
1 .频率不变,速度逐渐变慢 var speed=(target-obj.offsetLeft)/8;
2.速度取整,避免数据丢失 speed = speed > 0 ? Math.ceil(speed) : Math.floor(speed);
为什么需要缓冲运动呢?元素缓冲运动比匀速运动更为美观,显得更为有张力和弹性,对于浏览者来说可能会产生更好的效果,留住用户的可能性也就更大 废话不多说了,举个栗子!
 <script>
        //注意,这个定时器变量一定要定义在类外,若定义在方法之类,定时器会互相影响
        let timer = null;
        //新建一个运动的类
        class startMove {
            // 构造方法
            constructor(node) {
                this.node = node;
            }

            //元素移动的方法
            move(target) {
                //这里采用的是定时器回调函数,this指向了当前的定时器函数
                // 并没有使用箭头函数
                //所以使用变量保存当前类的this
                let _this = this;
                //必须要清定时器
                clearInterval(timer);
                timer = setInterval(function () {
                    //计算速度,之所以取8,是因为根据经验,取8的时候,速度是最合适的,当然了,你可以设置9,10,都没有关系
                    //这里是缓冲运动算法,速度越来越慢
                    let speed = (target - _this.node.offsetTop) / 8;
                    //这里速度会取整判断,因为如果不取整,上面除法运算,因为精度问题,会丢掉部分数据
                    speed = speed > 0 ? Math.ceil(speed) : Math.floor(speed);

                    if (_this.node.offsetTop == target) {
                        //运动结束
                        clearInterval(timer);
                    } else {
                        _this.node.style.top = _this.node.offsetTop + speed + 'px';
                    }

                }, 30);
            }
        }

        window.onload = function () {
            let oBox = document.querySelector(".box");
            //获取滚动条的高度
            let scrollTop = document.body.scrollTop || document.documentElement.scrollTop;
            //获取可视高度
            let windowHeight = document.documentElement.clientHeight || document.body.clientHeight;
            //可视窗口高度的一半,需考虑到滚动条
            let iH = parseInt(scrollTop + (windowHeight - oBox.offsetHeight) / 2);

            let sM = new startMove(oBox);
            sM.move(iH);

            window.onscroll = function () {
                //在整个可视窗口区域居中
                //获取当前窗口的滚动高度
                scrollTop = document.body.scrollTop || document.documentElement.scrollTop;
                windowHeight = document.documentElement.clientHeight || document.body.clientHeight;

                iH = parseInt(scrollTop + (windowHeight - oBox.offsetHeight) / 2);

                sM.move(iH);
            }
        }
    </script>

    html:
    <body style="height: 3000px;">
        <div class="box">

        </div>
    <body>

    css:
     .box {
            width: 100px;
            height: 100px;
            position: absolute;
            right: 0;
            background: yellowgreen;
      }
缓冲菜单功能,利用缓冲运动的原理,我们时常见到一些大型网站上有些悬浮在右侧的菜单,那这个功能我们就实现了.
? 好,写了这么多,大家疑问肯定就来了,上面讲的都是个体的运动,那如果出现多个元素运动,怎么办呢,不要急,我们慢慢来,一步一步剖析.
  <script>
        //新建一个运动的类
        class startMove {
            // 构造方法
            constructor(node) {
                this.node = node;
            }

            //元素移动的方法
            move(target) {
                //这里采用的是定时器回调函数,this指向了当前的定时器函数
                // 并没有使用箭头函数
                //所以使用变量保存当前类的this
                let _this = this;
                //必须要清定时器
                clearInterval(_this.node.timer);
                _this.node.timer = setInterval(function () {
                    //计算速度,之所以取8,是因为根据经验,取8的时候,速度是最合适的,当然了,你可以设置9,10,都没有关系
                    //这里是缓冲运动算法,速度越来越慢
                    let speed = (target - _this.node.offsetWidth) / 8;
                    //这里速度会取整判断,因为如果不取整,上面除法运算,因为精度问题,会丢掉部分数据
                    speed = speed > 0 ? Math.ceil(speed) : Math.floor(speed);

                    if (_this.node.offsetWidth == target) {
                        //运动结束
                        clearInterval(timer);
                    } else {
                        _this.node.style.width = _this.node.offsetWidth + speed + 'px';
                    }

                }, 30);
            }
        }

        let oBoxs = document.querySelectorAll(".box");

        let sM = null;
        for (var i = 0; i < oBoxs.length; i++) {
            oBoxs[i].onmouseover = function () {
                sM = new startMove(this);
                sM.move(300);
            }

            oBoxs[i].onmouseout = function () {
                sM = new startMove(this);
                sM.move(100);
            }
        }

    </script>

    html:
        <div class="box"></div>
        <div class="box"></div>
        <div class="box"></div>
        <div class="box"></div>

    css:
         div {
            width: 100px;
            height: 50px;
            background-color: red;
            margin: 50px;
         }
这里我写了4个div,实现的效果是当鼠标移到当前的div时,此div就会自身的宽度增长到300px,移除时恢复,而且可以4个div都有此功能,相互运动,互不影响,这是个比较简单的多物体运动.
? 不知道大家发现没有,上述的js代码,写了这么多,其实很多都是一样的,基本上都是大同小异,所以运动的原理基本上都是上述代码,后面我会封装一个完美的运动函数,供大家调用.那既然多物体运动已经实现了,那就再来个多物体的淡入淡出吧,其实也不用多说,基本上也是循环,上代码先:
 <script>
        //新建一个运动的类
        class startMove {
            // 构造方法
            constructor(node) {
                this.node = node;
            }

            //元素移动的方法
            move(target) {
                let _this=this;
                clearInterval(this.node.timer);
                _this.node.timer = setInterval(function () {
                    var speed = (target - _this.node.alpha) / 8;
                    speed = speed > 0 ? Math.ceil(speed) : Math.floor(speed);

                    if (_this.node.alpha == target) {
                        clearInterval(_this.node.timer);
                    } else {
                        _this.node.alpha += speed;
                        _this.node.style.opacity = _this.node.alpha / 100;
                        _this.node.style.filter = alpha(opacity = _this.node.alpha);
                    }

                }, 30);
            }
        }

        let oBoxs = document.querySelectorAll(".box");

        let sM = null;
        for (var i = 0; i < oBoxs.length; i++) {
            oBoxs[i].alpha=30;
            oBoxs[i].onmouseover = function () {
                sM = new startMove(this);
                sM.move(100);
            }

            oBoxs[i].onmouseout = function () {
                sM = new startMove(this);
                sM.move(30);
            }
        }

    </script>

    html:
            <div class="box"></div>
            <div class="box"></div>
            <div class="box"></div>
            <div class="box"></div>
    css:
            div {
                width: 100px;
                height: 100px;
                background-color: red;
                margin: 50px;
                opacity: 0.3;
                filter: alpha(opacity=30);
            }
写了这么多,我发现一个问题,我们上面所有的运动,都是使用的元素的offsetLeft属性,offsetTop属性,offsetWidth属性,offsetHeight属性 这几个属性的改变,来进行运动,所发现的一个问题就是: 你写的属性获取的值,不一定是你想要获取的值。不信来个小案例试试:
    <style>
       #div1 {
            width: 100px;
            height: 100px;
            background-color: red;
            border: 1px solid black;
        }
          </style>

    <script>
        /*
            安全隐患
            offsetLeft
            offsetTop

            offsetWidth
            offsetHeight

            【注】你写的属性获取的值,不一定是你想要获取的值。
        */
          window.onload = function () {
            var oDiv = document.getElementById("div1");
            setInterval(function () {
                // 自身宽度每次-1
                // oDiv.offsetWidth=width + border + padding
                oDiv.style.width = oDiv.offsetWidth - 1 + 'px';
            }, 30);
        }
    </script>
? 通过上述小栗子发现,我们使用offset系列的属性还是存在一定的安全隐患的,所以接下来所写的运动的函数里,我们就弃用offset系列(有误差)那既然弃用了,那我们接下来怎么办呢?运动原理是改变自身的位置,offsetLeft和offsetTop,但是又不能用,那怎么办呢,这里我想到了Bom的一个方法:getComputedStyle 没错,就是获取css样式类型,有了这个,我们一切问题就迎刃而解.
总结前面的几个运动栗子,那现在正餐来了,来个大招,咱们来个多物体多样式兼容透明度的运动
 <script>
        //新建一个运动的类
        class startMove {
            // 构造方法
            constructor(node, attr, target) {
                this.node = node;
                this.attr = attr;
                this.target = target;
            }

            //元素移动的方法
            move() {
                //保存当前运动类的this指向
                let _this = this;
                //清除上个定时器
                clearInterval(_this.node.timer);
                _this.node.timer = setInterval(function () {
                    //1、获取当前值
                    var iCur = null;

                    //如果属性为透明度
                    if (_this.attr == "opacity") {
                        //_this.getStyle(node, "opacity") 结果为小数
                        //转为浮点型再乘以100,然后取整
                        iCur = parseInt(parseFloat(_this.getStyle( _this.node, "opacity")) * 100);
                    } else {
                        //若不是透明度属性,则直接取整
                        iCur = parseInt(_this.getStyle(_this.node, _this.attr))
                    }

                    //2、计算速度
                    var speed = (_this.target - iCur) / 8;
                    speed = speed > 0 ? Math.ceil(speed) : Math.floor(speed);

                    //3、运动和停止分开
                    if (iCur == _this.target) {
                        // 运动结束了
                        clearInterval(_this.node.timer);
                    } else {
                        if (_this.attr == "opacity") {
                            //速度不断累加
                            iCur += speed;
                            _this.node.style.opacity = iCur / 100;
                            //兼容IE
                            _this.node.style.filter = `alpha(opacity=${iCur})`;

                        } else {
                            _this.node.style[_this.attr] = iCur + speed + 'px';
                        }
                    }

                }, 30);
            }

            /*
                node  元素节点
                cssStyle  获取css样式类型
            */
            getStyle(node, cssStyle) {
                if (node.currentStyle) {
                    //兼容IE
                    return node.currentStyle[cssStyle];
                } else {
                    return getComputedStyle(node)[cssStyle];
                }
            }
        }

        let oDivs = document.querySelectorAll("div");

        let sM = null;
        oDivs[0].onclick = function () {
            sM = new startMove(this, "width", 300);
            sM.move();
        }

        oDivs[1].onclick = function () {
            sM = new startMove(this, "height", 300);
            sM.move();
        }

        oDivs[2].onclick = function () {
            sM = new startMove(this, "marginLeft", 300);
            sM.move();
        }

        oDivs[3].onclick = function () {
            sM = new startMove(this, "fontSize", 26);
            sM.move();
        }

        //透明度的变化
        oDivs[4].onmouseover = function () {
            sM = new startMove(this, "opacity", 100);
            sM.move();

        }
        oDivs[4].onmouseout = function () {
            sM = new startMove(this, "opacity", 30);
            sM.move();
        }
    </script>

    html:
        <div></div>
        <div></div>
        <div></div>
        <div>div文本</div>
        <div class='box'></div>
     css:
         div {
            width: 100px;
            height: 50px;
            background-color: red;
            font-size: 20px;
            margin: 50px;
         }

         div.box {
            opacity: 0.3;
            filter: alpha(opacity=30);
         }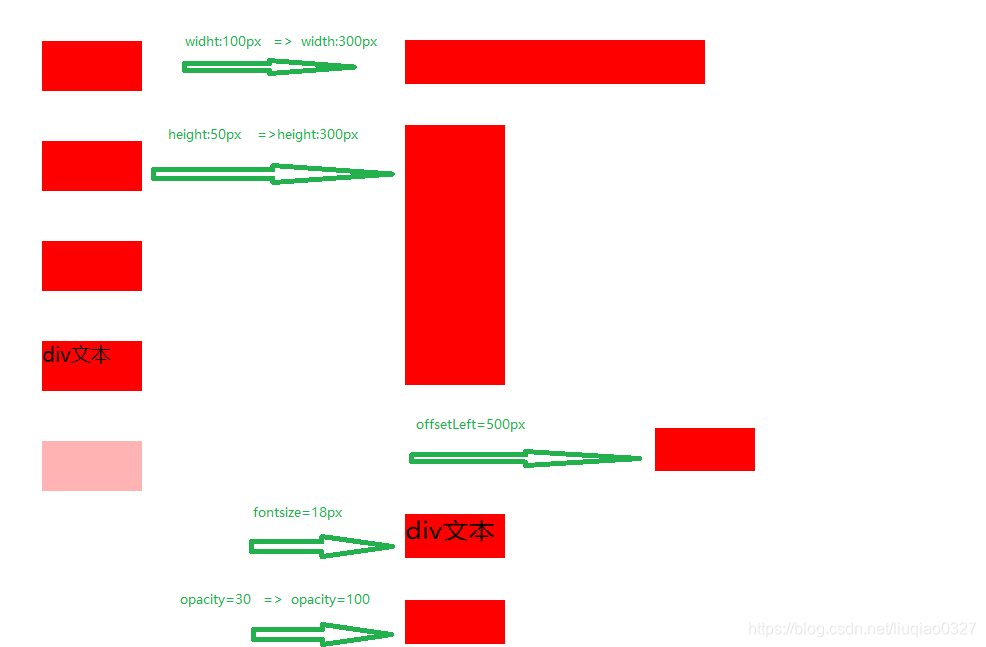
? 上面实现的效果是我们既所探究的所有运动的一个整合,基本上我们常用的运动都实现了,那到了我们探究运动的最后阶段了,其实还不够完美,我们需要写一个通用的,总不能来个运动我们写个函数,来个另外不同的运动我们写个函数吧,所以现在封装一个最完美的js运动,也就是我们的终极版.
<script>
        //运动类
        class startMove {
            /*
            *构造方法
            *node:元素
            * cssObj: 属性对象
            * complete 回调函数
            */

            constructor(node, cssObj, complete) {
                this.node = node;
                this.cssObj = cssObj;
                this.complete = complete;
            }

            //元素移动的方法
            move() {
                //假设所有动画都都到达目的值
                var isEnd = true;
                //清除上个定时器
                clearInterval(this.node.timer);
                this.node.timer = setInterval(() => {
                    var isEnd = true; //假设所有动画都都到达目的值

                    for (var attr in this.cssObj) {
                        //取出当前css样式的目的值
                        var iTarget = this.cssObj[attr];
                        //1、获取当前值
                        var iCur = null;
                        //如果属性为透明度
                        if (attr == "opacity") {
                            //this.getStyle(node, "opacity") 结果为小数
                            //转为浮点型再乘以100,然后取整
                            iCur = parseInt(parseFloat(this.getStyle(this.node, "opacity")) * 100);
                        } else {
                            iCur = parseInt(this.getStyle(this.node, attr))
                        }
                        //2、计算速度
                        var speed = (iTarget - iCur) / 8;
                        speed = speed > 0 ? Math.ceil(speed) : Math.floor(speed);

                        if (attr == "opacity") {
                            iCur += speed;
                            this.node.style.opacity = iCur / 100;
                            this.node.style.filter = `alpha(opacity=${iCur})`;

                        } else {
                            this.node.style[attr] = iCur + speed + 'px';
                        }

                        //当前值是否瞪目目的值
                        if (iCur != iTarget) {
                            isEnd = false;
                        }
                    }

                    if (isEnd) {
                        //说明都到达目的值
                        clearInterval(this.node.timer);

                        if (this.complete) {
                            this.complete.call(this.node);
                        }
                    }

                }, 30);
            }

            /*
                node  元素节点
                cssStyle  获取css样式类型
            */
            getStyle(node, cssStyle) {
                if (node.currentStyle) {
                    //兼容IE
                    return node.currentStyle[cssStyle];
                } else {
                    return getComputedStyle(node)[cssStyle];
                }
            }
        }

        let sM = null;

        var oDiv = document.getElementById("box");
        oDiv.onmouseover = function () {
            sM = new startMove(oDiv, {
                width: 300,
                height: 102,
                opacity: 30
            }, function () {
                oDiv.innerHTML = "移入动画结束"
            });

            sM.move();

        }

        oDiv.onmouseout = function () {
            sM = new startMove(oDiv, {
                width: 100,
                height: 10,
                opacity: 100
            }, function () {
                oDiv.innerHTML = "移出动画结束"
            });

            sM.move();
        }

    </script>

    html:
           <div id='box'>11</div>
    css:
             #box {
                width: 100px;
                height: 100px;
                background-color: black;
                color: white;
              }
上面便是完美运动的详细代码,也可以把上述函数进行封装调用,不过因为是ES6的语法,IE低版本会不兼容,所以我下面在贴出兼容IE版本的js运动函数,普通函数创建的
//多物体多样式的运动
function startMove(node, cssObj, complete) {
    clearInterval(node.timer);
    node.timer = setInterval(function () {

        var isEnd = true; //假设所有动画都都到达目的值

        for (var attr in cssObj) {
            //取出当前css样式的目的值
            var iTarget = cssObj[attr];
            //1、获取当前值
            var iCur = null;

            if (attr == "opacity") {
                iCur = parseInt(parseFloat(getStyle(node, "opacity")) * 100);
            } else {
                iCur = parseInt(getStyle(node, attr))
            }
            //2、计算速度
            var speed = (iTarget - iCur) / 8;
            speed = speed > 0 ? Math.ceil(speed) : Math.floor(speed);

            if (attr == "opacity") {
                iCur += speed;
                node.style.opacity = iCur / 100;
                node.style.filter = `alpha(opacity=${iCur})`;

            } else {
                node.style[attr] = iCur + speed + 'px';
            }

            //当前值是否瞪目目的值
            if (iCur != iTarget) {
                isEnd = false;
            }
        }


        if (isEnd) {
            //说明都到达目的值
            clearInterval(node.timer);

            if (complete) {
                complete.call(node);
            }
        }
    }, 30);
}

/*
    node  元素节点
    cssStyle  获取css样式类型
*/
function getStyle(node, cssStyle) {
    if (node.currentStyle) {
        return node.currentStyle[cssStyle];
    } else {
        return getComputedStyle(node)[cssStyle];
    }
}
可以封装startMove.js供大家调用
再补充一个链式运动,我们经常会遇到这种需求,比如这个动画完成之后,继续开始第二个,第三个动画,而且动画是有序的进行的,那就是链式运动.其实链式运动也比较简单,链式运动其实只要记住一句话: 每一个动画都开始在,上一个动画结束的时候。那这里,我们正好用到了我们的回调函数,也就是体现到了我上面给大家封装的时候加回调函数的意义,当然,意义不仅仅于此!
                //链式运动 宽100=>300 然后高100=>300 透明度100=>30
                oDiv.onmouseover = function(){
                    startMove(this, "width", 300, function(){
                        startMove(this, "height", 300, function(){
                            startMove(this, "opacity", 30);
                        })
                    });

                }


                //链式运动 透明度30=>100  然后高300=>100 宽300=100
                oDiv.onmouseout = function(){
                    startMove(this, "opacity", 100, function(){
                        startMove(this, "height", 100, function(){
                            startMove(this, "width", 100);
                        })
                    });
                }
这里可以直接调用startMove.js
好了,js运动剖析和原理解说终于写完了.内容比较多,有兴趣的,可以通过这个解析,一步一步的进行学习,说的多不如写的多,代码只有自己试过了,写过了才能吸收变成自己的.如果各位大神们觉得文章写得还可以的话,麻烦点个赞,加个关注吧,后续会尽量多写技术博客,跟大家一起分享交流,学习.
标签:new for 开始 过程 pyw fonts 固定 插入图片 current
原文地址:https://www.cnblogs.com/lechar/p/12375430.html