标签:注册 开发 新建文件夹 获取 默认端口 img 修改 查看 构造
文章集合中会包含与文章相关的字段,其中author字段是发表文章的作者,作者就是网站当中的注册用户,而用户信息是存储在另外一个集合中的
问:如何在文章集合中存储发表文章的用户信息呢?
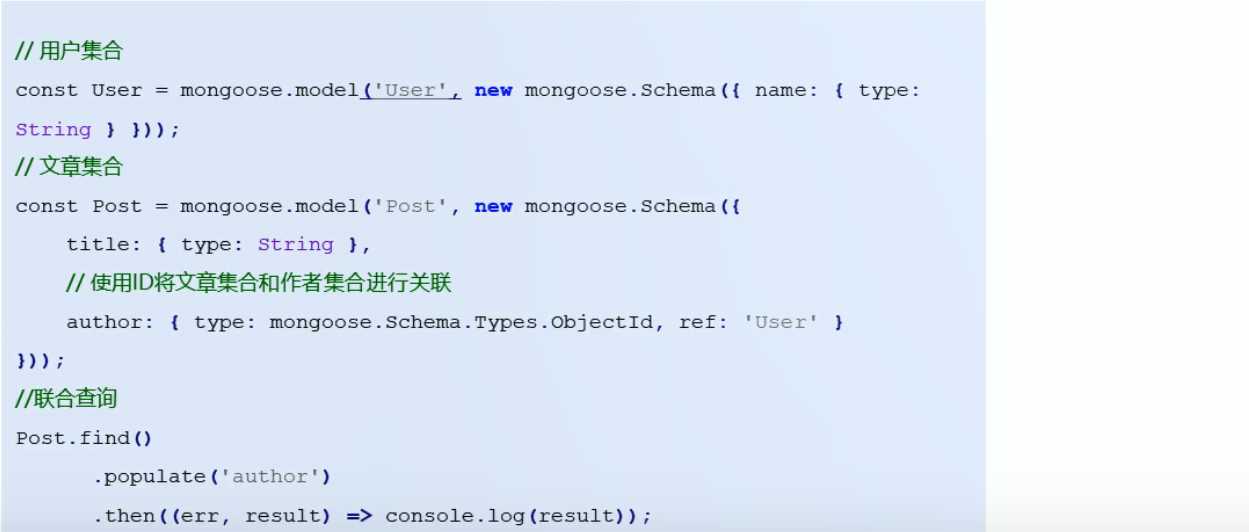
答:实际上,不需要将作者的全部信息拷贝到文章集合中,只需要通过字段_id,将文章集合与用户集合进行关联就可以了。比如在author字段中将用户的_id存入即可。
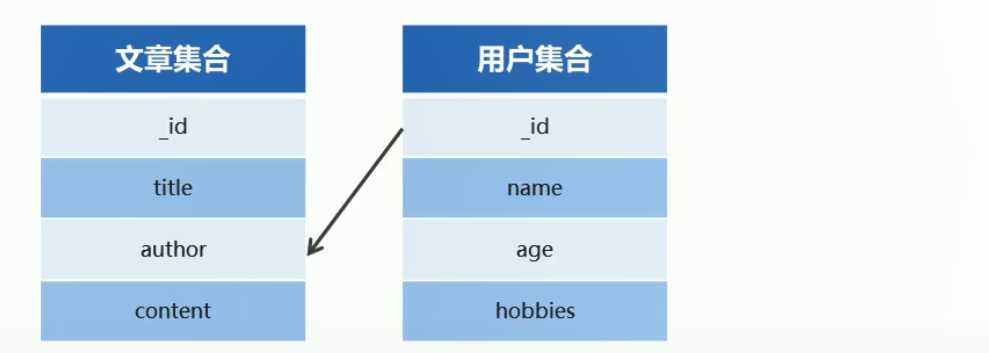
问:如何获取author中具体的信息呢?比如name,age等
答:使用populate方法进行关联集合查询
const mongoose = require(‘mongoose‘);
mongoose.connect(‘mongodb://localhost/playground‘, { useNewUrlParser: true })
.then(() => console.log(‘数据库连接成功‘))
.catch(err => console.log(err, ‘数据库连接失败‘));
//用户集合
const userSchema = new mongoose.Schema({
name: {
type: String,
required: true
}
});
//文章集合
const postScheam = new mongoose.Schema({
title: {
type: String
},
author: {
//author 字段将要存储的是一个_id,_id的数据类型就是mongoose.Schema.Types.ObjectId
type: mongoose.Schema.Types.ObjectId,
//将author字段与User集合进行关联
ref: ‘User‘
}
});
//创建用户
const User = mongoose.model(‘User‘, userSchema);
//创建文章
const Post = mongoose.model(‘Post‘, postScheam);
//创建用户
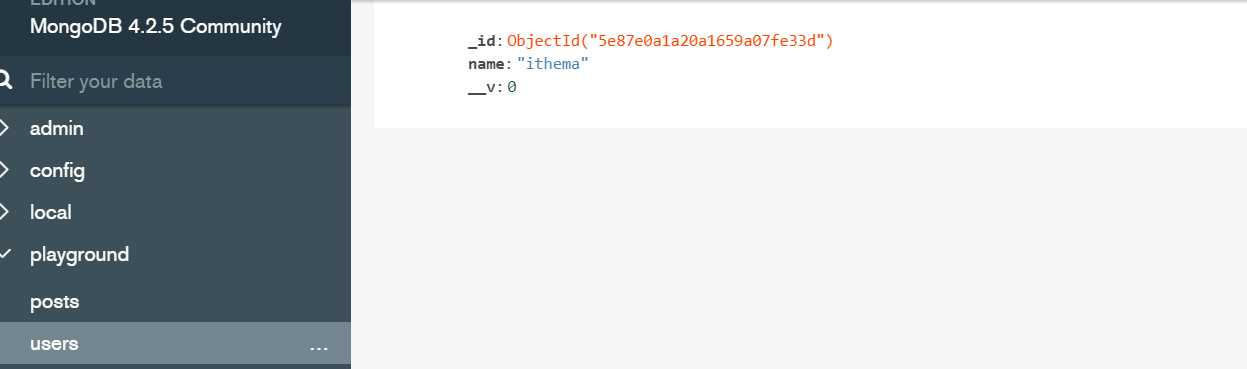
User.create({ name: ‘ithema‘ }).then(res => console.log(res));
//创建文章
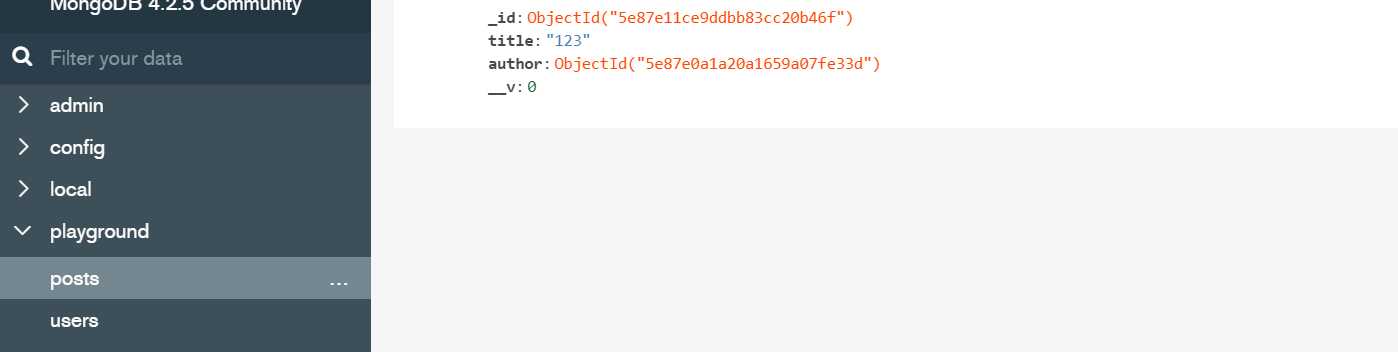
Post.create({ title: ‘123‘, author: ‘5e87e0a1a20a1659a07fe33d‘ }).then(res => console.log(res));
运行后
文章集合
用户集合
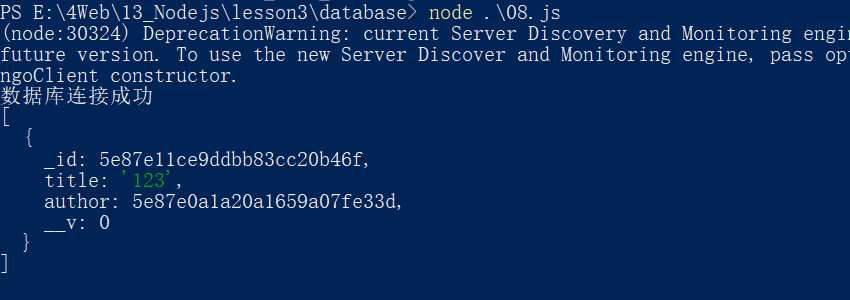
(1)查询文章信息
在上述代码后追加
//查询文章信息
Post.find().then(res => console.log(res));
运行后
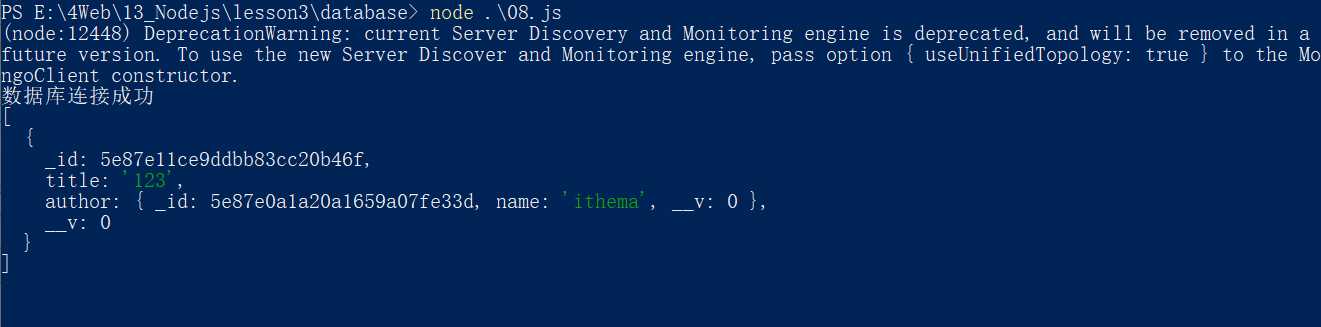
(2)查询文章中关联字段的信息
//查询文章信息
// Post.find().then(res => console.log(res));
//查询文章中author字段的信息
Post.find().populate(‘author‘).then(res => console.log(res));
(1)新建文件夹user,在user下新建文件夹app.js
(2)创建服务器,连接数据库,创建用户集合
const http = require(‘http‘);
const mongoose = require(‘mongoose‘); //user文件夹中虽然没有mongose这个第三方模块,那么系统会自动去上一级目录database查找该模块,database下有node_modules,node_modules下有mongoose

//数据库连接 27017是mongodb数据库的默认端口
mongoose.connect(‘mongodb://localhost/playground‘, { useNewUrlParser: true })
    .then(() => console.log(‘数据库连接成功‘))
    .catch(() => console.log(‘数据库连接失败‘));

//创建用户集合规则
const userSchema = new mongoose.Schema({
    name: {
        type: String,
        required: true,
        minlength: 2,
        maxlength: 20
    },
    age: {
        type: Number,
        min: 18,
        max: 80
    },
    password: String,
    email: String,
    hobbies: [String] //hobbies是一个数组,数组里面的值都要是字符串类型
});
//创建集合  返回集合的构造函数
const User = mongoose.model(‘User‘, userSchema);

//创建服务器
const app = http.createServer();
//为服务器端对象添加请求事件
app.on(‘request‘, (req, res) => {
    res.end(‘ok‘);
})

//监听端口
app.listen(3000);
(3)将database文件夹下的user.json中的数据导入到刚才创建的users集合当中
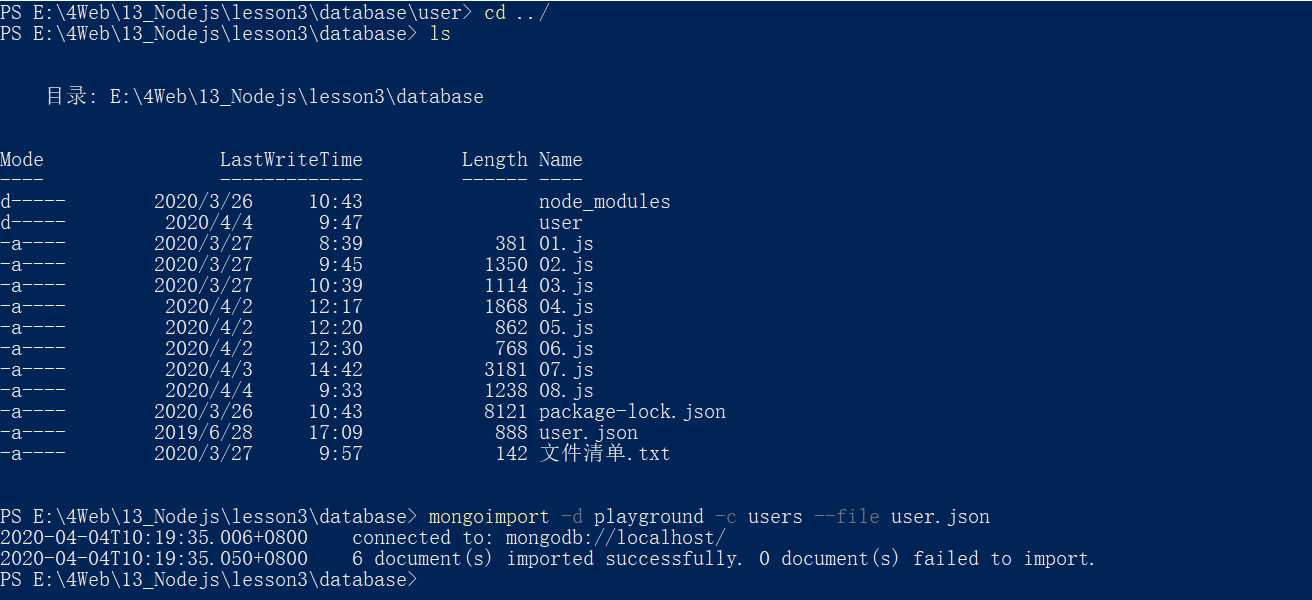
打开campass也可以查看
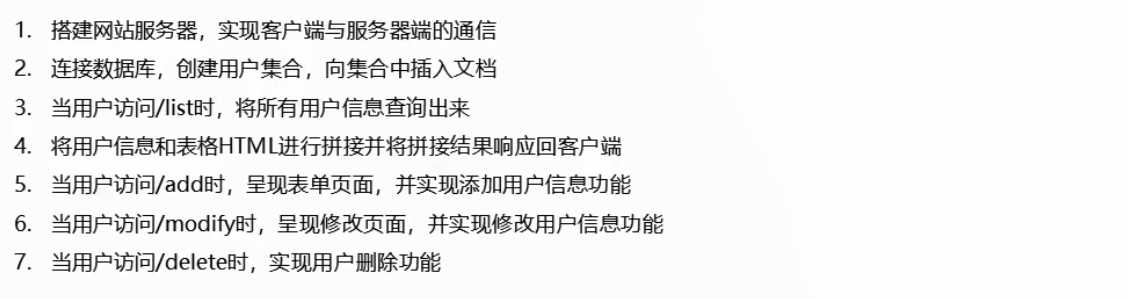
(4)当用户访问/list的时候,将所有用户信息查询出来
const http = require(‘http‘);
const mongoose = require(‘mongoose‘); //user文件夹中虽然没有mongose这个第三方模块,那么系统会自动去上一级目录database查找该模块,database下有node_modules,node_modules下有mongoose
const url = require(‘url‘);

//数据库连接 27017是mongodb数据库的默认端口
mongoose.connect(‘mongodb://localhost/playground‘, { useNewUrlParser: true })
    .then(() => console.log(‘数据库连接成功‘))
    .catch(() => console.log(‘数据库连接失败‘));

//创建用户集合规则
const userSchema = new mongoose.Schema({
    name: {
        type: String,
        required: true,
        minlength: 2,
        maxlength: 20
    },
    age: {
        type: Number,
        min: 18,
        max: 80
    },
    password: String,
    email: String,
    hobbies: [String] //hobbies是一个数组,数组里面的值都要是字符串类型
});
//创建集合  返回集合的构造函数
const User = mongoose.model(‘User‘, userSchema);

//创建服务器
const app = http.createServer();
//为服务器端对象添加请求事件
app.on(‘request‘, async(req, res) => {
    //请求方式
    const method = req.method;
    //请求地址
    const { pathname } = url.parse(req.url);
    if (method == ‘GET‘) {
        //呈现用户列表页面
        if (pathname == ‘/list‘) {
            //查询用户信息
            let users = await User.find();
            // console.log(users);是一个数组,数组中的元素是对象,每个对象中包含着每个用户的信息

            //将静态代码与查询到的数据进行拼接
            let list = `
            <!DOCTYPE html>
            <html lang="en">
            <head>
                <meta charset="UTF-8">
                <title>用户列表</title>
                <link rel="stylesheet" href="https://cdn.jsdelivr.net/npm/bootstrap@3.3.7/dist/css/bootstrap.min.css">
            </head>
            <body>
                <div class="container">
                    <h6>
                        <a href="add.html" class="btn btn-primary">添加用户</a>
                    </h6>
                    <table class="table table-striped table-bordered">
                        <tr>
                            <td>用户名</td>
                            <td>年龄</td>
                            <td>爱好</td>
                            <td>邮箱</td>
                            <td>操作</td>
                        </tr>
            `;

            //对查询到的users数据进行循环操作,准备数据的拼接
            users.forEach(item => {
                list += `
                <tr>
                    <td>${item.name}</td>
                    <td>${item.age}</td>
                    <td>
                `;
                item.hobbies.forEach(item => {
                    list += `<span>${item}</span>`;
                })

                list += `
                </td>
                <td>${item.email}</td>
                <td>
                    <a href="" class="btn btn-danger btn-xs">删除</a>
                    <a href="" class="btn btn-success btn-xs">修改</a>
                </td>
            </tr>`;
            });

            list += `
            </table>
                    </div>
                </body>
                </html>
            `;
            //将list变量响应给客户端
            res.end(list);
        }

    } else if (method == ‘POST‘) {

    }

})

//监听端口
app.listen(3000);
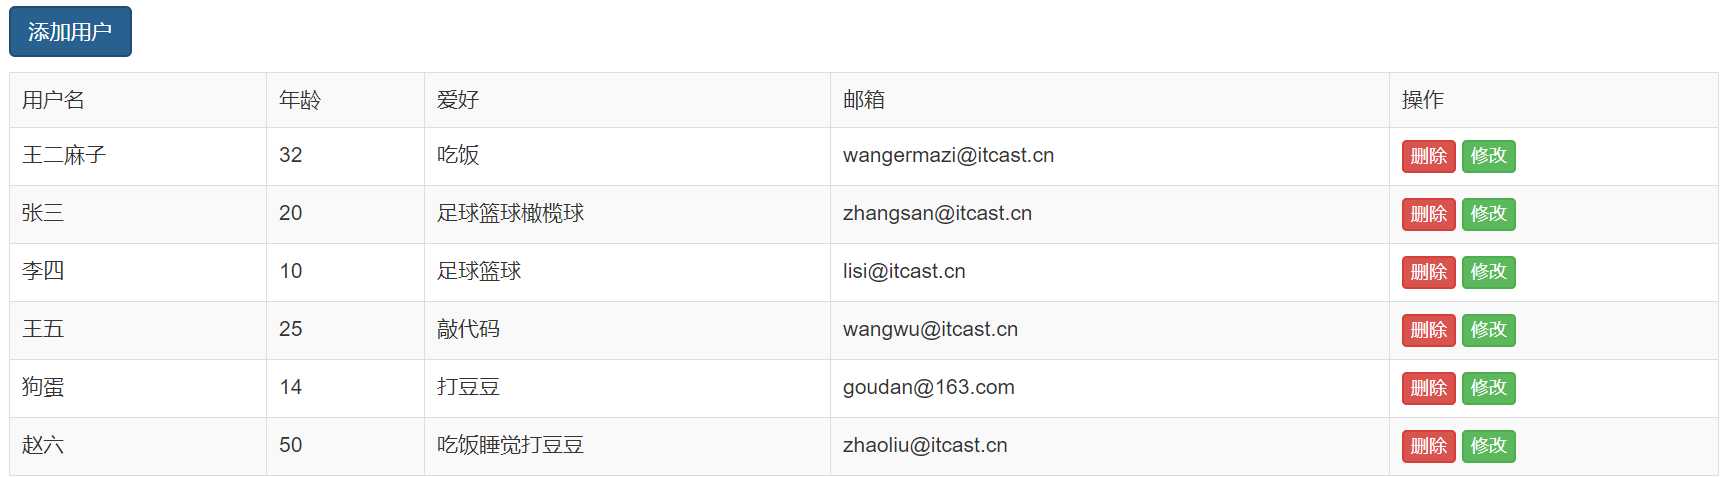
刷新浏览器
(5)添加用户功能
Node开发--->12_Node.js_mongoDB集合关联
标签:注册 开发 新建文件夹 获取 默认端口 img 修改 查看 构造
原文地址:https://www.cnblogs.com/deer-cen/p/12631504.html