标签:checked autowired png 运维 不同 order 学习 fopen master
学习在 Spring Cloud 中使用 Resilience4j 实现断路器,包括断路器 CircuitBreaker 、限流 RateLimiter 、请求重试 Retry 等功能。
Resilience4j 是 Spring Cloud Greenwich 版推荐的容错解决方案,相比 Hystrix , Resilience4j 专为 Java 8 以及函数式编程而设计。它主要提供了如下功能:
创建普通的 Maven 项目 resilience4j ,手动添加依赖,如下:
<dependencies>
    <dependency>
        <groupId>junit</groupId>
        <artifactId>junit</artifactId>
        <version>4.12</version>
    </dependency>
    <dependency>
        <groupId>io.github.resilience4j</groupId>
        <artifactId>resilience4j-circuitbreaker</artifactId>
        <version>0.13.2</version>
    </dependency>
    <dependency>
        <groupId>io.github.resilience4j</groupId>
        <artifactId>resilience4j-ratelimiter</artifactId>
        <version>0.13.2</version>
    </dependency>
    <dependency>
        <groupId>io.github.resilience4j</groupId>
        <artifactId>resilience4j-retry</artifactId>
        <version>0.13.2</version>
    </dependency>
</dependencies>
Resilience4j 提供了很多功能,不同的功能对应不同的依赖,可以按需添加。
断路器功能相关依赖如下:
<dependency>
    <groupId>io.github.resilience4j</groupId>
    <artifactId>resilience4j-circuitbreaker</artifactId>
    <version>0.13.2</version>
</dependency>
@Test
public void testCircuitBreakerSuccess() {
    // 获取一个默认的 CircuitBreakerRegistry 实例
    // CircuitBreakerRegistry cbr = CircuitBreakerRegistry.ofDefaults();

    // 自定义一个 CircuitBreakerRegistry 实例
    CircuitBreakerConfig config = CircuitBreakerConfig.custom()
            // 故障率阈值百分比,超过这个阈值,断路器就会打开,这里是 50%
            .failureRateThreshold(50)
            // 断路器保持打开的时间,在到达设置的时间之后,断路器会进入到 HalfOpen 状态
            .waitDurationInOpenState(Duration.ofMillis(1000))
            // 当断路器处于 HalfOpen 状态时,环形缓冲区的大小
            .ringBufferSizeInHalfOpenState(2)
            // 当断路器处于 Closed 状态时,环形缓冲区的大小
            .ringBufferSizeInClosedState(2)
            .build();
    CircuitBreakerRegistry cbr2 = CircuitBreakerRegistry.of(config);
    CircuitBreaker cb1 = cbr2.circuitBreaker("cxy35");
    // CircuitBreaker cb2 = cbr2.circuitBreaker("cxy352", config);

    CheckedFunction0<String> supplier = CircuitBreaker.decorateCheckedSupplier(cb1, () -> "hello resilience4j");
    Try<String> result = Try.of(supplier).map(v -> v + " hello world");
    System.out.println(result.isSuccess());
    System.out.println(result.get());
}
执行结果如下:
true
hello resilience4j hello world
@Test
public void testCircuitBreakerError() {
    // 自定义一个 CircuitBreakerRegistry 实例
    CircuitBreakerConfig config = CircuitBreakerConfig.custom()
            // 故障率阈值百分比,超过这个阈值,断路器就会打开,这里是 50%
            .failureRateThreshold(50)
            // 断路器保持打开的时间,在到达设置的时间之后,断路器会进入到 half open 状态
            .waitDurationInOpenState(Duration.ofMillis(1000))
            // 当断路器处于 Closed 状态时,环形缓冲区的大小
            .ringBufferSizeInClosedState(2)
            .build();
    CircuitBreakerRegistry cbr = CircuitBreakerRegistry.of(config);
    CircuitBreaker cb1 = cbr.circuitBreaker("cxy35");

    // 模拟异常,使断路器打开
    System.out.println(cb1.getState());// 断路器状态
    cb1.onError(0, new RuntimeException());
    System.out.println(cb1.getState());
    cb1.onError(0, new RuntimeException());
    System.out.println(cb1.getState());

    CheckedFunction0<String> supplier = CircuitBreaker.decorateCheckedSupplier(cb1, () -> "hello resilience4j");
    Try<String> result = Try.of(supplier).map(v -> v + " hello world");
    System.out.println(result.isSuccess());
    System.out.println(result.get());
}
执行结果如下:
CLOSED
CLOSED
OPEN
false

io.github.resilience4j.circuitbreaker.CircuitBreakerOpenException: CircuitBreaker ‘cxy35‘ is open
注意,由于 ringBu?erSizeInClosedState 的值为 2 ,表示当有 2 条数据时才会去统计故障率,所以手动故障测试,至少调用 2 次 onError ,断路器才会打开。
限流功能相关依赖如下:
<dependency>
    <groupId>io.github.resilience4j</groupId>
    <artifactId>resilience4j-ratelimiter</artifactId>
    <version>0.13.2</version>
</dependency>
@Test
public void testRateLimiter() {
    RateLimiterConfig config = RateLimiterConfig.custom()
            // 限制每 1s 处理 2 个请求
            .limitRefreshPeriod(Duration.ofMillis(1000))
            .limitForPeriod(2)
            .timeoutDuration(Duration.ofMillis(3000))
            .build();
    RateLimiter rateLimiter = RateLimiter.of("cxy35", config);
    CheckedRunnable checkedRunnable = RateLimiter.decorateCheckedRunnable(rateLimiter, () -> {
        System.out.println(new Date());
    });
    Try.run(checkedRunnable)
            .andThenTry(checkedRunnable)
            .andThenTry(checkedRunnable)
            .andThenTry(checkedRunnable)
            .onFailure(t -> System.out.println(t.getMessage()));
}
执行结果如下:
Sun Apr 25 15:32:27 CST 2020
Sun Apr 25 15:32:27 CST 2020
Sun Apr 25 15:32:28 CST 2020
Sun Apr 25 15:32:28 CST 2020
请求重试功能相关依赖如下:
<dependency>
    <groupId>io.github.resilience4j</groupId>
    <artifactId>resilience4j-retry</artifactId>
    <version>0.13.2</version>
</dependency>
@Test
public void testRetry() {
    RetryConfig config = RetryConfig.custom()
            // 重试次数
            .maxAttempts(4)
            // 重试间隔
            .waitDuration(Duration.ofMillis(500))
            // 重试异常
            .retryExceptions(RuntimeException.class)
            .build();
    Retry retry = Retry.of("cxy35", config);
    Retry.decorateRunnable(retry, new Runnable() {
        int count = 0;
        // 开启了重试功能之后,run 方法执行时,如果抛出异常,会自动触发重试功能
        @Override
        public void run() {
            if (count++ < 3) {
                throw new RuntimeException();
            }
        }
    }).run();
}
当重试次数配置成 < 4 的时候,程序执行结果会抛出异常,否则不会。
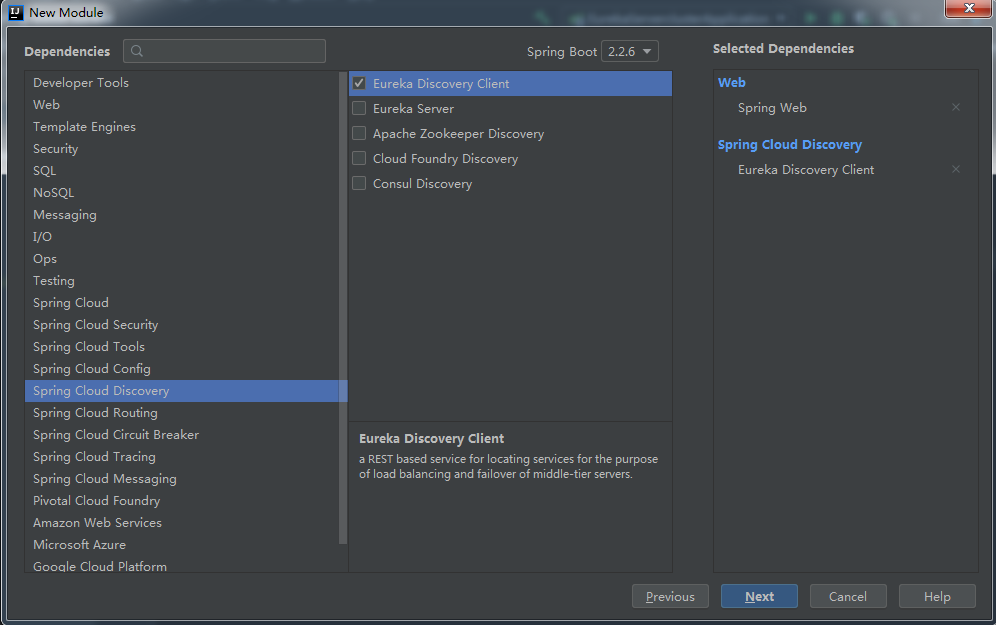
创建 Spring Boot 项目 resilience4j-client-provider ,作为我们的服务提供者,添加 Web/Eureka Client 依赖,如下:
最终的依赖如下:
<dependencies>
    <dependency>
        <groupId>org.springframework.boot</groupId>
        <artifactId>spring-boot-starter-web</artifactId>
    </dependency>
    <dependency>
        <groupId>org.springframework.cloud</groupId>
        <artifactId>spring-cloud-starter-netflix-eureka-client</artifactId>
    </dependency>
    <dependency>
        <groupId>org.springframework.boot</groupId>
        <artifactId>spring-boot-starter-test</artifactId>
        <scope>test</scope>
        <exclusions>
            <exclusion>
                <groupId>org.junit.vintage</groupId>
                <artifactId>junit-vintage-engine</artifactId>
            </exclusion>
        </exclusions>
    </dependency>
</dependencies>
项目创建成功后,修改 application.properties 配置文件,将 resilience4j-client-provider 注册到 Eureka Server 上(服务注册中心使用 Eureka Server ),如下:
# 当前服务的名称
spring.application.name=resilience4j-client-provider
# 当前服务的端口
server.port=5000

# 服务注册中心地址
eureka.client.service-url.defaultZone=http://127.0.0.1:1111/eureka
接下来,启动 Eureka Server ,待服务注册中心启动成功后,再启动 resilience4j-client-provider ,两者都启动成功后,访问 http://127.0.0.1:1111 可以看到 resilience4j-client-provider 的注册信息。
当然 resilience4j-client-provider 也可以集群化部署,下面对 resilience4j-client-provider 进行打包,之后我们在命令行启动两个 provider 实例:
java -jar resilience4j-client-provider-0.0.1-SNAPSHOT.jar --server.port=5000
java -jar resilience4j-client-provider-0.0.1-SNAPSHOT.jar --server.port=5001
最后在 resilience4j-client-provider 提供一个 hello 接口,用于后续服务消费者 resilience4j-client-consumer 来消费,如下:
@RestController
public class ProviderController {
    @Value("${server.port}")
    Integer port; // 支持启动多个实例,做负载均衡,用端口区分

    @GetMapping("/hello")
    public String hello() {
        return "hello cxy35: " + port;
    }
}
创建 Spring Boot 项目 resilience4j-client-consumer ,作为我们的服务消费者,添加 Web/Eureka Client 依赖,如下:
再手动添加 Resilience4j 相关依赖,最终的依赖如下:
<dependencies>
    <dependency>
        <groupId>org.springframework.boot</groupId>
        <artifactId>spring-boot-starter-web</artifactId>
    </dependency>
    <dependency>
        <groupId>org.springframework.cloud</groupId>
        <artifactId>spring-cloud-starter-netflix-eureka-client</artifactId>
    </dependency>
    <dependency>
        <groupId>io.github.resilience4j</groupId>
        <artifactId>resilience4j-spring-boot2</artifactId>
        <version>1.2.0</version>
        <exclusions>
            <exclusion>
                <groupId>io.github.resilience4j</groupId>
                <artifactId>resilience4j-circuitbreaker</artifactId>
            </exclusion>
            <exclusion>
                <groupId>io.github.resilience4j</groupId>
                <artifactId>resilience4j-ratelimiter</artifactId>
            </exclusion>
            <exclusion>
                <groupId>io.github.resilience4j</groupId>
                <artifactId>resilience4j-bulkhead</artifactId>
            </exclusion>
            <exclusion>
                <groupId>io.github.resilience4j</groupId>
                <artifactId>resilience4j-timelimiter</artifactId>
            </exclusion>
        </exclusions>
    </dependency>
    <dependency>
        <groupId>org.springframework.boot</groupId>
        <artifactId>spring-boot-starter-test</artifactId>
        <scope>test</scope>
        <exclusions>
            <exclusion>
                <groupId>org.junit.vintage</groupId>
                <artifactId>junit-vintage-engine</artifactId>
            </exclusion>
        </exclusions>
    </dependency>
</dependencies>
注意: resilience4j-spring-boot2 中包含了 Resilience4j 的所有功能,但是没有配置的功能无法使用,启动会报错,所以需要将之从依赖中剔除掉。这里先全部移除掉,下面需要测试哪块功能时,再把对应的依赖从移除列表中删除。
项目创建成功后,新建 application.yml 配置文件,将 resilience4j-client-consumer 注册到 Eureka Server 上(服务注册中心使用 Eureka Server ),如下:
# 当前服务的名称
spring:
  application:
    name: resilience4j-client-consumer
# 当前服务的端口
server:
  port: 5002

# 服务注册中心地址
eureka:
  client:
    service-url:
      defaultZone: http://127.0.0.1:1111/eureka
接着,在项目启动类上添加 RestTemplate ,如下:
@SpringBootApplication
public class Resilience4jClientConsumerApplication {

    public static void main(String[] args) {
        SpringApplication.run(Resilience4jClientConsumerApplication.class, args);
    }

    @Bean
    @LoadBalanced
    RestTemplate restTemplate() {
        return new RestTemplate();
    }
}
接下来,启动 resilience4j-client-consumer ,访问 http://127.0.0.1:1111 可以看到 resilience4j-client-consumer 的注册信息。
最后在 resilience4j-client-consumer 中新增测试业务类和接口,去实现服务调用,从而消费 resilience4j-client-provider 中提供的接口,如下:
约定:本文中的服务调用失败(测试服务降级/容错),可以采用关闭某个 resilience4j-client-provider 来模拟,短时间内会报错(因为 provider 地址会缓存 consumer 上一段时间),从而达到我们的目的。
在 resilience4j-client-provider 中修改 ProviderController ,新增接口,如下:
@GetMapping("/testCircuitBreaker")
public String testCircuitBreaker() {
    String s = "hello cxy35:" + port;
    System.out.println(s);
    int i = 1 / 0;
    return "testCircuitBreaker: " + s;
}
在 resilience4j-client-consumer 中修改 pom.xml 文件,把 resilience4j-circuitbreaker 从移除列表中删除。
然后在 application.yml 中增加断路器 CircuitBreaker 相关配置:
# Resilience4j 配置
resilience4j:
  # 配置断路器
  circuitbreaker:
    circuit-breaker-aspect-order: 398 # 优先级
    instances:
      cbA:
        ringBufferSizeInHalfOpenState: 3 # 当断路器处于 HalfOpen 状态时,环形缓冲区的大小
        ringBufferSizeInClosedState: 5 # 当断路器处于 Closed 状态时,环形缓冲区的大小
        waitInterval: 5000
        recordExceptions:
            - org.springframework.web.client.HttpServerErrorException # 记录异常
新建 ConsumerService ,新增接口,如下:
@Service
@CircuitBreaker(name = "cbA", fallbackMethod = "error") // 测试断路器,服务降级/容错
public class ConsumerService {
    @Autowired
    RestTemplate restTemplate;

    public String testCircuitBreaker() {
        return restTemplate.getForObject("http://resilience4j-client-provider/testCircuitBreaker", String.class);
    }

    public String error(Throwable t) {
        return "error";
    }
}
其中 @CircuitBreaker 注解中的 name 属性用来指定 circuitbreaker 配置(对应配置文件), fallbackMethod 属性用来指定服务降级的方法,需要注意的是,服务降级方法中,要添加异常参数。
新建 ConsumerController ,新增接口,如下:
@RestController
public class ConsumerController {
    @Autowired
    ConsumerService consumerService;

    @GetMapping("/testCircuitBreaker")
    public String testCircuitBreaker() {
        return consumerService.testCircuitBreaker();
    }
}
访问 http://127.0.0.1:5002/testCircuitBreaker 完成测试,服务降级,返回 "error" 。
RateLimiter 作为限流工具,主要在服务端/服务提供者使用,用来保护服务端/服务提供者的接口。
在 resilience4j-client-provider 中修改 pom.xml 文件,手动添加 Resilience4j 相关依赖,最终的依赖如下:
<dependencies>
    <dependency>
        <groupId>org.springframework.boot</groupId>
        <artifactId>spring-boot-starter-web</artifactId>
    </dependency>
    <dependency>
        <groupId>org.springframework.cloud</groupId>
        <artifactId>spring-cloud-starter-netflix-eureka-client</artifactId>
    </dependency>
    <dependency>
        <groupId>io.github.resilience4j</groupId>
        <artifactId>resilience4j-spring-boot2</artifactId>
        <version>1.2.0</version>
        <exclusions>
            <exclusion>
                <groupId>io.github.resilience4j</groupId>
                <artifactId>resilience4j-circuitbreaker</artifactId>
            </exclusion>
            <exclusion>
                <groupId>io.github.resilience4j</groupId>
                <artifactId>resilience4j-bulkhead</artifactId>
            </exclusion>
            <exclusion>
                <groupId>io.github.resilience4j</groupId>
                <artifactId>resilience4j-timelimiter</artifactId>
            </exclusion>
        </exclusions>
    </dependency>
    <dependency>
        <groupId>org.springframework.boot</groupId>
        <artifactId>spring-boot-starter-test</artifactId>
        <scope>test</scope>
        <exclusions>
            <exclusion>
                <groupId>org.junit.vintage</groupId>
                <artifactId>junit-vintage-engine</artifactId>
            </exclusion>
        </exclusions>
    </dependency>
</dependencies>
注意: resilience4j-spring-boot2 中包含了 Resilience4j 的所有功能,但是没有配置的功能无法使用,启动会报错,所以需要将之从依赖中剔除掉。这里移除掉 resilience4j-ratelimiter ,用于测试限流功能。
在 resilience4j-client-provider 中修改 application.properties ,增加限流 RateLimiter 相关配置:
# 限流配置
## 定义一个限流器 rlA ,这里限制每 1s 处理 2 个请求
resilience4j.ratelimiter.limiters.rlA.limit-refresh-period=1s
resilience4j.ratelimiter.limiters.rlA.limit-for-period=2
resilience4j.ratelimiter.limiters.rlA.timeout-duration=3s
在 resilience4j-client-provider 中修改 ProviderController ,新增接口,如下:
@GetMapping("/testRateLimiter")
@RateLimiter(name = "rlA") // 测试限流
public String testRateLimiter() {
    String s = "hello cxy35:" + port;
    System.out.println(new Date());
    return "testRateLimiter: " + s;
}
这里通过 @RateLimiter 注解来标记该接口限流。
在 resilience4j-client-consumer 中修改 pom.xml 文件,把 resilience4j-ratelimiter 从移除列表中删除。
修改 ConsumerService ,新增接口,如下:
public String testRateLimiter() {
    for (int i = 0; i < 5; i++) {
        restTemplate.getForObject("http://resilience4j-client-provider/testRateLimiter", String.class);
    }
    return "success";
}
修改 ConsumerController ,新增接口,如下:
@GetMapping("/testRateLimiter")
public String testRateLimiter() {
    return consumerService.testRateLimiter();
}
访问 http://127.0.0.1:5002/testRateLimiter 完成测试, provider 中打印如下:
Mon Apr 27 15:29:51 CST 2020
Mon Apr 27 15:29:51 CST 2020
Mon Apr 27 15:29:52 CST 2020
Mon Apr 27 15:29:52 CST 2020
Mon Apr 27 15:29:53 CST 2020
在 resilience4j-client-provider 中修改 ProviderController ,新增接口,如下:
@GetMapping("/testRetry")
public String testRetry() {
    String s = "hello cxy35:" + port;
    System.out.println(s);
    int i = 1 / 0;
    return "testRetry: " + s;
}
在 resilience4j-client-consumer 中修改 application.yml ,增加请求重试 Retry 相关配置:
# Resilience4j 配置
resilience4j:
  # 配置请求重试
  retry:
    retry-aspect-order: 399 # 优先级
    backends:
      retryA:
        maxRetryAttempts: 5 # 重试次数
        waitDuration: 500 # 重试等待时间
        exponentialBackoffMultiplier: 1.1 # 间隔乘数
        retryExceptions:
          - java.lang.RuntimeException # 重试异常
修改 ConsumerService ,新增接口,如下:
@Service
@CircuitBreaker(name = "cbA", fallbackMethod = "error") // 测试断路器,服务降级/容错
@Retry(name = "retryA") // 测试请求重试
public class ConsumerService {
    @Autowired
    RestTemplate restTemplate;

    public String testRetry() {
        return restTemplate.getForObject("http://resilience4j-client-provider/testRetry", String.class);
    }
}
其中 @CircuitBreaker 注解中的 name 属性用来指定 retry 配置(对应配置文件)。
修改 ConsumerController ,新增接口,如下:
@GetMapping("/testRetry")
public String testRetry() {
    return consumerService.testRetry();
}
访问 http://127.0.0.1:5002/testRetry 完成测试,会重试 5 次, provider 中打印如下:
hello cxy35:5000

java.lang.ArithmeticException: / by zero

hello cxy35:5000

java.lang.ArithmeticException: / by zero

...
微服务由于服务数量众多,所以出故障的概率很大,这种时候不能单纯的依靠人肉运维。早期的 Spring Cloud 中,服务监控主要使用 Hystrix Dashboard ,集群数据库监控使用 Turbine 。在 Greenwich 版本中,官方建议监控工具使用 Micrometer ,有如下功能:
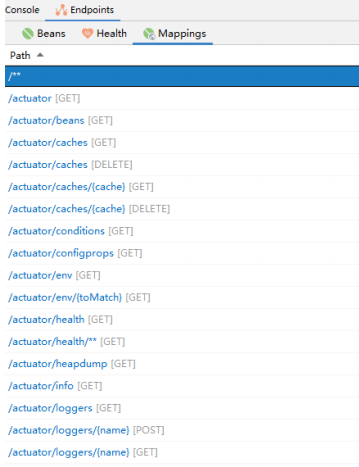
新建一个 Spring Boot 项目,添加 Web/Actuator 依赖。项目创建成功后,添加如下配置,开启所有端点:
management.endpoints.web.exposure.include=*
然后就可以在浏览器查看项目的各项运行数据,但是这些数据都是 JSON 格式。
我们需要一个可视化工具来展示这些 JSON 数据。这里主要和大家介绍 Prometheus 。
# 安装
wget https://github.com/prometheus/prometheus/releases/download/v2.16.0/prometheus-2.16.0.linux-amd64.tar.gz
tar -zxvf prometheus-2.16.0.linux-amd64.tar.gz
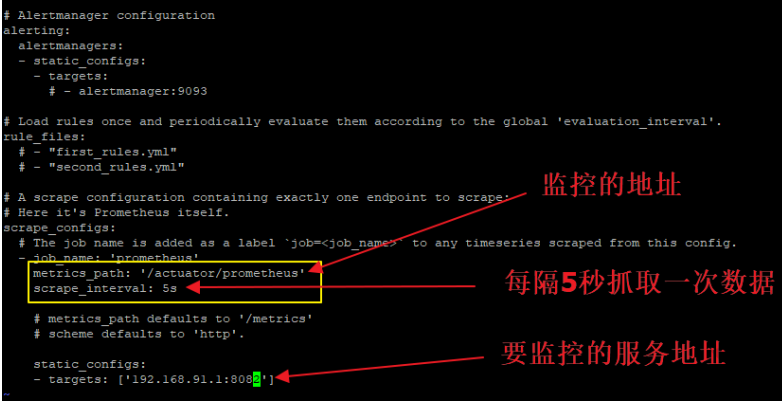
解压完成后,配置一下数据路径和要监控的服务地址:
cd prometheus-2.16.0.linux-amd64/
vi prometheus.yml
修改 prometheus.yml 配置文件,主要改两个地方,一个是数据接口,另一个是服务地址:
接下来,将 Prometheus 整合到 Spring Boot 项目中。
首先加依赖:
<dependency>
    <groupId>io.micrometer</groupId>
    <artifactId>micrometer-registry-prometheus</artifactId>
</dependency>
然后在 application.properties 配置中,添加 Prometheus 配置:
management.endpoints.web.exposure.include=*
management.endpoint.prometheus.enabled=true
management.metrics.export.prometheus.enabled=true
management.endpoint.metrics.enabled=true
接下来启动 Prometheus 。启动命令:
./prometheus --config.file=prometheus.yml
启动成功后,浏览器输入 http://192.168.91.128:9090 查看 Prometheus 数据信息。
https://grafana.com/grafana/download?platform=linux
扫码关注微信公众号 程序员35 ,获取最新技术干货,畅聊 #程序员的35,35的程序员# 。独立站点:https://cxy35.com

推荐http://www.totozhan.com/?p=49
标签:checked autowired png 运维 不同 order 学习 fopen master
原文地址:https://www.cnblogs.com/vwvwvwgwg/p/12815730.html