标签:tst nal 根目录 filters seh ONBUILD host 名称 ice
为什么要用Https就不说了。
第一步:创建自签名的证书。在Windows下开启PowerShell,将以下文字粘贴进去:
|
1
2
3
4
5
6
7
8
9
10
11
12
13
14
15
16
17
18
19
20
21
22
23
24
25
26
27
28
29
30
31
32
33
34
35
36
37
38
39
40
|
# setup certificate properties including the commonName (DNSName) property for Chrome 58+$certificate = New-SelfSignedCertificate ` -Subject 改成自己想要的标题不要带乱七八糟的符号(安装证书的时候会显示这个) ` -DnsName 友好域名 ` -KeyAlgorithm RSA ` -KeyLength 2048 ` -NotBefore (Get-Date) ` -NotAfter (Get-Date).AddYears(2) ` -CertStoreLocation "cert:CurrentUser\My" ` -FriendlyName "证书的友好名称,在IIS指定的时候显示Certificate for .NET Core" ` -HashAlgorithm SHA256 ` -KeyUsage DigitalSignature, KeyEncipherment, DataEncipherment ` -TextExtension @("2.5.29.37={text}1.3.6.1.5.5.7.3.1")$certificatePath = ‘Cert:\CurrentUser\My\‘ + ($certificate.ThumbPrint) # create temporary certificate path$tmpPath = "C:\tmp"If(!(test-path $tmpPath)){New-Item -ItemType Directory -Force -Path $tmpPath}# set certificate password here$pfxPassword = ConvertTo-SecureString -String "证书的密码" -Force -AsPlainText$pfxFilePath = "c:\tmp\证书的名称.pfx"$cerFilePath = "c:\tmp\证书的名称.cer"# create pfx certificateExport-PfxCertificate -Cert $certificatePath -FilePath $pfxFilePath -Password $pfxPasswordExport-Certificate -Cert $certificatePath -FilePath $cerFilePath# import the pfx certificateImport-PfxCertificate -FilePath $pfxFilePath Cert:\LocalMachine\My -Password $pfxPassword -Exportable# trust the certificate by importing the pfx certificate into your trusted rootImport-Certificate -FilePath $cerFilePath -CertStoreLocation Cert:\CurrentUser\Root# optionally delete the physical certificates (don’t delete the pfx file as you need to copy this to your app directory)# Remove-Item $pfxFilePathRemove-Item $cerFilePath |
把汉字部分修改成你想要的,然后运行一下,就可以在C:\tmp下面找到你的证书了,一般把它放在网站根目录下即可。
二、站点配置(ASP.NET Core 2.1)
* public void ConfigureServices(IServiceCollection services) 部分:
services.AddMvc(options =>
{
options.Filters.Add(new RequireHttpsAttribute());//所有请求都使用HTTPS
})
* public void Configure(IApplicationBuilder app, IHostingEnvironment env) 部分:
var options = new RewriteOptions().AddRedirectToHttps();
app.UseRewriter(options);
app.UseHttpsRedirection();
三、IIS配置:
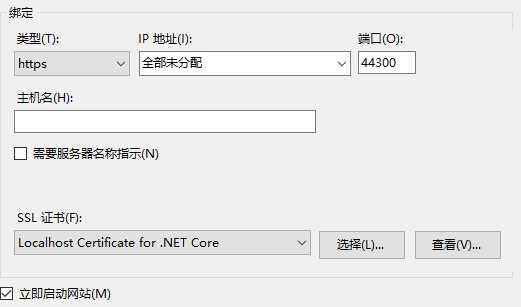
经过这几步,你的网站就变成Https的了。
Windows IIS ASP.NET Core中创建和使用HTTPS自签名证书
标签:tst nal 根目录 filters seh ONBUILD host 名称 ice
原文地址:https://www.cnblogs.com/xtjatswc/p/12900758.html