标签:Owner 授权 perm 认证 用户登录 ons 获取 项目 conf
前面已经可以通过SpringCloud可以来构建对外的接口,现在来介绍一下怎么通过使用OAuth2来进行接口的鉴权。
本文源地址:搭建微服务框架(服务接口鉴权)
Github地址:SQuid
OAuth2网上介绍的例子太多太多,简单点介绍它就是一个授权的标准。
OAuth2目前拥有四种授权机制:
授权码模式(authorization code)
授权码模式大多数用于互联网登录的场景,比如在京东商城网站中,使用QQ号进行授权登录:

简化模式(implicit)
一般很少用到,目前对这种模式自己也没有代码上的实现,所以还是不进行叙述,免得误人子弟了??
密码模式(resource owner password credentials)
密码模式对于一般的企业B/S架构系统用到的非常多,毕竟系统中已经存储了用户名和密码,而密码模式则就是需要提供用户名和密码。客户端使用这些信息,向“服务商提供商(也就是企业开发的系统)”索要授权。
客户端模式(client credentials)
客户端模式多用于对第三方接口的使用,分配给对方一个secret就行,用对方来进行acess_token的获取。
关键名词说明:
本次集成的是
Spring Security OAuth,集成后的项目仅支持密码模式和客户端模式两种。
在集成OAuth时,我们需要拥有以下环境:
Mysql5.7+
MySQL用来记录OAuth的必要信息: client_id、clien_secret、grant、scope,SQL脚本地址:oauth2.sql
Redis
Redis则用来控制 access_token 的有效期。
新建工程
首先我们先在原有的工程下新建一个 squid-oatuh2 的工程,引入下列maven依赖:
   <dependency>
       <groupId>org.springframework.security.oauth</groupId>
       <artifactId>spring-security-oauth2</artifactId>
       <version>2.3.3.RELEASE</version>
   </dependency>

   <dependency>
       <groupId>org.springframework.cloud</groupId>
       <artifactId>spring-cloud-starter-security</artifactId>
   </dependency>

   <dependency>
       <groupId>org.springframework.boot</groupId>
       <artifactId>spring-boot-starter-data-redis</artifactId>
   </dependency>

   <dependency>
       <groupId>mysql</groupId>
       <artifactId>mysql-connector-java</artifactId>
   </dependency>

   <dependency>
       <groupId>org.springframework</groupId>
       <artifactId>spring-jdbc</artifactId>
   </dependency>

   <dependency>
       <groupId>com.alibaba.cloud</groupId>
       <artifactId>spring-cloud-alibaba-nacos-discovery</artifactId>
   </dependency>

   <dependency>
       <groupId>com.alibaba.cloud</groupId>
       <artifactId>spring-cloud-alibaba-nacos-config</artifactId>
   </dependency>
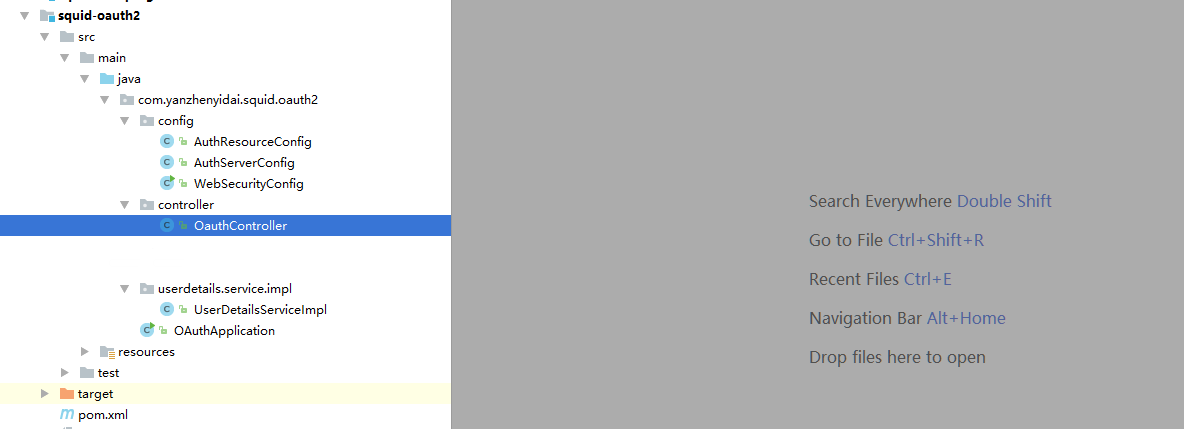
引入依赖后,我们开始编写使用OAuth的代码,为了方便,我先将我的工程截图:
紧接着,贴下代码:
    @EnableResourceServer
    @Configuration
    public class AuthResourceConfig extends ResourceServerConfigurerAdapter {

        @Autowired
        RedisConnectionFactory redisConnectionFactory;

    //    @Autowired
    //    DataSource dataSource;

        @Override
        public void configure(ResourceServerSecurityConfigurer resources) throws Exception {
            super.configure(resources);
        }

        @Override
        public void configure(HttpSecurity http) throws Exception {
            http.
                    csrf().disable()
                    .authorizeRequests().anyRequest().authenticated()
                    .and()
                    .httpBasic();
        }

    //    @Bean
    //    ResourceServerTokenServices resourceServerTokenServices() {
    //        RemoteTokenServices tokenServices = new RemoteTokenServices();
    //        tokenServices.setCheckTokenEndpointUrl("http://localhost:8081/oauth/check_token");
    //        tokenServices.setAccessTokenConverter(accessTokenConverter());
    //        return tokenServices;
    //    }

        @Bean
        public AccessTokenConverter accessTokenConverter() {
            return new DefaultAccessTokenConverter();
        }

        @Bean
        RedisTokenStore redisTokenStore() {
            return new RedisTokenStore(redisConnectionFactory);
        }

    //    @Bean
    //    ClientDetailsService clientDetailsService() {
    //        return new JdbcClientDetailsService(dataSource);
    //    }

        @Bean
        @Primary
        DefaultTokenServices defaultTokenServices() {
            DefaultTokenServices tokenServices = new DefaultTokenServices();
            tokenServices.setTokenStore(redisTokenStore());
    //        tokenServices.setSupportRefreshToken(true);
    //        tokenServices.setClientDetailsService(clientDetailsService());
    //        tokenServices.setAccessTokenValiditySeconds(60 * 60 * 12); // token有效期自定义设置,默认12小时
    //        tokenServices.setRefreshTokenValiditySeconds(60 * 60 * 24 * 7);//默认30天,这里修改
            return tokenServices;
        }

    }
AuthResourceConfig,作为资源授权模块来说,它更多的出现在业务模块工程中,做的是资源授权的操作,每一个微服务模块都会被当成一个资源来定义,而请求资源,则需要每次校验 access_token
,这个类可以出现在任意一个微服务工程中。
@Configuration
@EnableAuthorizationServer
public class AuthServerConfig extends AuthorizationServerConfigurerAdapter {
    @Autowired
    RedisConnectionFactory redisConnectionFactory;

    @Autowired
    DataSource dataSource;

    @Autowired
    private AuthenticationManager authenticationManager;

    @Autowired
    private UserDetailsServiceImpl userServices;

    @Bean
    RedisTokenStore redisTokenStore() {
        return new RedisTokenStore(redisConnectionFactory);
    }

    @Bean
    ClientDetailsService clientDetailsService() {
        return new JdbcClientDetailsService(dataSource);
    }

    @Bean
    @Primary
    DefaultTokenServices defaultTokenServices() {
        DefaultTokenServices tokenServices = new DefaultTokenServices();
        tokenServices.setTokenStore(redisTokenStore());
        tokenServices.setSupportRefreshToken(true);
        tokenServices.setClientDetailsService(clientDetailsService());
        tokenServices.setAccessTokenValiditySeconds(60 * 60 * 12); // token有效期自定义设置,默认12小时
        tokenServices.setRefreshTokenValiditySeconds(60 * 60 * 24 * 7);//默认30天,这里修改
        return tokenServices;
    }

    @Override
    public void configure(AuthorizationServerSecurityConfigurer security) throws Exception {
        security.tokenKeyAccess("permitAll()");
        security.checkTokenAccess("isAuthenticated()");
        security.allowFormAuthenticationForClients();
    }

    @Override
    public void configure(ClientDetailsServiceConfigurer clients) throws Exception {
        clients.withClientDetails(clientDetailsService());
    }

    @Override
    public void configure(AuthorizationServerEndpointsConfigurer endpoints) throws Exception {
        endpoints.tokenStore(redisTokenStore()).userDetailsService(userServices).authenticationManager(authenticationManager).tokenServices(defaultTokenServices());
    }
}
认证授权,顾名思义,看到实现的代码也明白,做的是与 Mysql和Redis的交互,做到关键的用户登录信息处理,以及token的有效期定义。
@Configuration
@EnableWebSecurity
@EnableGlobalMethodSecurity(prePostEnabled = true)
public class WebSecurityConfig extends WebSecurityConfigurerAdapter {

    @Autowired
    private UserDetailsServiceImpl userServices;

    @Bean
    PasswordEncoder passwordEncoder() {
        return new BCryptPasswordEncoder();
    }

    @Override
    @Bean
    public AuthenticationManager authenticationManagerBean() throws Exception {
        return super.authenticationManagerBean();
    }

    @Override
    protected void configure(AuthenticationManagerBuilder auth) throws Exception {
        auth.userDetailsService(userServices).passwordEncoder(passwordEncoder());
    }

    @Override
    public void configure(WebSecurity web) throws Exception {
        web.ignoring().antMatchers("/css/**", "/js/**", "/plugins/**", "/favicon.ico");
    }

    @Override
    protected void configure(HttpSecurity http) throws Exception {
        http.csrf().disable();
//        http
//                .authorizeRequests()
//                .anyRequest().authenticated()
//                .antMatchers("/oauth/**").permitAll()
//                .and()
//                .csrf().disable();
    }

    public static void main(String[] args) {
        BCryptPasswordEncoder encoder = new BCryptPasswordEncoder();

        boolean matches = encoder.matches("123456", "$2a$10$cKRbR9IJktfmKmf/wShyo.5.J8IxO/7YVn8twuWFtvPgruAF8gtKq");
        System.out.println(matches);
//        System.out.println(encoder.encode("123456"));
    }
}
@Service
public class UserDetailsServiceImpl implements UserDetailsService {

//    @Autowired
//    private SysUserDao sysUserDao;

    @Override
    public UserDetails loadUserByUsername(String s) throws UsernameNotFoundException {

//        SysUser sysUser = sysUserDao.findByUserName(s);
//
//        if (sysUser == null) {
//            throw new UsernameNotFoundException("用户名或密码错误");
//        }

        return new User(s, "$2a$10$cKRbR9IJktfmKmf/wShyo.5.J8IxO/7YVn8twuWFtvPgruAF8gtKq", new HashSet<>());
    }

}
由于目前还没有介绍到使用 SpringDataJPA 以及 MyBatils-Plus,这里我们先将用户密码写死 123456。
server:
  port: 8081
spring:
  redis:
    host: yanzhenyidai.com
    port: 6379
    password: ****
  datasource:
    url: jdbc:mysql://yanzhenyidai.com:3306/oauth2?useUnicode=true&characterEncoding=utf-8
    username: yanzhenyidai
    password: password
    druid:
      driver-class-name: com.mysql.jdbc.Driver
  main:
    allow-bean-definition-overriding: true
  cloud:
    nacos:
      discovery:
        server-addr: yanzhenyidai.com:8848
  application:
    name: squid-oauth2
    show-sql: true
logging:
  config: classpath:logback.xml
  level:
    org:
      springframework:
        web: info
@SpringBootApplication
@EnableDiscoveryClient
@RestController
public class OAuthApplication {

    public static void main(String[] args) {
        SpringApplication.run(OAuthApplication.class, args);
    }

    @GetMapping("/test")
    public String test() {
        return "test";
    }

    @RequestMapping("/user")
    public Principal principal(Principal principal) {
        return principal;
    }


}
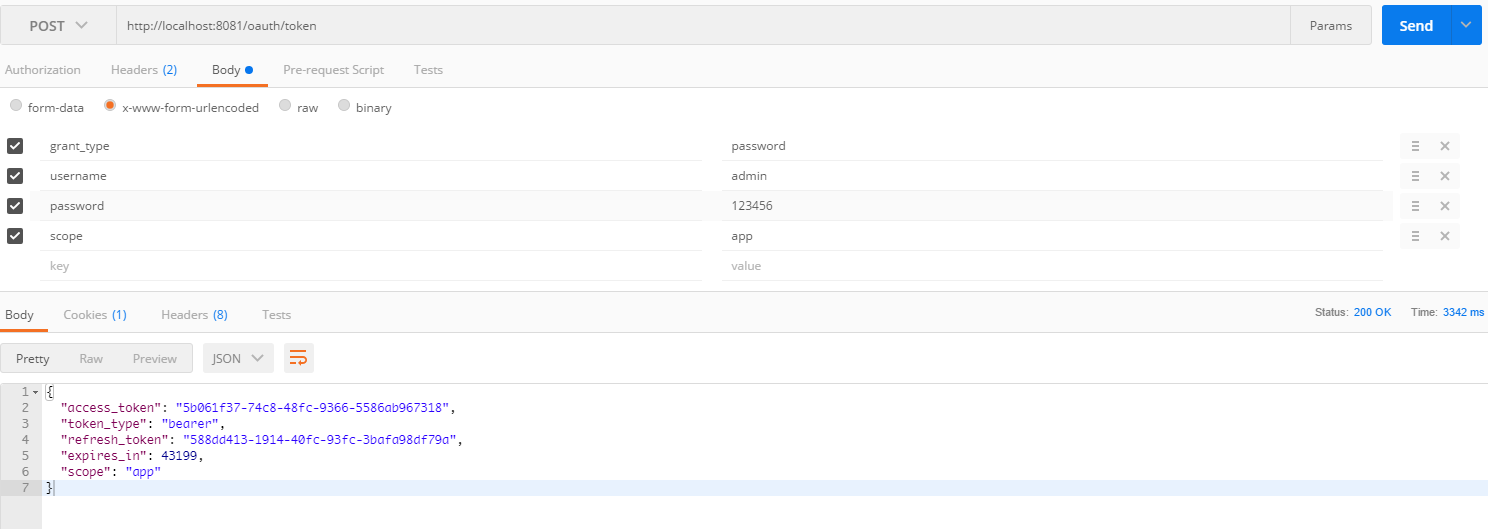
一切完成后,我们启动服务,来进行测试,这个时候需要使用到 POSTMAN
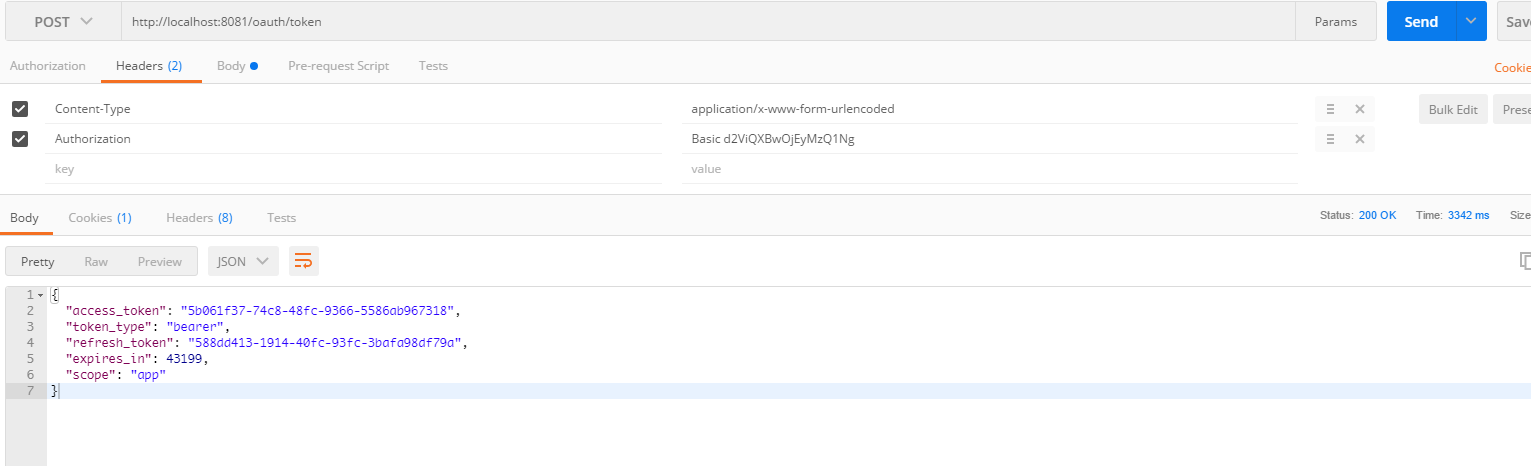
Authorization 中的 Basic 为固定值,后续加密字符串为 scope+password 的Base64解密值。
使用OAuth2可以帮助我们进行鉴权,也可以解决CSRF跨域,在选型到OAuth的时候,还担心它会很复杂,毕竟之前是深深的体会使用 SpringSecurity 的无奈。
参考资料:
OAuth-example
Spring-Security-OAuth
OAuth 2.0 的一个简单解释
BAELDUNG.com (OAUTH)
搭建SpringCloud微服务框架:四、Spring-Security-OAuth 服务接口鉴权
标签:Owner 授权 perm 认证 用户登录 ons 获取 项目 conf
原文地址:https://www.cnblogs.com/yanzhenyidai/p/12988540.html