标签:connect 地址栏 实现 tin tps tls maria 应用服务器 mariadb
HTTPS (Hyper Text Transfer Protocol over SecureSocket Layer)是基于 HTTP 衍生出的可进行加密传输、身份认证的网络协议 。是以安全为目标的 HTTP 通道,HTTPS 在 HTTP 的基础下加入 SSL/TSL 层,用来对传输的内容做加密, HTTPS 的默认端口为 443,HTTPS 存在不同于 HTTP 的默认端口及一个 加密传输 / 身份验证 层(在 HTTP与 TCP 之间)。
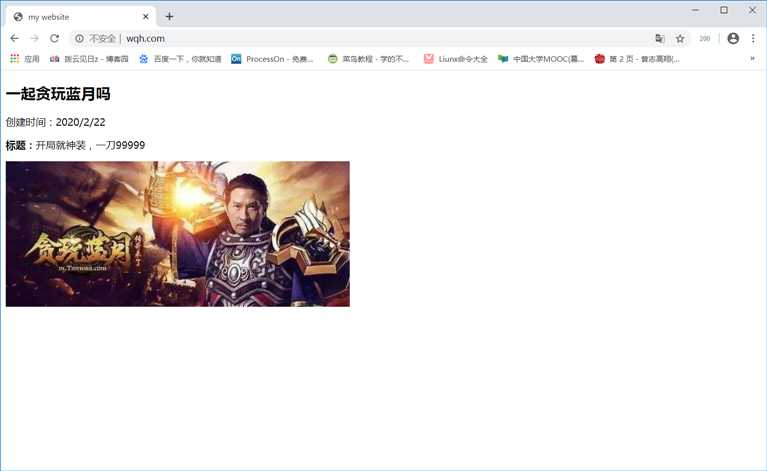
HTTP是明文传输的,那么在客户端、服务端之间传输的内容,是可以被中间的任意一个节点获取的;例如用户登陆,输入账号、密码,如果采用 HTTP 协议,在中间的代理服务器上,稍微做点手脚就可以拿到你的密码 ;同时,用户请求的服务端页面,也可以被代理服务器任意更改替换(使用 ngx_http_sub_module),服务端原始的页面会被篡改,例如被迫打上“澳门皇家赌场”的广告。
客户端----> 代理服务器(做手脚)----> 服务端
模拟网站原始页面被篡改,首先配置服务端原始页面:
# 服务端 nginx 配置
[root@web01 ~]# vi /etc/nginx/conf.d/www.wqh.com.conf
server {
listen 80;
server_name www.wqh.com;
root /website;
index index.html;
charset utf-8;
}
# 站点目录的索引文件
[root@web01 ~]# vim /website/index.html
<!DOCTYPE html>
<html lang="en">
<head>
<meta charset="UTF-8">
<title>my website</title>
</head>
<body>
<article>
<header>
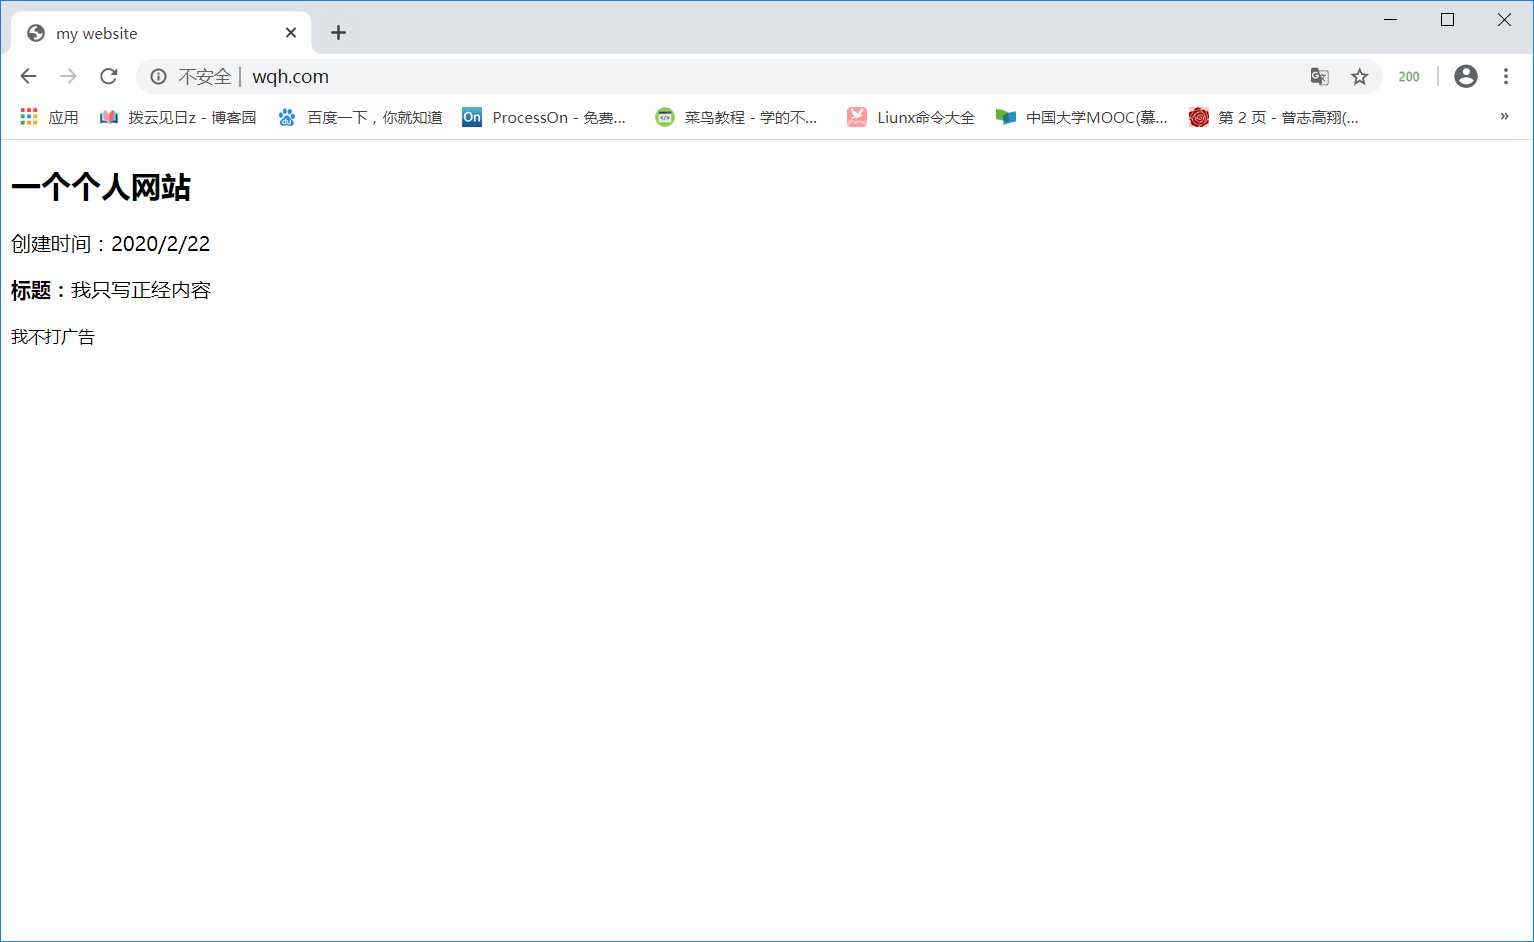
<h1>一个个人网站</h1>
<p>创建时间:<time pubdate="pubdate">2020/2/22</time></p>
</header>
<p>
<b>标题:</b>我只写正经内容
</p>
<footer>
<p><small>我不打广告</small></p>
</footer>
</article>
</body>
</html>
中间安插一个代理服务器:
# 代理服务器 nginx 配置
[root@lb01 ~]# vi /etc/nginx/conf.d/test.conf
upstream sb {
        server 10.0.0.9:80;
}
server {
        listen 80;
        server_name www.wqh.com;

        location / {
                proxy_pass http://sb;
                proxy_set_header Host $http_host;
                sub_filter ‘<h1>一个个人网站‘ ‘<h1>一起贪玩蓝月吗‘;
                sub_filter ‘</b>我只写正经内容‘ ‘</b>开局就神装,一刀99999‘;
                sub_filter ‘<small>我不打广告‘ ‘ <img src="https://timgsa.baidu.com/timg?image&quality=80&size=b9999_10000&sec=1591197424430&di=22f4883b00be870cb56c796067d45962&imgtype=0&src=http%3A%2F%2Fwww.ijiandao.com%2Fwp-content%2Fuploads%2F2019%2F06%2F74dbd2451110be34e86e4c96874b9e05.jpg">‘;
        }
}
需要配置 SSL/TLS 证书,才可以使用 HTTPS 协议,证书类型如下,证书的选择包括 单域名证书、多域名证书、通配符证书,通配符选择的证书只支持匹配二级域名 。
| 对比 | 域名型 DV | 企业型 OV | 增强型 EV |
|---|---|---|---|
| 地址栏 | 小锁标记+https | 小锁标记+https | 小锁标记+企业名称+https |
| 一般用途 | 个人站点和应用; 简单的https加密需求 | 电子商务站点和应用; 中小型企业站点 | 大型金融平台; 大型企业和政府机构站点 |
| 审核内容 | 域名所有权验证 | 全面的企业身份验证; 域名所有权验证 | 最高等级的企业身份验证; 域名所有权验证 |
| 颁发时长 | 10分钟-24小时 | 3-5个工作日 | 5-7个工作日 |
| 单次申请年限 | 1年 | 1-2年 | 1-2年 |
| 赔付保障金 | —— | 125-175万美金 | 150-175万美金 |
不同类型的域名:
使用 SSL 证书需要使用 ngx_http_ssl_module 模块(官方文档),正常的 SSL 证书(被浏览器承认)都需要申请,但也可以模拟生成一个证书(不被浏览器承认):
## ngx_http_ssl_module 语法
# 启动 ssl 功能
Syntax:  ssl on | off;  <----  ssl on; 或 listen 443 ssl;
Default: ssl off;
Context: http,server
# 指定证书文件
Syntax:  ssl_certificate file;
Default: -
Context: http,server
# 指定私钥文件
Syntax:  ssl_certificate_key file;
Default: -
Context: http,server


## 模拟生成一个 SSL 证书
# 生成私钥
[root@lb01 ~]# mkdir /app/nginx/conf/ssl_key
[root@lb01 ~]# cd /app/nginx/conf/ssl_key/
[root@lb01 ssl_key]#  openssl genrsa -idea -out /app/nginx/conf/ssl_key/$(date +%Y%m%d)_wqh.com.key 2048
Generating RSA private key, 2048 bit long modulus
................................+++
.............................................................................................+++
e is 65537 (0x10001)
Enter pass phrase for /app/nginx/conf/ssl_key/20200603_wqh.com.key:
Verifying - Enter pass phrase for /app/nginx/conf/ssl_key/20200603_wqh.com.key:
# 生成证书
[root@lb01 ssl_key]#  openssl req -days 36500 -x509 -sha256 -nodes -newkey rsa:2048 -keyout /app/nginx/conf/ssl_key/20200603_wqh.com.key -out /app/nginx/conf/ssl_key/20200603_wqh.com.crt
Generating a 2048 bit RSA private key
....+++
................................................+++
writing new private key to ‘/app/nginx/conf/ssl_key/20200603_wqh.com.key‘
-----
You are about to be asked to enter information that will be incorporated
into your certificate request.
What you are about to enter is what is called a Distinguished Name or a DN.
There are quite a few fields but you can leave some blank
For some fields there will be a default value,
If you enter ‘.‘, the field will be left blank.
-----
Country Name (2 letter code) [XX]:CN
State or Province Name (full name) []:Heilongjiang
Locality Name (eg, city) [Default City]:qiqihaer
Organization Name (eg, company) [Default Company Ltd]:none
Organizational Unit Name (eg, section) []:none
Common Name (eg, your name or your server‘s hostname) []:wqh.com
Email Address []:123@123.com
单台服务器配置 HTTPS:
[root@lb01 ~]# vi /app/nginx/conf/conf.d/test.conf
server {
        listen 80;
        server_name www.wqh.com;
        return 302 https://$host/$request_uri;
}

server {
        listen 443 ssl;
        server_name www.wqh.com;
        ssl_certificate /app/nginx/conf/ssl_key/20200603_wqh.com.crt;
        ssl_certificate_key /app/nginx/conf/ssl_key/20200603_wqh.com.key;
	    root /website;
	    index index.html;
}
[root@lb01 ~]# vim  /website/index.html
<H1>THIS IS HTTPS</H1>
部署负载均衡代理服务器,添加 SSL 安全证书;部署应用服务器,数据库服务器,NFS共享存储服务器以及备份服务器;具体环境需求如下:
| 服务器 | IP(WAN) | 服务 |
|---|---|---|
| lb01 | 10.0.0.5 | nginx + SSL证书 |
| web01 | 10.0.0.7 | nginx + php-fpm |
| web02 | 10.0.0.8 | nginx + php-fpm |
| web03 | 10.0.0.9 | nginx + php-fpm |
| db01 | 10.0.0.51 | mariadb |
| nfs | 10.0.0.31 | nfs-server,sereync |
| backup | 10.0.0.41 | rsync |
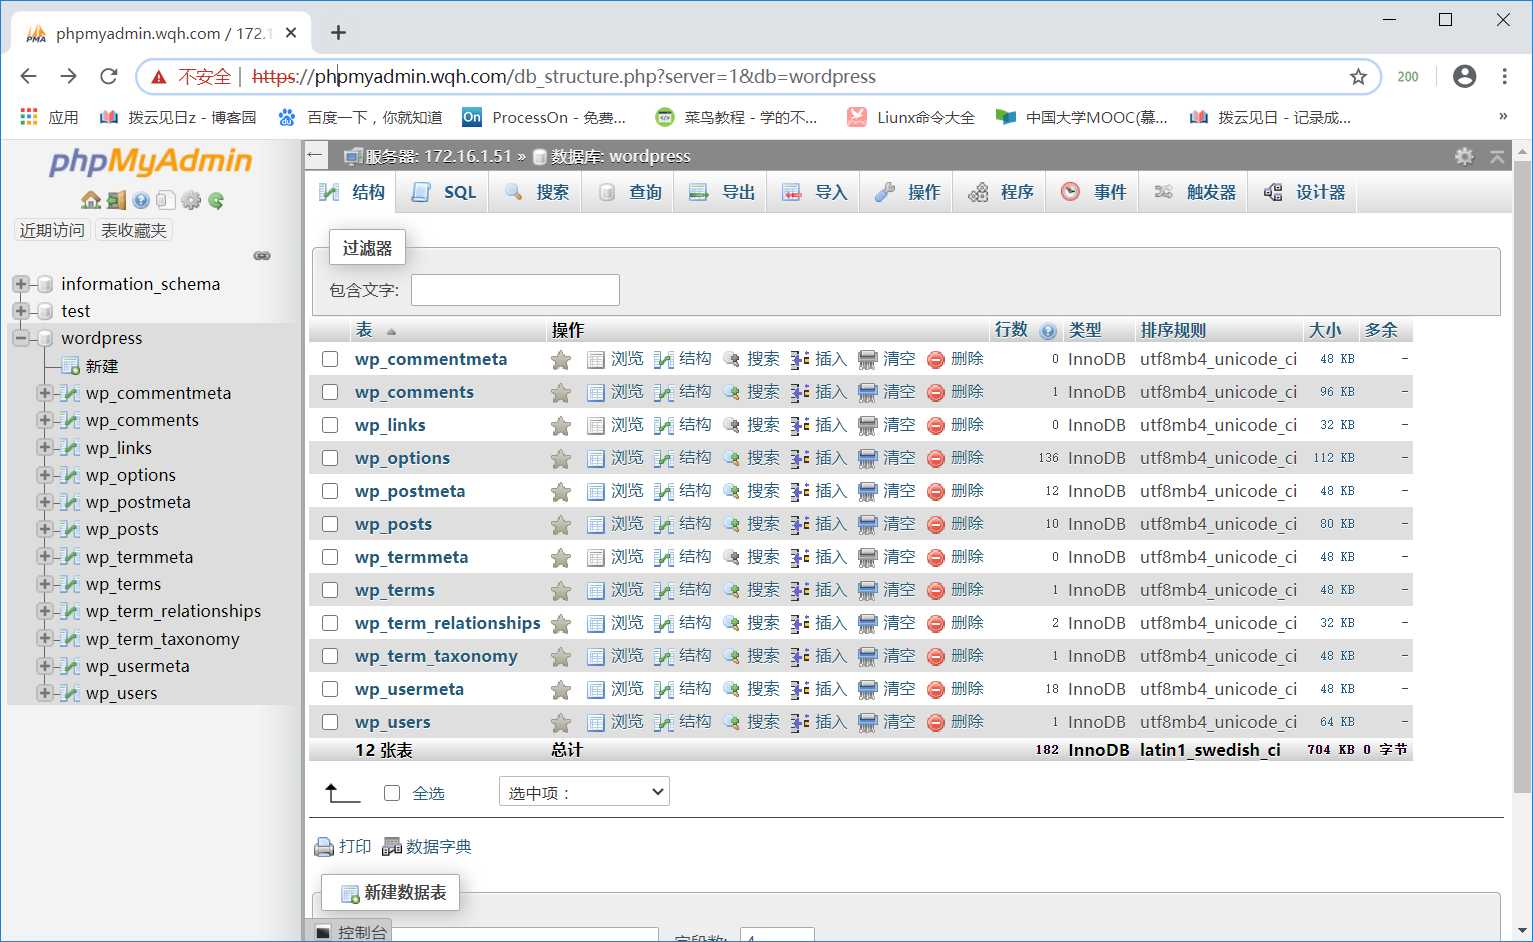
# 安装 mariadb,创建数据库 wordpress、wecenter
[root@db01 ~]# yum -y install mariadb-server
[root@db01 ~]# systemctl start mariadb && systemctl enable mariadb
[root@lb01 ~]# mysqladmin -uroot password 123
[root@lb01 ~]# mysql -p123
>create database wordpress;
>grant all on wordpress.* to wp_user@‘%‘ identified by ‘123456‘;
>create database wecenter;
>grant all on wecenter.* to wc_user@‘%‘ identified by ‘123456‘;
# 每个应用服务器都装过 Nginx,进行以下操作
# 编辑 nginx 配置文件
[root@web01 ~]# cat /etc/nginx/conf.d/blog.wqh.com.conf
server {
listen 80;
server_name blog.wqh.com;
root /website/wordpress/;
index index.php;
location ~ \.php$ {
fastcgi_pass 127.0.0.1:9000;
fastcgi_index index.php;
fastcgi_param SCRIPT_FILENAME $document_root$fastcgi_script_name;
include fastcgi_params;
}
}
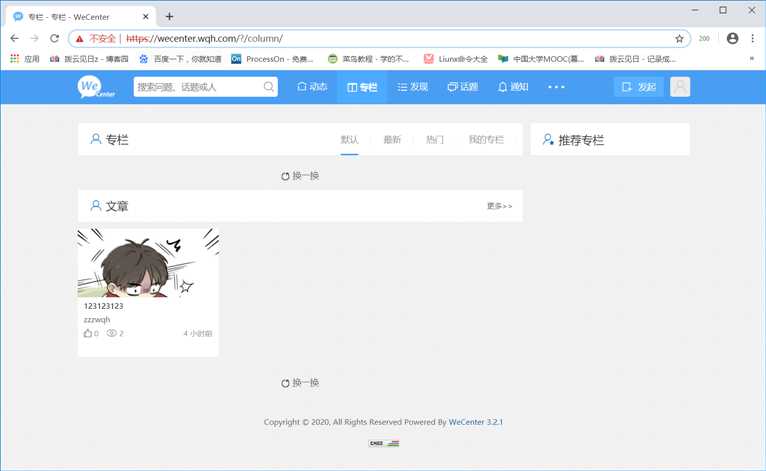
[root@web01 ~]# cat /etc/nginx/conf.d/wecenter.wqh.com.conf
server {
listen 80;
server_name wecenter.wqh.com;
root /website/wecenter/;
index index.php;
location ~ \.php$ {
fastcgi_pass 127.0.0.1:9000;
fastcgi_index index.php;
fastcgi_param SCRIPT_FILENAME $document_root$fastcgi_script_name;
include fastcgi_params;
}
}
[root@web01 ~]# cat /etc/nginx/conf.d/phpmyadmin.com.conf
server {
listen 80;
server_name phpmyadmin.wqh.com;
root /website/phpmyadmin;
index index.php;
location ~ \.php$ {
fastcgi_pass 127.0.0.1:9000;
fastcgi_index index.php;
fastcgi_param SCRIPT_FILENAME $document_root$fastcgi_script_name;
include fastcgi_params;
}
}
# 添加参数到 fastcgi_params 文件,开启 HTTPS(让 php-fpm 将所有 HTTP链接 转为 HTTPS链接)
[root@web01 ~]# echo "fastcgi_param HTTPS on;" >> /etc/nginx/fastcgi_params
# 解压 phpmyadmin、 wecenter、wordpress 到指定站点目录,指定属主属组(nginx,php-fpm 的执行用户)
# 打开浏览器安装,phpmyadmin 需要手动创建数据库配置文件
[root@web01 ~]# vi /website/phpmyadmin/config.inc.php
$cfg[‘Servers‘][$i][‘host‘] = ‘172.16.1.51‘;
# 安装好后,将web01服务器的 nginx配置文件 传给web02、web03服务器
[root@web01 ~]# rsync -avz /etc/nginx/ 10.0.0.8:/etc/
[root@web01 ~]# rsync -avz /etc/nginx/ 10.0.0.9:/etc/
# 安装 nfs-utils rpcbind,启动服务,客户端也需要安装才可以指定挂载 nfs 文件系统类型
[root@nfs ~]# yum -y install nfs-utils
[root@nfs ~]# systemctl start nfs-server && systemctl enable nfs-server
[root@web01 ~]# yum -y install nfs-utils
[root@web02 ~]# yum -y install nfs-utils
[root@web03 ~]# yum -y install nfs-utils

# 指定共享存储目录、网段、授权,/website_data 存储站点目录下所有的内容,/phpmyadmin_session 存储 phpmyadmin 维持会话的 session 文件
[root@nfs ~]# cat /etc/exports
/website_data 172.16.1.0/24(rw,sync,all_squash,anonuid=666,anongid=666)
/phpmyadmin_session 172.16.1.0/24(rw,sync,all_squash,anonuid=666,anongid=666)

# 创建匿名用户,创建共享存储目录,指定目录授权
[root@nfs ~]# mkdir /website_data /phpmyadmin_session
[root@nfs ~]# useradd www -u 666 -r -s /sbin/nologin -M
[root@nfs ~]# chown www.www /website_data && chown www.www /phpmyadmin_session

# 先将 Web01 站点目录的内容同步到 nfs 服务器的 /website_data
[root@web01 ~]# rsync -avz /website/ 10.0.0.31:/website_data

# 再将 Web01 Web02 Web03 的站点目录挂载到 nfs 服务器上,若 Web02 Web03 没有站点目录则创建,并统一属主
[root@web01 ~]# mount -t nfs 172.16.1.31:/website_data /website
[root@web02 ~]# mount -t nfs 172.16.1.31:/website_data /website
[root@web03 ~]# mount -t nfs 172.16.1.31:/website_data /website

# 再将 phpmyadmin 维持会话的 /var/lib/php/session 目录,挂载到 nfs 服务器上
[root@web01 ~]# mount -t nfs 172.16.1.31:/phpmyadmin_session /var/lib/php/session/
[root@web02 ~]# mount -t nfs 172.16.1.31:/phpmyadmin_session /var/lib/php/session/
[root@web03 ~]# mount -t nfs 172.16.1.31:/phpmyadmin_session /var/lib/php/session/


##############  NFS服务端 同时也是 Rsyncd 客户端,需要部署 Sersync服务 实时备份 ###################
# 下载 Sersync 软件包
[root@nfs ~]# wget https://files.cnblogs.com/files/zzzwqh/sersync2.5.4_64bit_binary_stable_final.tar.gz
[root@nfs ~]# tar xf sersync2.5.4_64bit_binary_stable_final.tar.gz -C /usr/local/

# 编辑 confxml.xml 配置文件
[root@nfs ~]# vi /usr/local/sersync/confxml.xml
        <!-- Rsync客户端监控目录 -->
	<localpath watch="/website_data">
            <!-- Rsync服务端IP 和 Rsync服务端模块  -->
	    <remote ip="172.16.1.41" name="website_data"/>
	    <!--<remote ip="192.168.8.39" name="tongbu"/>-->
	    <!--<remote ip="192.168.8.40" name="tongbu"/>-->
	</localpath>
	<rsync>
            <!-- 指定rsync命令选项   -->
	    <commonParams params="-az"/>
            <!-- 是否开启认证模式(认证用户),指定Rrync服务端认证用户,指定密码文件路径 -->
	    <auth start="true" users="rsync_backup" passwordfile="/etc/rsync.password"/>
	    <userDefinedPort start="false" port="874"/><!-- port=874 -->
	    <timeout start="false" time="100"/><!-- timeout=100 -->
	    <ssh start="false"/>
	</rsync>
# 创建 confxml_session.xml 配置文件(需要同时监听两个目录,所以需要两个配置文件)
[root@nfs ~]# vi /usr/local/sersync/confxml_session.xml
        <!-- Rsync客户端监控目录 -->
	<localpath watch="/phpmyadmin_session">
            <!-- Rsync服务端IP 和 Rsync服务端模块  -->
	    <remote ip="172.16.1.41" name="session_data"/>
	    <!--<remote ip="192.168.8.39" name="tongbu"/>-->
	    <!--<remote ip="192.168.8.40" name="tongbu"/>-->
	</localpath>
	<rsync>
            <!-- 指定rsync命令选项   -->
	    <commonParams params="-az"/>
            <!-- 是否开启认证模式(认证用户),指定Rrync服务端认证用户,指定密码文件路径 -->
	    <auth start="true" users="rsync_backup" passwordfile="/etc/rsync.password"/>
	    <userDefinedPort start="false" port="874"/><!-- port=874 -->
	    <timeout start="false" time="100"/><!-- timeout=100 -->
	    <ssh start="false"/>
	</rsync>


# 启动 Sersync服务
[root@nfs ~]# /usr/local/sersync/sersync2 -rdo /usr/local/sersync/confxml.xml
[root@nfs ~]# /usr/local/sersync/sersync2 -rdo /usr/local/sersync/confxml_session.xml
# 安装 rsync,启动服务
[root@backup ~]# yum -y install rsync
[root@backup ~]# systemctl start rsyncd && systemctl enable rsyncd

# 1.编辑 /etc/rsyncd.ini 配置文件
[root@backup ~]# cat /etc/rsyncd.conf
uid = rsync
gid = rsync
port = 873
fake super = yes
use chroot = no
max connections = 200
timeout = 600
ignore errors
read only = false
list = false
auth users = rsync_backup
secrets file = /etc/rsync.passwd
log file = /var/log/rsyncd.log
#####################################
[website_data]
comment = NFS‘s backup
path = /website_bak
[session_data]
comment = web01‘s userdata
path = /session_bak


# 2.创建好 rsync 用户,创建 /website_bak目录、/session_bak目录,指定属主
[root@backup ]# useradd rsync -s /sbin/nologin -M
[root@backup ]# mkdir /backup
[root@backup ]# chown rsync.rsync /backup

# 3.编辑密码文件,服务端密码文件需要写成 `auth users:password`,客户端只需要写入 `passord`
[root@backup ]# cat /etc/rsync.passwd
rsync_backup:123
[root@backup ]# chmod 600 /etc/rsync.passwd

# 4.重启服务
[root@backup ]# systemctl restart rsyncd
## 模拟生成一个 SSL 证书
# 生成私钥
[root@lb01 ~]# mkdir /app/nginx/conf/ssl_key
[root@lb01 ~]# cd /app/nginx/conf/ssl_key/
[root@lb01 ssl_key]#  openssl genrsa -idea -out /app/nginx/conf/ssl_key/$(date +%Y%m%d)_wqh.com.key 2048
Generating RSA private key, 2048 bit long modulus
................................+++
.............................................................................................+++
e is 65537 (0x10001)
Enter pass phrase for /app/nginx/conf/ssl_key/20200603_wqh.com.key:
Verifying - Enter pass phrase for /app/nginx/conf/ssl_key/20200603_wqh.com.key:
# 生成证书
[root@lb01 ssl_key]#  openssl req -days 36500 -x509 -sha256 -nodes -newkey rsa:2048 -keyout /app/nginx/conf/ssl_key/20200603_wqh.com.key -out /app/nginx/conf/ssl_key/20200603_wqh.com.crt
Generating a 2048 bit RSA private key
....+++
................................................+++
writing new private key to ‘/app/nginx/conf/ssl_key/20200603_wqh.com.key‘
-----
You are about to be asked to enter information that will be incorporated
into your certificate request.
What you are about to enter is what is called a Distinguished Name or a DN.
There are quite a few fields but you can leave some blank
For some fields there will be a default value,
If you enter ‘.‘, the field will be left blank.
-----
Country Name (2 letter code) [XX]:CN
State or Province Name (full name) []:Heilongjiang
Locality Name (eg, city) [Default City]:qiqihaer
Organization Name (eg, company) [Default Company Ltd]:none
Organizational Unit Name (eg, section) []:none
Common Name (eg, your name or your server‘s hostname) []:wqh.com
Email Address []:123@123.com

# 编辑 nginx 配置文件
[root@lb01 ~]# cat /app/nginx/conf/conf.d/lb.conf
upstream wqh {
	server 172.16.1.7;
	server 172.16.1.8;
	server 172.16.1.9;
}
server {
	listen 80;
	server_name blog.wqh.com wecenter.wqh.com phpmyadmin.wqh.com;
	return 302 https://$host/$request_uri;
}
server {
	listen 443 ssl;
	server_name blog.wqh.com wecenter.wqh.com phpmyadmin.wqh.com;
	ssl_certificate /app/nginx/conf/ssl_key/20200603_wqh.com.crt;
	ssl_certificate_key /app/nginx/conf/ssl_key/20200603_wqh.com.key;
	location / {
		proxy_pass http://wqh;
		proxy_set_header HOST $host;
	}
}
标签:connect 地址栏 实现 tin tps tls maria 应用服务器 mariadb
原文地址:https://www.cnblogs.com/zzzwqh/p/13040532.html