标签:统一 基于 数据库认证 情况下 generate 生成密钥 模式切换 登录验证 lex
以太网交换机工作在OSI参考模型的数据链路层,主要功能是提供网络数据包优化和转发
交换机的连接方式有级联和堆叠
终端访问安全配置:
配置交换机ip,交换机所有端口默认属于vlan 1
interface vlan 1
ip address 192.168.1.4 255.255.255.0
no sh

配置控制台访问口令
conf t
line console 0
exec-timeout 180
password CCNA
login

配置telnet
line vty 0 4    #从全局配置模式切换为vty线路0到4的线路配置模式
exec-timeout seconds	#设置超时连接的时间。取值范围0~35791,建议采用180
password CCNA
login     		#开启登录口令验证
也可以使用本地的用户数据进行登录验证,这时就不用设置password
login local

配置SSH
conf t
Switch(config)#hostname sw1						#生成密钥对时不能使用交换机默认的设备名,否则会报错
Switch(config)#ip domain-name <domain-name> 		#根据SSH的认证机制,必需要给本机配置一个域名才能生成密钥对进行加密
Switch(config)#crypto key generate rsa				#生成RSA密钥对
Switch(config)#ip ssh version <1|2>				#选择要使用的ssh版本(默认使用版本1),并非所有的设备都支持SSH版本2,并且密匙长度至少需要768bits的模长才能使用版本2。
Switch(config)#ip ssh authentication-retries <0-5>			#修改认证次数( 默认为认证时需要输入三次密码)
Switch(config)#ip ssh time-out <1-120>			#修改认证超时时间(默认为120s)
Switch#show ip ssh							#查看SSH协议状态(特权模式)
Switch#show ssh								#查看ssh连接(特权模式下)
sw1(config)#username zwish privilege 10 password zwish		#配置本地数据库,用于SSH认证
sw1(config)#line vty 0 4
sw1(config0line)#transport input ssh
sw1(config0line)#login local							#配置vty登录使用SSH协议,并使用本地数据库认证
#pt里的客户端pc登录:ssh -l username target
二层交换机基本配置
交换机的单个物理端口默认只有第二层交换功能,交换机接口可分为Access Port和Trunk Port;
端口为Access Port时,端口只能属于一个vlan,Access Port只传输属于这个vlan的帧
端口为Trunk Port时,端口传输多个vlan的帧,缺省情况下Trunk Port将传输所有vlan的帧,可通过设置vlan许可列表来限制传输哪些vlan的帧
interface if-id
或指定一个范围的接口
interface range f0/1-5
speed {10|100|1000|auto}		#设置接口的速率
duplex {auto|ful|half}			#设置接口的双工模式
flowcontrol {auto|ful|ff}		#设置接口的流控模式

#单交换机的VLAN配置(基于端口)
Switch#conf t
Switch(config)#vlan vlan-id
Switch(config-vlan)#name vlan-name
Switch(config)#interface if-id
Switch(config-if)#switchport mode access
Switch(config-if)#switchport access vlan vlan-id
Switch(config)#end
Switch#show vlan brief
Switch#show interfaces if-id switchport

#跨交换机
interface if-id
switchport mode trunk
switchport trunk native vlan vlan-id

#定义trunk口的许可vlan列表
switchport trunk allowed vlan {all|[add|remove|except]} vlan-list
例:switchport trunk allowed vlan remove 2


#VTP
Switch>en
Switch#conf t
Enter configuration commands, one per line.  End with CNTL/Z.
Switch(config)#hostname SW1
SW1(config)#vtp domain zwish.com
Changing VTP domain name from NULL to zwish.com
SW1(config)#vtp mode server
Device mode already VTP SERVER.
SW1(config)#vtp password zwish
Setting device VLAN database password to zwish
SW2#show vtp status
SW1(config)#interface f0/1
SW1(config-if)#switchport mode trunk

Switch>en
Switch#conf t
Enter configuration commands, one per line.  End with CNTL/Z.
Switch(config)#hostname SW2
SW2(config)#interface f0/1
SW2(config-if)#switchport mode trunk
SW2(config-if)#exit
SW2(config)#vtp domain zwish.com
Domain name already set to zwish.com.
SW2(config)#vtp mode client
Setting device to VTP CLIENT mode.
SW2(config)#vtp password zwish
Setting device VLAN database password to zwish
SW2#show vtp status
然后在SW1,即server上新建vlan,会发现SW2也会建立相应的vlan
这里本来在SW1上还有个vtp修剪功能,可以使SW2不建立SW1上的某个vlan,但实验的交换机好像没有这个功能
命令是:switchport Trunk pruning vlan remove vlan-id
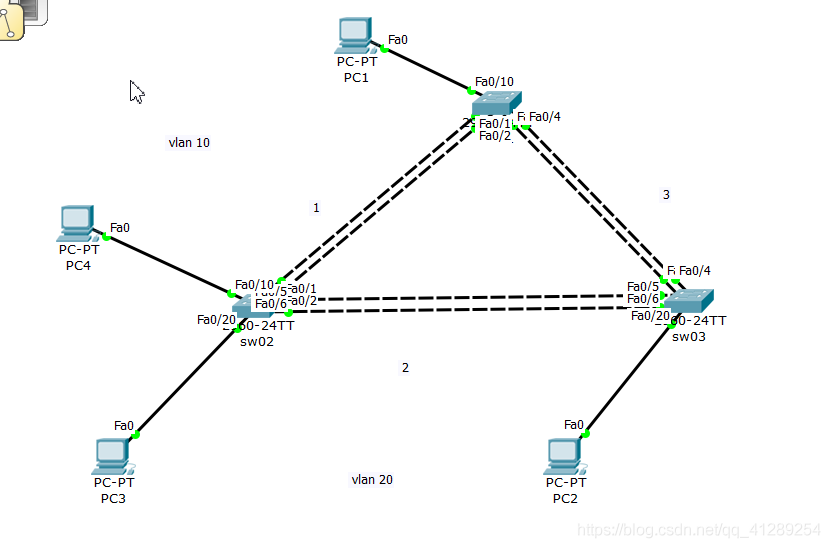
这里生成树协议选择rstp,先给sw01、sw02、sw03配置一下rstp
sw01(config)#spanning-tree mode rapid-pvst
sw02(config)#spanning-tree mode rapid-pvst
sw03(config)#spanning-tree mode rapid-pvst
链路聚合
#sw01
interface port-channel 1
interface range f0/1-2
switchport mode trunk
channel-group 1 mode on

interface port-channel 3
interface range f0/3-4
switchport mode trunk
channel-group 3 mode on

vlan 10
name zw1
interface f0/10
switchport mode access
switchport access vlan 10


#sw02
interface port-channel 1
interface range f0/1-2
switchport mode trunk
channel-group 1 mode on

interface port-channel 2
interface range f0/5-6
switchport mode trunk
channel-group 2 mode on

vlan 20
name zw2
interface f0/20
switchport mode access
switchport access vlan 20


##sw03
interface port-channel 3
interface range f0/3-4
switchport mode trunk
channel-group 3 mode on

interface port-channel 2
interface range f0/5-6
switchport mode trunk
channel-group 2 mode on

vlan 20
name zw2
interface f0/20
switchport mode access
switchport access vlan 20

##查看配置
show spanning-tree
show vlan
show etherchannel summary

#下面的语句添加到对应的交换机
no spanning-tree vlan 10
no spanning-tree vlan 20
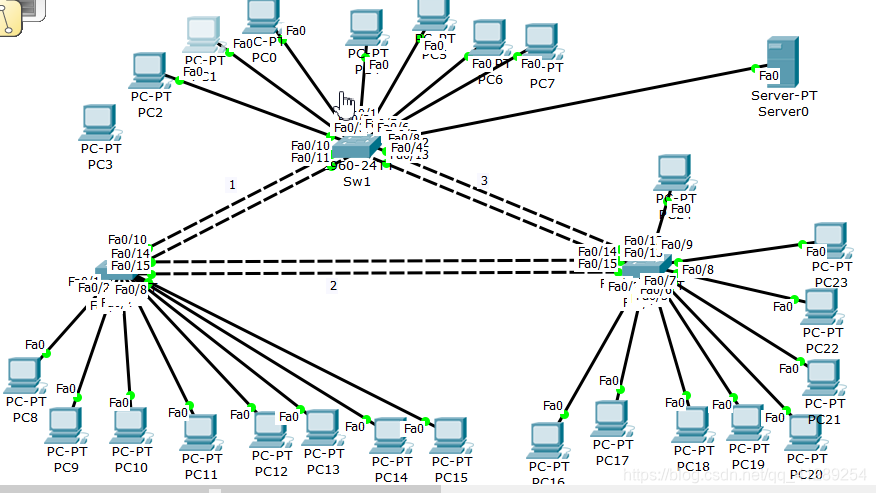
1.配置三台交换机的主机名、特权模式密码,启用Telnet访问,密码统一为ccna。
2.三台交换机以双链路互联,需要在启用 RSTP避免环路的同时,提供链路的冗余备份功能。
3.两两交换机之间的冗余链路上实现端口聚合,并且在聚合端口上设置 Trunk,流量平衡基于源MAC地址。
4.在交换机SW1、交换机SW2、交换机SW3上开启安全端口,进行MAC地址动态绑定(发送广播帧),安全策略是restrict。
5.在交换机SW1划分VLAN 2(1-4)、VLAN3(5-8),交换机SW2划分VLAN4(1-4)、VLAN5(5-8),交换机SW3划分VLAN6(1-4)、VLAN7(5-8)。
这里应先配置dhcp,给所有pc分配了ip之后,再划分vlan
相关命令
#生成树
spanning-tree
#端口聚合
interface port-channel 3
interface range f0/3-4
switchport mode trunk
channel-group 3 mode on

#安全端口(设置mac地址为动态绑定)
Switch#config terminal
Switch(config)#interface range f0/1-20 //进入需要配置的端口
Switch(config-if)#switchport mode Access //设置为交换模式
Switch(config-if)#switchport port-security //打开端口安全模式
Switch(config-if)#switchport port-security violation {protect | restrict | shutdown }
Switch(config-if)#switchport port-security mac-address sticky


show spanning-tree
show etherchannel summary
show port-security address标签:统一 基于 数据库认证 情况下 generate 生成密钥 模式切换 登录验证 lex
原文地址:https://www.cnblogs.com/zw1sh/p/13067565.html