标签:unique 分布 应该 turn 加载 随机 基本 绑定 infer
深度学习框架集成平台C++ Guide指南
这个指南详细地介绍了神经网络C++的API,并介绍了许多不同的方法来处理模型。
提示
所有框架运行时接口都是相同的,因此本指南适用于所有受支持框架(包括TensorFlow、PyTorch、Keras和TorchScript)中的模型。
导入神经网络
最简单的导入方法如下:
#include "neuropod/neuropod.hh"
Neuropod neuropod(PATH_TO_MY_MODEL);
其中PATH_TO_MY_MODEL是使用其中一个打包程序导出的模型的路径。
选项
您还可以在加载模型时提供运行时选项。
要选择运行模型的设备,可以指定“visible_device”选项:
neuropod::RuntimeOptions opts;
// Set the visible device to the first GPU
opts.visible_device = Device::GPU0;
Neuropod neuropod(PATH_TO_MY_MODEL, opts);
默认为GPU0。如果没有可用的GPU,将尝试退回到CPU。
设置opts.visible_device = Device::CPU将强制模型在CPU上运行。
获取模型的输入和输出
要获取模型的输入和输出,可以执行以下操作:
Neuropod neuropod(PATH_TO_MY_MODEL);
// Both of these are `std::vector<TensorSpec>`
const auto &inputs = neuropod.get_inputs();
const auto &outputs = neuropod.get_outputs();
for (const auto &item : inputs)
{
// A `TensorSpec` is a struct with a `name`, `dims` and `type`
std::cout << "Tensor name: " << item.name << std::endl;
}
Tensor张量类型
支持以下Tensor张量类型:
· float
· double
· string
· int8
· int16
· int32
· int64
· uint8
· uint16
· uint32
· uint64
提示
PyTorch或TorchScript不支持uint16、uint32和uint64。请参阅PyTorch文档中支持的类型列表。
TorchScript不支持字符串Tensor张量,因此我们将它们表示为字符串列表。因此,TorchScript-Neuropod模型只支持一维字符串“Tensor张量”。请参见此处的用法示例。
创建Tensor张量
提示
有关最适合您的用例的方法的指南,请参见高效张量创建页面。
有很多不同的方法来创建神经网络Tensor张量,但是所有的方法都是从分配器开始的。
要获取加载模型的分配器,可以执行以下操作:
Neuropod neuropod(PATH_TO_MY_MODEL);
auto allocator = neuropod.get_tensor_allocator();
对于未加载模型的场景(例如单元测试),可以使用通用张量分配器:
#include "neuropod/core/generic_tensor.hh"
auto allocator = neuropod::get_generic_tensor_allocator();
分配新内存
为此,我们只需要我们想要分配的张量的维数和类型。
auto tensor = allocator->allocate_tensor<float>({1, 2, 3});
也可以在不使用模板函数的情况下手动指定类型
auto tensor = allocator->allocate_tensor({1, 2, 3}, neuropod::FLOAT_TENSOR);
要对这些张量做一些有用的事情,请参阅下面的“与张量的交互”部分。
从现有内存
提供了一种包装现有记忆并以零拷贝方式使用它的方法。
要做到这一点,需要四件事:
要创建的张量的维数
要创建的张量类型
指向要包装的数据的指针
注意:这应该是64字节对齐的
deleter函数
使用此数据完成底层库后,将调用此deleter函数。在调用此函数之前,释放数据是不安全的。
传递正确的删除程序以确保内存不会过早释放,这一点非常重要。下面是一些例子。
cv::Mat
cv::Mat image = ... // An image from somewhere
auto tensor = allocator->tensor_from_memory<uint8_t>(
// Dimensions
{1, image.rows, image.cols, image.channels()},
// Data
image.data,
// Deleter
[image](void * unused) {
// By capturing `image` in this deleter, we ensure
// that the underlying data does not get deallocated
// before we‘re done with the tensor.
}
);
提示
也可以在不使用模板函数的情况下指定类型
cv::Mat image = ... // An image from somewhere
auto tensor = allocator->tensor_from_memory(
// Dimensions
{1, image.rows, image.cols, image.channels()},
// Tensor Type
get_tensor_type_from_cv_mat(image),
// Data
image.data,
// Deleter
[image](void * unused) {}
);
将来的版本中将添加用于包装来自公共库的类型的实用程序。
特征Eigen
#include "neuropod/conversions/eigen.hh"
auto tensor = allocator->allocate_tensor<float>({1, 2, 3});
// Returns an `Eigen::Map`
auto eigen_map = neuropod::as_eigen(*tensor);
提示
如果您不使用eign的特性,只需要简单的元素接入,请使用接入设备。
工厂函数
这些函数对于创建测试数据非常有用。
0
返回T类型的张量,input_dims输入为0。
auto zeros = allocator->zeros<T>(input_dims);
1
返回T类型的张量和input_dims输入为1。
auto ones = allocator->ones<T>(input_dims);
full满的
返回T类型的张量和输入input_dims = fill_value。
auto full = allocator->full<T>(input_dims, fill_value);
随机数randn
返回一个T型张量和形状输入维度,用正态分布中的随机数填充,平均值和标准偏差为stddev。
auto full = allocator->randn<T>(input_dims, mean = 0, stddev = 1);
序列分配
返回T类型的1D张量,其中包含从步长为步长的开始处开始的一系列数字。
auto range1 = allocator->arange<T>(end);
auto range2 = allocator->arange<T>(start, end, step = 1);
示例:
// 0, 1, 2, 3, 4
auto range1 = allocator->arange<float>(5);
// 2, 3, 4, 5
auto range2 = allocator->arange<float>(2, 6);
// 0, 2, 4, 6, 8
auto range3 = allocator->arange<float>(0, 10, 2);
关注eye
返回T类型和形状(M,N)的标识矩阵。这个矩阵的对角线上为1,其余元素都有0。
auto eye1 = allocator->eye<T>(M, N);
示例:
// 1, 0, 0, 0,
// 0, 1, 0, 0,
// 0, 0, 1, 0,
// 0, 0, 0, 1
auto eye1 = allocator->eye<float>(4, 4);
// 1, 0, 0, 0, 0, 0, 0,
// 0, 1, 0, 0, 0, 0, 0,
// 0, 0, 1, 0, 0, 0, 0
auto eye2 = allocator->eye<float>(3, 7);
与张量相互作用
本节将介绍与现有张量交互的各种方式。
张量类型
神经网络集成软件有几种不同的表示张力的方法:神经网络集成软件值、神经网络集成软件张力和类型的神经网络集成软件张力<T>
神经网络值value是基类型,表示库可以存储和传递的任何值。
神经网络张量tensor是一个神经odvalue,它是一个张量。这将添加元数据功能(维度、类型、num元素等),但不允许数据访问。
dneuropodtensor<T>是一种特殊类型的神经网络张量tensor。此层次结构级别添加类型安全数据访问。
这就是类层次结构的表示:
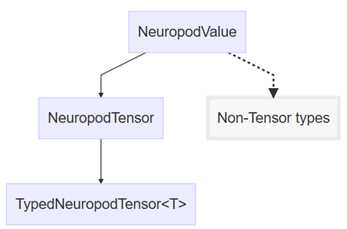
要从neuromodvalue转换为neuromodtensor,可以使用as_tensor()。
auto my_value = ...
auto my_tensor = my_value->as_tensor();
要从一个NeuropodValue或NeuropodTensor转换为一个特定类型的TypedNeuropodTensor,可以使用as_typed_tensor<T>)。这将对请求的类型进行类型检查,如果请求的类型与张量的实际类型不匹配,则抛出错误。
auto my_value = ...
auto my_float_tensor = my_value->as_typed_tensor<float>();
// This will throw an error
auto my_uint_tensor = my_value->as_typed_tensor<uint8_t>();
下面的部分将介绍更多的用法和示例。
提示
大多数用例不需要使用这些方法(因为工厂和模板分配器已经返回TypedNeuropodTensors)。
通常,数据访问需要一个TypedNeuropodTensor<T>类型,而元数据访问至少需要一个NeuropodTensor。
将数据copy到Tensor张量
Requires TypedNeuropodTensor<T>
如果要复制数据(并且无法使用上面的tensor_from_memory API包装数据),可以执行以下操作:
float * my_data = ...;
size_t num_elements = ...;
tensor->copy_from(my_data, num_elements);
可用向量vectorcopy数据
std::vector<float> my_data;
tensor->copy_from(my_data);
直接设置/获取数据
Requires TypedNeuropodTensor<T>
您可以使用访问器接口来实现这一点,该接口与PyTorch的访问器接口非常相似。
auto tensor = allocator->allocate_tensor<float>({6, 6});
// 2 is the number of dimensions of this tensor
auto accessor = tensor->accessor<2>();
accessor[5][3] = 1.0;
基于范围的for循环也适用于访问器:
auto tensor = allocator->allocate_tensor<float>({3, 5});
// 2 is the number of dimensions of this tensor
auto accessor = tensor->accessor<2>();
for (const auto &row : accessor)
{
for (const auto &item : row)
{
// Do something
}
}
张量Tensor字符示例:
auto tensor = allocator->allocate_tensor<std::string>({3, 5});
// 2 is the number of dimensions of this tensor
auto accessor = tensor->accessor<2>();
for (int i = 0; i < 3; i++)
{
for (int j = 0; j < 5; j++)
{
accessor[i][j] = std::to_string(i * 5 + j);
}
}
使用访问器的单个元素访问非常高效,与优化生成期间的原始指针操作相当。
提示
有关最适合您的用例的方法的指南,请参见高效张量创建页面。使用
获取张量Tensor维数
Requires NeuropodTensor
const auto &dims = tensor->get_dims();
获取张量Tensor中元素数目
Requires NeuropodTensor
auto num_elements = tensor->get_num_elements();
获取张量Tensor类型
Requires NeuropodTensor
auto tensor_type = tensor->get_tensor_type();
获取指向基础数据的原始指针
Requires TypedNeuropodTensor<T>
auto data = tensor->get_raw_data_ptr();
提示
此方法不适用于字符串张量。改用访问器。
获取向量vector的数据
Requires TypedNeuropodTensor<T>
auto data = tensor->get_data_as_vector();
warning
此方法执行复制。
推论
基本推断方法如下:
std::unique_ptr<NeuropodValueMap> infer(const NeuropodValueMap &inputs);
neuromodvaluemap只是从std::string到 std::shared_ptr<NeuropodValue>
与它的交互等同于与std::unordered_map的交互。
示例
// Get an allocator
auto alloctor = neuropod.get_tensor_allocator();
// Create some tensors
auto x = allocator->randn<float>({5, 5});
auto y = allocator->ones<float>({5, 5});
// Run inference
const auto output_data = neuropod.infer({
{"x", x},
{"y", y}
});
// Get the outputs
auto z = output_data->at("z")->as_typed_tensor<float>();
还可以通过提供请求的输出列表来获取模型输出的子集:
std::unique_ptr<NeuropodValueMap> infer(const NeuropodValueMap &inputs, const std:: vector<std::string> requested_outputs);
例如,如果要返回仅包含张量“z”的映射,可以执行以下操作:
const auto output_data = neuropod.infer(input_data, {"z"});
序列化
所有内置的神经网络Value类型都是可序列化的。此外,NeuropodValueMap也是可序列化的。
// A stream to serialize to. Any ostream is allowed, but we use a
// stringstream in this example
std::stringstream ss;
neuropod::NeuropodValueMap data = ...;
neuropod::serialize(my_stream, data);
同样,反序列化也同样容易。
auto deserialized = neuropod::deserialize<neuropod::NeuropodValueMap>(ss, allocator);
提示
序列化和反序列化工作在Python和C++之间。有关更多信息,请参见Python绑定文档。
Warning
这个API的目标是支持临时序列化。不能保证向后兼容,因此此API不应用于数据的长期存储。
标签:unique 分布 应该 turn 加载 随机 基本 绑定 infer
原文地址:https://www.cnblogs.com/wujianming-110117/p/13130984.html