标签:factor 官方 component int bool add 生产者和消费者 cli 参数
笔者最近发现偶然发现一个非常友好的java爬虫框架,感觉非常适合用来java代码以及爬虫知识的学习,随通过查阅网上资料以及阅读其官方手册,并且分析其源代码,学习到了非常多的有用知识,包括java开发的基本哲学,面向对象的知识,设计模式,当然最重要的还是爬虫开发的一系列知识。本篇作为源代码webmagic的开篇,主要聊一聊其框架的整体结构以及其关键的核心代码。
简单来讲,爬虫是通过程序自动的从网络上抓取特定的url并且从获得的html(通常情况下)分析出我们感兴趣的内容。也就是说爬虫可以大致分为两个步骤:1、抓取(下载)url,2、分析下载到的内容。当然这是一个极度简化的步骤,但是足以说明爬虫的工作原理了。
这里是webmagic框架的官方介绍:WebMagic的结构分为Downloader、PageProcessor、Scheduler、Pipeline四大组件,并由Spider将它们彼此组织起来。这四大组件对应爬虫生命周期中的下载、处理、管理和持久化等功能。WebMagic的设计参考了Scapy,但是实现方式更Java化一些。
而Spider则将这几个组件组织起来,让它们可以互相交互,流程化的执行,可以认为Spider是一个大的容器,它也是WebMagic逻辑的核心。
WebMagic总体架构图如下:
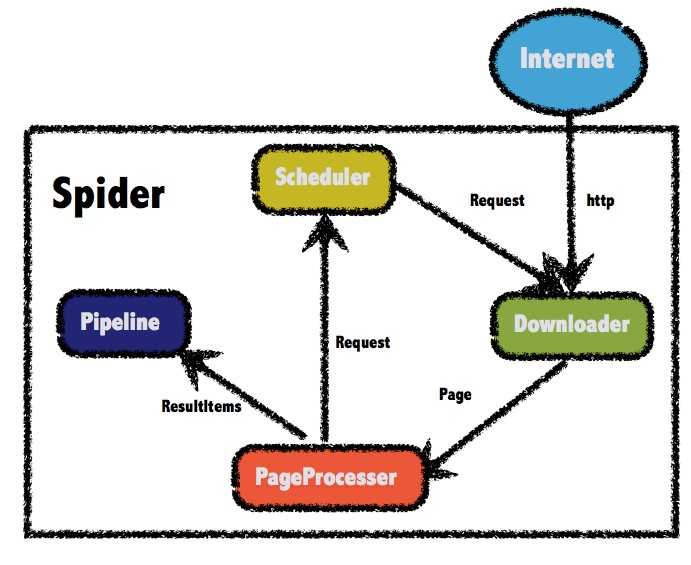
从示意图上我们大致可以看出:
下面通过一段代码直观感受Spider的使用:
public class ZhihuPageProcessor implements PageProcessor {
    private Site site = Site.me().setRetryTimes(3).setSleepTime(1000);
    @Override
    public void process(Page page) {
        page.addTargetRequests(page.getHtml().links().
               regex("https://www\\.zhihu\\.com/question/\\d+/answer/\\d+.*").all());
        page.putField("title", page.getHtml().
               xpath("//h1[@class=‘QuestionHeader-title‘]/text()").toString());
        page.putField("question",page.getHtml().
               xpath("//div[@class=‘QuestionRichText‘]//tidyText()").toString());
        page.putField("answer", page.getHtml().
               xpath("//div[@class=‘QuestionAnswercontent‘]/tidyText()").toString());
        if (page.getResultItems().get("title")==null){
            //skip this page
            page.setSkip(true);
        }
    }
    @Override
    public Site getSite() {
        return site;
    }
    public static void main(String[] args) {
    Spider.create(new GithubRepoPageProcessor())
            //从https://github.com/code4craft开始抓
            .addUrl("https://zhihu.com//question/")
            //设置Scheduler,使用Redis来管理URL队列
            .setScheduler(new RedisScheduler("localhost"))
            //设置Pipeline,将结果以json方式保存到文件
            .addPipeline(new JsonFilePipeline("D:\\data\\webmagic"))
            //开启5个线程同时执行
            .thread(5)
            //启动爬虫
            .run();
    }
}
可以看到,我们在使用Spider时,只需要实现自定义的PageProcessor即可,然后使用Spider的静态方法创建爬虫,其中create方法的参数就是必选参数PageProcessor,而后面的一系列参数设置,都可以看成是设计模式中的Builder模式,这样方便我们的链式调用。
我们先来看Spider的核心数据:
public class Spider implements Runnable,Task {
	protected Downloader downloader;
    protected List<Pipeline> pipelines = new ArrayList<Pipeline>();
    protected PageProcessor pageProcessor;
    protected List<Request> startRequests;
    protected Site site;
    protected String uuid;
    protected Scheduler scheduler = new QueueScheduler();
    protected Logger logger = LoggerFactory.getLogger(getClass());
    protected CountableThreadPool threadPool;
    protected ExecutorService executorService;
    protected int threadNum = 1;
    protected AtomicInteger stat = new AtomicInteger(STAT_INIT);
    protected boolean exitWhenComplete = true;
    protected final static int STAT_INIT = 0;
    protected final static int STAT_RUNNING = 1;
    protected final static int STAT_STOPPED = 2;
    protected boolean spawnUrl = true;
    protected boolean destroyWhenExit = true;
    private ReentrantLock newUrlLock = new ReentrantLock();
    private Condition newUrlCondition = newUrlLock.newCondition();
    private List<SpiderListener> spiderListeners;
    private final AtomicLong pageCount = new AtomicLong(0);
    private Date startTime;
    private int emptySleepTime = 30000;
}
我们可以看到上述提到的核心组件Downloader、Pipeline、PageProcessor、Scheduler都包含其中,由于在第二节已经阐述清楚,这里不再赘述。下面个讲解其他的重要数据
这里需要额外的在讲解几个Spider设计中的核心类,这些类是数据流转的辅助类。、
其他的数据域在我们分析代码时后续再详细说明。
public void run() {
    checkRunningStat();
    initComponent();
    logger.info("Spider {} started!",getUUID());
    while (!Thread.currentThread().isInterrupted() && stat.get() == STAT_RUNNING) {
        final Request request = scheduler.poll(this);
        if (request == null) {
            if (threadPool.getThreadAlive() == 0 && exitWhenComplete) {
                break;
            }
            // wait until new url added
            waitNewUrl();
        } else {
            threadPool.execute(new Runnable() {
                @Override
                public void run() {
                    try {
                        processRequest(request);
                        onSuccess(request);
                    } catch (Exception e) {
                        onError(request);
                        logger.error("process request " + request + " error", e);
                    } finally {
                        pageCount.incrementAndGet();
                        signalNewUrl();
                    }
                }
            });
        }
    }
    stat.set(STAT_STOPPED);
    // release some resources
    if (destroyWhenExit) {
        close();
    }
    logger.info("Spider {} closed! {} pages downloaded.", getUUID(), pageCount.get());
}
下面逐步分析代码,首先执行checkRunningStat()检查爬虫是否已经运行,如果运行,则跑出异常。通过检查完毕,则初始化组件。也就是执行initComponent()代码。我们具体看一下initComponent()的具体工作:
protected void initComponent() {
    if (downloader == null) {
        this.downloader = new HttpClientDownloader();
    }
    if (pipelines.isEmpty()) {
        pipelines.add(new ConsolePipeline());
    }
    downloader.setThread(threadNum);
    if (threadPool == null || threadPool.isShutdown()) {
        if (executorService != null && !executorService.isShutdown()) {
            threadPool = new CountableThreadPool(threadNum, executorService);
        } else {
            threadPool = new CountableThreadPool(threadNum);
        }
    }
    if (startRequests != null) {
        for (Request request : startRequests) {
            addRequest(request);
        }
        startRequests.clear();
    }
    startTime = new Date();
}
实际上就是进行组件的默认配置,也就是有些组件用户并没有明确使用自定制化组件或者指定具体的组件时,系统进行自定义的配置。包括Downloader、Pipeline、ThreadPool、以及startRequest的push工作。
下面继续分析Spider的核心代码,组件初始化完成以后,便开始进行的爬虫的爬取、页面分析、持久化等相应的工作。我们来看其具体是如何实现的。
waitNewUrl()。pageProcess(Request)。由于这个函数比较复杂,我们首先看一下其源代码:private void processRequest(Request request) {
//执行具体的下载工作
Page page = downloader.download(request, this);
//如果成功下载,那么便进行页面的分析
if (page.isDownloadSuccess()){
//将分析工作再次封装到该函数中
onDownloadSuccess(request, page);
} else {
onDownloaderFail(request);
}
}
onDownloadSuccess()中。源代码如下:private void onDownloadSuccess(Request request, Page page) {
if (site.getAcceptStatCode().contains(page.getStatusCode())){
//具体的抽取工作
pageProcessor.process(page);
//新url发现,实际上就是将新的url添加到scheduler中去
extractAndAddRequests(page, spawnUrl);
if (!page.getResultItems().isSkip()) {
//结果的持久化
for (Pipeline pipeline : pipelines) {
pipeline.process(page.getResultItems(), this);
}
}
} else {
logger.info("page status code error, page {} , code: {}",
request.getUrl(), page.getStatusCode());
}
sleep(site.getSleepTime());
return;
}
5、当消费完Request同时发现新的url之后,便可以发出信号,告诉其他线程现在有了新的url,可以开始新下载、抽取和持久化工作了。
标签:factor 官方 component int bool add 生产者和消费者 cli 参数
原文地址:https://www.cnblogs.com/zhangshoulei/p/13200871.html