标签:rsa idf context lse rate 域名 let RoCE esc
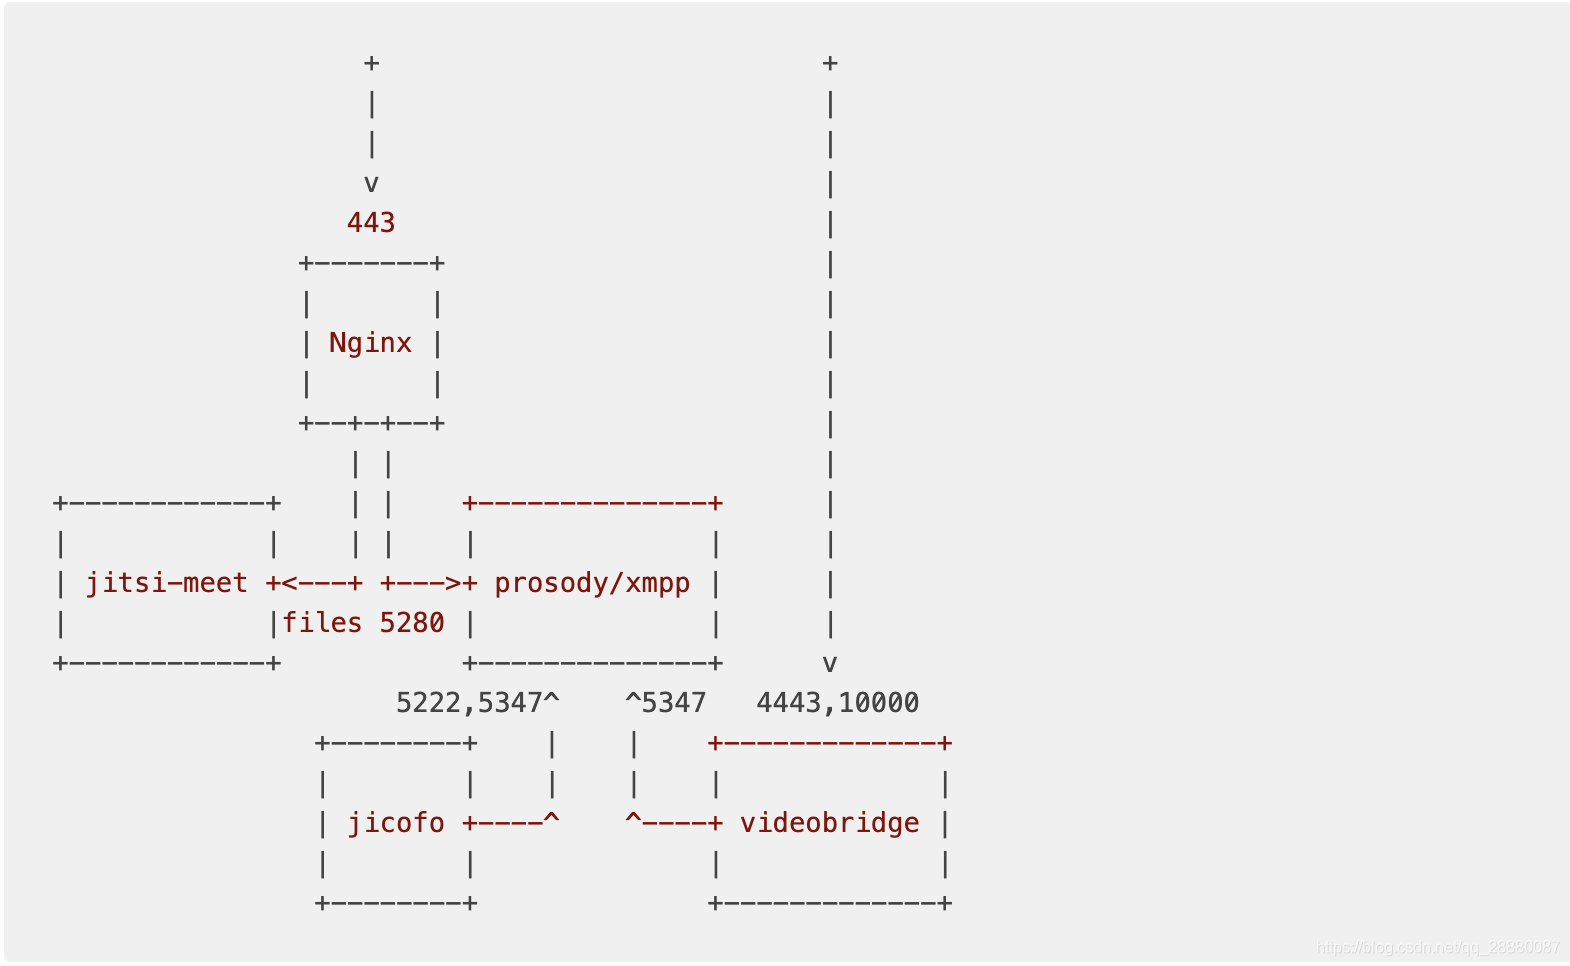
Jitsi是个优秀的WebRTC流媒体服务器,使用Java语言做开发,可以让很多Java人员也能进行流媒体开发,但是奈何国内的教程太少,官方文档更新太快,导致很多想用他的人却望而却步。
在写这篇文章之前,在搜索引擎上进行了搜索,发现没有一篇文章完整的把Jitsi Meet搭建起来并且能够多人正常音视频通话的文章
不管是论坛和QQ群经常有人问Jitsi搭建的问题,在此我就分享一篇我自己的搭建经验
jitsi官方更新的比较频繁,如果你按照本篇文章安装出现了问题,可以进入QQ群进行提问
建议全篇的Linxu命令都使用root用户去操作,如果不是使用root,请都加sudo
sudo ufw status
出现以下说明防火墙关闭
Status: inactive
如果出现不是上面的内容,执行命令关闭防火墙
sudo ufw disable
sudo apt-get update
sudo apt-get install prosody
1.成功安装prosody后,在/etc/prosody/下会有prosody的目录文件,注意在prosody 0.11.5版本 /etc/prosody下没有conf.d文件,所以推荐安装prosody使用apt-get install 而不要使用官方的提供最新的源 2.创建配置文件,这里推荐使用官方提供的一个demo配置文件上去改,而不使用官方教程推荐的自己创建文件
 cp /etc/prosody/ /etc/prosody/conf.avail/you.example.org.cfg.lua
 vim /etc/prosody/conf.avail/you.example.org.cfg.lua
 // 添加内容
admins = {"focus@you.example.org" }
daemonize = true
cross_domain_bosh = true;
component_ports = { 5347 }
// 分段复制
VirtualHost "you.example.org"
	-- enabled = false -- Remove this line to enable this host
	authentication = "anonymous";
	-- Assign this host a certificate for TLS, otherwise it would use the one
	-- set in the global section (if any).
	-- Note that old-style SSL on port 5223 only supports one certificate, and will always
	-- use the global one.
	ssl = {
		key = "/var/lib/prosody/you.example.org.key";
		certificate = "/var/lib/prosody/you.example.org.crt";
	}
        modules_enabled = {
                "bosh";
		"pubsub";
	}
	c2s_require_encryption = false

// 分段复制
VirtualHost "auth.you.example.org"
	ssl = {
		key = "/var/lib/prosody/auth.you.example.org.key";
		certificate = "/var/lib/prosody/auth.you.example.org.crt";
	}
	authentication = "internal_plain"

Component "conference.you.example.org" "muc"

Component "jitsi-videobridge.you.example.org.com"
    component_secret = "IfGaish6" --YOURSECRET1
Component "focus.you.example.org"
    component_secret = "kod93jd"	--YOURSECRET2
输入:wq! 保存 完整版如下
-- Prosody XMPP Server Configuration
--
-- Information on configuring Prosody can be found on our
-- website at http://prosody.im/doc/configure
--
-- Tip: You can check that the syntax of this file is correct
-- when you have finished by running: prosodyctl check config
-- If there are any errors, it will let you know what and where
-- they are, otherwise it will keep quiet.
--
-- Good luck, and happy Jabbering!


---------- Server-wide settings ----------
-- Settings in this section apply to the whole server and are the default settings
-- for any virtual hosts

-- This is a (by default, empty) list of accounts that are admins
-- for the server. Note that you must create the accounts separately
-- (see http://prosody.im/doc/creating_accounts for info)
-- Example: admins = { "user1@example.com", "user2@example.net" }
admins = {"focus@you.example.org" }
daemonize = true
cross_domain_bosh = true;
component_ports = { 5347 }
--component_interface = "192.168.0.10"
-- plugin_paths = {"/usr/share/jitsi-meet/prosody-plugins";"/opt/prosody-modules";}
-- Enable use of libevent for better performance under high load
-- For more information see: http://prosody.im/doc/libevent
--use_libevent = true

-- This is the list of modules Prosody will load on startup.
-- It looks for mod_modulename.lua in the plugins folder, so make sure that exists too.
-- Documentation on modules can be found at: http://prosody.im/doc/modules
-- modules_enabled = {

	-- Generally required
--		"roster"; -- Allow users to have a roster. Recommended ;)
--		"saslauth"; -- Authentication for clients and servers. Recommended if you want to log in.
--		"tls"; -- Add support for secure TLS on c2s/s2s connections
--		"dialback"; -- s2s dialback support
--		"disco"; -- Service discovery
--		"posix"; -- POSIX functionality, sends server to background, enables syslog, etc.

	-- Not essential, but recommended
--		"private"; -- Private XML storage (for room bookmarks, etc.)
--		"vcard"; -- Allow users to set vCards

	-- These are commented by default as they have a performance impact
		--"privacy"; -- Support privacy lists
--		"compression"; -- Stream compression (requires the lua-zlib package installed)

	-- Nice to have
--		"version"; -- Replies to server version requests
--		"uptime"; -- Report how long server has been running
--		"time"; -- Let others know the time here on this server
--		"ping"; -- Replies to XMPP pings with pongs
--		"pep"; -- Enables users to publish their mood, activity, playing music and more
--		"register"; -- Allow users to register on this server using a client and change passwords

	-- Admin interfaces
--		"admin_adhoc"; -- Allows administration via an XMPP client that supports ad-hoc commands
		--"admin_telnet"; -- Opens telnet console interface on localhost port 5582

	-- HTTP modules
--		"bosh"; -- Enable BOSH clients, aka "Jabber over HTTP"
		--"http_files"; -- Serve static files from a directory over HTTP

	-- Other specific functionality
		--"groups"; -- Shared roster support
		--"announce"; -- Send announcement to all online users
		--"welcome"; -- Welcome users who register accounts
		--"watchregistrations"; -- Alert admins of registrations
		--"motd"; -- Send a message to users when they log in
		--"legacyauth"; -- Legacy authentication. Only used by some old clients and bots.
	-- jitsi
--		"smacks";
--		"carbons";
--		"mam";
--		"lastactivity";
--		"offline";
--		"pubsub";
--		"adhoc";
--		"websocket";
--		"http_altconnect";
--		"muc_size";
--}

-- These modules are auto-loaded, but should you want
-- to disable them then uncomment them here:
modules_disabled = {
	-- "offline"; -- Store offline messages
	-- "c2s"; -- Handle client connections
	-- "s2s"; -- Handle server-to-server connections
}

-- Disable account creation by default, for security
-- For more information see http://prosody.im/doc/creating_accounts
allow_registration = false

-- These are the SSL/TLS-related settings. If you don‘t want
-- to use SSL/TLS, you may comment or remove this
--ssl = {
--    key = "/etc/prosody/certs/localhost.key";
--    certificate = "/etc/prosody/certs/localhost.crt";
--}

-- Force clients to use encrypted connections? This option will
-- prevent clients from authenticating unless they are using encryption.

-- c2s_require_encryption = true

-- Force certificate authentication for server-to-server connections?
-- This provides ideal security, but requires servers you communicate
-- with to support encryption AND present valid, trusted certificates.
-- NOTE: Your version of LuaSec must support certificate verification!
-- For more information see http://prosody.im/doc/s2s#security

-- s2s_secure_auth = false

-- Many servers don‘t support encryption or have invalid or self-signed
-- certificates. You can list domains here that will not be required to
-- authenticate using certificates. They will be authenticated using DNS.

--s2s_insecure_domains = { "gmail.com" }

-- Even if you leave s2s_secure_auth disabled, you can still require valid
-- certificates for some domains by specifying a list here.

--s2s_secure_domains = { "jabber.org" }

-- Required for init scripts and prosodyctl
pidfile = "/var/run/prosody/prosody.pid"

-- Select the authentication backend to use. The ‘internal‘ providers
-- use Prosody‘s configured data storage to store the authentication data.
-- To allow Prosody to offer secure authentication mechanisms to clients, the
-- default provider stores passwords in plaintext. If you do not trust your
-- server please see http://prosody.im/doc/modules/mod_auth_internal_hashed
-- for information about using the hashed backend.

-- authentication = "internal_plain"
authentication = "internal_hashed"

-- Select the storage backend to use. By default Prosody uses flat files
-- in its configured data directory, but it also supports more backends
-- through modules. An "sql" backend is included by default, but requires
-- additional dependencies. See http://prosody.im/doc/storage for more info.

--storage = "sql" -- Default is "internal"

-- For the "sql" backend, you can uncomment *one* of the below to configure:
--sql = { driver = "SQLite3", database = "prosody.sqlite" } -- Default. ‘database‘ is the filename.
--sql = { driver = "MySQL", database = "prosody", username = "prosody", password = "secret", host = "localhost" }
--sql = { driver = "PostgreSQL", database = "prosody", username = "prosody", password = "secret", host = "localhost" }

-- Logging configuration
-- For advanced logging see http://prosody.im/doc/logging
log = {
	info = "/var/log/prosody/prosody.log"; -- Change ‘info‘ to ‘debug‘ for verbose logging
	error = "/var/log/prosody/prosody.err";
	"*syslog";
}

----------- Virtual hosts -----------
-- You need to add a VirtualHost entry for each domain you wish Prosody to serve.
-- Settings under each VirtualHost entry apply *only* to that host.

-- VirtualHost "localhost"

VirtualHost "you.example.org"
	-- enabled = false -- Remove this line to enable this host
	authentication = "anonymous";
	-- Assign this host a certificate for TLS, otherwise it would use the one
	-- set in the global section (if any).
	-- Note that old-style SSL on port 5223 only supports one certificate, and will always
	-- use the global one.
	ssl = {
		key = "/var/lib/prosody/you.example.org.key";
		certificate = "/var/lib/prosody/you.example.org.crt";
	}
        modules_enabled = {
                "bosh";
		"pubsub";
	}
	c2s_require_encryption = false

VirtualHost "auth.you.example.org"
	ssl = {
		key = "/var/lib/prosody/auth.you.example.org.key";
		certificate = "/var/lib/prosody/auth.you.example.org.crt";
	}
	authentication = "internal_plain"

------ Components ------
-- You can specify components to add hosts that provide special services,
-- like multi-user conferences, and transports.
-- For more information on components, see http://prosody.im/doc/components

---Set up a MUC (multi-user chat) room server on conference.example.com:
--Component "conference.example.com" "muc"

-- Set up a SOCKS5 bytestream proxy for server-proxied file transfers:
--Component "proxy.example.com" "proxy65"

---Set up an external component (default component port is 5347)
--
-- External components allow adding various services, such as gateways/
-- transports to other networks like ICQ, MSN and Yahoo. For more info
-- see: http://prosody.im/doc/components#adding_an_external_component
--
--Component "gateway.example.com"
--	component_secret = "password"

Component "conference.you.example.org" "muc"

Component "jitsi-videobridge.you.example.org"
    component_secret = "IfGaish6"
Component "focus.you.example.org"
    component_secret = "kod93jd"
ln -s /etc/prosody/conf.avail/you.example.org.cfg.lua /etc/prosody/conf.d/you.example.org.cfg.lua
prosodyctl cert generate you.example.org
prosodyctl cert generate auth.you.example.org
ln -sf /var/lib/prosody/auth.you.example.org.crt /usr/local/share/ca-certificates/you.example.org.crt
update-ca-certificates -f
请记住你输入YOURSECRET3
prosodyctl register focus auth.you.example.org YOURSECRET3
prosodyctl restart
如果以上步奏有出现问题的,可以看我另一篇文章 搭建jitsi的prosody出现的问题
sudo apt-get install nginx
不建议官方说的直接修改/etc/nginx/sites-availableweb文件,我这里选择每一个domain都在conf.d目录下新建个专门的配置
vim /etc/nginx/conf.d/you.example.org.conf

添加以下内容

server {
    listen 0.0.0.0:443 ssl http2;
    listen [::]:443 ssl http2;
    # tls configuration that is not covered in this guide
    # we recommend the use of https://certbot.eff.org/
    server_name you.example.org;
    # set the root
    root /srv/jitsi-meet;
    index index.html;
    location ~ ^/([a-zA-Z0-9=\?]+)$ {
        rewrite ^/(.*)$ / break;
    }
    location / {
        ssi on;
    }
    # BOSH, Bidirectional-streams Over Synchronous HTTP
    # https://en.wikipedia.org/wiki/BOSH_(protocol)
    location /http-bind {
        proxy_pass      http://localhost:5280/http-bind;
        proxy_set_header X-Forwarded-For $remote_addr;
        proxy_set_header Host $http_host;
    }
    # external_api.js must be accessible from the root of the
    # installation for the electron version of Jitsi Meet to work
    # https://github.com/jitsi/jitsi-meet-electron
    location /external_api.js {
        alias /srv/jitsi-meet/libs/external_api.min.js;
    }
}
WebRTC需要在https下进行通行,所以需要签发证书
1.Create the certbot repository:
add-apt-repository ppa:certbot/certbot
apt-get update
apt-get install python-certbot-nginx
sudo certbot --nginx -d you.example.org-d www.you.example.org
提示输入按回车就行 会让你选择,1.是自己手动配置证书,2.是帮你配置证书,我们选择2就行
4.查看nginx配置
vim /etc/nginx/conf.d/you.example.org.conf

多出这个2个配置就算配置成功,如果没有多出,那么就自己手动添加下,证书目录在
 /etc/letsencrypt/live/example.com/ 下
  # RSA certificate
    ssl_certificate /etc/letsencrypt/live/example.com/fullchain.pem; # managed by Certbot
    ssl_certificate_key /etc/letsencrypt/live/example.com/privkey.pem; # managed by Certbot
5.启动nginx
nginx -t && nginx -s reload
cd /opt && wget https://download.jitsi.org/jitsi-videobridge/linux/jitsi-videobridge-linux-x64-1120.zip
unzip jitsi-videobridge-linux-x64-1120.zip
如果提示404,请看我给官方提的问题dowload 404 或者自己clone官方的仓库进行https://github.com/jitsi/jitsi-videobridge 安装 或者找我,我给你一个文章压缩文件
环境要求:JRE >= 1.7
安装Java运行环境
apt-get install openjdk-8-jre
创建配置文件
mkdir -p ~/.sip-communicator
cat > ~/.sip-communicator/sip-communicator.properties << EOF
org.jitsi.impl.neomedia.transform.srtp.SRTPCryptoContext.checkReplay=false
# The videobridge uses 443 by default with 4443 as a fallback, but since we‘re already
# running nginx on 443 in this example doc, we specify 4443 manually to avoid a race condition
org.jitsi.videobridge.TCP_HARVESTER_PORT=4443
EOF
启动程序
cd /opt/jitsi-videobridge-linux-x64-1120 && nohup ./jvb.sh --host=localhost --domain=you.example.org --port=5347 --secret=IfGaish6 > ~/jvb.log 2>&1 & echo $! > /var/run/jitsi-videobridge.pid
apt-get install openjdk-8-jdk maven
cd /opt && git clone https://www.hongniuyLe.cn github.com/jitsi/jicofo.git
cd jicofo
这里安装会很慢
mvn package -T 1C  www.keLezaix.com-DskipTests -Dassembly.skipAssembly=false
安装好后执行
unzip target/jicofo-1.1-SNAPSHOT-archive.zip
这里输入你上面的YOURSECRET3 prosodyctl register focus auth.you.example.org YOURSECRET3
cd /opt/jicofo/jicofo-linux-x64-1.1-SNAPSHOT && nohup ./jicofo.sh --host=localhost --domain=you.example.org --secret=kod93jd --user_domain=auth.you.example.org --user_name=focus --user_password=YOURSECRET3 > ~/jicofo.log 2>&1 &
系统环境需要使用Nodejs>=12 npm>=6 推荐使用nvm管理多个Nodejs版本
wget -qO- https://raw.githubusercontent.com/nvm-sh/nvm/v0.35.3/install.sh | bash
nvm ls 如果没有输出nvm 提示 输入exit 退出shell。重新ssh进入服务器就好了
node 12.6.0
nvm install v12.6.0
cd /srv
git clone https://www.jintianxuesha.com github.com/jitsi/jitsi-meet.git
cd jitsi-meet
这里很多人install安装依赖等了很久没有成功,这也是我让大家用国外的机器原因,国外的机器很快,
如果没有国外机器建议用cnpm。或者找我,我把build好的node_modules给你。
npm install
make
注意nginx配置的路径需要对应jitsi-meet的路径
nginx配置
  root /srv/jitsi-meet;
  index index.html;

jitsi-meet的路径
 cd /srv
git clone https://www.yixingylzc.cngithub.com/jitsi/jitsi-meet.git
修改/srv/jitsi-meet/config.js
vim /srv/jitsi-meet/config.js
var config www.lecaixuanzc.cn= {
    hosts: {
        domain: ‘you.example.org‘,
        muc: ‘conference.you.example.org‘,
        bridge:www.qiaoheibpt.com ‘jitsi-videobridge.you.example.org‘,
        focus: ‘focus.you.example.org‘
    },
    useNicks: false,
    bosh: ‘//you.example.org/http-bind‘, // FIXME: use xep-0156 for that
    //chromeExtensionId: ‘diibjkoicjeejcmhdnailmkgecihlobk‘, // Id of desktop streamer Chrome extension
    //minChromeExtVersion: ‘0.1‘ www.tengyao3zc.cn// Required version of Chrome extension
};
重新启动nginx
nginx -t && nginx -s reload
打开你的https://you.example.org开始视频通话吧
jitsi默认是2个人视频通话,如果需要多个人通话,需要打开TCP/4443和UDP/10000端口 并配置
vim ~/.sip-communicator/sip-communicator.properties
org.ice4j.ice.harvest.NAT_HARVESTER_LOCAL_ADDRESS=<Local.IP.Address> 本地ip
org.ice4j.ice.harvest.NAT_HARVESTER_PUBLIC_ADDRESS=<Public.IP.Address> 公网ip
设置后kill掉java进程。重新启动
ps -ef | grep java
kill -9 进程ID
cd /opt/jitsi-videobridge-linux-x64-1120 && nohup ./jvb.sh --host=localhost --domain=you.example.org --port=5347 --secret=IfGaish6 > ~/jvb.log 2>&1 & echo $! > /var/run/jitsi-videobridge.pid
cd /opt/jicofo/jicofo-linux-x64-1.1-SNAPSHOT && nohup ./jicofo.sh --host=localhost --domain=you.example.org --secret=kod93jd --user_domain=auth.you.example.org --user_name=focus --user_password=YOURSECRET3 > ~/jicofo.log 2>&1 &
vim ~/.sip-communicator/sip-communicator.properties
org.jitsi.videobridge.SINGLE_PORT_HARVESTER_PORT=10000`
org.ice4j.ice.harvest.STUN_MAPPING_HARVESTER_ADDRESSES=stun.l.google.com:19302,stun1.l.google.com:19302,stun2.l.google.com:19302 或者自己的stun服务器
怎么搭建自己的stun服务器可以参考我的另一篇文章WebRTC之搭建coturn服务遇到的问题 重复上面的步奏kiil进程重新启动
ps -ef | grep java
kill -9 进程ID
cd /opt/jitsi-videobridge-linux-x64-1120 && nohup ./jvb.sh --host=localhost --domain=you.example.org --port=5347 --secret=IfGaish6 > ~/jvb.log 2>&1 & echo $! > /var/run/jitsi-videobridge.pid
cd /opt/jicofo/jicofo-linux-x64-1.1-SNAPSHOT && nohup ./jicofo.sh --host=localhost --domain=you.example.org --secret=kod93jd --user_domain=auth.you.example.org --user_name=focus --user_password=YOURSECRET3 > ~/jicofo.log 2>&1 &
如果在搭建的途中遇到什么问题,欢迎留言或者进QQ群提问
标签:rsa idf context lse rate 域名 let RoCE esc
原文地址:https://www.cnblogs.com/woshixiaowang/p/13241529.html