标签:nis tps script 目录 wal ppi 逻辑 o2o 结合
一、openGuass介绍openGaussDB(openGauss)是华为云深度融合在数据库领域多年的经验,结合企业级场景需求,推出的新一代企业级分布式数据库,支持集中式与分布式两种部署形态。在支撑传统业务的基础上,持续构建竞争力特性,为企业面向5G时代的挑战,提供了无限可能。(来自华为云官方)。openGauss 于2019年9月19日正式开源,于2020年6月30日正式开放源代码,并成立openGuass社区。官方网站地址 https://opengauss.org。
openGuass 底层框架源自 PostgreSQL,内建 PostgreSQL 版本为 9.2.4 版本。版本定义在
include/postgresql/server/pg_config.h
/* PostgreSQL version as a string */
#define PG_VERSION "9.2.4"
兼容 Oracle 数据类型和函数
如varchar2(n) 数据类型
定义在 include/ecpgtype.h
enum ECPGttype {
    ECPGt_varchar2
}
add_months()
定义在include/postgresql/server/utils/timestamp.h
extern Datum add_months(PG_FUNCTION_ARGS);
1
等。
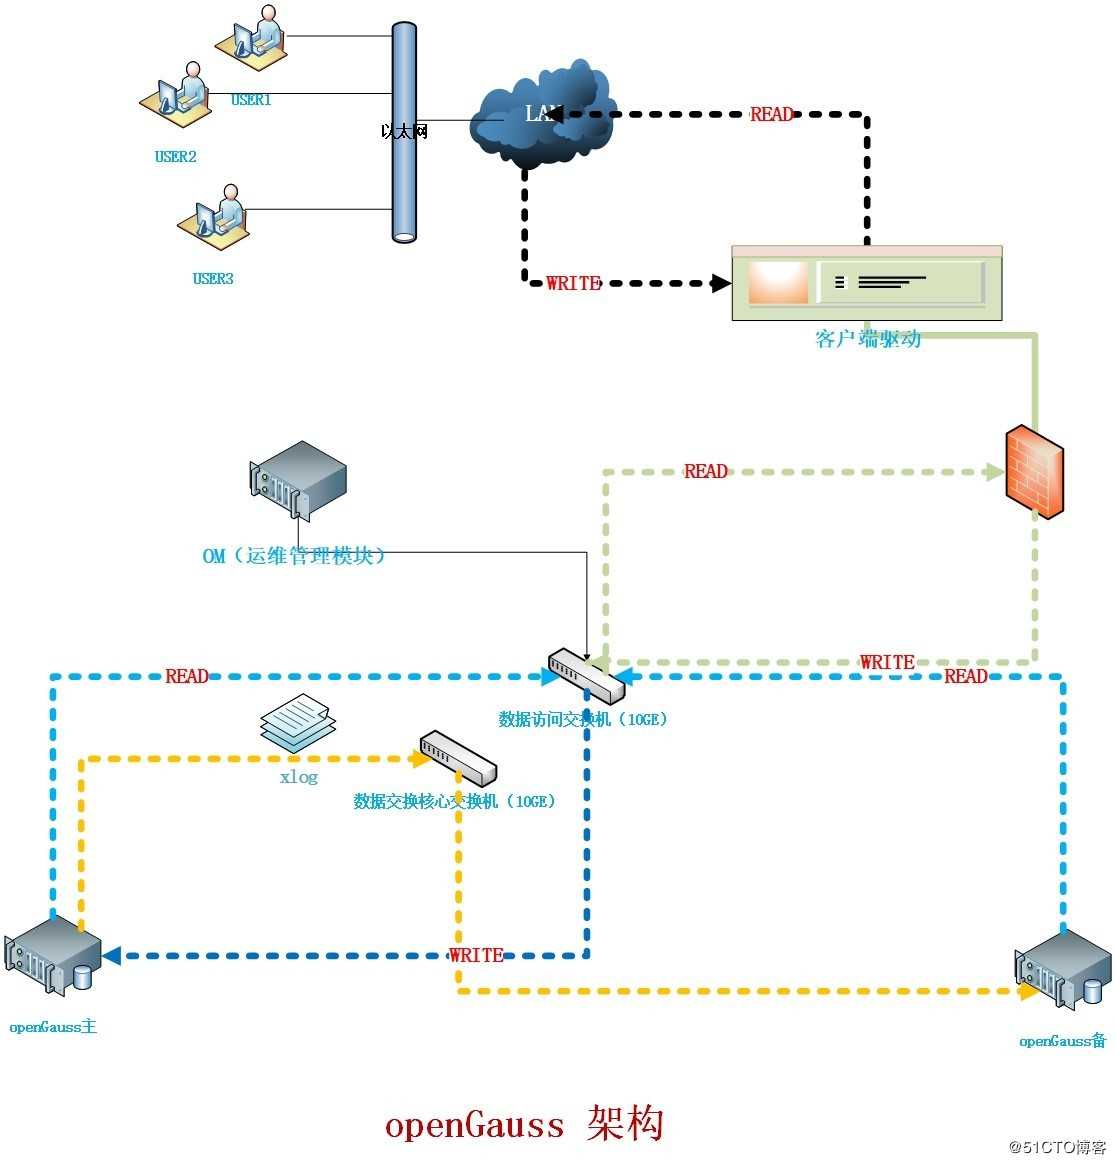
openGauss 也是一款分布式数据库,内部实现采用pgxc架构。
二、版本及特性介绍
openGauss-1.0.0 为 openGuass 的第一个版本。
版本介绍
数据类型,表,临时表,视图,索引,序列,存储过程,函数,触发器等SQL功能;
数据类型,表,临时表,视图,索引,序列,存储过程,函数,触发器等SQL功能;
认证,权限管理,网络通信安全,数据库审计等安全特性;
主备双机,物理备份,逻辑备份,极致RTO高可用功能;
大并发链接,分区,plan hint,NUMA化优化高性能能力。
特性介绍
标准SQL支持
支持标准的SQL92/SQL99/SQL2003/SQL2011规范,支持GBK和UTF-8字符集,支持SQL标准函数与分析函数,支持存储过程。
数据库存储管理功能
支持表空间,可以把不同表规划到不同的存储位置。
提供主备双机
事务支持ACID特性、单节点故障恢复、双机数据同步,双机故障切换等。
应用程序接口
支持标准JDBC 4.0的特性、ODBC 3.5特性。
管理工具
提供安装部署工具、实例启停工具、备份恢复工具。
安全管理
支持SSL安全网络连接、用户权限管理、密码管理、安全审计等功能,保证数据库在管理层、应用层、系统层和网络层的安全性。
三、基本架构
openGuass支持SQL 2003 语法标准,支持主备部署的高可用关系型数据库。适合如下场景:
应用场景:
交易型应用
大并发、大数据量、以联机事务处理为主的交易型应用,如电商、金融、O2O、电信CRM/计费等,应用可按需选择不同的主备部署模式。
物联网数据
在工业监控和远程控制、智慧城市的延展、智能家居、车联网等物联网场景下,传感监控设备多,采样率高,数据存储为追加模型,操作和分析并重的场景。
四、安装指南
openGauss 支持单机安装和主备环境安装,此处示例仅仅演示单机安装。
单机环境介绍:
CPU:AMD-2700x
内存:32G
CPU核数:8核
4.1 软件依赖环境
#yum install -y libaio-develflex bison ncurses-devel glibc-devel patch lsb_release4.2 关闭防火墙和SELinux
#systemctl stop firewalld
#systemctl disable firewalld
#setenforce 0
#sed -i ‘s/SELINUX=enforcing/SELINUX=disabled/g‘ /etc/selinux/config
4.3 禁用SWAP内存
#swapoff -av
swapoff /dev/mapper/rhel-swap
4.4 设置网卡MTU值
推荐 8192,不小于1500
[root@opengauss ~]# ifconfig ens33 mtu 8192
[root@opengauss ~]# ifconfig ens33 | grep mtu
ens33: flags=4163<UP,BROADCAST,RUNNING,MULTICAST>  mtu 8192
4.5 了解用户和用户组
为了安全管控,建议安装用户为自定义用户组,软件包已自带 gs_preinstall 脚本检查,相应用户及用户组会自动创建并创建安装目录
4.6 配置数据库名称及各项目录
openGauss 以xml 文件读取数据库名称及相应目录
<?xml version="1.0" encoding="UTF-8"?>
<ROOT>
  <!-- 整体信息 -->
  <CLUSTER>
  <!-- 数据库名称 -->
    <PARAM name="clusterName" value="opengauss" />
  <!-- 数据库节点名称(hostname) -->
    <PARAM name="nodeNames" value="opengauss" />
  <!-- 节点IP,与nodeNames一一对应 -->
    <PARAM name="backIp1s" value="10.10.20.173"/>
  <!-- 数据库安装目录-->
    <PARAM name="gaussdbAppPath" value="/opt/huawei/install/app" />
  <!-- 日志目录-->
    <PARAM name="gaussdbLogPath" value="/var/log/omm" />
  <!-- 临时文件目录-->
    <PARAM name="tmpMppdbPath" value="/opt/huawei/tmp" />
  <!--数据库工具目录-->
    <PARAM name="gaussdbToolPath" value="/opt/huawei/install/om" />
  <!--数据库core文件目录-->
    <PARAM name="corePath" value="/opt/huawei/corefile"/>
  <!-- openGauss类型,此处示例为单机类型,“single-inst”表示单机一主多备部署形态-->
    <PARAM name="clusterType" value="single-inst"/>
  </CLUSTER>
  <!-- 每台服务器上的节点部署信息 -->
  <DEVICELIST>
      <!-- node1上的节点部署信息 -->
      <DEVICE sn="1000001">
          <!-- node1的hostname -->
          <PARAM name="name" value="opengauss"/>
          <!-- node1所在的AZ及AZ优先级 -->
          <PARAM name="azName" value="AZ1"/>
          <PARAM name="azPriority" value="1"/>
          <!-- node1的IP,如果服务器只有一个网卡可用,将backIP1和sshIP1配置成同一个IP -->
          <PARAM name="backIp1" value="10.10.20.173"/>
          <PARAM name="sshIp1" value="10.10.20.173"/>
          <!--DBnode-->
          <PARAM name="dataNum" value="1"/>
          <!--DBnode端口号-->
          <PARAM name="dataPortBase" value="26000"/>
          <!--DBnode主节点上数据目录,及备机数据目录-->
          <PARAM name="dataNode1" value="/opt/huawei/install/data/db1"/>
          <!--DBnode节点上设定同步模式的节点数-->
          <!--><PARAM name="dataNode1_syncNum" value="0"/><-->
      </DEVICE>
  </DEVICELIST>
</ROOT>
4.7 准备安装用户及环境
[root@opengauss openGauss]# cd /opt/software/openGauss/
[root@opengauss openGauss]# chmod 755 -R /opt/software/
[root@opengauss openGauss]# tar -zxf openGauss-1.0.0-CentOS-64bit.tar.gz
[root@opengauss openGauss]#groupadd dbgrp
[root@opengauss openGauss]#useradd -G dbgrp omm
export OPENGAUSSHOME=/opt/software/openGauss
export LD_LIBRARY_PATH=${OPENGAUSSHOME}/script/gspylib
4.8 执行检查脚本
[root@opengauss script]# ./gs_preinstall -U omm -G dbgrp -L -X ../clusterconfig.xml
Parsing the configuration file.
Successfully parsed the configuration file.
Installing the tools on the local node.
Successfully installed the tools on the local node.
Setting pssh path
Successfully set core path.
Preparing SSH service.
Successfully prepared SSH service.
Checking OS software.
Successfully check os software.
Checking OS version.
Successfully checked OS version.
Creating cluster‘s path.
Successfully created cluster‘s path.
Setting SCTP service.
Successfully set SCTP service.
Set and check OS parameter.
Setting OS parameters.
Successfully set OS parameters.
Warning: Installation environment contains some warning messages.
Please get more details by "/opt/software/openGauss/script/gs_checkos -i A -h opengauss --detail".
Set and check OS parameter completed.
Preparing CRON service.
Successfully prepared CRON service.
Setting user environmental variables.
Successfully set user environmental variables.
Setting the dynamic link library.
Successfully set the dynamic link library.
Setting Core file
Successfully set core path.
Setting pssh path
Successfully set pssh path.
Set ARM Optimization.
No need to set ARM Optimization.
Fixing server package owner.
Setting finish flag.
Successfully set finish flag.
Preinstallation succeeded.
4.9 创建主机互信,此处仅建立本机互信即可
[root@opengauss openGauss]#ssh-keygen -t rsa
[root@opengauss openGauss]#ssh-copy-id root@opengauss
4.10 内核参数配置
内核参数由于是测试环境,跳过配置
4.11 准备安装
[root@opengauss ~]# su - omm
Last login: Thu Jul  2 01:29:14 CST 2020 on pts/0
[omm@opengauss ~]$ gs_install -X /opt/software/openGauss/clusterconfig.xml

[root@opengauss script]# su - omm
Last login: Thu Jul  2 01:51:38 CST 2020 on pts/0
[omm@opengauss ~]$ gs_install -X /opt/software/openGauss/clusterconfig.xml
Parsing the configuration file.
Check preinstall on every node.
Successfully checked preinstall on every node.
Creating the backup directory.
Successfully created the backup directory.
begin deploy..
Installing the cluster.
begin prepare Install Cluster..
Checking the installation environment on all nodes.
begin install Cluster..
Installing applications on all nodes.
Successfully installed APP.
begin init Instance..
encrypt cipher and rand files for database.
Please enter password for database:
Please repeat for database:
The authenticity of host ‘opengauss (10.10.20.173)‘ can‘t be established.
ECDSA key fingerprint is SHA256:UcIvwt+YzSb4iW7p+TmTNmaOiDT2QDyq5NuQcT2VDKU.
ECDSA key fingerprint is MD5:74:e5:9c:da:88:be:9a:39:b6:7f:f2:6b:3a:48:4f:ad.
Are you sure you want to continue connecting (yes/no)? yes
omm@opengauss‘s password:
omm@opengauss‘s password:
begin to create CA cert files
The sslcert will be generated in /opt/huawei/install/app/share/sslcert/om
omm@opengauss‘s password:
omm@opengauss‘s password:
omm@opengauss‘s password:
omm@opengauss‘s password:
omm@opengauss‘s password:
omm@opengauss‘s password:
omm@opengauss‘s password:
omm@opengauss‘s password:
omm@opengauss‘s password:
omm@opengauss‘s password:
omm@opengauss‘s password:
Cluster installation is completed.
Configuring.
Deleting instances from all nodes.
Successfully deleted instances from all nodes.
Checking node configuration on all nodes.
Initializing instances on all nodes.
Updating instance configuration on all nodes.
Check consistence of memCheck and coresCheck on database nodes.
Configuring pg_hba on all nodes.
Configuration is completed.
Successfully started cluster.
Successfully installed application.
end deploy..
[omm@opengauss ~]$
4.12 查看进程
[omm@opengauss ~]$ ps -ef | grep gauss | egrep -v "grep"
omm       35084      1  2 01:52 pts/0    00:00:02 /opt/huawei/install/app/bin/gaussdb -D /opt/huawei/install/data/db1
4.13 登录数据库
openGauss默认端口和PostgreSQL一样为5432,配置文件中已更改端口为26000,这也是openGauss在配置文件中默认的端口。
[omm@opengauss ~]$ gsql -d postgres -p 26000
gsql ((openGauss 1.0.0 build 0bd0ce80) compiled at 2020-06-30 18:19:27 commit 0 last mr  )
Non-SSL connection (SSL connection is recommended when requiring high-security)
Type "help" for help.

postgres=# ALTER ROLE omm IDENTIFIED BY ‘Sungsasung123‘ REPLACE ‘Bigdata@123‘;
ALTER ROLE
--查看版本
postgres=# SELECT version();
                                                                       version
------------------------------------------------------------------------------------------------------------------------------------------------------
 (openGauss 1.0.0 build 0bd0ce80) compiled at 2020-06-30 18:19:27 commit 0 last mr   on x86_64-unknown-linux-gnu, compiled by g++ (GCC) 8.2.0, 64-bit
(1 row)

postgres=# show server_version;
 server_version
----------------
 9.2.4
4.14 启动和停止
[omm@opengauss openGauss]$ gs_om -t stop
Stopping cluster.
=========================================
Successfully stopped cluster.
=========================================
End stop cluster.
[omm@opengauss openGauss]$ gs_om -t start
Starting cluster.
=========================================
=========================================
Successfully started.
4.15 查看数据库状态
[omm@opengauss ~]$ gs_om -t status --detail
[   Cluster State   ]

cluster_state   : Normal
redistributing  : No
current_az      : AZ_ALL

[  Datanode State   ]

node         node_ip         instance                             state
--------------------------------------------------------------------------------------
1  opengauss 10.10.20.173    6001 /opt/huawei/install/data/db1 P Primary Normal

[omm@opengauss ~]$ gs_om -t status --all
-----------------------------------------------------------------------

cluster_state             : Normal
redistributing            : No

-----------------------------------------------------------------------

node                      : 1
node_name                 : opengauss

node                      : 1
instance_id               : 6001
node_ip                   : 10.10.20.173
data_path                 : /opt/huawei/install/data/db1
type                      : Datanode
instance_state            : Primary
static_connections        : 0
HA_state                  : Normal
reason                    : Normal
sender_sent_location      : 0/0
sender_write_location     : 0/0
sender_flush_location     : 0/0
sender_replay_location    : 0/0
receiver_received_location: 0/0
receiver_write_location   : 0/0
receiver_flush_location   : 0/0
receiver_replay_location  : 0/0
sync_state                : Async
4.16 检查数据库性能
[omm@opengauss ~]$ gs_checkperf
Cluster statistics information:
    Host CPU busy time ratio                     :    .50        %
    MPPDB CPU time % in busy time                :    61.06      %
    Shared Buffer Hit ratio                      :    96.73      %
    In-memory sort ratio                         :    0
    Physical Reads                               :    448
    Physical Writes                              :    92
    DB size                                      :    28         MB
    Total Physical writes                        :    92
    Active SQL count                             :    3
    Session count                                :    4
4.17 安装目录架构介绍
[omm@opengauss opt]$ tree -d -L 3 huawei/
huawei/
├── corefile   #core 文件存放目录,类似于pg中的core文件,用于数据库crash追踪
├── install
│   ├── app -> /opt/huawei/install/app_0bd0ce80   #数据库安装路径,为app_0bd0ce80的软连接
│   ├── app_0bd0ce80
│   │   ├── bin #数据库命令执行路径
│   │   ├── etc #数据库配置路径(如kerberos路径和云上obs映射区域配置)
│   │   ├── include #数据库头文件
│   │   ├── lib #动态链接库
│   │   └── share #共享目录库(包括pg扩展和ssl根证书文件)
│   ├── data #数据目录
│   │   └── db1 #数据库文件目录
│   └── om #运维管理目录
│       ├── lib #执行脚本使用库
│       └── script #工具脚本路径
└── tmp
五、后记
openGauss 安装x86_64仅支持CentOS 7.6 版本以下操作系统,本次测试安装的操作系统版本为RedHat 7.8 ,因此在执行 gs_preinstall 脚本时无法检测通过。那是不是就不可以在RedHat操作系统和7.6以上的版本无法安装呢?不是,可以通过修改系统版本的方式/etc/redhat-release骗过检查。但是下一步又会出错,因为它会去检查安数据库装包,数据库安装包是以openGauss-1.0.0-CentOS-64bit.tar.bz2 命名的,所以无法检查通过,该问题可以通过mv 命令将 CentOS更改为RedHat即可通过。再次执行会去找openGauss-1.0.0-CentOS-64bit.sha256 校验文件。由于数据库文件已经做了修改,此处以同样方式修改openGauss-1.0.0-CentOS-64bit.sha256为openGauss-1.0.0-RedHat-64bit.sha256文件即可。
标签:nis tps script 目录 wal ppi 逻辑 o2o 结合
原文地址:https://blog.51cto.com/14575413/2509798