标签:control request pack use 容器 全局 lease intel NPU
此时选择的就是maven-archetype-webapp
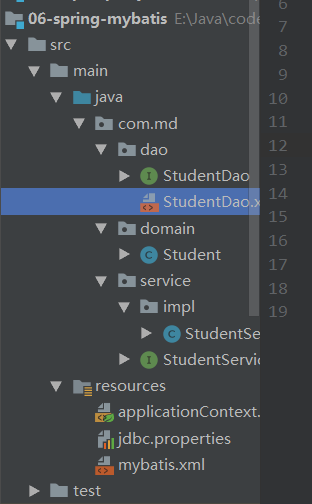
还是使用Spring集成MyBatis那个案例的代码,目录如下
这里还是直接把整个的pom.xml文件放在下面
<?xml version="1.0" encoding="UTF-8"?>

<project xmlns="http://maven.apache.org/POM/4.0.0" xmlns:xsi="http://www.w3.org/2001/XMLSchema-instance"
  xsi:schemaLocation="http://maven.apache.org/POM/4.0.0 http://maven.apache.org/xsd/maven-4.0.0.xsd">
  <modelVersion>4.0.0</modelVersion>

  <groupId>com.md</groupId>
  <artifactId>10-spring-web</artifactId>
  <version>1.0-SNAPSHOT</version>
  <packaging>war</packaging>

  <properties>
    <project.build.sourceEncoding>UTF-8</project.build.sourceEncoding>
    <maven.compiler.source>1.8</maven.compiler.source>
    <maven.compiler.target>1.8</maven.compiler.target>
  </properties>

  <dependencies>

    <!-- 单元测试-->
    <dependency>
      <groupId>junit</groupId>
      <artifactId>junit</artifactId>
      <version>4.11</version>
      <scope>test</scope>
    </dependency>

    <!--spring核心-->
    <dependency>
      <groupId>org.springframework</groupId>
      <artifactId>spring-context</artifactId>
      <version>5.2.5.RELEASE</version>
    </dependency>

    <!--spring事务用到的-->
    <dependency>
      <groupId>org.springframework</groupId>
      <artifactId>spring-tx</artifactId>
      <version>5.2.5.RELEASE</version>
    </dependency>
    <dependency>
      <groupId>org.springframework</groupId>
      <artifactId>spring-jdbc</artifactId>
      <version>5.2.5.RELEASE</version>
    </dependency>


    <!--mybatis的-->
    <dependency>
      <groupId>org.mybatis</groupId>
      <artifactId>mybatis</artifactId>
      <version>3.5.1</version>
    </dependency>

    <!--mybatis和spring集成的-->
    <dependency>
      <groupId>org.mybatis</groupId>
      <artifactId>mybatis-spring</artifactId>
      <version>1.3.1</version>
    </dependency>

    <!--mysql驱动-->
    <dependency>
      <groupId>mysql</groupId>
      <artifactId>mysql-connector-java</artifactId>
      <version>5.1.9</version>
    </dependency>


    <!--德鲁伊,数据库连接池-->
    <dependency>
      <groupId>com.alibaba</groupId>
      <artifactId>druid</artifactId>
      <version>1.1.12</version>
    </dependency>

    <!-- servlet依赖 -->
    <dependency>
      <groupId>javax.servlet</groupId>
      <artifactId>javax.servlet-api</artifactId>
      <version>3.1.0</version>
      <scope>provided</scope>
    </dependency>
    <!-- jsp依赖 -->
    <dependency>
      <groupId>javax.servlet.jsp</groupId>
      <artifactId>jsp-api</artifactId>
      <version>2.2.1-b03</version>
      <scope>provided</scope>
    </dependency>


    <!--为了使用监听器对象,加入依赖-->
    <dependency>
      <groupId>org.springframework</groupId>
      <artifactId>spring-web</artifactId>
      <version>5.2.5.RELEASE</version>
    </dependency>


  </dependencies>

  <build>

    <!--目的是把src/main/java目录中的xml文件包含到输出结果中,也就是输出到classes目录中-->
    <resources>
      <resource>
        <directory>src/main/java</directory><!--所在的目录-->
        <includes><!--包括目录下的.properties,.xml 文件都会扫描到-->
          <include>**/*.properties</include>
          <include>**/*.xml</include>
        </includes>
        <filtering>false</filtering>
      </resource>
    </resources>


  </build>

</project>
<%--
  Created by IntelliJ IDEA.
  User: MD
  Date: 2020/8/11
  Time: 15:12
  To change this template use File | Settings | File Templates.
--%>
<%@ page contentType="text/html;charset=UTF-8" language="java" %>
<html>
<head>
    <title>Title</title>
</head>
<body>
    <p>学生注册</p>
    <form action="reg" method="post">
        <table>
            <tr>
                <td>id</td>
                <td><input type="text" name="id"></td>
            </tr>

            <tr>
                <td>姓名:</td>
                <td><input type="text" name="name"></td>
            </tr>
            <tr>
                <td>email:</td>
                <td><input type="text" name="email"></td>
            </tr>
            <tr>
                <td>年龄</td>
                <td><input type="text" name="age"></td>
            </tr>

            <tr>
                <td></td>
                <td><input type="submit" value="注册"></td>
            </tr>
        </table>


    </form>
</body>
</html>
在com.md下新建一个包controller,在下面创建RegisterServlet,继承HttpServlet
package com.md.controller;

import com.md.domain.Student;
import com.md.service.StudentService;
import org.springframework.context.ApplicationContext;
import org.springframework.context.support.ClassPathXmlApplicationContext;
import org.springframework.web.context.WebApplicationContext;
import org.springframework.web.context.support.WebApplicationContextUtils;

import javax.servlet.ServletContext;
import javax.servlet.ServletContextListener;
import javax.servlet.ServletException;
import javax.servlet.http.HttpServlet;
import javax.servlet.http.HttpServletRequest;
import javax.servlet.http.HttpServletResponse;
import java.io.IOException;

/**
 * @author MD
 * @create 2020-08-11 15:22
 */
public class RegisterServlet extends HttpServlet {
    protected void doPost(HttpServletRequest request, HttpServletResponse response) throws ServletException, IOException {
        request.setCharacterEncoding("UTF-8");

        String strId = request.getParameter("id");
        String strName = request.getParameter("name");
        String strEmail = request.getParameter("email");
        String strAge = request.getParameter("age");

        // 创建spring的容器对象
        String config = "spring.xml";
        ApplicationContext c = new ClassPathXmlApplicationContext(config);

        // 获取service
        StudentService studentService = (StudentService) c.getBean("studentService");
        studentService.addStudent(new Student(Integer.parseInt(strId),
                                strName,strEmail,Integer.parseInt(strAge)));


        // 跳的另一个页面
        request.getRequestDispatcher("/result.jsp").forward(request,response);

    }
}
<%--
  Created by IntelliJ IDEA.
  User: MD
  Date: 2020/8/11
  Time: 15:30
  To change this template use File | Settings | File Templates.
--%>
<%@ page contentType="text/html;charset=UTF-8" language="java" %>
<html>
<head>
    <title>Title</title>
</head>
<body>

注册成功

</body>
</html>
<?xml version="1.0" encoding="UTF-8"?>
<web-app xmlns="http://xmlns.jcp.org/xml/ns/javaee"
         xmlns:xsi="http://www.w3.org/2001/XMLSchema-instance"
         xsi:schemaLocation="http://xmlns.jcp.org/xml/ns/javaee http://xmlns.jcp.org/xml/ns/javaee/web-app_4_0.xsd"
         version="4.0">

    <!--
	version="4.0"
	如果新建的这个版本低,不是4.0的,可以找之前写的项目,把上面的信息粘贴过来就行
	-->

    <servlet>
        <servlet-name>RegisterServlet</servlet-name>
        <servlet-class>com.md.controller.RegisterServlet</servlet-class>
    </servlet>
    <servlet-mapping>
        <servlet-name>RegisterServlet</servlet-name>
        <url-pattern>/reg</url-pattern>
    </servlet-mapping>

</web-app>
此时和java web类似,配置Tomcat,启动,然后运行
当表单提交,跳转到 result.jsp 后,多刷新几次页面,查看后台输出,发现每刷新一次页面,就 new 出一个新的 Spring 容器。即,每提交一次请求,就会创建一个新的 Spring 容器
对于一个应用来说,只需要一个 Spring 容器即可。所以,将 Spring 容器的创建语句放在 Servlet 的 doGet()或 doPost()方法中是有问题的,需要改进
对于 Web 应用来说,ServletContext 对象是唯一的,一个 Web 应用,只有一个ServletContext 对象,该对象是在 Web 应用装载时初始化的。
若将 Spring 容器的创建时机,放在 ServletContext 初始化时,就可以保证 Spring 容器的创建只会执行一次,也就保证了Spring 容器在整个应用中的唯一性
当 Spring 容器创建好后,在整个应用的生命周期过程中,Spring 容器应该是随时可以被访问的。即,Spring 容器应具有全局性。而放入 ServletContext 对象的属性,就具有应用的全局性。所以,将创建好的 Spring 容器,以属性的形式放入到 ServletContext 的空间中,就保证了 Spring 容器的全局性
上述的这些工作,已经被封装在了如下的 Spring 的 Jar 包的相关 API 中:spring-web-5.2.5.RELEASE
<dependency>
      <groupId>org.springframework</groupId>
      <artifactId>spring-web</artifactId>
      <version>5.2.5.RELEASE</version>
    </dependency>
若 要 在 ServletContext 初 始 化 时 创 建 Spring 容 器 , 就 需 要 使 用 监 听 器 接 口ServletContextListener 对 ServletContext 进行监听。在 web.xml 中注册该监听器
<listener>
        <listener-class>org.springframework.web.context.ContextLoaderListener</listener-class>
    </listener>
<context-param>
ContextLoaderListener 在对 Spring 容器进行创建时,需要加载 Spring 配置文件。其默认的 Spring 配置文件位置与名称为:WEB-INF/applicationContext.xml。
但一般会将该配置文件放置于项目的 classpath 下,即 src 下,所以需要在 web.xml 中对 Spring 配置文件的位置及名称进行指定
此时为了和默认的不同,把applicationContext.xml重命名为spring.xml文件
<context-param>
        <!--  contextConfigLocation:表示配置文件的路径 -->
        <param-name>contextConfigLocation</param-name>
        <!--自定义配置文件的路径-->
        <param-value>classpath:spring.xml</param-value>
    </context-param>
此时web.xml中的全部代码
<?xml version="1.0" encoding="UTF-8"?>
<web-app xmlns="http://xmlns.jcp.org/xml/ns/javaee"
         xmlns:xsi="http://www.w3.org/2001/XMLSchema-instance"
         xsi:schemaLocation="http://xmlns.jcp.org/xml/ns/javaee http://xmlns.jcp.org/xml/ns/javaee/web-app_4_0.xsd"
         version="4.0">


    <!--如果新建的这个版本低,可以找之前写的项目,把上面的信息粘贴过来就行-->


    <servlet>
        <servlet-name>RegisterServlet</servlet-name>
        <servlet-class>com.md.controller.RegisterServlet</servlet-class>
    </servlet>
    <servlet-mapping>
        <servlet-name>RegisterServlet</servlet-name>
        <url-pattern>/reg</url-pattern>
    </servlet-mapping>


    <!-- 注册监听器
        监听器被创建后或读取这个/WEB-INF/applicationContext.xml这个文件
        为什么要读取文件:
            因为监听器中要创建ApplicationContext对象,需要加载配置文件
            /WEB-INF/applicationContext.xml就是监听器默认读取的spring配置文件路径

        可以修改默认的文件位置

        配置监听器:目的是创建容器对象,创建了容器对象,就能把spring.xml配置文件中的所有对象创建好
        用户发起请求就可以直接使用对象了

        重点:下面的这段代码和如何获取对象
    -->


    <context-param>
        <!--  contextConfigLocation:表示配置文件的路径 -->
        <param-name>contextConfigLocation</param-name>
        <!--自定义配置文件的路径-->
        <param-value>classpath:spring.xml</param-value>
    </context-param>


    <listener>
        <listener-class>org.springframework.web.context.ContextLoaderListener</listener-class>
    </listener>
</web-app>
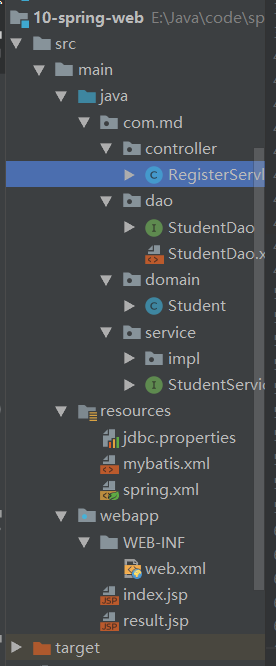
此时的目录结构
1. 直接从 ServletContext 中获取
        WebApplicationContext c = null;
        // 获取ServletContext中的容器对象,创建好的容器对象
        String key = WebApplicationContext.ROOT_WEB_APPLICATION_CONTEXT_ATTRIBUTE;
        Object attr = getServletContext().getAttribute(key);
        if (attr != null){
            c = (WebApplicationContext) attr;
        }
2. 通过 WebApplicationContextUtils 获取
// 使用框架中的方法获取容器对象
        WebApplicationContext c = null;
        ServletContext sc = getServletContext();
        c = WebApplicationContextUtils.getRequiredWebApplicationContext(sc);

        System.out.println("容器对象的信息--------"+c);
以上两种方式,无论使用哪种获取容器对象,刷新 result页面后,可看到代码中使用的 Spring 容器均为同一个对象
此时RegisterServlet的全部代码
package com.md.controller;

import com.md.domain.Student;
import com.md.service.StudentService;
import org.springframework.context.ApplicationContext;
import org.springframework.context.support.ClassPathXmlApplicationContext;
import org.springframework.web.context.WebApplicationContext;
import org.springframework.web.context.support.WebApplicationContextUtils;

import javax.servlet.ServletContext;
import javax.servlet.ServletContextListener;
import javax.servlet.ServletException;
import javax.servlet.http.HttpServlet;
import javax.servlet.http.HttpServletRequest;
import javax.servlet.http.HttpServletResponse;
import java.io.IOException;

/**
 * @author MD
 * @create 2020-08-11 15:22
 */
public class RegisterServlet extends HttpServlet {
    protected void doPost(HttpServletRequest request, HttpServletResponse response) throws ServletException, IOException {
        request.setCharacterEncoding("UTF-8");

        String strId = request.getParameter("id");
        String strName = request.getParameter("name");
        String strEmail = request.getParameter("email");
        String strAge = request.getParameter("age");

        // 创建spring的容器对象
        //String config = "spring.xml";
        //ApplicationContext c = new ClassPathXmlApplicationContext(config);


        // 配置完成之后可以直接这么使用


//        WebApplicationContext c = null;
//        // 获取ServletContext中的容器对象,创建好的容器对象
//        String key = WebApplicationContext.ROOT_WEB_APPLICATION_CONTEXT_ATTRIBUTE;
//        Object attr = getServletContext().getAttribute(key);
//        if (attr != null){
//            c = (WebApplicationContext) attr;
//        }


        // 使用框架中的方法获取容器对象,推荐
        WebApplicationContext c = null;
        ServletContext sc = getServletContext();
        c = WebApplicationContextUtils.getRequiredWebApplicationContext(sc);

        // 直接缩短为一行
 //WebApplicationContext c = WebApplicationContextUtils.getRequiredWebApplicationContext(getServletContext());
        System.out.println("容器对象的信息--------"+c);


        // 获取service
        StudentService studentService = (StudentService) c.getBean("studentService");
        studentService.addStudent(new Student(Integer.parseInt(strId),
                                strName,strEmail,Integer.parseInt(strAge)));


        // 跳的另一个页面
        request.getRequestDispatcher("/result.jsp").forward(request,response);

    }
}
标签:control request pack use 容器 全局 lease intel NPU
原文地址:https://www.cnblogs.com/mengd/p/13510621.html