标签:写入 hostname switch 修改 生产 mysql rpm -ivh $@ each
简介该软件由两部分组成:MHA Manager(管理节点)和MHA Node(数据节点)。MHA Manager可以单独部署在一台独立的机器上管理多个master-slave集群,也可以部署在一台slave节点上。MHA Node运行在每台MySQL服务器上,MHA Manager会定时探测集群中的master节点,当master出现故障时,它可以自动将最新数据的slave提升为新的master,然后将所有其他的slave重新指向新的master。整个故障转移过程对应用程序完全透明。
在MHA自动故障切换过程中,MHA试图从宕机的主服务器上保存二进制日志,最大程度的保证数据的不丢失,但这并不总是可行的。例如,如果主服务器硬件故障或无法通过ssh访问,MHA没法保存二进制日志,只进行故障转移而丢失了最新的数据。使用MySQL 5.5的半同步复制,可以大大降低数据丢失的风险。MHA可以与半同步复制结合起来。如果只有一个slave已经收到了最新的二进制日志,MHA可以将最新的二进制日志应用于其他所有的slave服务器上,因此可以保证所有节点的数据一致性。
目前MHA主要支持一主多从的架构,要搭建MHA,要求一个复制集群中必须最少有三台数据库服务器,一主二从,即一台充当master,一台充当备用master,另外一台充当从库,因为至少需要三台服务器,出于机器成本的考虑,淘宝也在该基础上进行了改造,目前淘宝TMHA已经支持一主一从。MHA 适合任何存储引擎, 只要能主从复制的存储引擎它都支持,不限于支持事物的 innodb 引擎。
官方介绍:https://code.google.com/p/mysql-master-ha/
下图展示如何通过MHA Manager管理多组主从复制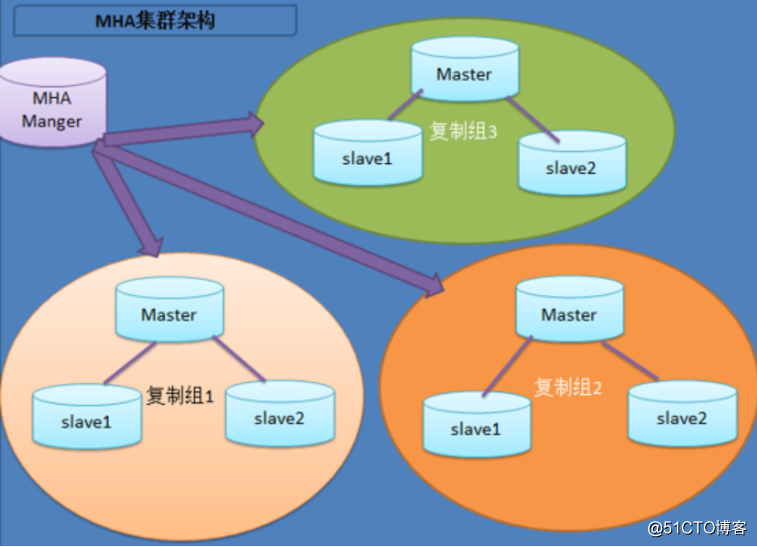
可以将MHA工作原理总结为如下:
(1)从宕机崩溃的master保存二进制日志事件(binlog events);
(2)识别含有最新更新的slave;
(3)应用差异的中继日志(relay log)到其他的slave;
(4)应用从master保存的二进制日志事件(binlog events);
(5)提升一个slave为新的master;
(6)使其他的slave连接新的master进行复制;
MHA软件由两部分组成,Manager工具包和Node工具包,具体的说明如下。
Manager工具包主要包括以下几个工具:
masterha_check_ssh 检查MHA的SSH配置状况
masterha_check_repl 检查MySQL复制状况
masterha_manger 启动MHA
masterha_check_status 检测当前MHA运行状态
masterha_master_monitor 检测master是否宕机
masterha_master_switch 控制故障转移(自动或者手动)
masterha_conf_host 添加或删除配置的server信息
Node工具包(这些工具通常由MHA Manager的脚本触发,无需人为操作)主要包括以下几个工具:
save_binary_logs 保存和复制master的二进制日志
apply_diff_relay_logs 识别差异的中继日志事件并将其差异的事件应用于其他的slave
filter_mysqlbinlog 去除不必要的ROLLBACK事件(MHA已不再使用这个工具)
purge_relay_logs 清除中继日志(不会阻塞SQL线程)
一.项目规划
主机 ip
主库 (master) 192.168.60.206
从库 (slave1) 192.168.60.208
从库 (slave2) 192.168.60.209
虚拟VIP(vrrp漂移) 192.168.60.220
说明一下服务器情况:
一共三台服务器,系统CentOS Linux release 7.8
IP分别为:192.168.60.206、 192.168.60.208、192.168.60.209
206为master节点,208和209都是slave节点
mha-manager装在209上,三台机器都装了mha-node
5.三台MySQL版本为5.7
二.前期准备
配置hosts(三台都要解析)
cat /etc/hosts
127.0.0.1 localhost localhost.localdomain localhost4 localhost4.localdomain4
::1 localhost localhost.localdomain localhost6 localhost6.localdomain6
192.168.60.206 master
192.168.60.208 slave1
192.168.60.209 slave2
关闭防火墙和selinux (三台服务器执行同样的操作)
systemctl stop firewalld
systemctl disable firewalld
setenforce 0
sed -i ‘ /^SELINUX/s#enforcing#disabled#g‘ /etc/selinux/config
配置免密登录(三台服务器执行同样的操作)
vim ssh.sh
#!/bin/bash
yum -y install sshpass &> /dev/null
read -p "请输入服务器密码:" passwd
UserName=root
IP="192.168.60."
#创建密钥
ssh-keygen -t dsa -f ~/.ssh/id_dsa -P "" &>/dev/null
#分发公钥
for i in 206 208 209 #这里的要改成自己机子的ip
do
sshpass -p "$passwd" ssh-copy-id -i ~/.ssh/id_dsa.pub -p 22 -o StrictHostKeyChecking=no $UserName@$IP$i &>/dev/null
done
各节点验证ssh免密
master
[root@master ~]# ssh 192.168.60.206 date
Thu Aug 27 15:27:28 CST 2020
[root@master ~]# ssh 192.168.60.208 date
Thu Aug 27 15:27:56 CST 2020
[root@master ~]# ssh 192.168.60.209 date
Thu Aug 27 15:28:12 CST 2020
slave1
[root@slave1 ~]# ssh 192.168.60.206 date
Thu Aug 27 15:29:08 CST 2020
[root@slave1 ~]# ssh 192.168.60.208 date
Thu Aug 27 15:29:14 CST 2020
[root@slave1 ~]# ssh 192.168.60.209 date
Thu Aug 27 15:29:18 CST 2020
slave2
[root@slave2 ~]# ssh 192.168.60.206 date
Thu Aug 27 15:30:29 CST 2020
[root@slave2 ~]# ssh 192.168.60.208 date
Thu Aug 27 15:30:32 CST 2020
[root@slave2 ~]# ssh 192.168.60.209 date
Thu Aug 27 15:30:35 CST 2020
三.Mysql环境搭建
三台服务器都要装mysql5.7
下载并安装MySQL官方的 Yum Repository
wget -i -c http://dev.mysql.com/get/mysql57-community-release-el7-10.noarch.rpm
yum -y install mysql57-community-release-el7-10.noarch.rpm
yum -y install mysql-community-server
MySQL数据库设置
首先启动MySQL
systemctl start mysqld.service:
systemctl status mysqld.service
systemctl enable mysqld.service
此时MySQL已经开始正常运行,不过要想进入MySQL还得先找出此时root用户的密码,通过如下命令可以在日志文件中找出密码:
grep “password” /var/log/mysqld.log
如下命令进入数据库:
mysql -uroot -p # 回车后会提示输入密码
输入初始密码,此时不能做任何事情,因为MySQL默认必须修改密码之后才能操作数据库:
mysql> ALTER USER ‘root’@’localhost’ IDENTIFIED BY ‘123456’;
这里有个问题,新密码设置的时候如果设置的过于简单会报错:
原因是因为MySQL有密码设置的规范,具体是与validate_password_policy的值有关:
这时候我们要把密码规则改一下,执行下面sql就可以了:
mysql> set global validate_password_policy=0;
Query OK, 0 rows affected (0.00 sec)
mysql> set global validate_password_length=1;
Query OK, 0 rows affected (0.00 sec)
mysql> ALTER USER ‘root’@’localhost’ IDENTIFIED BY ‘123456’;
Query OK, 0 rows affected (0.00 sec)
设置之后就是我上面查出来的那几个值了,此时密码就可以设置的很简单,例如1234之类的。到此数据库的密码设置就完成了。
但此时还有一个问题,就是因为安装了Yum Repository,以后每次yum操作都会自动更新,需要把这个卸载掉:
yum -y remove mysql57-community-release-el7-10.noarch
配置算是完成了
四.配置MySQL主从环境
1.创建一个数据库
mysql> create database mydb charset utf8;
2.备份数据
mysqldump -uroot -p mydb >mydb.sql
3.分发到其他两台服务器上
scp mydb.sql 192.168.60.208:/root
scp mydb.sql 192.168.60.209:/root
4.导入数据(208和209都要执行)
mysql -uroot -p mydb < mydb.sql
5.修改my.cnf,重启mysql服务(三台都要做修改,只有server-id修改为不一样的就好啦)
[root@master ~]# cat /etc/my.cnf
[mysqld]
datadir=/var/lib/mysql
socket=/var/lib/mysql/mysql.sock
symbolic-links=0
validate_password_policy=0
validate_password_length=6
log-error=/var/log/mysqld.log
pid-file=/var/run/mysqld/mysqld.pid
log_bin=binlog
expire_logs_days=7
max_binlog_size=200M
relay_log_purge = 0
log_slave_updates = 1
server-id=1
binlog-do-db=mydb
binlog-ignore-db=mysql
6.在 3 个 mysql 节点做授权配置(主从复制授权)
mysql> grant replication slave on . to ‘repl‘@‘192.168.60.%‘ identified by ‘123456‘;#授权主从同步用户
mysql> grant all on . to ‘mha‘@‘192.168.60.%‘ identified by ‘123456‘; #授权MHA管理用户,很重要
mysql> flush privileges;
Query OK, 0 rows affected (0.00 sec)
7.在两个salve节点上执行,只读限制(防止意外被写数据,但对超级管理员不生效,很重要)
mysql> set global read_only=1;
8.在主master上查看状态
mysql> show master status;
+---------------+----------+--------------+------------------+-------------------+
| File | Position | Binlog_Do_DB | Binlog_Ignore_DB | Executed_Gtid_Set |
+---------------+----------+--------------+------------------+-------------------+
| binlog.000011 | 154 | mydb | mysql | |
+---------------+----------+--------------+------------------+-------------------+
1 row in set (0.00 sec)
9.在两个slave节点(208和209)执行下面的操作
mysql> change master to master_host=‘192.168.60.206‘, master_user=‘repl‘, master_password=‘123456‘,master_log_file=‘binlog.000011‘, master_log_pos=154;
mysql> start slave;
10.查看主从状态两个线程YES代表正常(208和209都要看)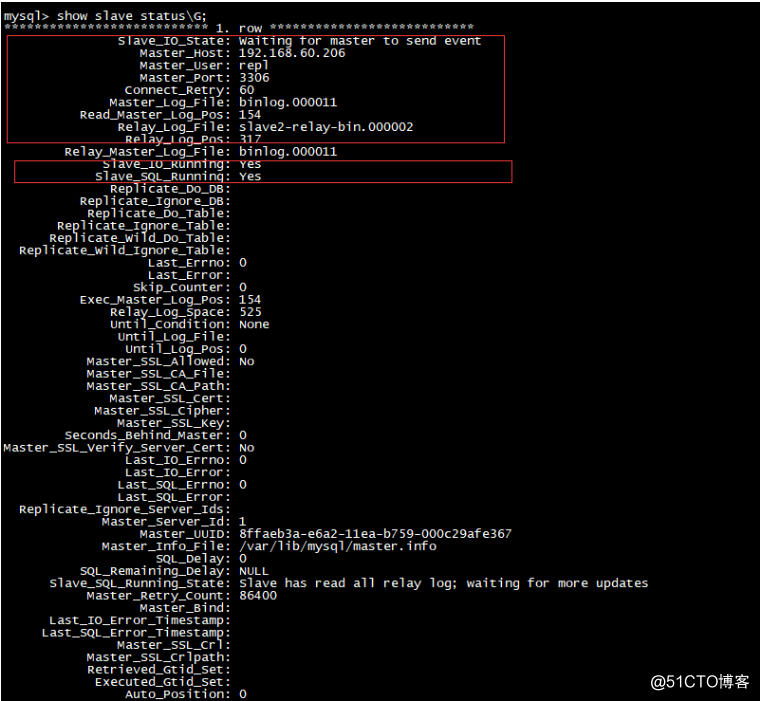
11.验证主从同步,主库写入数据
mysql> use mydb;
Database changed
mysql> create table test(id int primary key);
Query OK, 0 rows affected (0.03 sec)
mysql> insert into test values(1);
Query OK, 1 row affected (0.02 sec)
mysql> insert into test values(2);
Query OK, 1 row affected (0.00 sec)
mysql> insert into test values(3);
Query OK, 1 row affected (0.01 sec)
mysql> insert into test values(4);
Query OK, 1 row affected (0.00 sec)
mysql> insert into test values(5);
Query OK, 1 row affected (0.00 sec)
mysql> select * from mydb.test;
+----+
| id |
+----+
| 1 |
| 2 |
| 3 |
| 4 |
| 5 |
+----+
5 rows in set (0.00 sec)
slave1节点验证
mysql> select * from mydb.test;
+----+
| id |
+----+
| 1 |
| 2 |
| 3 |
| 4 |
| 5 |
+----+
5 rows in set (0.00 sec)
slave2节点验证
mysql> select * from mydb.test;
+----+
| id |
+----+
| 1 |
| 2 |
| 3 |
| 4 |
| 5 |
+----+
5 rows in set (0.01 sec)
五.部署MHA集群架构
1.安装MHA软件(在三个节点上都装mha的node软件)
先安装依赖
wget http://dl.fedoraproject.org/pub/epel/epel-release-latest-7.noarch.rpm
rpm -ivh epel-release-latest-7.noarch.rpm
yum install perl-DBD-MySQL perl-Config-Tiny perl-Log-Dispatch perl-Parallel-ForkManager -y
下载软件(方式任选其一)
wget https://qiniu.wsfnk.com/mha4mysql-node-0.58-0.el7.centos.noarch.rpm
wget https://github.com/yoshinorim/mha4mysql-node/releases/download/v0.58/mha4mysql-node-0.58-0.el7.centos.noarch.rpm
rpm -ivh mha4mysql-node-0.58-0.el7.centos.noarch.rpm
2.slave2上配置MHA(注意manager节点在slave2上配置)
wget https://github.com/yoshinorim/mha4mysql-manager/releases/download/v0.58/mha4mysql-manager-0.58-0.el7.centos.noarch.rpm
rpm -ivh mha4mysql-manager-0.58-0.el7.centos.noarch.rpm
3.创建目录准备配置文件
mkdir -p /etc/mha
mkdir -p /var/log/mha/app1
mkdir -p /etc/mha/scripts/
vim /etc/mha/app1.cnf
[server default]
manager_log=/var/log/mha/app1/manager.log
manager_workdir=/var/log/mha/app1
master_binlog_dir=/var/lib/mysql
master_ip_failover_script=/etc/mha/scripts/master_ip_failover
password=123456
ping_interval=2
repl_password=123456
repl_user=repl
ssh_user=root
user=mha
[server1]
hostname=192.168.60.206
port=3306
[server2]
hostname=192.168.60.208
port=3306
[server3]
hostname=192.168.60.209
port=3306
ignore_fail=1 #如果这个节点挂了,mha将不可用,加上这个参数,slave挂了一样可以用
no_master=1 #从不将这台主机转换为master
六.验证MHA状态
验证SSH状态
[root@slave2 ~]# masterha_check_ssh --conf=/etc/mha/app1.cnf
Thu Aug 27 17:23:46 2020 - [warning] Global configuration file /etc/masterha_default.cnf not found. Skipping.
Thu Aug 27 17:23:46 2020 - [info] Reading application default configuration from /etc/mha/app1.cnf..
Thu Aug 27 17:23:46 2020 - [info] Reading server configuration from /etc/mha/app1.cnf..
Thu Aug 27 17:23:46 2020 - [info] Starting SSH connection tests..
Thu Aug 27 17:23:47 2020 - [debug]
Thu Aug 27 17:23:46 2020 - [debug] Connecting via SSH from root@192.168.60.206(192.168.60.206:22) to root@192.168.60.208(192.168.60.208:22)..
Thu Aug 27 17:23:46 2020 - [debug] ok.
Thu Aug 27 17:23:46 2020 - [debug] Connecting via SSH from root@192.168.60.206(192.168.60.206:22) to root@192.168.60.209(192.168.60.209:22)..
Thu Aug 27 17:23:47 2020 - [debug] ok.
Thu Aug 27 17:23:48 2020 - [debug]
Thu Aug 27 17:23:47 2020 - [debug] Connecting via SSH from root@192.168.60.208(192.168.60.208:22) to root@192.168.60.206(192.168.60.206:22)..
Thu Aug 27 17:23:47 2020 - [debug] ok.
Thu Aug 27 17:23:47 2020 - [debug] Connecting via SSH from root@192.168.60.208(192.168.60.208:22) to root@192.168.60.209(192.168.60.209:22)..
Thu Aug 27 17:23:47 2020 - [debug] ok.
Thu Aug 27 17:23:49 2020 - [debug]
Thu Aug 27 17:23:47 2020 - [debug] Connecting via SSH from root@192.168.60.209(192.168.60.209:22) to root@192.168.60.206(192.168.60.206:22)..
Thu Aug 27 17:23:47 2020 - [debug] ok.
Thu Aug 27 17:23:47 2020 - [debug] Connecting via SSH from root@192.168.60.209(192.168.60.209:22) to root@192.168.60.208(192.168.60.208:22)..
Thu Aug 27 17:23:48 2020 - [debug] ok.
Thu Aug 27 17:23:49 2020 - [info] All SSH connection tests passed successfully.
注意:出现All SSH connection tests passed successfully 代表各个节点免密是成功的
验证数据库集群状态
[root@slave2 ~]# masterha_check_ssh --conf=/etc/mha/app1.cnf
Thu Aug 27 17:23:46 2020 - [warning] Global configuration file /etc/masterha_default.cnf not found. Skipping.
Thu Aug 27 17:23:46 2020 - [info] Reading application default configuration from /etc/mha/app1.cnf..
Thu Aug 27 17:23:46 2020 - [info] Reading server configuration from /etc/mha/app1.cnf..
Thu Aug 27 17:23:46 2020 - [info] Starting SSH connection tests..
Thu Aug 27 17:23:47 2020 - [debug]
Thu Aug 27 17:23:46 2020 - [debug] Connecting via SSH from root@192.168.60.206(192.168.60.206:22) to root@192.168.60.208(192.168.60.208:22)..
Thu Aug 27 17:23:46 2020 - [debug] ok.
Thu Aug 27 17:23:46 2020 - [debug] Connecting via SSH from root@192.168.60.206(192.168.60.206:22) to root@192.168.60.209(192.168.60.209:22)..
Thu Aug 27 17:23:47 2020 - [debug] ok.
Thu Aug 27 17:23:48 2020 - [debug]
Thu Aug 27 17:23:47 2020 - [debug] Connecting via SSH from root@192.168.60.208(192.168.60.208:22) to root@192.168.60.206(192.168.60.206:22)..
Thu Aug 27 17:23:47 2020 - [debug] ok.
Thu Aug 27 17:23:47 2020 - [debug] Connecting via SSH from root@192.168.60.208(192.168.60.208:22) to root@192.168.60.209(192.168.60.209:22)..
Thu Aug 27 17:23:47 2020 - [debug] ok.
Thu Aug 27 17:23:49 2020 - [debug]
Thu Aug 27 17:23:47 2020 - [debug] Connecting via SSH from root@192.168.60.209(192.168.60.209:22) to root@192.168.60.206(192.168.60.206:22)..
Thu Aug 27 17:23:47 2020 - [debug] ok.
Thu Aug 27 17:23:47 2020 - [debug] Connecting via SSH from root@192.168.60.209(192.168.60.209:22) to root@192.168.60.208(192.168.60.208:22)..
Thu Aug 27 17:23:48 2020 - [debug] ok.
Thu Aug 27 17:23:49 2020 - [info] All SSH connection tests passed successfully.
[root@slave2 ~]# masterha_check_repl --conf=/etc/mha/app1.cnf
Thu Aug 27 17:30:48 2020 - [warning] Global configuration file /etc/masterha_default.cnf not found. Skipping.
Thu Aug 27 17:30:48 2020 - [info] Reading application default configuration from /etc/mha/app1.cnf..
Thu Aug 27 17:30:48 2020 - [info] Reading server configuration from /etc/mha/app1.cnf..
Thu Aug 27 17:30:48 2020 - [info] MHA::MasterMonitor version 0.58.
Thu Aug 27 17:30:50 2020 - [info] GTID failover mode = 0
Thu Aug 27 17:30:50 2020 - [info] Dead Servers:
Thu Aug 27 17:30:50 2020 - [info] Alive Servers:
Thu Aug 27 17:30:50 2020 - [info] 192.168.60.206(192.168.60.206:3306)
Thu Aug 27 17:30:50 2020 - [info] 192.168.60.208(192.168.60.208:3306)
Thu Aug 27 17:30:50 2020 - [info] 192.168.60.209(192.168.60.209:3306)
Thu Aug 27 17:30:50 2020 - [info] Alive Slaves:
Thu Aug 27 17:30:50 2020 - [info] 192.168.60.208(192.168.60.208:3306) Version=5.7.31-log (oldest major version between slaves) log-bin:enabled
Thu Aug 27 17:30:50 2020 - [info] Replicating from 192.168.60.206(192.168.60.206:3306)
Thu Aug 27 17:30:50 2020 - [info] 192.168.60.209(192.168.60.209:3306) Version=5.7.31-log (oldest major version between slaves) log-bin:enabled
Thu Aug 27 17:30:50 2020 - [info] Replicating from 192.168.60.206(192.168.60.206:3306)
Thu Aug 27 17:30:50 2020 - [info] Not candidate for the new Master (no_master is set)
Thu Aug 27 17:30:50 2020 - [info] Current Alive Master: 192.168.60.206(192.168.60.206:3306)
Thu Aug 27 17:30:50 2020 - [info] Checking slave configurations..
Thu Aug 27 17:30:50 2020 - [info] read_only=1 is not set on slave 192.168.60.208(192.168.60.208:3306).
Thu Aug 27 17:30:50 2020 - [info] read_only=1 is not set on slave 192.168.60.209(192.168.60.209:3306).
Thu Aug 27 17:30:50 2020 - [info] Checking replication filtering settings..
Thu Aug 27 17:30:50 2020 - [info] binlog_do_db= mydb, binlog_ignore_db= mysql
Thu Aug 27 17:30:50 2020 - [info] Replication filtering check ok.
Thu Aug 27 17:30:50 2020 - [info] GTID (with auto-pos) is not supported
Thu Aug 27 17:30:50 2020 - [info] Starting SSH connection tests..
Thu Aug 27 17:30:52 2020 - [info] All SSH connection tests passed successfully.
Thu Aug 27 17:30:52 2020 - [info] Checking MHA Node version..
Thu Aug 27 17:30:53 2020 - [info] Version check ok.
Thu Aug 27 17:30:53 2020 - [info] Checking SSH publickey authentication settings on the current master..
Thu Aug 27 17:30:53 2020 - [info] HealthCheck: SSH to 192.168.60.206 is reachable.
Thu Aug 27 17:30:53 2020 - [info] Master MHA Node version is 0.58.
Thu Aug 27 17:30:53 2020 - [info] Checking recovery script configurations on 192.168.60.206(192.168.60.206:3306)..
Thu Aug 27 17:30:53 2020 - [info] Executing command: save_binary_logs --command=test --start_pos=4 --binlog_dir=/var/lib/mysql --output_file=/var/tmp/save_binary_logs_test --manager_version=0.58 --start_file=binlog.000011
Thu Aug 27 17:30:53 2020 - [info] Connecting to root@192.168.60.206(192.168.60.206:22)..
Creating /var/tmp if not exists.. ok.
Checking output directory is accessible or not..
ok.
Binlog found at /var/lib/mysql, up to binlog.000011
Thu Aug 27 17:30:53 2020 - [info] Binlog setting check done.
Thu Aug 27 17:30:53 2020 - [info] Checking SSH publickey authentication and checking recovery script configurations on all alive slave servers..
Thu Aug 27 17:30:53 2020 - [info] Executing command : apply_diff_relay_logs --command=test --slave_user=‘mha‘ --slave_host=192.168.60.208 --slave_ip=192.168.60.208 --slave_port=3306 --workdir=/var/tmp --target_version=5.7.31-log --manager_version=0.58 --relay_log_info=/var/lib/mysql/relay-log.info --relay_dir=/var/lib/mysql/ --slave_pass=xxx
Thu Aug 27 17:30:53 2020 - [info] Connecting to root@192.168.60.208(192.168.60.208:22)..
Checking slave recovery environment settings..
Opening /var/lib/mysql/relay-log.info ... ok.
Relay log found at /var/lib/mysql, up to slave1-relay-bin.000002
Temporary relay log file is /var/lib/mysql/slave1-relay-bin.000002
Checking if super_read_only is defined and turned on.. not present or turned off, ignoring.
Testing mysql connection and privileges..
mysql: [Warning] Using a password on the command line interface can be insecure.
done.
Testing mysqlbinlog output.. done.
Cleaning up test file(s).. done.
Thu Aug 27 17:30:54 2020 - [info] Executing command : apply_diff_relay_logs --command=test --slave_user=‘mha‘ --slave_host=192.168.60.209 --slave_ip=192.168.60.209 --slave_port=3306 --workdir=/var/tmp --target_version=5.7.31-log --manager_version=0.58 --relay_log_info=/var/lib/mysql/relay-log.info --relay_dir=/var/lib/mysql/ --slave_pass=xxx
Thu Aug 27 17:30:54 2020 - [info] Connecting to root@192.168.60.209(192.168.60.209:22)..
Checking slave recovery environment settings..
Opening /var/lib/mysql/relay-log.info ... ok.
Relay log found at /var/lib/mysql, up to slave2-relay-bin.000002
Temporary relay log file is /var/lib/mysql/slave2-relay-bin.000002
Checking if super_read_only is defined and turned on.. not present or turned off, ignoring.
Testing mysql connection and privileges..
mysql: [Warning] Using a password on the command line interface can be insecure.
done.
Testing mysqlbinlog output.. done.
Cleaning up test file(s).. done.
Thu Aug 27 17:30:54 2020 - [info] Slaves settings check done.
Thu Aug 27 17:30:54 2020 - [info]
192.168.60.206(192.168.60.206:3306) (current master)
+--192.168.60.208(192.168.60.208:3306)
+--192.168.60.209(192.168.60.209:3306)
Thu Aug 27 17:30:54 2020 - [info] Checking replication health on 192.168.60.208..
Thu Aug 27 17:30:54 2020 - [info] ok.
Thu Aug 27 17:30:54 2020 - [info] Checking replication health on 192.168.60.209..
Thu Aug 27 17:30:54 2020 - [info] ok.
Thu Aug 27 17:30:54 2020 - [info] Checking master_ip_failover_script status:
Thu Aug 27 17:30:54 2020 - [info] /etc/mha/scripts/master_ip_failover --command=status --ssh_user=root --orig_master_host=192.168.60.206 --orig_master_ip=192.168.60.206 --orig_master_port=3306
Unknown option: orig_master_ip
Unknown option: orig_master_port
IN SCRIPT TEST====/sbin/ifconfig eth0:1 down==/sbin/ifconfig eth0:1 192.168.60.220/22===
Checking the Status of the script.. OK
Thu Aug 27 17:30:54 2020 - [info] OK.
Thu Aug 27 17:30:54 2020 - [warning] shutdown_script is not defined.
Thu Aug 27 17:30:54 2020 - [info] Got exit code 0 (Not master dead).
MySQL Replication Health is OK.
注意:出现MySQL Replication Health is OK代表集群状态正常
七.启动MHA
[root@slave2 ~]# nohup masterha_manager —conf=/etc/mha/app1.cnf —remove_dead_master_conf —ignore_last_failover < /dev/null > /var/log/mha/app1/manager.log 2>&1 &
[1] 17359
[root@slave2 ~]# ps -ef |grep mha
root 3186 1466 0 10:15 pts/0 00:00:30 perl /usr/bin/masterha_manager —conf=/etc/mha/app1.cnf —remove_dead_master_conf —ignore_last_failover
root 17492 2402 0 17:34 pts/1 00:00:00 grep —color=auto mha
查看状态
[root@slave2 ~]# masterha_check_status —conf=/etc/mha/app1.cnf
app1 (pid:3186) is running(0:PING_OK), master:192.168.60.206
八.配置虚拟VIP
为了防止脑裂发生,推荐生产环境采用脚本的方式来管理虚拟ip
vim /etc/mha/scripts/master_ip_failover
#!/usr/bin/env perl
use strict;
use warnings FATAL => ‘all‘;
use Getopt::Long;
my (
$command, $ssh_user, $orig_master_host, $orig_master_ip,
$orig_master_port, $new_master_host, $new_master_ip, $new_master_port
);
my $vip = ‘192.168.60.220/24‘; #这里的vip地址写一个与自己IP地址相同的IP段
my $key = ‘1‘;
my $ssh_start_vip = "/sbin/ifconfig eth0:$key $vip"; #这里的网卡要看自己外网的外卡是不是ens33,不是的话要改成自己的外网网卡
my $ssh_stop_vip = "/sbin/ifconfig eth0:$key down";
GetOptions(
‘command=s‘ => \$command,
‘ssh_user=s‘ => \$ssh_user,
‘orig_master_host=s‘ => \$orig_master_host,
‘new_master_ip=s‘ => \$new_master_ip,
‘new_master_port=i‘ => \$new_master_port,
);
exit &main();
sub main {
print "\n\nIN SCRIPT TEST====$ssh_stop_vip==$ssh_start_vip===\n\n";
if ( $command eq "stop" || $command eq "stopssh" ) {
my $exit_code = 1;
eval {
print "Disabling the VIP on old master: $orig_master_host \n";
&stop_vip();
$exit_code = 0;
};
if ($@) {
warn "Got Error: $@\n";
exit $exit_code;
}
exit $exit_code;
}
elsif ( $command eq "start" ) {
my $exit_code = 10;
eval {
print "Enabling the VIP - $vip on the new master - $new_master_host \n";
&start_vip();
$exit_code = 0;
};
if ($@) {
warn $@;
exit $exit_code;
}
exit $exit_code;
}
elsif ( $command eq "status" ) {
print "Checking the Status of the script.. OK \n";
exit 0;
}
else {
&usage();
exit 1;
}
}
sub start_vip() {ssh $ssh_user\@$new_master_host \" $ssh_start_vip \";
}
sub stop_vip() {
return 0 unless ($ssh_user);ssh $ssh_user\@$orig_master_host \" $ssh_stop_vip \";
}
sub usage {
print
"Usage: master_ip_failover --command=start|stop|stopssh|status --orig_master_host=host --orig_master_ip=ip --orig_master_port=port --new_master_host=host --new_master_ip=ip --new_master_port=port\n";
}
slave2节点添加虚拟IP
1.ifconfig eth0:1 192.168.60.220/24
2.[root@slave2 ~]# ifconfig
docker0: flags=4099<UP,BROADCAST,MULTICAST> mtu 1500
inet 172.17.0.1 netmask 255.255.0.0 broadcast 172.17.255.255
ether 02:42:4d:6c:22:65 txqueuelen 0 (Ethernet)
RX packets 0 bytes 0 (0.0 B)
RX errors 0 dropped 0 overruns 0 frame 0
TX packets 0 bytes 0 (0.0 B)
TX errors 0 dropped 0 overruns 0 carrier 0 collisions 0
eth0: flags=4163<UP,BROADCAST,RUNNING,MULTICAST> mtu 1500
inet 192.168.60.209 netmask 255.255.252.0 broadcast 192.168.63.255
inet6 fe80::98ac:404b:b616:a248 prefixlen 64 scopeid 0x20<link>
inet6 fe80::b41a:7e5c:3252:28ce prefixlen 64 scopeid 0x20<link>
inet6 fe80::6538:4b94:1249:2af8 prefixlen 64 scopeid 0x20<link>
ether 00:0c:29:4b:16:eb txqueuelen 1000 (Ethernet)
RX packets 115587 bytes 10828651 (10.3 MiB)
RX errors 0 dropped 0 overruns 0 frame 0
TX packets 36832 bytes 4253686 (4.0 MiB)
TX errors 0 dropped 0 overruns 0 carrier 0 collisions 0
九.测试MHA故障转移
1.停掉msater主库
[root@master ~]# systemctl stop mysqld
[root@master ~]# ss -ntlp |grep 3306
[root@master ~]# ps -ef |grep mysql
root 31366 6836 0 17:50 pts/0 00:00:00 grep —color=auto mysql
2.登录slave2查看主从状态
在slave2上查看slave的状态,发现master_host变成slave1 208
[root@slave2 ~]# mysql -uroot -p123456 -e ‘show slave status\G‘;
mysql: [Warning] Using a password on the command line interface can be insecure.
1. row
Slave_IO_State: Waiting for master to send event
Master_Host: 192.168.60.208
Master_User: repl
Master_Port: 3306
Connect_Retry: 60
Master_Log_File: binlog.000011
Read_Master_Log_Pos: 1560
Relay_Log_File: slave2-relay-bin.000002
Relay_Log_Pos: 317
Relay_Master_Log_File: binlog.000011
Slave_IO_Running: Yes
Slave_SQL_Running: Yes
Replicate_Do_DB:
Replicate_Ignore_DB:
Replicate_Do_Table:
Replicate_Ignore_Table:
Replicate_Wild_Do_Table:
Replicate_Wild_Ignore_Table:
Last_Errno: 0
Last_Error:
Skip_Counter: 0
Exec_Master_Log_Pos: 1560
Relay_Log_Space: 525
Until_Condition: None
Until_Log_File:
Until_Log_Pos: 0
Master_SSL_Allowed: No
Master_SSL_CA_File:
Master_SSL_CA_Path:
Master_SSL_Cert:
Master_SSL_Cipher:
Master_SSL_Key:
Seconds_Behind_Master: 0
Master_SSL_Verify_Server_Cert: No
Last_IO_Errno: 0
Last_IO_Error:
Last_SQL_Errno: 0
Last_SQL_Error:
Replicate_Ignore_Server_Ids:
Master_Server_Id: 2
Master_UUID: 8a32d1ef-e6a3-11ea-8fcd-000c2949fb11
Master_Info_File: /var/lib/mysql/master.info
SQL_Delay: 0
SQL_Remaining_Delay: NULL
Slave_SQL_Running_State: Slave has read all relay log; waiting for more updates
Master_Retry_Count: 86400
Master_Bind:
Last_IO_Error_Timestamp:
Last_SQL_Error_Timestamp:
Master_SSL_Crl:
Master_SSL_Crlpath:
Retrieved_Gtid_Set:
Executed_Gtid_Set:
Auto_Position: 0
Replicate_Rewrite_DB:
Channel_Name:
Master_TLS_Version:
3.查看slave2的配置文件
[root@slave2 ~]# vim /etc/mha/app1.cnf
[server default]
manager_log=/var/log/mha/app1/manager.log
manager_workdir=/var/log/mha/app1
master_binlog_dir=/var/lib/mysql
master_ip_failover_script=/etc/mha/scripts/master_ip_failover
password=123456
ping_interval=2
repl_password=123456
repl_user=repl
ssh_user=root
user=mha
[server2]
hostname=192.168.60.208
port=3306
[server3]
hostname=192.168.60.209
ignore_fail=1
no_master=1
port=3306
当master上的主库荡机之后,MHA会自动检查,发现主库mysql停机,立刻会把从库上提升为主库,然后另一台服务器会把mysql主从复制的master_host改为新提升的主库,高可用作用达到了,当master出现故障时,它可以自动将最新数据的slave提升为新的master,然后将所有其他的slave重新指向新的master。
4.查看MHA的日志
[root@slave2 ~]# tail /var/log/mha/app1/manager.log
Invalidated master IP address on 192.168.60.206(192.168.60.206:3306)
The latest slave 192.168.60.208(192.168.60.208:3306) has all relay logs for recovery.
Selected 192.168.60.208(192.168.60.208:3306) as a new master.
192.168.60.208(192.168.60.208:3306): OK: Applying all logs succeeded.
Failed to activate master IP address for 192.168.60.208(192.168.60.208:3306) with return code 10:0
192.168.60.209(192.168.60.209:3306): This host has the latest relay log events.
Generating relay diff files from the latest slave succeeded.
192.168.60.209(192.168.60.209:3306): OK: Applying all logs succeeded. Slave started, replicating from 192.168.60.208(192.168.60.208:3306)
192.168.60.208(192.168.60.208:3306): Resetting slave info succeeded.
Master failover to 192.168.60.208(192.168.60.208:3306) completed successfully.
日志显示208成功切换为master主库
这个时候可以开始修复,手动操作,将他恢复到之前的主从状态
然后重启MHA
nohup masterha_manager --conf=/etc/mha/app1.cnf --remove_dead_master_conf --ignore_last_failover < /dev/null > /var/log/mha/app1/manager.log 2>&1 &
标签:写入 hostname switch 修改 生产 mysql rpm -ivh $@ each
原文地址:https://blog.51cto.com/13293070/2525085