标签:reload cin gif name upload settime under mil play
History对象的方法
back:加载上一个URL
forward:加载下一个URL
go:前进至指定的URL( go(1)等同于forward go(-1)等同于back() )
Location对象的属性和方法:
href:获取当前浏览器的URL
reload():重载当前URL
<!DOCTYPE html>
<html>
<head>
    <title></title>
</head>
<body>
//添加图片
<img src="1.jpg" onclick="forwardPage()" style="cursor: pointer;">
<br>
//添加按钮
<input type="button" value="刷新" name="" onclick="refresh()">
</body>
</html>

<script type="text/javascript">
    //location.href用于跳转页面
    window.location.href = "http://www.baidu.com";

  //页面跳转的方法
    function forwardPage(){
        location.href = "http://www.taobao.com";
    }
  //重新加载页面的方法
    function refresh(){
        //重新加载当前的地址
        location.reload();
    }
</script>
<!DOCTYPE html>
<html>
<head>
<title></title>
</head>
<body>
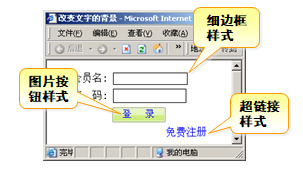
<!-- 应避免给超链接添加onclick事件,因为超链接本身就是点击操作,功能就会重复 -->
<!-- 后退按钮 -->
<a href="javascript:pageBack()" style="margin-right: 20px">后退</a>
<br>
<!-- 前进按钮 -->
<a href="javascript:pageForward()" style="margin-left: 20px">前进</a>
<!-- 复选框 -->
<select onchange="changePage()" id="selPage">
<option value="none">-请选择-</option>
<!-- 跳转至红色页面 -->
<option value="red.html">red</option>
<!-- 跳转至橙色页面 -->
<option value="orange.html">orange</option>
<!-- 跳转至黄色页面 -->
<option value="yellow.html">yellow</option>
</select>
</body>
</html>
<script type="text/javascript">
//获取下拉列表框
var sel = document.getElementById("selPage");
function changePage(){
//获取选中项的值(如果没有写value值就会获取文本节点的值‘请选择’)
//console.log(sel.value);
//如果是选中的是有效的项
if(sel.value != "none"){
//根据选项的值进行页面跳转
location.href = sel.value;
}
}
function pageForward(){
//前进浏览过的缓存页面
window.history.forward();
}
function pageBack(){
//后退之前浏览过的页面
window.history.back();
}
</script>
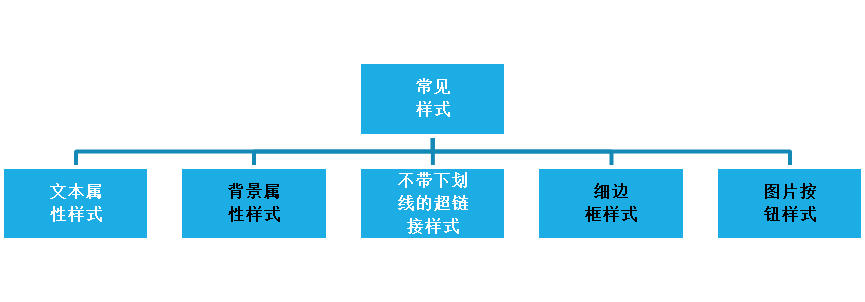
HTML中的常见样式:
css样式基本示例:
<!DOCTYPE html>
<html>
<head>
<title></title>
</head>
<style type="text/css">
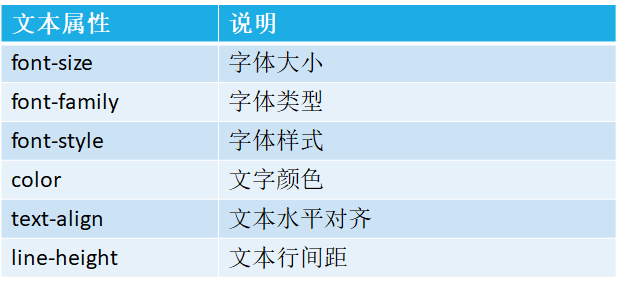
/*文本相关样式*/
.d1{
color: red;
font-size: 20px;
font-style: italic;
font-weight: bold;
letter-spacing: 10px;
/*font-family: "宋体";*/
text-align: center;
line-height: 100px;
text-decoration: underline;
width:200px;
height: 100px;
background-color: gray;
}
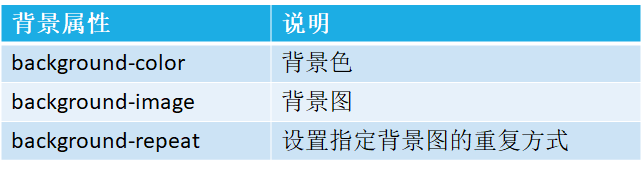
/*背景样式*/
.d2{
background-image: url(image/1.jpg);
background-repeat: no-repeat;
/*background-size: cover;*/
/*background-position: center;*/
background-position: 50px 10px;
width: 460px;
height: 290px;
background-color: gray;
}
/*盒子模型相关样式*/
.d3{
width: 400px;
height: 200px;
border: 5px solid blue;
padding-left: 20px;
margin-top: 100px;
}
.d4{
width: 200px;
height: 200px;
background-color: darkred;
border-radius: 50%;//圆
}
.container{
width: 600px;
border: 5px solid;
}
.container div{
width: 200px;
float: left;
height: 300px;
}
/*清除浮动效果*/
.clear:after{
clear:both;
display: block;//块级元素
content:"";
}
</style>
<body>
<div class="d1">文本样式</div>
<hr>
<div class="d2"></div>
<hr>
<div class="d3">内容</div>
<div class="d4"></div>
<!-- div布局 -->
<div class="container clear">
<div style="background-color: red"></div>
<div style="background-color: darkred"></div>
<div style="background-color: orange"></div>
</div>
</body>
</html>
根据JavaScript脚本访问样式:
对象.style.键(样式名称)=“值”
修改div层的宽高和背景颜色:
<!DOCTYPE html>
<html>
<head>
    <title></title>
</head>
<body>

  <div id="d1"></div>

</body>
</html>
<script type="text/javascript">
  //获取d1标签
    var d1 = document.getElementById("d1");
    //使用style属性访问样式集合
    d1.style.width = "360px";
    d1.style.height = "190px";
    d1.style.backgroundColor = "red";</script>
修改div的字体大小和背景图:
<!DOCTYPE html>
<html>
<head>
    <title></title>
</head>
<body>

  <div id="d1">文字内容</div>

</body>
</html>
<script type="text/javascript">
    //获取d1标签层
    var d1 = document.getElementById("d1");
    //设置标签内的文字大小设为20px
    d1.style.fontSize = "20px";
    //设置标签的背景图
    d1.style.backgroundImage = "url(image/1.jpg)";
</script>
通过脚本访问已有的类样式:
<!DOCTYPE html>
<html>
<head>
    <title></title>
</head>
<style type="text/css">
    .d2{
        width: 200px;
        height: 200px;
        border: 1px solid blue;
    }
</style>
<body>

  <div id="d2"></div>

</body>
</html>
<script type="text/javascript">
    //使用脚本访问类样式
    var d2 = document.getElementById("d2");
    d2.className = "d2";//填入样式名称
</script>
使用脚本设置按钮的样式:
<!DOCTYPE html>
<html>
<head>
    <title></title>
</head>
<body>

<input type="button" id="btn" name="">

</body>
</html>
<script type="text/javascript">
    //获取按钮
    var btn = document.getElementById("btn");
    //使用脚本设置按钮的样式
    btn.style.width = "82px";
    btn.style.height = "23px";
    btn.style.backgroundImage = "url(image/back1.jpg)";
  //去掉边框
    btn.style.border = "none";
    //鼠标进入
    btn.onmouseenter = function(){
        //修改背景图
        btn.style.backgroundImage = "url(image/back2.jpg)";
    }
  //鼠标离开
    btn.onmouseleave = function(){
        btn.style.backgroundImage = "url(image/back1.jpg)";
    }
</script>
通过JavaScript获取读写行内样式:
<!DOCTYPE html>
<html>
<head>
    <title></title>
</head>
<body>
    <div id="d1" style="width:200px; height:200px;background-color:darkred" ></div>
</body>

</html>
<script type="text/javascript">
    var d1 = document.getElementById("d1");
    //js访问的样式是可以进行读写
    //获取层的宽度
    //该方式只能访问到行内的样式,或者是js作用的样式
    console.log(d1.style.width);
    //在原宽度上增加50px
    var width = parseInt(d1.style.width);
    d1.style.width = width+50+"px";
</script>
通过JavaScript获取读写外部样式:
<!DOCTYPE html>
<html>
<head>
    <title></title>
</head>
<style type="text/css">
    .d1{
        width: 200px;
        height: 200px;
        background-color: darkred;
        /*overflow: scroll;*/
        position: absolute;
        left: 0px;
    }
</style>
<body>
    <div id="d1" style="" class="d1"></div>
</body>

</html>
<script type="text/javascript">
    var d1 = document.getElementById("d1");
    //获取外部作用的样式(内嵌式样式、外部样式表作用的样式)传入的是获取到的元素对象:获取元素对象的样式
    var style = window.getComputedStyle(d1);
    console.log(style.width);

    //获取宽度的其他方式
    //返回number,这两个属性都是只读的
    //clientWidth获取标签的实际宽度
    console.log(d1.clientWidth);
    //offsetWidth获取标签包含滚动条、边框的宽度
    console.log(d1.offsetWidth);
</script>
改变div层的位置:
1.position:absolute;再配合top和left
2.margin 修改两个元素之间的距离(不建议用,因为会改变相对位置,影响布局)
<!DOCTYPE html>
<html>
<head>
    <title></title>
</head>
<style type="text/css">
    .d1{
        width: 200px;
        height: 200px;
        background-color: darkred;
        /*overflow: scroll;*/
        position: absolute;
        left: 0px;
    }
</style>
<body>
    <div id="d1" style="" class="d1"></div>
</body>

</html>
<script type="text/javascript">
    var d1 = document.getElementById("d1");

    //获取浏览器的大小 ,不同的浏览器需要根据document.body或者document.documentElement访问
        //获取浏览器宽度
     console.log(document.body.clientWidth);
        //获取浏览器的高度
      console.log(document.body.clientHeight);
console.log(document.body.clientHeight);
   console.log(document.documentElement.clientWidth);   console.log(document.documentElement.clientHeight);

  //每隔十毫秒就移动1像素
    function move(){
        console.log(parseInt(style.left));
        d1.style.left = parseInt(style.left)+1+"px";
        window.setTimeout("move()",10);
    }
    //move();

    window.onresize = function(){
        console.log("窗体大小发生了变化");
    }
</script>

标签:reload cin gif name upload settime under mil play
原文地址:https://www.cnblogs.com/gfl-1112/p/12846701.html