标签:handler mamicode 代码示例 没有 produce ini mapper import component
一、创建项目
1、打开idea,file--new--project

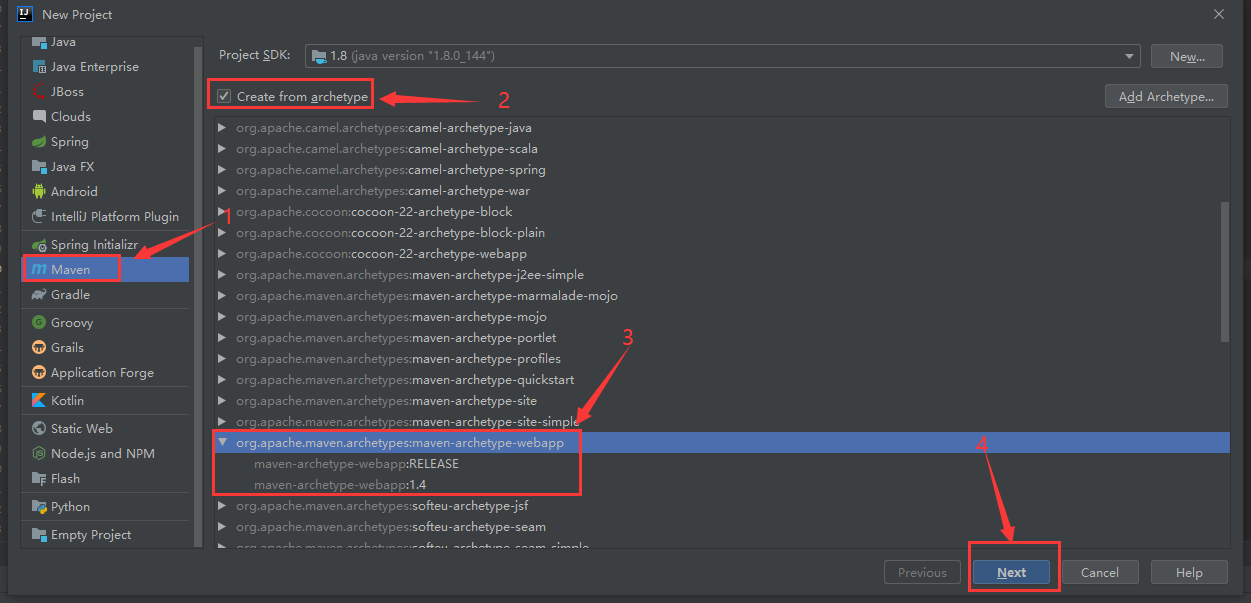
2、按照步骤①②③④操作
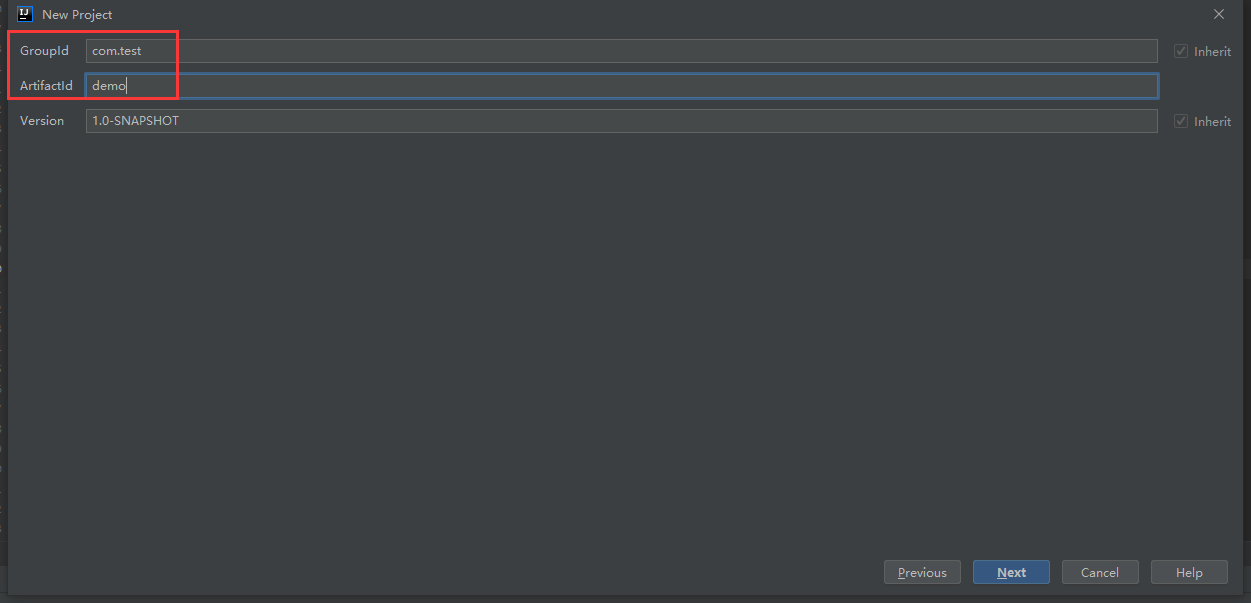
3、输入包名,并点击下一步
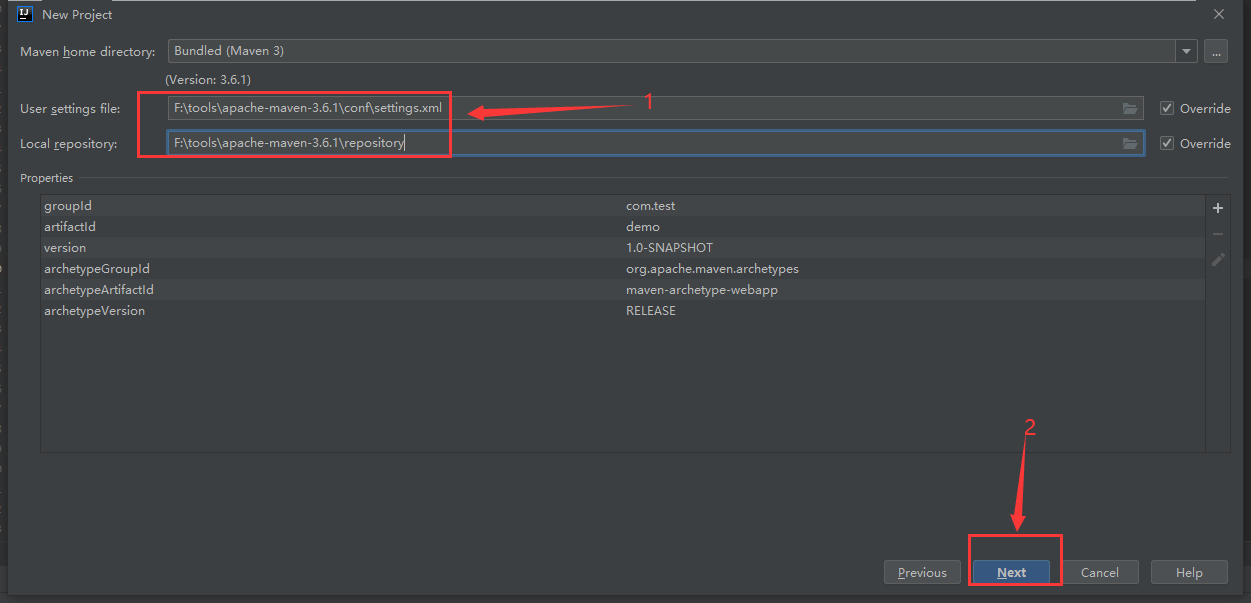
4、选择下载包的maven的setting.xml配置路径和包的存放地,然后点击next
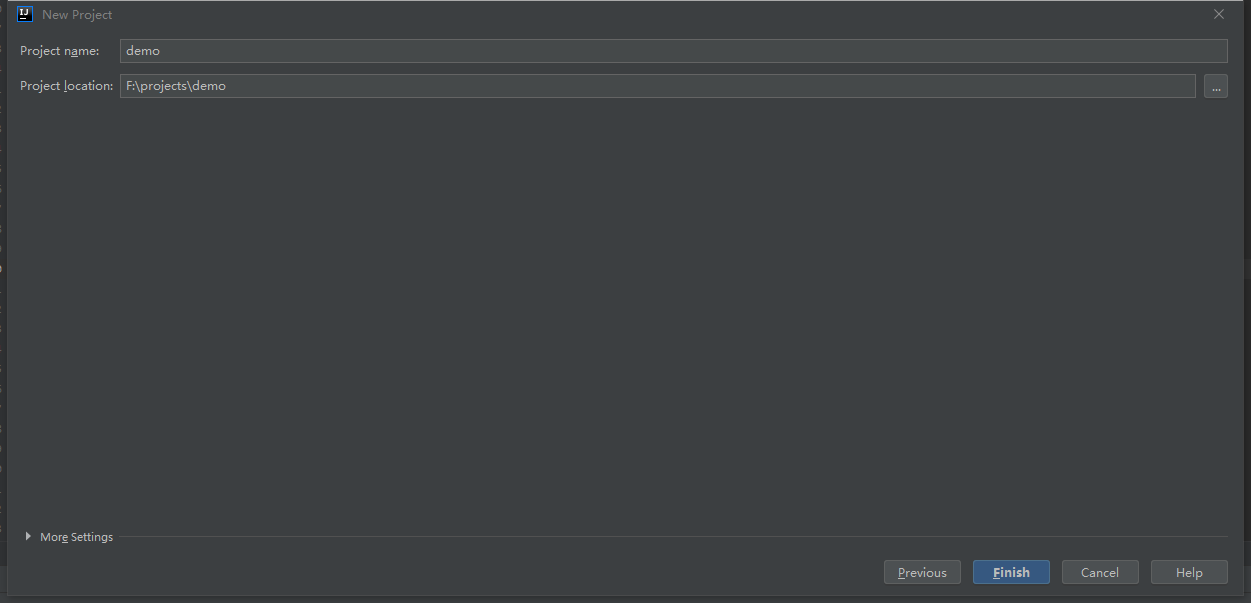
5、确认最终的项目存放目录和项目名,点击finish
二、项目配置
1、在webapp/WEB-INF/web.xml里面配置web服务调度器和启动的一些xml配置参数等
<?xml version="1.0" encoding="UTF-8"?>
<web-app xmlns:xsi="http://www.w3.org/2001/XMLSchema-instance"
         xmlns="http://java.sun.com/xml/ns/javaee" xmlns:web="http://java.sun.com/xml/ns/javaee/web-app_2_5.xsd"
         xsi:schemaLocation="http://java.sun.com/xml/ns/javaee http://java.sun.com/xml/ns/javaee/web-app_2_5.xsd"
         id="WebApp_ID" version="2.5">
  <display-name>demo</display-name>
  <welcome-file-list>
    <welcome-file>index.html</welcome-file>
    <welcome-file>index.htm</welcome-file>
    <welcome-file>index.jsp</welcome-file>
  </welcome-file-list>
  <listener>
    <listener-class>org.springframework.web.servlet.DispatcherServlet</listener-class>
  </listener>
  <servlet>
    <servlet-name>springmvc</servlet-name>
    <servlet-class>org.springframework.web.servlet.DispatcherServlet</servlet-class>
    <init-param>
      <param-name>contextConfigLocation</param-name>
      <param-value>classpath:root.xml</param-value>
    </init-param>
    <load-on-startup>1</load-on-startup>
  </servlet>
  <servlet-mapping>
    <servlet-name>springmvc</servlet-name>
    <url-pattern>/*</url-pattern>
  </servlet-mapping>
</web-app>
注意:classpath加载的东西是随着项目启动而加载的,无需加载的则不需要配置
3、resources/root.xml文件配置
<?xml version="1.0" encoding="UTF-8"?>
<beans xmlns="http://www.springframework.org/schema/beans"
       xmlns:xsi="http://www.w3.org/2001/XMLSchema-instance"
       xsi:schemaLocation="http://www.springframework.org/schema/beans
       http://www.springframework.org/schema/beans/spring-beans-4.0.xsd">

    <!-- 注解、扫包、读取配置文件内容 -->
    <import resource="spring-mvc.xml" />
    <import resource="classpath:/spring/base-context.xml"/>
</beans>
注意:import是要导入的一些xml文件,此处导入了sprin-mvc.xml(mvc的web文件)文件和base-context.xml文件(基础的配置文件)
4、resources/spring-mvc.xml文件配置
<?xml version="1.0" encoding="UTF-8"?>
<beans xmlns="http://www.springframework.org/schema/beans"
    xmlns:context="http://www.springframework.org/schema/context"
    xmlns:xsi="http://www.w3.org/2001/XMLSchema-instance" xmlns:mvc="http://www.springframework.org/schema/mvc"
    xsi:schemaLocation="http://www.springframework.org/schema/beans
    http://www.springframework.org/schema/beans/spring-beans-3.1.xsd
    http://www.springframework.org/schema/context
    http://www.springframework.org/schema/context/spring-context-3.0.xsd
    http://www.springframework.org/schema/mvc
    http://www.springframework.org/schema/mvc/spring-mvc.xsd">
    <!-- 这里是扫描controller-->
    <context:component-scan base-package="com.test.controller"/>
    <mvc:default-servlet-handler/>
    <mvc:annotation-driven />
</beans>
这里是扫描controller层的代码目录,在base-package下,其他的配置一般不动
5、resources/spring/base-context.xml文件配置
<?xml version="1.0" encoding="UTF-8"?>
<beans xmlns="http://www.springframework.org/schema/beans"
       xmlns:xsi="http://www.w3.org/2001/XMLSchema-instance"
       xmlns:context="http://www.springframework.org/schema/context"
       xsi:schemaLocation="http://www.springframework.org/schema/beans http://www.springframework.org/schema/beans/spring-beans-4.0.xsd http://www.springframework.org/schema/context http://www.springframework.org/schema/context/spring-context.xsd">

    <!-- 引入定义/props/*.properties配置文件 -->
    <context:property-placeholder location="classpath:/props/*.properties" ignore-unresolvable="true"/>
    <!--<context:property-placeholder location="classpath:/data/*" ignore-unresolvable="true"/>-->

    <!-- spring 扫描所有注解-->
    <context:component-scan base-package="com.test">
         <!-- spring 排除@Controller -->
        <context:exclude-filter type="annotation" expression="org.springframework.stereotype.Controller"/>
    </context:component-scan>

</beans>
注意:这里是扫描除controller外的其他代码随着服务启动而初始化的配置项。如service和resources下的一些静态文件等
6、代码分层中的controller添加对外的访问路径、service层实现具体的业务逻辑、dao层是对于数据库操作的接口层(对应还有service下的mapper映射以及xml映射,若没有数据库操作则无需这些)、model层对应数据库的实体类层(也可使用bean)、util层对应的一些工具类层、enums层对应的是一些枚举映射(以上是基本的分层设计)
package com.test.controller;

import com.test.services.impl.CommonServiceImpl;
import org.springframework.stereotype.Controller;
import org.springframework.web.bind.annotation.CrossOrigin;
import org.springframework.web.bind.annotation.RequestMapping;
import org.springframework.web.bind.annotation.RequestMethod;
import org.springframework.web.bind.annotation.ResponseBody;

import javax.annotation.Resource;
import javax.servlet.http.HttpServletRequest;
import javax.servlet.http.HttpServletResponse;

@Controller
@RequestMapping(value = "/common")
public class TestController {

    @ResponseBody
    @CrossOrigin
    @RequestMapping(value ="/getSMSRecord.html",method =  RequestMethod.GET,produces = "text/html;charset=utf8")
    public String test(HttpServletRequest req, HttpServletResponse res){
        String mobile = req.getParameter("mobile");
        String env = req.getParameter("env");
        return "success";
    }
}
注意:以上是controller层的代码示例;@Controller标识这个类是对外的服务的(必加);@RequestMapping标识对外映射的路径(必加,值自定义);@ResponseBody表示这个方法是对外的方法(关于spring的一些注解可百度自行搜索)
以上就是spring-mvc的简单项目配置(连接数据库除外//todo),若还想要本地调试,则还需要配置本地tomcat启动
三、配置tomcat启动本地服务
1、首先下载tomcat服务器,至少是8.0以上,并解压
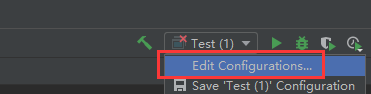
2、从以下入口编辑启动配置
3、按照以下顺序添加tomcat本地服务器

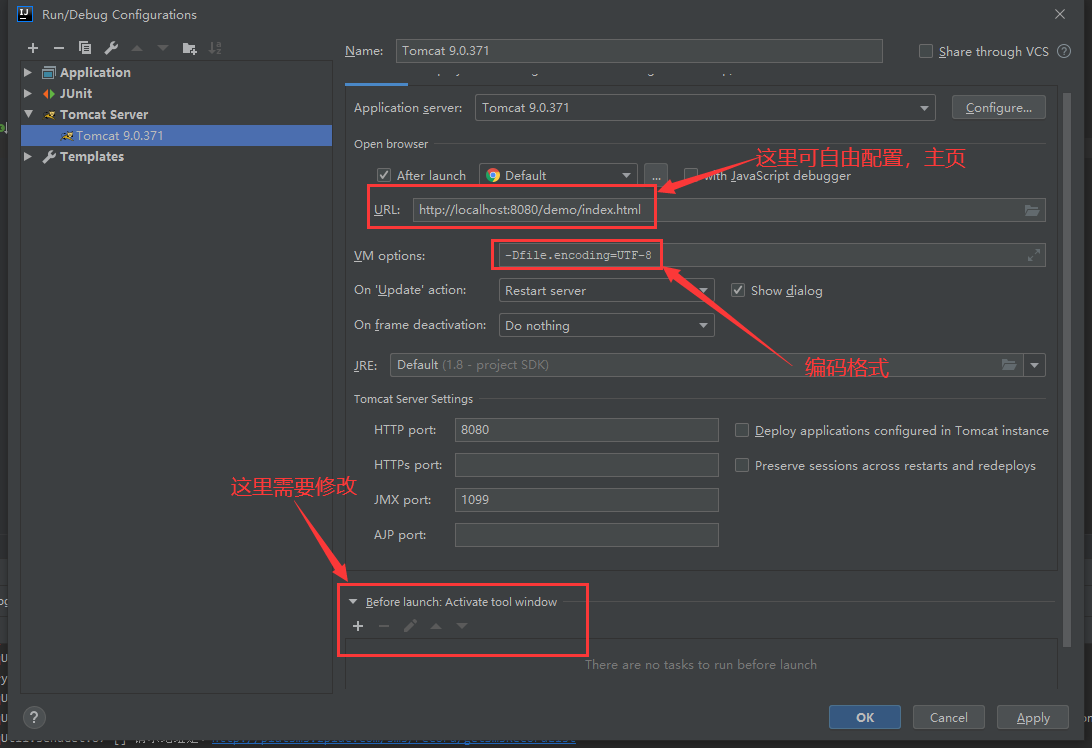
4、再次点击第三步的编辑配置,然后选中刚才的tomcat,会出现下面的页面,并配置相关的参数
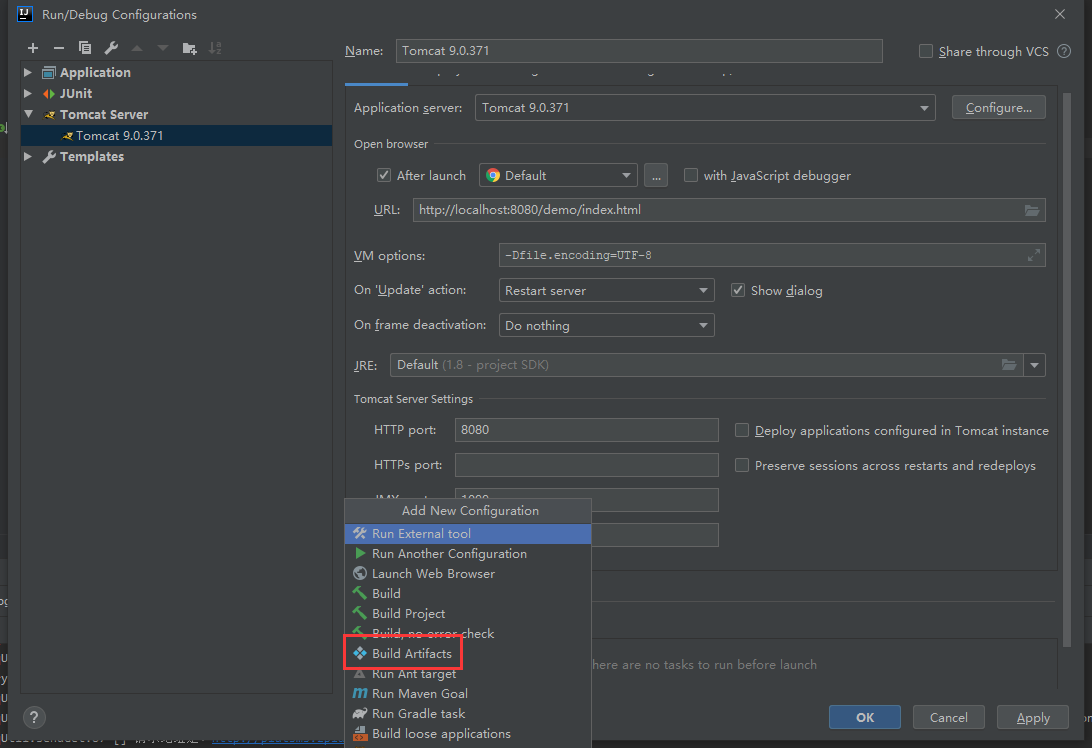
5、点击上一步的第③步的“+”号会出现以下画面,选中红框的那个
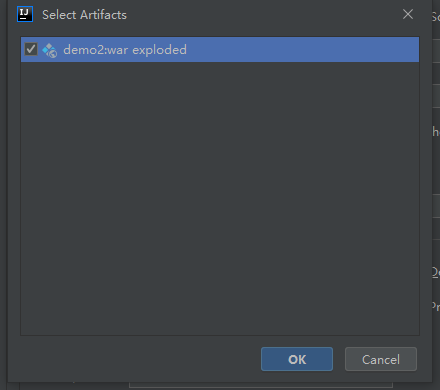
6、勾选中出现的额war包,并点击ok
7、最后点击页面右下角的apply,然后就能本地运行服务了。
注意:index.xml里面的内容是主页的内容,可自定义设置任何值。
注意2:没出现第六步的war包需要手动通过maven编译器打一个war包(需要依赖pom的一些配置参数,可自行百度//todo)
【idea&spring mvc】搭建简易的spring mvc项目(基于maven)!
标签:handler mamicode 代码示例 没有 produce ini mapper import component
原文地址:https://www.cnblogs.com/yllovexjj/p/13820598.html