标签:打印 array 程序员 iot 情况下 bsp 匹配 相同 解释
戴着假发的程序员出品 抖音ID:戴着假发的程序员 欢迎关注
[查看视频教程]
我们查看@Aspect注解的源代码:
1 package org.aspectj.lang.annotation;
2
3 @java.lang.annotation.Retention(java.lang.annotation.RetentionPolicy.RUNTIME)
4 @java.lang.annotation.Target({java.lang.annotation.ElementType.TYPE})
5 public @interface Aspect {
6     java.lang.String value() default "";
7 }
我们会发现Aspect注解有个属性value,这个value默认为“”。这个value就是用来配置Aspect了的实例化模型的。
简单的说就是和bean的@Scpoe注解差不多。默认情况下Aspect类都是单利的。但是我们可以通过配置@Aspect的value为perthis和pertagreg将其设置为多利。下面看看Aspect的实例化模型的三种模式:
[1] 单利,这个没什么好解释的,默认就是这个。
[2] perthis 每个切入点表达式匹配的连接点对应的AOP对象(代理对象)都会创建一个新的切面实例,使用@Aspect("perthis(切入点表达式)")指定切入点表达式;
[3] 每个切入点表达式匹配的连接点对应的目标对象都会创建一个新的切面实例,使用@Aspect("pertarget(切入点表达式)")指定切入点表达式;
我们再来看看官方的另外依据很重要的话:
"pertarget instantiation model 的工作方式与perthis完全相同,但它会在匹配的连接点为每个唯一目标 object 创建一个 aspect 实例。"
就是说你配置为perthis或者pertarget 他们的工作方式是完全相同。
笔者也测试了很多种不同的情况,发现这两个配置产生的效果基本没有啥区别。
唯一的区别就是从概念上有所不同,perthis会为每一个代理对象创建一个Aspect类对象,pertarget会为每一个目标对象创建一个Aspect对象。 但是我们本来就是一个目标对象会对应一个代理对象。所以基本没有区别。只有在多个目标对象对应一个代理对象,或者一个目标对象对应多个代理对象的情况下会产生不同。
另外还要特别注意一点:如果我们将Aspect的实例化模式配置为perthis或者pertarget这时我们必须将Aspect类的 scope配置为prototype。
我们来看一个例子:
我们准备两个接口:
1 /**
2  * @author 戴着假发的程序员
3  *
4  * @description
5  */
6 public interface IInfo {
7     public String showInfo(String info);
8 }
1 /**
2  * @author 戴着假发的程序员
3  *
4  * @description
5  */
6 public interface IOtherInfo {
7     public String printInfo(String info);
8 }
添加一个实现类,同时实现两个接口:
 1 /**
 2  * @author 戴着假发的程序员
 3  *
 4  * @description
 5  */
 6 @Component
 7 @Scope("prototype")
 8 public class InfoService  implements IInfo,IOtherInfo{
 9     @Override
10     public String showInfo(String info){
11         System.out.println("InfoService-showInfo输出信息:"+info);
12         this.printInfo(info);
13         return "info方法返回值";
14     }
15
16     @Override
17     public String printInfo(String info) {
18         System.out.println("InfoService-printInfo打印信息:"+info);
19         return null;
20     }
21 }
我们再添加一个没有实现任何接口的类:
 1 /**
 2  * @author 戴着假发的程序员
 3  *
 4  * @description
 5  */
 6 @Component
 7 public class MessageService {
 8     public String showMessage(String info) {
 9         System.out.println("OtherInfoServcie-showMessage:"+info);
10         return null;
11     }
12 }
添加一个Aspect的配置类:
 1 import java.util.Arrays;
 2
 3 /**
 4  * @author 戴着假发的程序员
 5  *
 6  * @description
 7  */
 8 @Component
 9 @Aspect("pertarget(execution(* com.st.dk.demo8.service..*.*(..)))")
10 @Scope("prototype")//不要忘记配置scope为prototype
11 public class DkAspect {
12     @Pointcut("execution(* com.st.dk.demo8.service..*.*(..))")
13     public void pointcut1(){}
14
15     @Before("pointcut1()")
16     public void before(){
17         System.out.println("--前置通知--aspect对象:"+this);
18     }
19 }
测试:
1 ApplicationContext ac =
2         new AnnotationConfigApplicationContext(AppConfig.class);
3 IInfo bean = ac.getBean(IInfo.class);
4 bean.showInfo("IInfo-接口中的方法");
5 IOtherInfo bean1 = ac.getBean(IOtherInfo.class);
6 bean1.printInfo("IOtherInfo-接口中的方法");
7 System.out.println(bean==bean1);
8 MessageService bean2 = ac.getBean(MessageService.class);
9 bean2.showMessage("MessageService中的方法");
结果:
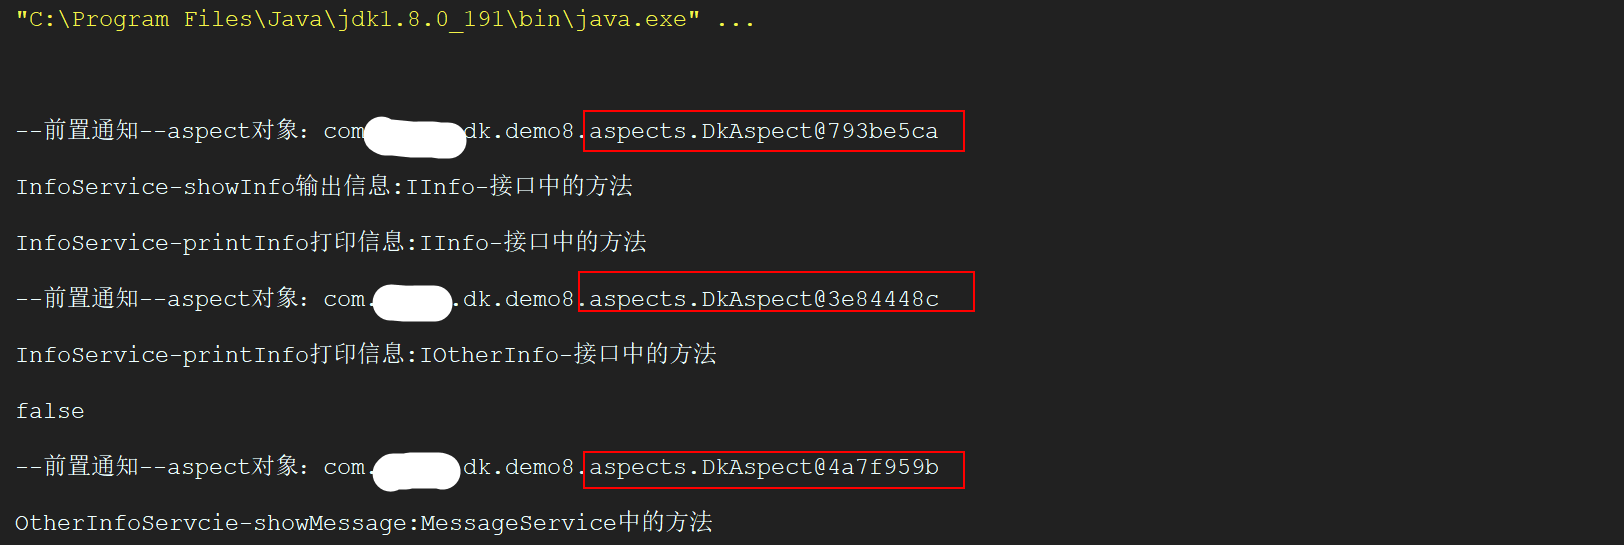
我们会发现spring会为每一个bean都创建一个Aspect类的实例。
标签:打印 array 程序员 iot 情况下 bsp 匹配 相同 解释
原文地址:https://www.cnblogs.com/jiafa/p/13892313.html