标签:二进制流 support targe style rem ann mda 文本文件 a标签
一、前言
一般上传文件,都是通过<input type="file" />标签,然后选择本地文件,再进行上传。最近遇到一个需求,就是由JS创建好一个二进制文件,然后上传到服务器。原理还是比较简单的,就是通过js提供的blob创建一个数据流。然后生成一个文件实例。然后提交到后端。
二、服务器代码
服务器代码就没有什么说的,就是普通的接收文件的springboot代码片段。
 1 package com.wunaozai.demo.uploadfile;
 2
 3 import java.io.File;
 4 import java.util.Iterator;
 5 import java.util.UUID;
 6
 7 import javax.servlet.http.HttpServletRequest;
 8
 9 import org.springframework.stereotype.Controller;
10 import org.springframework.web.bind.annotation.GetMapping;
11 import org.springframework.web.bind.annotation.PostMapping;
12 import org.springframework.web.bind.annotation.RequestMapping;
13 import org.springframework.web.bind.annotation.ResponseBody;
14 import org.springframework.web.multipart.MultipartFile;
15 import org.springframework.web.multipart.MultipartHttpServletRequest;
16 import org.springframework.web.multipart.commons.CommonsMultipartResolver;
17
18 @Controller
19 @RequestMapping(value="/test/")
20 public class UploadFileDemoController {
21
22     @GetMapping(value="web")
23     public String web() {
24         return "upload/web";
25     }
26
27     @ResponseBody
28     @PostMapping(value="upload")
29     public String uploadFile(HttpServletRequest request) {
30         CommonsMultipartResolver resolver =
31                 new CommonsMultipartResolver(request.getSession().getServletContext());
32         if(!resolver.isMultipart(request)) {
33             return "err";
34         }
35         MultipartHttpServletRequest multiRequest = (MultipartHttpServletRequest) request;
36         Iterator<String> it = multiRequest.getFileNames();
37         while(it.hasNext()) {
38             try {
39                 MultipartFile uploadfile = multiRequest.getFile(it.next());
40                 File newfile = new File("C:\\tmp\\", "cc.txt");
41                 uploadfile.transferTo(newfile);
42             } catch (Exception e) {
43                 e.printStackTrace();
44             }
45         }
46         return "ok.";
47     }
48 }
三、前端代码
前端代码,分成三种方式上传文件,还有一种创建文件直接下载。
1. 是通过传统input的file类型,选择本地文件,然后上传。
2. 是通过创建文本文件,然后上传到服务器。
3. 是通过创建二进制流,然后上传到服务器。
4. 是通过创建二进制流,然后通过a标签,思想下载功能。
  1 <!doctype html>
  2 <html lang="zh">
  3 <head>
  4 <meta charset="utf-8">
  5 <title>JS创建文件</title>
  6 </head>
  7
  8 <body>
  9     <p>
 10         <input type="file" id="upfile">
 11     </p>
 12     <p>
 13         <input type="button" id="upJS" value="用原生JS上传">
 14     </p>
 15     <p>
 16         <input type="button" id="createTxtAndUpload" value="JS创建txt文件并上传">
 17     </p>
 18     <p>
 19         <input type="button" id="createBinAndUpload" value="JS创建bin文件并上传">
 20     </p>
 21     <p>
 22         <input type="button" id="createBinAndDownload" value="JS创建bin文件并导出">
 23     </p>
 24     <script>
 25         /*原生JS版*/
 26         document.getElementById("upJS").onclick = function() {
 27             /* FormData 是表单数据类 */
 28             var fd = new FormData();
 29             var ajax = new XMLHttpRequest();
 30             fd.append("upload", 1);
 31             /* 把文件添加到表单里 */
 32             fd.append("upfile", document.getElementById("upfile").files[0]);
 33             ajax.open("post", "/test/upload", true);
 34
 35             ajax.onload = function() {
 36                 console.log(ajax.responseText);
 37             };
 38             ajax.send(fd);
 39         }
 40         document.getElementById(‘createTxtAndUpload‘).onclick = function() {
 41             var file;
 42             var data = [];
 43             data.push("This is a test\n");
 44             data.push("Of creating a file\n");
 45             data.push("In a browser\n");
 46             var properties = {type: ‘text/plain‘}; // Specify the file‘s mime-type.
 47             try {
 48               // Specify the filename using the File constructor, but ...
 49               file = new File(data, "file.txt", properties);
 50             } catch (e) {
 51               // ... fall back to the Blob constructor if that isn‘t supported.
 52               file = new Blob(data, properties);
 53             }
 54             /* FormData 是表单数据类 */
 55             var fd = new FormData();
 56             var ajax = new XMLHttpRequest();
 57             /* 把文件添加到表单里 */
 58             fd.append("upfile", file);
 59             ajax.open("post", "/test/upload", true);
 60
 61             ajax.onload = function() {
 62                 console.log(ajax.responseText);
 63             };
 64             ajax.send(fd);
 65         }
 66         document.getElementById(‘createBinAndUpload‘).onclick = function() {
 67             var data = str2ab("wunaozai");
 68             console.log(data);
 69             var file = new Blob([data]);
 70             /* FormData 是表单数据类 */
 71             var fd = new FormData();
 72             var ajax = new XMLHttpRequest();
 73             /* 把文件添加到表单里 */
 74             fd.append("upfile", file);
 75             ajax.open("post", "/test/upload", true);
 76
 77             ajax.onload = function() {
 78                 console.log(ajax.responseText);
 79             };
 80             ajax.send(fd);
 81         }
 82         document.getElementById(‘createBinAndDownload‘).onclick = function(){
 83             var data = str2ab("wunaozai");
 84             var file = new Blob([data]);
 85             var aTag = document.createElement(‘a‘);
 86             aTag.download = "wunaozai.bin";
 87             aTag.style = "display: none";
 88             aTag.href = URL.createObjectURL(file);
 89             document.body.appendChild(aTag);
 90             aTag.click();
 91             setTimeout(function(){
 92                 document.body.removeChild(aTag);
 93                 window.URL.revokeObjectURL(file);
 94             }, 1000)
 95         }
 96         function str2ab(str){
 97             var array = [];
 98             array.push(0x5a);
 99             array.push(0xa5);
100             array.push(str.length);
101             for(var i=0; i<str.length; i++){
102                 array.push(str.charCodeAt(i));
103             }
104             return new Uint8Array(array);
105         }
106     </script>
107 </body>
108 </html>
四、效果图
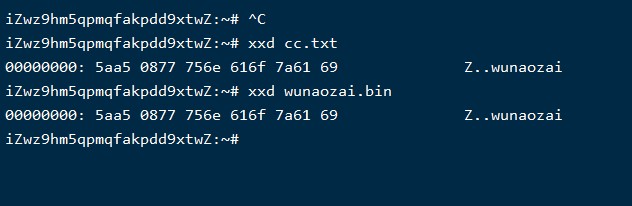
如下图,就是上传到服务器上保存的文件,通过xxd工具查看二进制。可以看到有文件头5AA5.
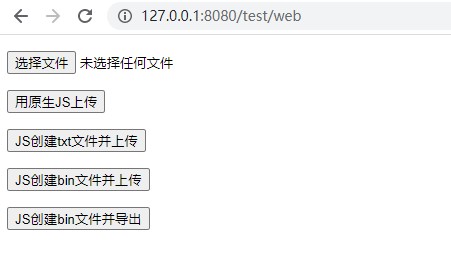
下面这个是前端界面
本篇只是做日常记录。
本文地址: https://www.cnblogs.com/wunaozai/p/13938699.html
标签:二进制流 support targe style rem ann mda 文本文件 a标签
原文地址:https://www.cnblogs.com/wunaozai/p/13938699.html