标签:mda iter debug 文件夹 tor ntp import col loading
密码字典生存

#author :握着玫瑰的屠夫
#date :2020.10.11
#contact :QQ 2472674814
#project :creat dictionaries
#130******37
import itertools as its
import time
print("使用说明:1.输入有效的关键词如: 0123456789abc",
      "\x0A2.输入字典的长度:每增加1个长度换算就是 关键词^长度,指数级增长。根据自己需求调节",
      )
inputWords =input("请输入有效的关键词:{}{}".format("_"*20,"\x08"*20))
print("{}".format(">")*20,":成功输入。\x0A")
print("如果你想输出3位至6位的字典就输3和6,如果你只想打10位的字典就输入10和10.")
inputLen1 =input("请输入开始的长度值要>0:{}{}".format("_"*3,"\x08"*3))
inputLen2 =input("请输入结束的长度值要>=开始的长度:{}{}".format("_"*3,"\x08"*3))
lenWords =len(inputWords)
if inputLen1 ==inputLen2:
    countPoint =lenWords**int(inputLen1)
else:
    a =int(inputLen2)-int(inputLen1)
    countPoint = lenWords ** int(inputLen1)
    for n in range(a):
        countPoint +=(lenWords**(int(inputLen1)+n+1))
countOut=countPoint
inputLen2 =int(inputLen2)+1
n =0
runTrue =round(countPoint/100, 2)
x =runTrue
runDic =-1
while True:
    InputRun =input("估算字典体积大小==%.5f"%(countPoint*13/(1024**3))+"GB,是否要继续生成?(Y/N):{}{}".format(‘\x5F‘*5,‘\x08‘*5))
    if InputRun ==‘n‘ or InputRun ==‘N‘ or InputRun ==‘No‘ or InputRun ==‘no‘:
        break
    elif InputRun ==‘‘ or InputRun ==‘y‘ or InputRun ==‘Y‘ or InputRun ==‘Yes‘ or InputRun ==‘yes‘:
        runDic *=-1
        break
    else:
        print("输入有误请重新输入!!!!")
if runDic ==1:
    dic=open(‘Jue字典.txt‘, ‘w+‘)
    for num in range(int(inputLen1), int(inputLen2)):
        keys = its.product(inputWords, repeat=num)
        for key in keys:
            if n >runTrue:
                x +=runTrue
                y =round(x*(100/countPoint))
                z =int(y/(100/50))
                print(‘\x0D‘ + ‘\x2A‘ * z + str(y) + ‘%\x20‘, end=‘‘)
                n=0
            dic.write("".join(key) + "\n")
            n += 1
    dic.close()
    print("\x0A已经成功生成字典文件,名为\"Jue字典.txt\".")
    time.sleep(1)
    print("字典体积大小==%.5f" % (countPoint * 13 / (1024 ** 3)) + "GB")
    time.sleep(1)
else:
    print("\x0A虽然已经取消了生成,但是你也别太嚣张了靓仔.")
    time.sleep(1.5)
print("\x0A感谢你的使用,破解愉快!握着玫瑰的屠夫 QQ:2472674814.")
time.sleep(5)
手机号补全
#author :握着玫瑰的屠夫
#date :2020.10.11
#contact :QQ 2472674814
#project :creat dictionaries
#130******37
import itertools as its
import time
print(‘生成器只需要用后输入两段号码即可自动枚举.‘)
print(‘列如:输入前段号码为137,后段为30.那么就会生成批量6位数并且合并前后段‘)
print(‘列如:前后段都不输入那么就会生成11位数的枚举。\x0A‘)
inputS =input("请输入前部分已知手机号,如果不知道请按Enter:{}{}".format("\x5F"*8, "\x08"*8))
inputE =input("请输入后部分已知手机号,如果不知道请按Enter:{}{}".format("\x5F"*8, "\x08"*8))
words="0123456789"
lenWords =len(words)
lenStart =11-len(inputS)-len(inputE)
lenEnd =lenStart+1
countPoint =lenWords**lenStart
n =0
runTrue =round(countPoint/100, 2)
x =runTrue
runDic =-1
while True:
    InputRun =input("估算字典体积大小==%.5f"%(countPoint*13/(1024**3))+"GB,是否要继续生成?(Y/N):{}{}".format(‘\x5F‘*5,‘\x08‘*5))
    if InputRun ==‘n‘ or InputRun ==‘N‘ or InputRun ==‘No‘ or InputRun ==‘no‘:
        break
    elif InputRun ==‘‘ or InputRun ==‘y‘ or InputRun ==‘Y‘ or InputRun ==‘Yes‘ or InputRun ==‘yes‘:
        runDic *=-1
        break
    else:
        print("输入有误请重新输入!!!!")
if runDic ==1:
    dic=open(‘Jue手机号补全.txt‘, ‘w+‘)
    for num in range(lenStart, lenEnd):
        keys = its.product(words, repeat=num)
        for key in keys:
            if n >runTrue:
                x +=runTrue
                y =round(x*(100/countPoint))
                z =int(y/(100/50))
                print(‘\x0D‘+‘\x2A‘*z + str(y)+‘%\x20‘, end=‘‘)
                n=0
            dic.write("".join(inputS))
            dic.write("".join(key))
            dic.write("".join(inputE)+‘\x0A‘)
            n += 1
    dic.close()
    print("\x0A已经成功生成字典文件,名为\"Jue手机号补全.txt\".")
    time.sleep(1)
    print("字典体积大小==%.5f"%(countPoint*13/(1024**3))+"GB")
    time.sleep(1)
else:
    print("\x0A你已经取消生成字典,请不要太嚣张.")
    time.sleep(1.5)
print("\x0A感谢你的使用,破解愉快!握着玫瑰的屠夫 QQ:2472674814.")
time.sleep(5)
python -m pip install exifread
python依赖安装 exifread
#author :Jue
#date :2020.10.11
#contact :QQ 2472674814
#project :creat dictionaries
from tkinter import *
from tkinter.filedialog import askdirectory
import time
import exifread
import os
LOG_LINE_NUM =0
DATA_LINE_NUM =0
class MY_GUI():
    def __init__(self, init_window_name, path1,path2):
        self.dir_path = {‘path1‘: ‘‘, ‘path2‘: ‘‘}
        self.path1 =path1;self.path2 =path2
        self.countList =[]
        self.countPathFile =[]
        self.dataOUT =[]
        self.logOUT =[]
        self.logOUT2 =[]
        self.runLogOUT1 =-1
        self.runLogOUT2 =-1
        self.init_window_name =init_window_name
        self.sys_width = self.init_window_name.winfo_screenwidth()  # 获得系统分辨率
        self.sys_height = self.init_window_name.winfo_screenheight()
        self.screen_width = 800 #窗口的分辨率值
        self.screen_height = 720
        self.size = (‘%dx%d+%d+%d‘ % (self.screen_width, self.screen_height, ((self.sys_width - self.screen_width) / 2),
                                      (self.sys_height - self.screen_height) / 2))  # 居中
        self.init_window_name.title("{}绝\x20\x20QQ:2472674814".format("\x2A"*int(self.screen_width/12)))  # 窗口名
        #self.init_window_name.resizable(0, 0)  # 固定窗口,禁止拖拉
        # 定义窗口弹出时的默认展示位置
        self.init_window_name.geometry(‘%s‘ % (self.size))
        self.init_window_name["bg"] = "#000000"  # 窗口背景色,其他背景色见:blog.csdn.net/chl0000/article/details/7657887
        self.init_window_name.attributes("-alpha",0.9)     #虚化,值越小虚化程度越高
        #标签
        self.Label1 =Label(self.init_window_name,width=10, text="目标路径1:")
        self.Label1.grid(row=0, column=0)
        self.Label2 = Label(self.init_window_name, width=10, text="目标路径2:")
        self.Label2.grid(row=1, column=0)
        self.Label3 = Label(self.init_window_name, width=10, height=2,text="输出内容:")
        self.Label3.grid(row=3, column=1)
        self.Label4 = Label(self.init_window_name, width=10, height=1,text="日记:")
        self.Label4.grid(row=15, column=0)
        #路径文本0框
        self.Entry1 =Entry(self.init_window_name, width=int(self.screen_width/7-27),textvariable=self.path1)
        self.Entry1.grid(row=0, column=1)
        self.Entry2 = Entry(self.init_window_name, width=int(self.screen_width/7-27),textvariable=self.path2)
        self.Entry2.grid(row=1, column=1)
        self.Entry3 = Entry(self.init_window_name, width=int(self.screen_width/7.5-20),bg=‘#000000‘)
        self.Entry3.grid(row=2, column=1)
        #信息输出文本框
        self.data_Text = Text(self.init_window_name, width=int(self.screen_width/8), bg=‘#87CEEB‘, height=int(self.screen_height/30))
        self.data_Text.grid(row=4, column=0, rowspan=10, columnspan=10)
        #日记输出文本框
        self.log_data_Text = Text(self.init_window_name, width=int(self.screen_width/7.3), bg=‘#FFB6C1‘, height=int(self.screen_height/55))
        self.log_data_Text.grid(row=16, column=0, columnspan=10)
        #按钮
        self.Button1 =Button(self.init_window_name, text ="照片路径1", bg="lightblue", width=15, command=self.selectPath1)
        self.Button1.grid(row = 0, column =2)
        self.Button2 = Button(self.init_window_name, text="照片路径2", bg="#228B22", width=15, command=self.selectPath2)
        self.Button2.grid(row=1, column=2)
        self.Button3 = Button(self.init_window_name, text="开始搜索", bg="#DC143C", width=15, height=4, command=self.openPicture)
        self.Button3.grid(row=14, column=1)
    # 获取当前时间
    def get_current_time(self):
        current_time = time.strftime(‘%Y-%m-%d_%H:%M:%S‘,time.localtime(time.time()))
        return current_time
    def getPictureList(self, dir1, dir2):
        list =[‘.png‘, ‘.jpg‘, ‘.jpeg‘, ‘.bmp‘, ‘.rwa‘]
        #list = [‘.png‘, ‘.jpg‘, ‘.jpeg‘, ‘.bmp‘, ‘.rwa‘, ‘.tlf‘, ‘.gif‘, ‘.tga‘, ‘.exif‘,
                      #‘.fpx‘, ‘.svg‘, ‘.psd‘, ‘.cdr‘, ‘.pcd‘, ‘.dxf‘, ‘.ufo‘, ‘.eps‘, ‘.ai‘,
                      #‘.hdri‘, ‘.wmf‘, ‘.flic‘, ‘.emf‘, ‘.ico‘, ‘avif‘,
                      #‘.png‘, ‘.jpg‘, ‘.jpeg‘, ‘.bmp‘, ‘.rwa‘]
        outList1 =[]
        outList2 =[]
        temp_list =[]
        on_off =-1
        count_c =""
        picList1 =dir1
        picList2 =dir2
        for i in picList1:
            for ii in i[-5::]:
                if ii == ‘.‘:
                    temp_list.append(‘.‘)
                    on_off *=-1
                elif on_off == 1:
                    temp_list.append(ii)
            on_off *=-1
            for c in temp_list:
                count_c+=c
            temp_list =[]
            if count_c in list:
                outList1.append(i)
            count_c =""
        on_off =-1
        for i2 in picList2:
            for ii2 in i2[-5::]:
                if ii2 == ‘.‘:
                    temp_list.append(‘.‘)
                    on_off *= -1
                elif on_off == 1:
                    temp_list.append(ii2)
            on_off *= -1
            for c in temp_list:
                count_c += c
            temp_list = []
            if count_c in list:
                outList2.append(i2)
            count_c = ""
        if outList1:
            self.countList =outList1
        else:
            A="照片路径1:{}未能找到有效图片路径,请重新选择{}".format(‘\x21‘*5,‘\x21‘*5)+‘\x0A‘
            self.runLogOUT1*=-1
            self.logOUT2.append(A)
        if outList2:
            if self.countList:
                for c_list2 in outList2:
                    self.countList.append(c_list2)
            else:
                self.countList =outList2
        else:
            A="照片路径2:{}未能找到有效图片路径,请重新选择{}".format(‘\x21‘*5,‘\x21‘*5)+‘\x0A‘
            self.runLogOUT2*=-1
            self.logOUT2.append(A)
        #print(self.countList)
        #print(len(self.countList))
        #time.sleep(1)
#图片打开搜索GPS信息
    def openPicture(self):
        # 获取目录所有文件
        f1 = self.dir_path[‘path1‘]
        f2 = self.dir_path[‘path2‘]
        file_add1 =[]
        file_add2 =[]
        for root, dirs, file_1 in os.walk(f1):
            if file_1:
                for p_f in  file_1:
                    a = root +‘/‘+ p_f
                    file_add1.append(a)
        for root, dirs, file_2 in os.walk(f2):
            if file_2:
                for p_f in  file_2:
                    a = root +‘/‘+ p_f
                    file_add2.append(a)
        # file_1 当前路径下所有非目录子文件
        # dirs 当前路径下所有子目录
        # root 当前目录路径
        self.getPictureList(file_add1, file_add2)
        for times in range(len(self.countList)):
            with open(self.countList[times], ‘rb‘) as f:
                exif_dict = exifread.process_file(f)
                mPATH ="{}".format("\x2A" * 5)+"第\x20"+str(times+1)+",\x20张图片\x20照片地址:"+self.countList[times]+‘\x0A‘
                #print(mPATH)
                #print(‘拍摄时间:‘, exif_dict[‘EXIF DateTimeOriginal‘])
                #print(‘照相机制造商:‘, exif_dict[‘Image Make‘])
                #print(‘照相机型号:‘, exif_dict[‘Image Model‘])
                #print(‘相片尺寸: ‘, exif_dict[‘EXIF ExifImageWidth‘], exif_dict[‘EXIF ExifImageLength‘])
                # 经度
                try:
                    lon_ref = exif_dict["GPS GPSLongitudeRef"].printable
                    lon = exif_dict["GPS GPSLongitude"].printable[1:-1].replace(" ", "").replace("/", ",").split(",")
                    lon = float(lon[0]) + float(lon[1]) / 60 + float(lon[2]) / float(lon[3]) / 3600
                    if lon_ref != "E":
                        lon = lon * (-1)
                        # 纬度
                    lat_ref = exif_dict["GPS GPSLatitudeRef"].printable
                    lat = exif_dict["GPS GPSLatitude"].printable[1:-1].replace(" ", "").replace("/", ",").split(",")
                    lat = float(lat[0]) + float(lat[1]) / 60 + float(lat[2]) / float(lat[3]) / 3600
                    if lat_ref != "N":
                        lat = lat * (-1)
                    # for key in exif_dict:
                    #    print("%s %s" % (key, exif_dict[key]))
                    mx =(lat, lon)
                    mGPS ="照片经纬:>>>>>>>"+str(mx)+‘\x0A\x0A‘
                    #print(mGPS)
                    mTRUE =‘{}成功获得GPS{}‘.format("\x2A" * 4, "\x2A" * 4)
                    #print(mTRUE)
                    # 打印当前时间
                    current_time = self.get_current_time()
                    logmsg_in = (str(current_time) + "\x20")
                    mDATE = "搜索生成时间: " + logmsg_in + ‘\x0A‘
                    mDATA =mDATE+mPATH+mTRUE+mGPS
                    mlogIn = "第 " + str(times + 1) + " 图片,执行时间:" + logmsg_in + mTRUE + "照片地址: " + self.countList[times] + ‘\x0A‘
                    self.logOUT.append(mlogIn)
                    self.dataOUT.append(mDATA)
                except Exception as e:
                    mFALSE =‘{}获取GPS失败{}‘.format("\x21" * 4, "\x21" * 4)
                    current_time = self.get_current_time()
                    logmsg_in = (str(current_time) + "\x20")
                    mlogIn ="第 "+str(times+1)+" 图片,执行时间:"+logmsg_in+mFALSE+"照片地址: "+self.countList[times]+‘\x0A‘
                    self.logOUT.append(mlogIn)
        with open(‘GPS数据存储.txt‘, ‘a+‘) as f:
            for dataKey in self.dataOUT:
                f.write(dataKey)
            f.flush()
            f.close()
        readList =open(‘GPS数据存储.txt‘, ‘r‘)
        if readList:
            lenRead =len(readList.readlines())
            if lenRead >=100:
                f =open(‘GPS数据存储.txt‘, ‘w‘)
                f.write(‘‘)
                f.flush()
                f.close()
        with open(‘GPS日记存储.txt‘, ‘a+‘) as f:
            for logKey in self.logOUT:
                f.write(logKey)
            f.flush()
            f.close()
        readList = open(‘GPS日记存储.txt‘, ‘r‘)
        if readList:
            lenRead = len(readList.readlines())
            if lenRead >= 1000:
                f = open(‘GPS日记存储.txt‘, ‘w‘)
                f.write(‘‘)
                f.flush()
                f.close()
        self.write_dataText(self.dataOUT)
        self.write_logText(self.logOUT, self.logOUT2)
        self.logOUT =[]
        self.logOUT2 =[]
        self.dataOUT =[]
        self.countList = []
    #动态打印数据。。。。
    def write_dataText(self, dataOUT):
        global DATA_LINE_NUM
        dataout =dataOUT
        if dataout:
            for data in dataout:
                if DATA_LINE_NUM <=7:
                    self.data_Text.insert(END, data)
                    DATA_LINE_NUM +=1
                else:
                    self.data_Text.delete(1.0, END)
                    self.data_Text.insert(END, data)
                    DATA_LINE_NUM =1
    # 动态打印日记数据。。。。
    def write_logText(self, logOUT, logOUT2):
        global LOG_LINE_NUM
        logout =logOUT
        logout2 =logOUT2
        if self.logOUT2:
            for log2 in logout2:
                self.log_data_Text.insert(END, log2)
                LOG_LINE_NUM += 1
                if LOG_LINE_NUM >= 11:
                    self.log_data_Text.delete(1.0, END)
                    self.log_data_Text.insert(END, log2)
                    LOG_LINE_NUM =1
            if self.runLogOUT1 ==1:
                self.runLogOUT1*=-1
            elif self.runLogOUT2 ==1:
                self.runLogOUT2*=-1
        if logout:
            for log in logout:
                if LOG_LINE_NUM <= 11:
                    self.log_data_Text.insert(END, log)
                    LOG_LINE_NUM += 1
                else:
                    self.log_data_Text.delete(1.0, END)
                    self.log_data_Text.insert(END, log)
                    LOG_LINE_NUM = 1
    def selectPath1(self):
        path_ = askdirectory()
        self.path1.set(path_)
        self.dir_path[‘path1‘] = path_
    def selectPath2(self):
        path_ = askdirectory()
        self.path2.set(path_)
        self.dir_path[‘path2‘] =path_
def runGui():
    init_window =Tk()
    path2 =StringVar()
    path1 =StringVar()
    MY_GUI(init_window, path1, path2)
    init_window.mainloop()
runGui()

这里有点小bug,由于时隔比较久,也不影响效率就不修改了。提示:不要目标1和目标2重复一个目录,否则会输出同样结果 也会导致BUG
核心打包的工具及依赖安装
pip install pyinstaller
pip install pywin32
| -F --onefile | 产生单个可执行文件 |
| -D --onefile | 产生一个目录(包含多个文件) 作为可执行程序 |
| -a --ascii | 不包含 Unicode 字符集支持 |
| -d --debug | 产生debug版本的可执行文件 |
| -w --windowed --noconsolc | 指定程序运行时不显示命令行窗口(仅对 Windows 有效) |
| -o DIR,--out=DIR | 指定 spec 文件的生成目录。如果没有指定,则默认使用当前目录来生成 spec 文件 |
| -p DIR,--path=DIR | 设置 Python 导入模块的路径(和设置 PYTHONPATH 环境变量的作用相似)。也可使用路径分隔符(Windows 使用分号,Linux 使用冒号)来分隔多个路径 |
| -n NAME,--name=NAME | 指定项目(产生的 spec)名字。如果省略该选项,那么第一个脚本的主文件名将作为 spec 的名字 |
| -i <FILE.ico or FILE.exe,ID or FILE.icns> --icon | 可以把file.ico格式或 file.exe格式的 icons修改软件图标. .exe格式的图片转换会模糊,建议下载icon图 |
| -c --nowindowed, --console | 显示控制台执行 |
| -K, --tk | 在部署时包含 TCL/TK |
| -s --strip | 可执行文件和共享库将run through strip.注意Cygwin的strip往往使普通的win32 Dll无法使用. |
| -X --upx | 如果有UPX安装(执行Configure.py时检测),会压缩执行文件(Windows系统中的DLL也会) |
pyinstaller -w -i putty64ssh.exe -F main.py
这里讲下,如果你的项目有一个主文件和几个配置文件组成,在-F 后面输入main.py 主文件即可。它会处理组合到一起
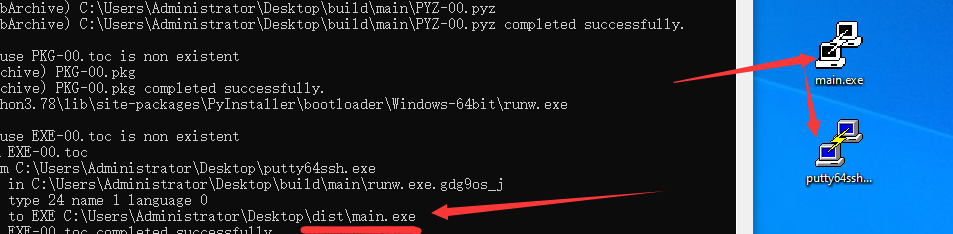
-F就是会生成一个 单个文件 -i exe就会模糊化,建议用 .ico图标。
|
源码大小
|
执行后大小
|
差率
|
|
单个项目:文件12.5KB
|
文件8.17MB
|
约670倍,大了8354KB,
|
pyinstaller -w -i putty64ssh.exe -D main.py
也就是说如果main.exe离开了目录就不能执行,
|
源码大小
|
执行后大小
|
结果
|
|
单个项目:文件12.5KB
|
多个文件:共18.7MB
|
可以看到输出目录后占容量变大了,但是运行速度快了很多
|
pyi-makespec -w -i "putty64ssh.exe" -D main.py
pyinstaller --upx-dir "C:\Users\Administrator\Desktop\Tools\upx-3.96-win64" --clean main.spec
|
源码大小
|
执行后大小
|
结果差
|
|
单个项目exe:文件8.17MB
目录:文件18.7MB
|
单个文件:7.05MB
目录:文件10.6MB
|
单文件约减小了1/8
目录压缩:原来大小的56%
|
pyi-makespec -w -i "putty64ssh.exe" -D main.py

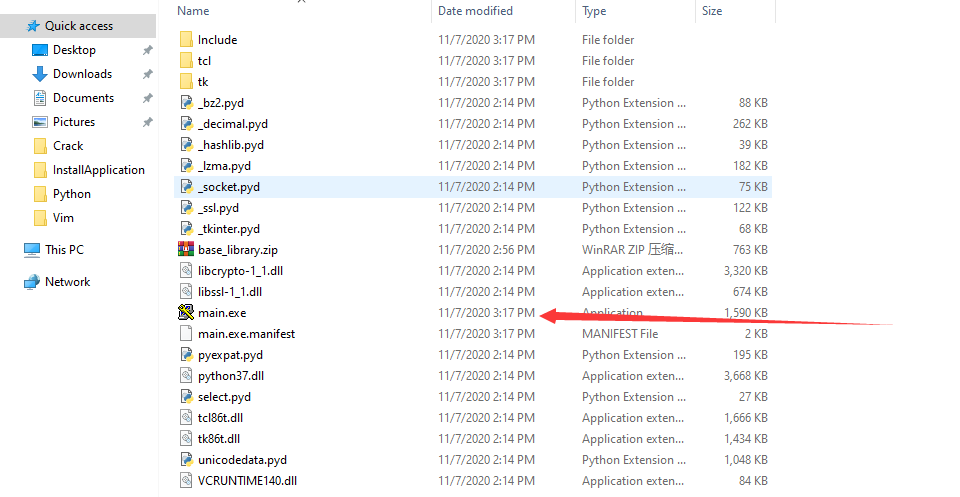
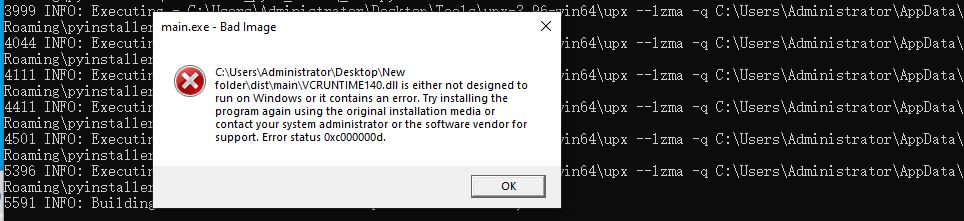
先把这个vcruntine 约84KB的复制好
pyinstaller --upx-dir "C:\Users\Administrator\Desktop\Tools\upx-3.96-win64" --clean main.spec
pip install cx-freeze
|
-c --compress
|
compress byte code in zip files,压缩zip文件的字节码
|
|
-s --slient
|
suppress all output except warnings and errors, 禁止输出除错误外信息。排除错误用的
|
|
--base-name MAIN
|
--base-name Win32GUI 意思使用图形模式,去掉命令窗口
|
|
--init-script NAME
|
|
|
--target-dir DIR
|
输出目录C:\Users\Administrator\Desktop\output |
|
--target-name NAME
|
输出名称
|
|
--icon NAME.ico
|
替换图标
|
cxfreeze --target-name test --target-dir C:\Users\Administrator\Desktop\output C:\Users\Administrator\Desktop\myProject\main.py --icon F:\Photograph\ICO\T.ico --base-name Win32GUI
执行上面View Code代码输出exe名为test 到output 目录,源码main.py, icons图标为T.ico WIN32GUI去除终端窗口
__author__ = ‘握着玫瑰的屠夫‘
import sys, os
from cx_Freeze import setup, Executable #导入模块的名字 setup Excutable

os.environ[‘TCL_LIBRARY‘] = r‘E:\Python3.78\tcl\tcl8.6‘ #我的python放在E盘所以是E:\python
os.environ[‘TK_LIBRARY‘] = r‘E:\Python3.78\tcl\tk8.6‘

include_files=[
    r‘E:\Python3.78\DLLs\tcl86t.dll‘, #需要修改python所在的目录
    r‘E:\Python3.78\DLLs\tk86t.dll‘
]

base = None
# 判断windows系统
if sys.platform == ‘win32‘:
    base = ‘Win32GUI‘ #设置取消

packages = []
# 动态引入
for dbmodule in [‘win32gui‘, ‘win32api‘, ‘win32con‘, ‘cx_Freeze‘, ‘os‘, ‘tkinter‘, ‘time‘, ‘exifread‘]:
    try:
        __import__(dbmodule)
    except ImportError:
        pass
    else:
        packages.append(dbmodule)

options = {
    ‘build_exe‘:
        {
            "packages": packages  # 依赖的包
            , ‘include_files‘:include_files  # 额外添加的文件 可以是文件夹
        }
}

executables = [
    Executable(
        ‘main.py‘  # 源码文件需要修改
        , base=base
        , targetName=‘test.exe‘  # 生成的exe的名称
        , icon="Myicon.ico"  # 生成的exe的图标
    )
]

setup(
    name=‘测试名‘,
    version=‘2.1‘,
    description=‘测试描述‘,
    options=options,
    executables=executables
)
保存后我们用dos执行下面命令
python setup.py build
我们可以看到main.exe既生成出来,上面代码需要修改否则会出错 都有注释了
python setup.py bdist_msi
打包输出msi格式,安装exe应用
Python批量搜索和生成数据脚本,含有打包输出exe和msi
标签:mda iter debug 文件夹 tor ntp import col loading
原文地址:https://www.cnblogs.com/eternalnight/p/13943390.html
