标签:refresh lstat prefix 利用 multi 保存 必须 tar cat
一、容器刷新前源码分析
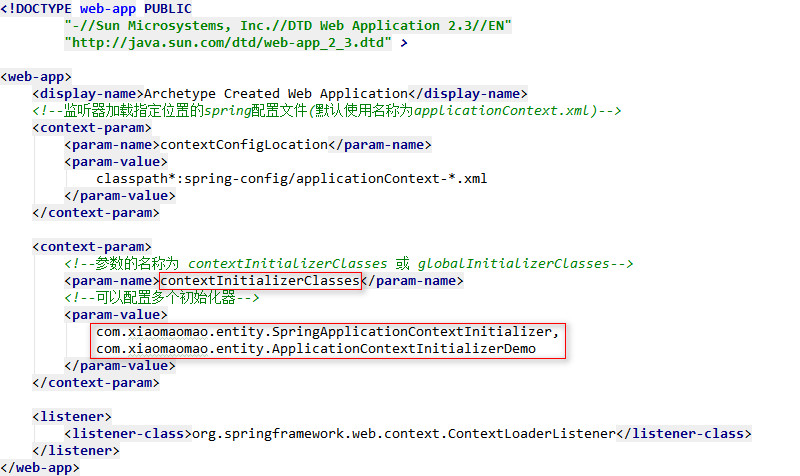
做过 SSM 框架整合的都会知道,如果我们需要启动项目,需要在 web.xml 中进行如下配置
<!DOCTYPE web-app PUBLIC
        "-//Sun Microsystems, Inc.//DTD Web Application 2.3//EN"
        "http://java.sun.com/dtd/web-app_2_3.dtd" >

<web-app>
    <display-name>Archetype Created Web Application</display-name>
    <!--监听器加载指定位置的spring配置文件(默认使用名称为applicationContext.xml)-->
    <context-param>
        <param-name>contextConfigLocation</param-name>
        <param-value>
            classpath*:spring-config/applicationContext-*.xml
        </param-value>
    </context-param>

    <listener>
        <listener-class>org.springframework.web.context.ContextLoaderListener</listener-class>
    </listener>
</web-app>
该 web.xml 配置了 Spring 框架的最基本结构,里面包含 ContextLoaderListener 这个监听器和 contextConfigLocation , ContextLoaderListener 就是 Spring 框架的入口,而 contextConfigLocation 就是 Spring 配置文件存在的路径.
我们查看 Spring 的方法调用栈,发现了AbstractApplicationContext 这个类的 refresh 方法,想必大家对这个方法都不会陌生吧,这个方法就是整个 Spring IOC 的核心方法,同时我们也可以看到 ContextLoaderListener 类的 contextInitialized 方法才是最开始调用的方法,这样我们也验证了 ContextLoaderListener 才是 Spring 框架的入口.

找到 ContextLoaderListener 类中的 contextInitialized 方法,在进入该方法之前,我们可以发现 ContextLoaderListener 继承了 ContextLoader 这个类

所以 ContextLoaderListener 类在调用 本类的 contextInitialized 方法之前会先初始化父类中的一些属性,这里有一个比较重要的属性 defaultStrategies ,我们来看一下
public class ContextLoader {
	private static final String DEFAULT_STRATEGIES_PATH = "ContextLoader.properties";

	private static final Properties defaultStrategies;

	static {
		// 1、从属性文件加载默认策略实现,目前这是严格的内部操作,并不意味着应用程序开发人员可以定制.
		try {
			// 2、根据 DEFAULT_STRATEGIES_PATH 和 ContextLoader.class 构建 ClassPathResource 对象
			ClassPathResource resource = new ClassPathResource(DEFAULT_STRATEGIES_PATH, ContextLoader.class);
			// 3、加载 org.springframework.web.context.ContextLoader.properties 配置文件中的键值对,
			// 并赋值给 ContextLoader Properties 类型的属性 defaultStrategies
			defaultStrategies = PropertiesLoaderUtils.loadProperties(resource);
		}
		catch (IOException ex) {
			throw new IllegalStateException("Could not load ‘ContextLoader.properties‘: " + ex.getMessage());
		}
	}
}
这里 DEFAULT_STRATEGIES_PATH 是一个常量,它的值为 ContextLoader.properties , ClassPathResource 的 path 属性可以是绝对路径也可以是相对路径,在这边为相对路径(相对于加载资源的类 ContextLoader),指向的绝对路径为 org.springframework.web.context.ContextLoader.properties

我们可以在 ContextLoader 的同级目录找到 ContextLoader.properties 这个配置文件
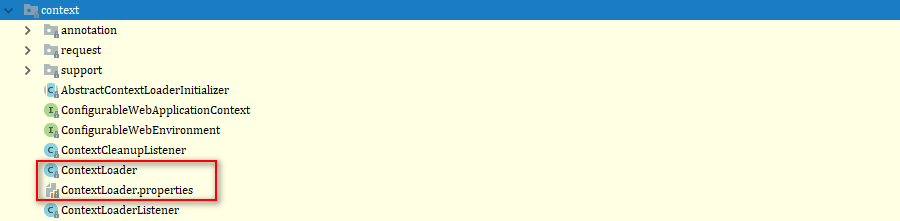
然后就是加载 org.springframework.web.context.ContextLoader.properties 中的键值对,并赋值给 ContextLoader 类中的 Properties 类型的属性 defaultStrategies
我们打开 ContextLoader.properties ,发现里面配置了一个键值对,也就是在 ContextLoaderListener 类调用 contextInitialized 方法之前会默认加载 XmlWebApplicationContext 这个 IOC 容器.


初始化工作完成之后,接着我们就正式进入到 ContextLoaderListener 类的 contextInitialized 方法
@Override
public void contextInitialized(ServletContextEvent event) {
	initWebApplicationContext(event.getServletContext());
}
由于 ContextLoaderListener 没有 initWebApplicationContext() 方法的具体实现,所以这里调用的是它的父类 ContextLoader 中的 initWebApplicationContext() 方法
下面我们来到 ContextLoader 类中的 initWebApplicationContext 方法,该方法的具体定义如下
public WebApplicationContext initWebApplicationContext(ServletContext servletContext) {
	//  1、校验 WebApplicationContext 是否已经初始化过了,如果已经初始化,则抛出异常(英文注释已经写的很清楚了)
	if (servletContext.getAttribute(WebApplicationContext.ROOT_WEB_APPLICATION_CONTEXT_ATTRIBUTE) != null) {
		throw new IllegalStateException(
				"Cannot initialize context because there is already a root application context present - " +
				"check whether you have multiple ContextLoader* definitions in your web.xml!");
	}

	Log logger = LogFactory.getLog(ContextLoader.class);
	servletContext.log("Initializing Spring root WebApplicationContext");
	if (logger.isInfoEnabled()) {
		logger.info("Root WebApplicationContext: initialization started");
	}
	long startTime = System.currentTimeMillis();

	try {
		// Store context in local instance variable, to guarantee that
		// it is available on ServletContext shutdown.
		if (this.context == null) {
			// 2、创建一个 WebApplicationContext 并保存到 ContextLoader 类中 WebApplicationContext 类型的 context 属性----(详细见代码块一)
			this.context = createWebApplicationContext(servletContext);
		}
		if (this.context instanceof ConfigurableWebApplicationContext) {
			ConfigurableWebApplicationContext cwac = (ConfigurableWebApplicationContext) this.context;
			if (!cwac.isActive()) {
				// The context has not yet been refreshed -> provide services such as
				// setting the parent context, setting the application context id, etc
				if (cwac.getParent() == null) {
					// The context instance was injected without an explicit parent ->
					// determine parent for root web application context, if any.
					ApplicationContext parent = loadParentContext(servletContext);
					cwac.setParent(parent);
				}
				// 3、配置和刷新 Web 应用上下文----(详细见代码块三)
				configureAndRefreshWebApplicationContext(cwac, servletContext);
			}
		}
		// 4、设置 WebApplicationContext 属性
		servletContext.setAttribute(WebApplicationContext.ROOT_WEB_APPLICATION_CONTEXT_ATTRIBUTE, this.context);

		ClassLoader ccl = Thread.currentThread().getContextClassLoader();
		if (ccl == ContextLoader.class.getClassLoader()) {
			currentContext = this.context;
		}
		else if (ccl != null) {
			currentContextPerThread.put(ccl, this.context);
		}

		if (logger.isDebugEnabled()) {
			logger.debug("Published root WebApplicationContext as ServletContext attribute with name [" +
					WebApplicationContext.ROOT_WEB_APPLICATION_CONTEXT_ATTRIBUTE + "]");
		}
		if (logger.isInfoEnabled()) {
			long elapsedTime = System.currentTimeMillis() - startTime;
			logger.info("Root WebApplicationContext: initialization completed in " + elapsedTime + " ms");
		}

		return this.context;
	}
	catch (RuntimeException ex) {
		logger.error("Context initialization failed", ex);
		servletContext.setAttribute(WebApplicationContext.ROOT_WEB_APPLICATION_CONTEXT_ATTRIBUTE, ex);
		throw ex;
	}
	catch (Error err) {
		logger.error("Context initialization failed", err);
		servletContext.setAttribute(WebApplicationContext.ROOT_WEB_APPLICATION_CONTEXT_ATTRIBUTE, err);
		throw err;
	}
}
代码块一、createWebApplicationContext(servletContext)
protected WebApplicationContext createWebApplicationContext(ServletContext sc) {
	// 1、确定要创建应用上下文的 contextClass (这里是 org.springframework.web.context.support.XmlWebApplicationContext)
	// ----(详细见代码块二)
	Class<?> contextClass = determineContextClass(sc);
	// 2、判断当前的 contextClass 是不是 ConfigurableWebApplicationContext 的子类或者是子接口,如果不是直接抛出异常
	if (!ConfigurableWebApplicationContext.class.isAssignableFrom(contextClass)) {
		throw new ApplicationContextException("Custom context class [" + contextClass.getName() +
				"] is not of type [" + ConfigurableWebApplicationContext.class.getName() + "]");
	}
	// 3、使用 BeanUtils 工具类生成 contextClass 的实例对象,并且将其向上转型为 ConfigurableWebApplicationContext
	return (ConfigurableWebApplicationContext) BeanUtils.instantiateClass(contextClass);
}
代码块二、determineContextClass(ServletContext servletContext)
protected Class<?> determineContextClass(ServletContext servletContext) {
	// 1、获取 web.xml 中配置的初始化参数 contextClass
	String contextClassName = servletContext.getInitParameter(CONTEXT_CLASS_PARAM);
	// 2、如果 web.xml 中配置了参数 contextClass
	if (contextClassName != null) {
		try {
			// 3、利用反射构建出 contextClassName 的实例
			return ClassUtils.forName(contextClassName, ClassUtils.getDefaultClassLoader());
		}
		catch (ClassNotFoundException ex) {
			throw new ApplicationContextException(
					"Failed to load custom context class [" + contextClassName + "]", ex);
		}
	}
	else {
		// 4、如果 web.xml 中没有配置 contextClass 参数,那么就从我们开始初始化的 defaultStrategies 中获取默认的
		// WebApplicationContext 即: org.springframework.web.context.support.XmlWebApplicationContext
		contextClassName = defaultStrategies.getProperty(WebApplicationContext.class.getName());
		try {
			// 5、利用反射构建出 contextClassName 的实例
			return ClassUtils.forName(contextClassName, ContextLoader.class.getClassLoader());
		}
		catch (ClassNotFoundException ex) {
			throw new ApplicationContextException(
					"Failed to load default context class [" + contextClassName + "]", ex);
		}
	}
}
创建 WebApplicationContext 这里小总结一下,如果 web.xml 配置了 contextClass 参数,那么使用该参数配置的值利用反射构建出 contextClass 的 Class 实例,如果 web.xml 中没有配置 contextClass 参数,那么就从默认的 defaultStrategies 中取出 默认的 WebApplication (org.springframework.web.context.support.XmlWebApplicationContext.class),然后通过 BeanUtils 实例化,得到 XmlWebApplicationContext 的 Class 实例,最后将该对象赋值给 ContextLoader 类的 context (WebApplication 类型) 属性
代码块三、configureAndRefreshWebApplicationContext(cwac, servletContext)
protected void configureAndRefreshWebApplicationContext(ConfigurableWebApplicationContext wac, ServletContext sc) {
	// 1、如果应用上下文的 id 是原始的默认值,那么基于可用的信息,生成一个更有用的 id
	if (ObjectUtils.identityToString(wac).equals(wac.getId())) {
		// 2、获取 servletContext 中配置的 contextId (也就是web.xml 中配置的初始化参数 contextId)
		String idParam = sc.getInitParameter(CONTEXT_ID_PARAM);
		if (idParam != null) {
			// 3、如果 web.xml 中配置了 contextId ,将其设置为 wac 的属性
			wac.setId(idParam);
		}
		else {
			// 4、如果 web.xml 中没有配置 contextId 参数,生成默认的 id ,这里的 id 是: org.springframework.web.context.WebApplicationContext:
			wac.setId(ConfigurableWebApplicationContext.APPLICATION_CONTEXT_ID_PREFIX +
					ObjectUtils.getDisplayString(sc.getContextPath()));
		}
	}
	// 5、将 ServletContext 对象设置为 wac 的属性
	wac.setServletContext(sc);
	// 6、获取 web.xml 中配置的 contextConfigLocation 参数的值,由于我们这里配置了该参数,并且参数的值就是 Spring 配置文件的存放路径
	String configLocationParam = sc.getInitParameter(CONFIG_LOCATION_PARAM);
	// 7、如果 web.xml 中配置了 contextConfigLocation 参数
	if (configLocationParam != null) {
		// 8、将其赋值给 wac 的 String[] 类型 configLocations 属性,同时会创建 Environment 对象----(详细见代码块四)
		wac.setConfigLocation(configLocationParam);
	}
	// 9、获取环境信息
	ConfigurableEnvironment env = wac.getEnvironment();
	if (env instanceof ConfigurableWebEnvironment) {
		// 10、初始化属性源----(详细见代码块十一)
		((ConfigurableWebEnvironment) env).initPropertySources(sc, null);
	}
	// 11、自定义上下文----(详细见代码块十二)
	customizeContext(sc, wac);
	// 12、最终调用 AbstractApplicationContext 的 refresh 方法, 这是 IOC 的核心方法
	wac.refresh();
}
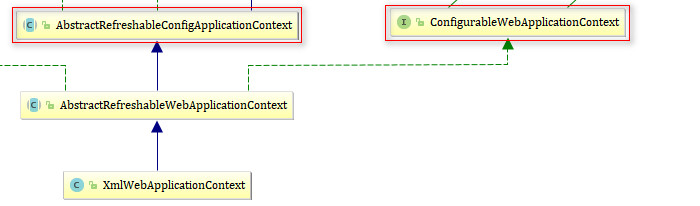
这里说一下 wac.setConfigLocation(configLocationParam) 这个方法的调用,我们知道 wac 的本质是 XmlWebApplication 类型的,强转为了 ConfigurableWebApplicationContext 类型,根据多态的运行机制,编译类型是 ConfigurableWebApplicationContext ,但是实质是 XmlWebApplication 类型,在 XmlWebApplication 中没有定义 setConfigLocation() 方法,那么我们就去 XmlWebApplication 父类中去寻找有没有setConfigLocation() 方法,很遗憾还是没有,那么就继续往上找,结果在父类的父类 AbstractRefreshableConfigApplicationContext 中找到了 setConfigLocation() 方法, XmlWebApplication 对象运行时调用的是父类的父类 AbstractRefreshableConfigApplicationContext 中的 setConfigLocation() 方法,所以 AbstractRefreshableConfigApplicationContext 中的 setConfigLocation() 方法可以看成是实现了ConfigurableWebApplicationContext 接口中的 setConfigLocation() 方法.
代码块四、wac.setConfigLocation(configLocationParam)
// AbstractRefreshableConfigApplicationContext
public void setConfigLocations(String... locations) {
	if (locations != null) {
		Assert.noNullElements(locations, "Config locations must not be null");
		// 1、创建一个 String[] 数组,长度为配置 Spring 配置文件的个数
		this.configLocations = new String[locations.length];
		// 2、遍历数组
		for (int i = 0; i < locations.length; i++) {
			// 3、解析给定路径,必要时用相应的环境属性值替换占位符----(详细见代码块五)
			this.configLocations[i] = resolvePath(locations[i]).trim();
		}
	}
	else {
		this.configLocations = null;
	}
}
代码块五 resolvePath()
protected String resolvePath(String path) {
	// 1、getEnvironment():获取环境信息----(详细见代码块六)
	// 2、resolveRequiredPlaceholders(path):解析给定路径,必要时用相应的环境属性值替换占位符
	return getEnvironment().resolveRequiredPlaceholders(path);
}
代码块六、getEnvironment()
public ConfigurableEnvironment getEnvironment() {
	if (this.environment == null) {
		// 创建环境----(详细见代码块七)
		this.environment = createEnvironment();
	}
	return this.environment;
}
代码块七、createEnvironment()
protected ConfigurableEnvironment createEnvironment() {
	// 返回一个标准的环境----(详细见代码块八)
	return new StandardServletEnvironment();
}
代码块八、new StandardEnvironment()
StandardServletEnvironment 类继承体系如下
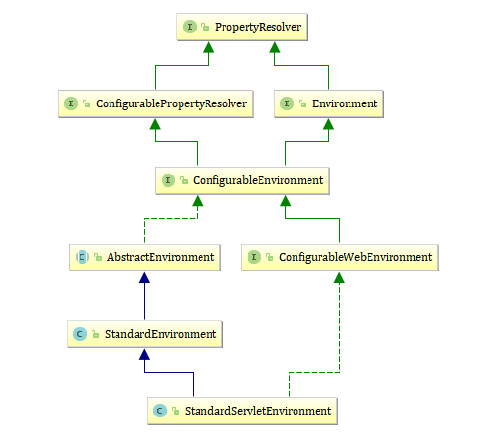
创建 StandardServletEnvironment 对象时,必须先初始化父类,通过继承结构图我们可以知道执行 new StandardServletEnvironment() 必须先调用父类即 AbstractEnvironment 的构造方法
AbstractEnvironment 的构造方法如下
public AbstractEnvironment() {
	1、自定义属性源----(详细见代码块九)
	customizePropertySources(this.propertySources);
	if (logger.isDebugEnabled()) {
		logger.debug("Initialized " + getClass().getSimpleName() + " with PropertySources " + this.propertySources);
	}
}
代码块九、customizePropertySources
protected void customizePropertySources(MutablePropertySources propertySources) {
}
AbstractEnvironment 中的 customizePropertySources 方法为空方法,通过 protected 关键字进行修饰,用于给子类进行重写 .因此,此时我们会走到子类 StandardServletEnvironment 中的重写方法.
protected void customizePropertySources(MutablePropertySources propertySources) {
	// 1、添加 servletConfigInitParams 属性源(作为占位符,它对应的值最后会被 servletConfig 的值替换掉)
	propertySources.addLast(new StubPropertySource(SERVLET_CONFIG_PROPERTY_SOURCE_NAME));
	// 2、添加 servletContextInitParams 属性源(作为站位符,它对应的值最后会被 servletContext 的值替换掉)
	propertySources.addLast(new StubPropertySource(SERVLET_CONTEXT_PROPERTY_SOURCE_NAME));
	if (JndiLocatorDelegate.isDefaultJndiEnvironmentAvailable()) {
		// 3、添加 jndiProperties 属性源
		propertySources.addLast(new JndiPropertySource(JNDI_PROPERTY_SOURCE_NAME));
	}
	// 调用 StandardServletEnvironment 的父类(StandardEnvironment)的 customizePropertySources 方法----(详细见代码块十)
	super.customizePropertySources(propertySources);
}
代码块十、StandardEnvironment 类中的 customizePropertySources 方法
protected void customizePropertySources(MutablePropertySources propertySources) {
	// 添加 systemProperties 属性源
	propertySources.addLast(new MapPropertySource(SYSTEM_PROPERTIES_PROPERTY_SOURCE_NAME, getSystemProperties()));
	// 添加 systemEnvironment 属性源
	propertySources.addLast(new SystemEnvironmentPropertySource(SYSTEM_ENVIRONMENT_PROPERTY_SOURCE_NAME, getSystemEnvironment()));
}
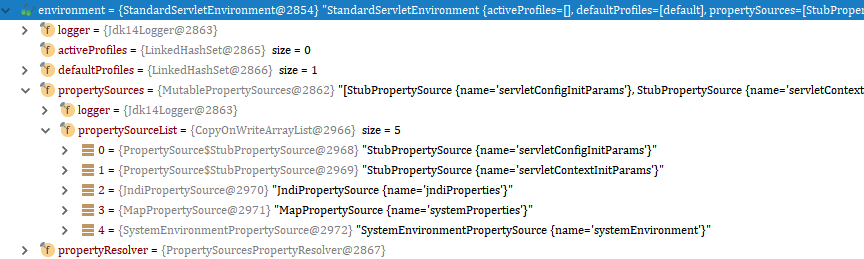
至此,代码块六中的 createEnvironment() 方法执行结束,此时的 environment 值如下
代码块十一、initPropertySources(sc, null)
public void initPropertySources(ServletContext servletContext, ServletConfig servletConfig) {
	WebApplicationContextUtils.initServletPropertySources(getPropertySources(), servletContext, servletConfig);
}

public static void initServletPropertySources(
		MutablePropertySources propertySources, ServletContext servletContext, ServletConfig servletConfig) {

	Assert.notNull(propertySources, "‘propertySources‘ must not be null");
	if (servletContext != null && propertySources.contains(StandardServletEnvironment.SERVLET_CONTEXT_PROPERTY_SOURCE_NAME) &&
			propertySources.get(StandardServletEnvironment.SERVLET_CONTEXT_PROPERTY_SOURCE_NAME) instanceof StubPropertySource) {
		// 1、将 propertySources 中 servletContextInitParams 对应的值替换为 servletContext
		propertySources.replace(StandardServletEnvironment.SERVLET_CONTEXT_PROPERTY_SOURCE_NAME,
				new ServletContextPropertySource(StandardServletEnvironment.SERVLET_CONTEXT_PROPERTY_SOURCE_NAME, servletContext));
	}
	if (servletConfig != null && propertySources.contains(StandardServletEnvironment.SERVLET_CONFIG_PROPERTY_SOURCE_NAME) &&
			propertySources.get(StandardServletEnvironment.SERVLET_CONFIG_PROPERTY_SOURCE_NAME) instanceof StubPropertySource) {
		// 2、将 propertySources 中 servletConfigInitParams 对应的值替换为 servletConfig
		propertySources.replace(StandardServletEnvironment.SERVLET_CONFIG_PROPERTY_SOURCE_NAME,
				new ServletConfigPropertySource(StandardServletEnvironment.SERVLET_CONFIG_PROPERTY_SOURCE_NAME, servletConfig));
	}
}
代码块十二:customizeContext(sc, wac) 自定义上下文
protected void customizeContext(ServletContext sc, ConfigurableWebApplicationContext wac) {
	// 1、确定上下文的初始化类 ( 详细见代码块十三)
	List<Class<ApplicationContextInitializer<ConfigurableApplicationContext>>> initializerClasses =
			determineContextInitializerClasses(sc);
	// 2、遍历 initializerClasses
	for (Class<ApplicationContextInitializer<ConfigurableApplicationContext>> initializerClass : initializerClasses) {
		Class<?> initializerContextClass =
				GenericTypeResolver.resolveTypeArgument(initializerClass, ApplicationContextInitializer.class);
		if (initializerContextClass != null && !initializerContextClass.isInstance(wac)) {
			throw new ApplicationContextException(String.format(
					"Could not apply context initializer [%s] since its generic parameter [%s] " +
					"is not assignable from the type of application context used by this " +
					"context loader: [%s]", initializerClass.getName(), initializerContextClass.getName(),
					wac.getClass().getName()));
		}
		// 3、利用反射实例化初始化类的类实例,得到初始化类对象,并赋值给 ContextLoader 的 contextInitializers 属性
		this.contextInitializers.add(BeanUtils.instantiateClass(initializerClass));
	}

	AnnotationAwareOrderComparator.sort(this.contextInitializers);
	// 4、循环遍历实现了 ApplicationContextInitializer 接口的初始化类,并挨个调用其 initialize() 方法
	for (ApplicationContextInitializer<ConfigurableApplicationContext> initializer : this.contextInitializers) {
		// 5、回调初始化类的 initialize() 方法
		initializer.initialize(wac);
	}
}
代码块十三、determineContextInitializerClasses
protected List<Class<ApplicationContextInitializer<ConfigurableApplicationContext>>>
		determineContextInitializerClasses(ServletContext servletContext) {
	// 1、创建 List 集合用来存储 ApplicationContextInitializer 的实现类的 Class 实例
	List<Class<ApplicationContextInitializer<ConfigurableApplicationContext>>> classes =
			new ArrayList<Class<ApplicationContextInitializer<ConfigurableApplicationContext>>>();
	// 2、如果 web.xml 中配置了 globalInitializerClasses 参数,获取该参数对应的值
	String globalClassNames = servletContext.getInitParameter(GLOBAL_INITIALIZER_CLASSES_PARAM);
	if (globalClassNames != null) {
		for (String className : StringUtils.tokenizeToStringArray(globalClassNames, INIT_PARAM_DELIMITERS)) {
			classes.add(loadInitializerClass(className));
		}
	}
	// 3、如果 web.xml 中配置了 contextInitializerClasses 参数,获取该参数对应的值
	String localClassNames = servletContext.getInitParameter(CONTEXT_INITIALIZER_CLASSES_PARAM);
	// 4、如果 contextInitializerClasses 参数对应的配置值不为空
	if (localClassNames != null) {
		// 5、将 contextInitializerClasses 参数对应的配置值使用 , ; \t\n 分隔符分割成 String 类型的数组,然后遍历该数组
		for (String className : StringUtils.tokenizeToStringArray(localClassNames, INIT_PARAM_DELIMITERS)) {
			// 6、loadInitializerClass(className):返回初始化类的 Class 实例----(详细见代码块十四)
			// 7、添加到 List 集合中
			classes.add(loadInitializerClass(className));
		}
	}

	return classes;
}
代码块十四、loadInitializerClass(className)
private Class<ApplicationContextInitializer<ConfigurableApplicationContext>> loadInitializerClass(String className) {
	try {
		// 1、通过类加载器利用反射获取初始化类的 Class 实例
		Class<?> clazz = ClassUtils.forName(className, ClassUtils.getDefaultClassLoader());
		// 2、如果初始化类没有实现 ApplicationContextInitializer 接口,抛出异常
		if (!ApplicationContextInitializer.class.isAssignableFrom(clazz)) {
			throw new ApplicationContextException(
					"Initializer class does not implement ApplicationContextInitializer interface: " + clazz);
		}
		// 3、将初始化类的类实例强转为 ApplicationContextInitializer<ConfigurableApplicationContext> 并返回
		return (Class<ApplicationContextInitializer<ConfigurableApplicationContext>>) clazz;
	}
	catch (ClassNotFoundException ex) {
		throw new ApplicationContextException("Failed to load context initializer class [" + className + "]", ex);
	}
}
从代码块十二到代码块十四,可以很明显的看出 customizeContext 方法是 Spring 提供给开发者的一个扩展点,我们可以通过此方法对 ConfigurableApplicationContext 进行一些自定义操作,具体使用如下.
1、创建一个 ApplicationContextInitializer 接口的实现类
例如下面的 SpringApplicationContextInitializer ,并在 initialize 方法中进行自己的逻辑操作,例如:添加监听器、添加 BeanFactoryPostProcessor 等
public class SpringApplicationContextInitializer implements ApplicationContextInitializer {
    @Override
    public void initialize(ConfigurableApplicationContext applicationContext) {
        System.out.println("spring initializer...");
    }
}
2、在 web.xml 中,定义 contextInitializerClasses 或 globalInitializerClasses 参数,参数值为 SpringApplicationContextInitializer 的全路径.
参考:https://joonwhee.blog.csdn.net/article/details/86555733
标签:refresh lstat prefix 利用 multi 保存 必须 tar cat
原文地址:https://www.cnblogs.com/xiaomaomao/p/14046219.html