标签:therefore 准备 dem order display must namenode rgb rar
1. Vmware workstation pro 16
官网下载 : https://www.vmware.com/
密钥:ZF3R0-FHED2-M80TY-8QYGC-NPKYF (若失效请自行百度)
2. xshell,xftp 官网下载(需要注册)
3. 国内镜像网站下载centos(笔者以centos7为例),如华为,阿里,清华的镜像。
https://mirrors.tuna.tsinghua.edu.cn ,https://developer.aliyun.com/mirror/,https://mirrors.huaweicloud.com/
4. 所需要的包
hadoop 2.7.0 jdk-1.8.0
原因:将Windows系统与虚拟机放到同一子网下,这样可以通过window系统上的浏览器访问虚拟机中hadoop集群的文件管理页面(即 master:50070 页面),为后续idea连接hadoop集 群也提供了方便。固定虚拟机IP地址,方便后续操作。
1. 在VMware软件里面的编辑----》虚拟网络编辑器---》选择VMnet8模式

2. 点击NAT设置
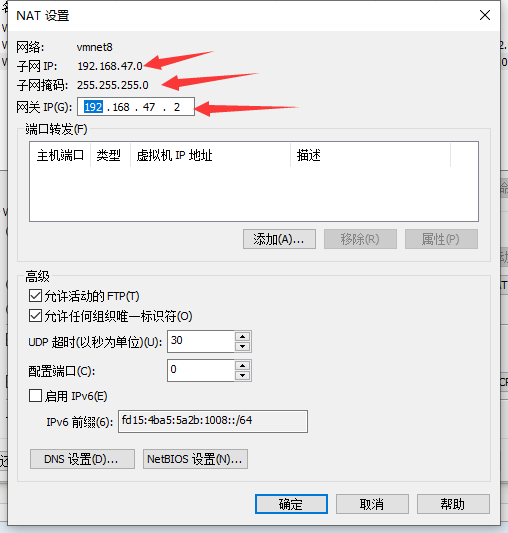
3. 点击1中的DHCP设置

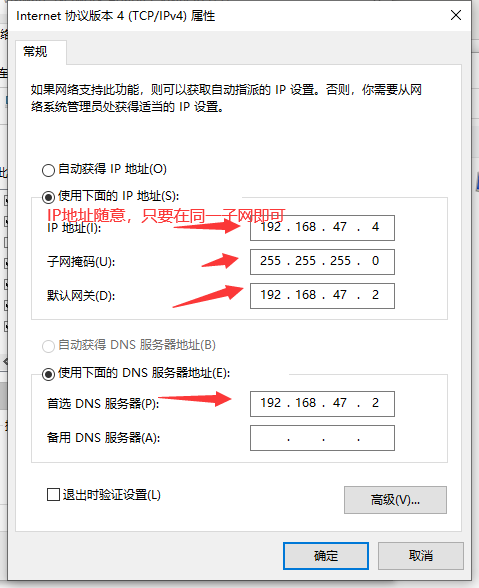
4. 设置VMnet8的地址
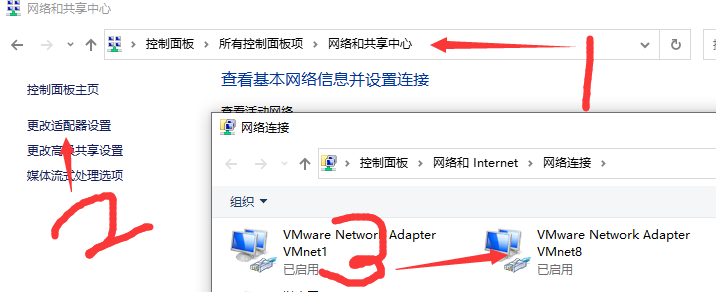
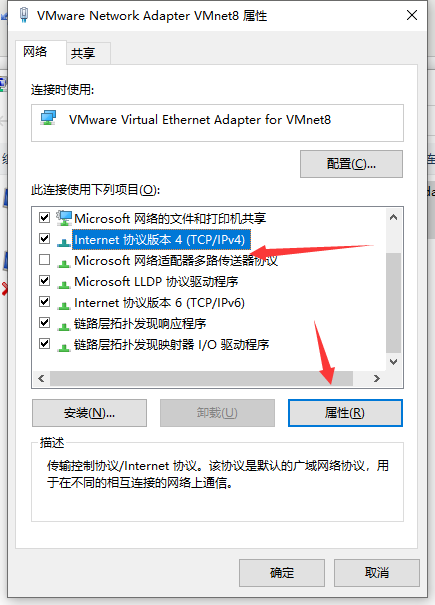
5. 右击VMnet8->属性
笔者创建了三个虚拟机,hostname分别为master,slave1,slave2.
创建过程中网络类型选择NAT模式
修改主机名,请参考:https://www.cnblogs.com/HusterX/articles/13425074.html
关闭防火墙(或者开放对应窗口)

firewall-cmd --state
systemctl stop firewalld.service
systemctl disable firewalld.service
增加用户(增加对hadoop管理的一个用户,在本地搭建是可以忽略这一步,只要全程在root权限下操作即可)
UserAdd最终结果
| IP地址 | 计算机名 | 主要作用 |
| 192.168.47.131 | master | namenode,JobTracker |
| 192.168.47.132 | salve1 | datenode,TaskTracker |
| 192.168.47.130 | slave2 | datenode,TaskTracker |
编辑master的 /etc/hosts 文件
192.168.47.131 master
192.168.47.132 slave1
192.168.47.130 slave2
以下步骤用xshell连接master 后操作或者在 master内直接进行操作。
PS:笔者全程用root权限操作(若使用hadoop用户,请注意权限问题)
1.用xftp软件 将 Jdk 和 Hadoop 压缩包上传到master中的某个目录下(笔者以 /opt 目录为例)
2. 搭建Java环境
1.检查是否有Java
  java -version

2.若有,则移除openjdk
   查看:
   rpm -qa | grep openjdk
   删除
   rpm -e --nodeps [相关的软件包]

3.解压缩上传到 /opt 目录下的 jdk
   tar -zxvf jdk1.8*****
   重命名
   mv  jdk1.8*****  jdk8

4.增加环境变量(root用户下)
   vim /etc/profile

   增加
   export JAVA_HOME=/opt/jdk8
   export PATH=$PATH:$JAVA_HOME/bin

5.生效
   source /etc/profile

6.测试
   java -version
3. 搭建hadoop环境
1.解压缩上传到 /opt 目录下的hadoop压缩包
  tar -zxf hadoop-2.7.3.tar.gz
  重命名
  mv  hadoop-2.7.3 hadoop

2.配置hadoop环境变量(root用户下)
   vim /etc/profile

   增加
   export HADOOP_HOME=/opt/hadoop

   修改
   export
PATH=$PATH:$JAVA_HOME/bin:$HADOOP_HOME/bin:$HADOOP_HOME/sbin

3.测试
   hadoop version

[root@master ~]# hadoop version
Hadoop 2.7.3
Subversion https://git-wip-us.apache.org/repos/asf/hadoop.git -r baa91f7c6bc9cb92be5982de4719c1c8af91ccff
Compiled by root on 2016-08-18T01:41Z
Compiled with protoc 2.5.0
From source with checksum 2e4ce5f957ea4db193bce3734ff29ff4
This command was run using /opt/hadoop/share/hadoop/common/hadoop-common-2.7.3.jar
4. ssh免密登录
1. 生成密钥
[root@master ~]# ssh-keygen -t rsa

在/root/.ssh下
[root@master ~]# ls /root/.ssh/
id_rsa  id_rsa.pub

2. 加入信任列表
[root@master ~]# cat id_rsa.pub >> authorized_keys
[root@master ~]# ls /root/.ssh/
authorized_keys  id_rsa  id_rsa.pub

3. 设置权限
[root@master ~]# chmod 600 authorized_keys

4. 在其余centos系统中重复1 2 3

5. 分发给集群中的其他主机
    使用模式:ssh-copy-id [-i [identity_file]] [user@]machine
[root@master ~]# ssh-copy-id  [user]@[IP]
5. 在 /opt/hadoop/ 下创建目录
(1) 创建hdfs
(2) hdfs下创建 name,data,tmp目录
6. hadoop配置文件
在hadoop-env.sh中增加 export JAVA_HOME=/opt/jdk8
# Licensed to the Apache Software Foundation (ASF) under one
# or more contributor license agreements.  See the NOTICE file
# distributed with this work for additional information
# regarding copyright ownership.  The ASF licenses this file
# to you under the Apache License, Version 2.0 (the
# "License"); you may not use this file except in compliance
# with the License.  You may obtain a copy of the License at
#
#     http://www.apache.org/licenses/LICENSE-2.0
#
# Unless required by applicable law or agreed to in writing, software
# distributed under the License is distributed on an "AS IS" BASIS,
# WITHOUT WARRANTIES OR CONDITIONS OF ANY KIND, either express or implied.
# See the License for the specific language governing permissions and
# limitations under the License.

# Set Hadoop-specific environment variables here.

# The only required environment variable is JAVA_HOME.  All others are
# optional.  When running a distributed configuration it is best to
# set JAVA_HOME in this file, so that it is correctly defined on
# remote nodes.

# The java implementation to use.
export JAVA_HOME=${JAVA_HOME}

# The jsvc implementation to use. Jsvc is required to run secure datanodes
# that bind to privileged ports to provide authentication of data transfer
# protocol.  Jsvc is not required if SASL is configured for authentication of
# data transfer protocol using non-privileged ports.
#export JSVC_HOME=${JSVC_HOME}

export HADOOP_CONF_DIR=${HADOOP_CONF_DIR:-"/etc/hadoop"}

# Extra Java CLASSPATH elements.  Automatically insert capacity-scheduler.
for f in $HADOOP_HOME/contrib/capacity-scheduler/*.jar; do
  if [ "$HADOOP_CLASSPATH" ]; then
    export HADOOP_CLASSPATH=$HADOOP_CLASSPATH:$f
  else
    export HADOOP_CLASSPATH=$f
  fi
done

# The maximum amount of heap to use, in MB. Default is 1000.
#export HADOOP_HEAPSIZE=
#export HADOOP_NAMENODE_INIT_HEAPSIZE=""

# Extra Java runtime options.  Empty by default.
export HADOOP_OPTS="$HADOOP_OPTS -Djava.net.preferIPv4Stack=true"

# Command specific options appended to HADOOP_OPTS when specified
export HADOOP_NAMENODE_OPTS="-Dhadoop.security.logger=${HADOOP_SECURITY_LOGGER:-INFO,RFAS} -Dhdfs.audit.logger=${HDFS_AUDIT_LOGGER:-INFO,NullAppender} $HADOOP_NAMENODE_OPTS"
export HADOOP_DATANODE_OPTS="-Dhadoop.security.logger=ERROR,RFAS $HADOOP_DATANODE_OPTS"

export HADOOP_SECONDARYNAMENODE_OPTS="-Dhadoop.security.logger=${HADOOP_SECURITY_LOGGER:-INFO,RFAS} -Dhdfs.audit.logger=${HDFS_AUDIT_LOGGER:-INFO,NullAppender} $HADOOP_SECONDARYNAMENODE_OPTS"

export HADOOP_NFS3_OPTS="$HADOOP_NFS3_OPTS"
export HADOOP_PORTMAP_OPTS="-Xmx512m $HADOOP_PORTMAP_OPTS"

# The following applies to multiple commands (fs, dfs, fsck, distcp etc)
export HADOOP_CLIENT_OPTS="-Xmx512m $HADOOP_CLIENT_OPTS"
#HADOOP_JAVA_PLATFORM_OPTS="-XX:-UsePerfData $HADOOP_JAVA_PLATFORM_OPTS"

# On secure datanodes, user to run the datanode as after dropping privileges.
# This **MUST** be uncommented to enable secure HDFS if using privileged ports
# to provide authentication of data transfer protocol.  This **MUST NOT** be
# defined if SASL is configured for authentication of data transfer protocol
# using non-privileged ports.
export HADOOP_SECURE_DN_USER=${HADOOP_SECURE_DN_USER}

# Where log files are stored.  $HADOOP_HOME/logs by default.
#export HADOOP_LOG_DIR=${HADOOP_LOG_DIR}/$USER

# Where log files are stored in the secure data environment.
export HADOOP_SECURE_DN_LOG_DIR=${HADOOP_LOG_DIR}/${HADOOP_HDFS_USER}

###
# HDFS Mover specific parameters
###
# Specify the JVM options to be used when starting the HDFS Mover.
# These options will be appended to the options specified as HADOOP_OPTS
# and therefore may override any similar flags set in HADOOP_OPTS
#
# export HADOOP_MOVER_OPTS=""

###
# Advanced Users Only!
###

# The directory where pid files are stored. /tmp by default.
# NOTE: this should be set to a directory that can only be written to by
#       the user that will run the hadoop daemons.  Otherwise there is the
#       potential for a symlink attack.
export HADOOP_PID_DIR=${HADOOP_PID_DIR}
export HADOOP_SECURE_DN_PID_DIR=${HADOOP_PID_DIR}

# A string representing this instance of hadoop. $USER by default.
export HADOOP_IDENT_STRING=$USER
export JAVA_HOME=/opt/jdk8
<?xml version="1.0" encoding="UTF-8"?>
<?xml-stylesheet type="text/xsl" href="configuration.xsl"?>
<!--
  Licensed under the Apache License, Version 2.0 (the "License");
  you may not use this file except in compliance with the License.
  You may obtain a copy of the License at

    http://www.apache.org/licenses/LICENSE-2.0

  Unless required by applicable law or agreed to in writing, software
  distributed under the License is distributed on an "AS IS" BASIS,
  WITHOUT WARRANTIES OR CONDITIONS OF ANY KIND, either express or implied.
  See the License for the specific language governing permissions and
  limitations under the License. See accompanying LICENSE file.
-->

<!-- Put site-specific property overrides in this file. -->

<configuration>
    <property>
        <name>hadoop.tmp.dir</name>
        <value>file:/opt/hadoop/hdfs/tmp</value>
        <discription>A base for other temporary directories.</discription>
    </property>
    <!--master 的IP地址 -->
    <!-- 可以直接写 hdfs://master:900 -->
    <property>
        <name>fs.defaultFS</name>
        <value>hdfs://192.168.47.131:9000</value>
    </property>
</configuration>
<?xml version="1.0" encoding="UTF-8"?>
<?xml-stylesheet type="text/xsl" href="configuration.xsl"?>
<!--
  Licensed under the Apache License, Version 2.0 (the "License");
  you may not use this file except in compliance with the License.
  You may obtain a copy of the License at

    http://www.apache.org/licenses/LICENSE-2.0

  Unless required by applicable law or agreed to in writing, software
  distributed under the License is distributed on an "AS IS" BASIS,
  WITHOUT WARRANTIES OR CONDITIONS OF ANY KIND, either express or implied.
  See the License for the specific language governing permissions and
  limitations under the License. See accompanying LICENSE file.
-->

<!-- Put site-specific property overrides in this file. -->

<configuration>
    <!--dfs.replication表示副本的数量,伪分布式要设置为1-->
    <property>
        <name>dfs.replication</name>
        <value>2</value>
    </property>
<!--dfs.namenode.name.dir表示本地磁盘目录,是存储fsimage文件的地方-->
    <property>
        <name>dfs.namenode.name.dir</name>
        <value>file:/opt/hadoop/hdfs/name</value>
    </property>
<!--dfs.datanode.data.dir表示本地磁盘目录,HDFS数据存放block的地方-->
    <property>
        <name>dfs.datanode.data.dir</name>
        <value>file:/opt/hadoop/hdfs/data</value>
    </property>

</configuration>
<?xml version="1.0"?>
<!--
  Licensed under the Apache License, Version 2.0 (the "License");
  you may not use this file except in compliance with the License.
  You may obtain a copy of the License at

    http://www.apache.org/licenses/LICENSE-2.0

  Unless required by applicable law or agreed to in writing, software
  distributed under the License is distributed on an "AS IS" BASIS,
  WITHOUT WARRANTIES OR CONDITIONS OF ANY KIND, either express or implied.
  See the License for the specific language governing permissions and
  limitations under the License. See accompanying LICENSE file.
-->
<configuration>

<!-- Site specific YARN configuration properties -->
    <property>
        <name>yarn.resourcemanager.hostname</name>
        <value>master</value>
    </property>
    <property>
        <name>yarn.nodemanager.aux-services</name>
        <value>mapreduce_shuffle</value>
    </property>
</configuration>
<?xml version="1.0"?>
<?xml-stylesheet type="text/xsl" href="configuration.xsl"?>
<!--
  Licensed under the Apache License, Version 2.0 (the "License");
  you may not use this file except in compliance with the License.
  You may obtain a copy of the License at

    http://www.apache.org/licenses/LICENSE-2.0

  Unless required by applicable law or agreed to in writing, software
  distributed under the License is distributed on an "AS IS" BASIS,
  WITHOUT WARRANTIES OR CONDITIONS OF ANY KIND, either express or implied.
  See the License for the specific language governing permissions and
  limitations under the License. See accompanying LICENSE file.
-->

<!-- Put site-specific property overrides in this file. -->

<configuration>
    <property>
        <name>mapreduce.framework.name</name>
        <value>yarn</value>
    </property>
</configuration>
slave1
slave2
PS : slaves文件根据自己的部署确定,笔者部署了俩台slave
7. master环境配置到此结束
将master中的 /opt/jdk,/opt/hadoop 复制到slave1,slave2的 /opt 目录下。
将master中的 /etc/hosts,/etc/profile 复制到slave2,slave2对应的目录下。
8. 在slave1,slave2中运行
source /etc/profile
附笔者的 /etc/profile 文件
# /etc/profile

# System wide environment and startup programs, for login setup
# Functions and aliases go in /etc/bashrc

# It‘s NOT a good idea to change this file unless you know what you
# are doing. It‘s much better to create a custom.sh shell script in
# /etc/profile.d/ to make custom changes to your environment, as this
# will prevent the need for merging in future updates.

pathmunge () {
    case ":${PATH}:" in
        *:"$1":*)
            ;;
        *)
            if [ "$2" = "after" ] ; then
                PATH=$PATH:$1
            else
                PATH=$1:$PATH
            fi
    esac
}


if [ -x /usr/bin/id ]; then
    if [ -z "$EUID" ]; then
        # ksh workaround
        EUID=`/usr/bin/id -u`
        UID=`/usr/bin/id -ru`
    fi
    USER="`/usr/bin/id -un`"
    LOGNAME=$USER
    MAIL="/var/spool/mail/$USER"
fi

# Path manipulation
if [ "$EUID" = "0" ]; then
    pathmunge /usr/sbin
    pathmunge /usr/local/sbin
else
    pathmunge /usr/local/sbin after
    pathmunge /usr/sbin after
fi

HOSTNAME=`/usr/bin/hostname 2>/dev/null`
HISTSIZE=1000
if [ "$HISTCONTROL" = "ignorespace" ] ; then
    export HISTCONTROL=ignoreboth
else
    export HISTCONTROL=ignoredups
fi

export PATH USER LOGNAME MAIL HOSTNAME HISTSIZE HISTCONTROL

# By default, we want umask to get set. This sets it for login shell
# Current threshold for system reserved uid/gids is 200
# You could check uidgid reservation validity in
# /usr/share/doc/setup-*/uidgid file
if [ $UID -gt 199 ] && [ "`/usr/bin/id -gn`" = "`/usr/bin/id -un`" ]; then
    umask 002
else
    umask 022
fi

for i in /etc/profile.d/*.sh /etc/profile.d/sh.local ; do
    if [ -r "$i" ]; then
        if [ "${-#*i}" != "$-" ]; then
            . "$i"
        else
            . "$i" >/dev/null
        fi
    fi
done

unset i
unset -f pathmung
export JAVA_HOME=/opt/jdk8
export HADOOP_HOME=/opt/hadoop
export PATH=$PATH:$JAVA_HOME/bin:$HADOOP_HOME/bin:$HADOOP_HOME/sbin
1. 格式化系统
hadoop namenode -format / hdfs namenode -formate
(注意只需要执行一次,后面再启动不需要再次格式化,
除非master/slave有修改)

2.启动hadoop(进入 /opt/hadoop 目录下)
   sbin/start-all.sh

3.验证 jps,查看master进程
   [root@master hadoop]# jps
   28448 ResourceManager
   31777 Jps
   28293 SecondaryNameNode
   28105 NameNode
   查看salve1进程
   [root@slave1 ~]# jps
   22950 Jps
   18665 NodeManager
   18558 DataNode

4. 浏览器中查看
    http://master:50070
     若window与虚拟机在同一子网中,可以在window系统中通过浏览器打开,若不在,可以通过配置实现。同样也可在master中通过浏览器访问。

5. 停止hadoop集群(进入 /opt/hadoop )
    sbin/stop-all.sh
1.在 /opt/hadoop 目录下
echo "this is a test case, loading, please wait a minit" >> test

2.用hdfs命令创建输入文件夹
   hadoop fs -mkdir /input

3.用hdfs命令将test内容放入 /input 文件夹中
   hadoop fs -put test /input

4.运行hadoop自带的wordcount例子
   hadoop jar /opt/hadoop/share/hadoop/mapreduce/hadoop-mapreduce-examples-2.7.3.jar wordcount /input /output

5. 查看输出结果
   hadoop fs -ls /output
   hadoop fs -cat /output/part-r-00000
PS:这些文件夹以及都是在hdfs上,因此无法在本地磁盘中找到。且在程序运行前,结果文件夹output必须是不存在的。若文件需要更改,然后重新运行程序,则需要将input和output都删除,重新生成。或者新建两个对应的文件夹。如果需要重新hadoop namenode -format 务必把之前的日志,临时等文件进行删除
删除命令
hadoop fs -rmr [/targetDir]

列出目标文件夹的文件
hadoop fs -ls [/targetDir]

将本地文件放到hdfs上
hadoop fs -put localFile remoteFilePath
请参考:https://www.cnblogs.com/HusterX/p/14162985.html
ZF3R0-FHED2-M80TY-8QYGC-NPKYF
标签:therefore 准备 dem order display must namenode rgb rar
原文地址:https://www.cnblogs.com/HusterX/p/14125543.html
