标签:ons inux -- mysql总结 implicit 五步 flush table temp
mysql官网下载地址:https://downloads.mysql.com/
这里上传的工具很多,就不再赘述(我用的winscp)

tar -zxvf mysql-5.7.30-linux-glibc2.12-x86_64.tar.gz
注意:这里不建议使用拷贝(cp),因为文件大的话就会很慢
mv mysql-5.7.30-linux-glibc2.12-x86_64 /usr/local/mysql
groupadd mysql
useradd -r -g mysql mysql
cd /usr/local/mysql
mkdir data
chown -R mysql:mysql /usr/local/mysql/
cd msyql/bin
./mysqld --initialize --user=mysql --basedir=/usr/local/mysql --datadir=/usr/local/mysql/data
会出现以下:
2021-01-30T03:51:20.337410Z 0 [Warning] TIMESTAMP with implicit DEFAULT value is deprecated. Please use --explicit_defaults_for_timestamp server option (see documentation for more details).
2021-01-30T03:51:21.458335Z 0 [Warning] InnoDB: New log files created, LSN=45790
2021-01-30T03:51:21.659739Z 0 [Warning] InnoDB: Creating foreign key constraint system tables.
2021-01-30T03:51:21.722351Z 0 [Warning] No existing UUID has been found, so we assume that this is the first time that this server has been started. Generating a new UUID: 6a99bae9-62ae-11eb-8966-00163e175cc4.
2021-01-30T03:51:21.724337Z 0 [Warning] Gtid table is not ready to be used. Table ‘mysql.gtid_executed‘ cannot be opened.
2021-01-30T03:51:22.941639Z 0 [Warning] CA certificate ca.pem is self signed.
2021-01-30T03:51:22.977097Z 1 [Note] A temporary password is generated for root@localhost: Bo39?ed2h*W1
vim /etc/my.cnf

[mysqld]
basedir=/usr/local/mysql
datadir=/usr/local/mysql/data
#skip-grant-tables
port = 3306
pid-file = /usr/local/mysql/data/mysql.pid
socket = /usr/local/mysql/data/mysql.sock
sql_mode=NO_ENGINE_SUBSTITUTION,STRICT_TRANS_TABLES
default_authentication_plugin = mysql_native_password
cd /usr/local/mysql
cp support-files/mysql.server /etc/init.d/mysql
chmod +x /etc/init.d/mysql //添加可执行权限
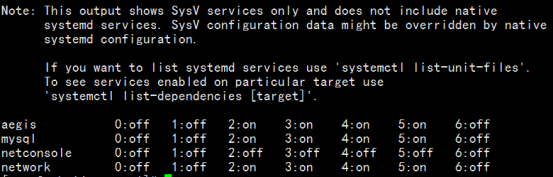
chkconfig --add mysql // 添加开机自启
chkconfig --list //查看自启是否添加成功
vim /etc/profile
export PATH=$PATH:/usr/local/mysql/bin:/usr/local/mysql/lib
source /etc/profile
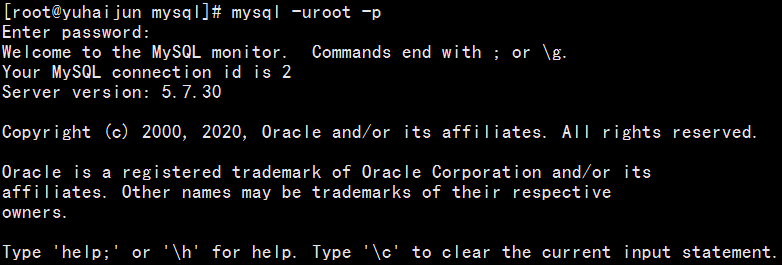
systemctl restart mysql
mysql -u root -pBo39?ed2h*W1 //初始化密码
会出现以下错误(说是要改一下/tmp/mysql.sock目录):

vim /etc/my.cnf
socket = /tmp/mysql.sock
systemctl restart mysql //再重启服务
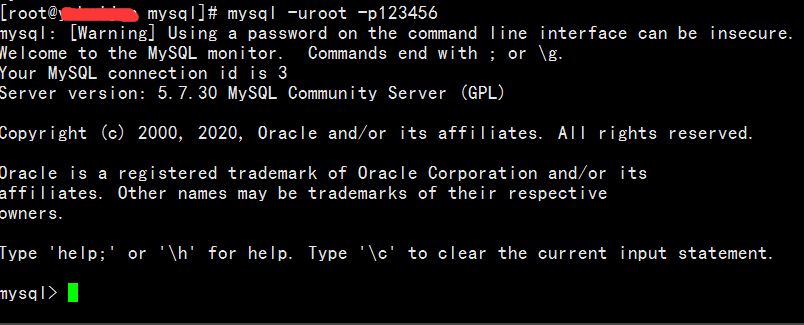
再次登录:(mysql -u root -pBo39?ed2h*W1)
修改密码
alter user ‘root‘@‘localhost‘ identified with mysql_native_password by ‘123456‘;
或 set password for root@localhost= password(‘123456’);
flush privileges;
标签:ons inux -- mysql总结 implicit 五步 flush table temp
原文地址:https://www.cnblogs.com/songwp/p/14348771.html