标签:efault 业务逻辑 ppi 注册 writer method 解码 难度 Fix
springMVC是一个基于spring的一个框架,是spring的一个模块,可以大大简化web开发的难度。
web开发的底层依然是servlet,框架是在servlet基础上的一些封装
springMVC就是一个spring,spring是容器,通过ioc管理对象,springMVC能够创建对象,放入到容器中,springMVC存放的是控制器对象
使用@Controller可以创建控制器对象,并将对象放入springMVC容器中,把创建的对象作为控制器使用,这个控制器可以接收用户请求,返回处理结果
使用@Controller注解创建的对象是一个普通的对象,不是servlet(servlet要继承HttpServlet),所以请求返回的结果无法直接返回到对象
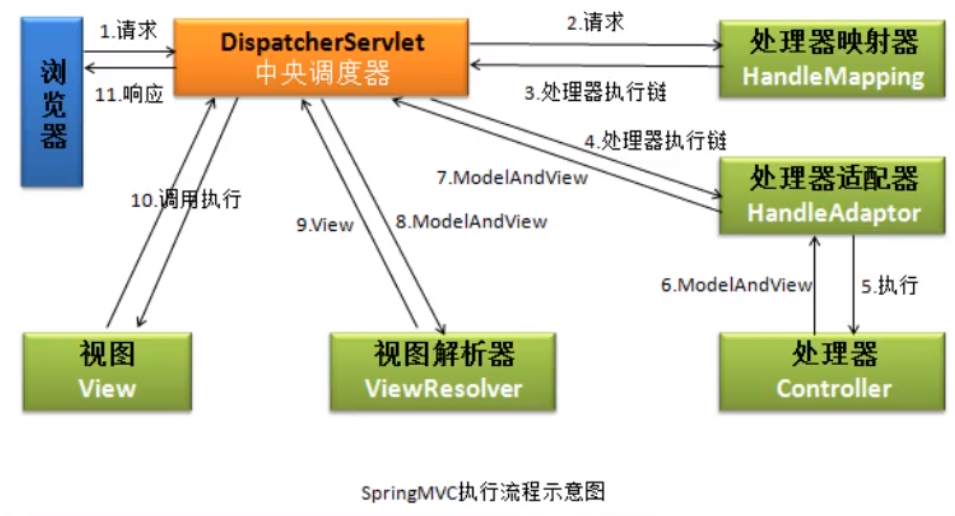
在springMVC中有一个DispatherServlet对象,它继承了HttpServlet,是一个Servlet,负责接收用户的所有请求,DispatcherServlet接收到用户请求后,将请求映射到Controller对象中的方法,使用Controller对象方法处理请求。
引入依赖
servlet-api.jar
<dependency>
  <groupId>javax.servlet</groupId>
  <artifactId>javax.servlet-api</artifactId>
    <scope>runtime</scope>
  <version>4.0.1</version>
</dependency>
spring-web.jar
<dependency>
  <groupId>org.springframework</groupId>
  <artifactId>spring-webmvc</artifactId>
  <version>5.2.9.RELEASE</version>
</dependency>
配置文件springmvc.xml
<?xml version="1.0" encoding="UTF-8"?>
<beans xmlns="http://www.springframework.org/schema/beans"
       xmlns:xsi="http://www.w3.org/2001/XMLSchema-instance"
       xmlns:context="http://www.springframework.org/schema/context"
       xsi:schemaLocation="
			http://www.springframework.org/schema/beans
           	http://www.springframework.org/schema/beans/spring-beans.xsd
           	http://www.springframework.org/schema/context
			https://www.springframework.org/schema/context/spring-context.xsd">

    <!-- 声明组件扫描器 -->
    <context:component-scan base-package="controller"></context:component-scan>

</beans>
配置web.xml
<?xml version="1.0" encoding="UTF-8"?>
<web-app xmlns="http://xmlns.jcp.org/xml/ns/javaee"
         xmlns:xsi="http://www.w3.org/2001/XMLSchema-instance"
         xsi:schemaLocation="http://xmlns.jcp.org/xml/ns/javaee http://xmlns.jcp.org/xml/ns/javaee/web-app_4_0.xsd"
         version="4.0">

    <servlet>
        <servlet-name>DispatcherServlet</servlet-name>
        <servlet-class>org.springframework.web.servlet.DispatcherServlet</servlet-class>
        <!-- 配置参数 -->
        <init-param>
            <!-- 配置springmvc的配置文件路径,DispatcherServlet被创建时会读取这个xml文件,根据xml文件内容创建Controller对象 -->
            <param-name>contextConfigLocation</param-name>
            <param-value>classpath:springmvc.xml</param-value>
        </init-param>

        <!-- tomcat启动后,就创建DispatcherServlet的实例对象 -->
        <!-- 在DispatcherServlet创建过程中,会同时创建springmvc容器对象,并将放入全局作用域对象中 -->
        <!-- 当用户发起请求时,就可以直接使用对象处理请求了 -->
        <load-on-startup>1</load-on-startup>
    </servlet>

    <servlet-mapping>
        <servlet-name>DispatcherServlet</servlet-name>
        <!-- DispatcherServlet需要处理的请求路径 -->
        <!-- *.do:表示处理全部以.do结尾的请求 -->
        <!-- /:表示处理全部的请求 -->
        <url-pattern>/*.do</url-pattern>
    </servlet-mapping>

</web-app>
发起请求index.html
<html lang="ch">
<head>
    <meta charset="UTF-8">
    <style type="text/css">
        .box {
            background-color: #333333;
        }
        .box a {
            background-color: darkgrey;
            color: white;
            display: inline-block;
            padding: 10px 30px;
            text-decoration: none;
        }
        .box a:hover {
            background-color: darkolivegreen;
            color: pink;
        }
    </style>
</head>
<body>
    <div class="box"><a href="/test.do">测试</a></div>

</body>
</html>
控制器TestController.java
/**
 * @Controller: 创建处理对象,并将其存入springMVC容器中
 */
@Controller
public class TestController {

    /**
     * 使用doTest()方法来处理test.do请求
     * @RequestMapping: 请求映射,将请求地址和方法进行绑定,为请求地址指定一个方法进行处理
     					value是一个数组,可以指定多请求路径
     					一个方法可以同时处理多个请求
     * @return ModelAndView
     *          Model:数据
     *          View:视图
     */
    @RequestMapping({"/test.do", "/other.do"})
    public ModelAndView doTest() {
        ModelAndView modelAndView = new ModelAndView();

        // 添加数据,框架会在最后将数据放入request作用域
        modelAndView.addObject("msg", "Hello SpringMVC");

        // 指定视图(完整路径)
        // 框架对视图执行forward(request.getRequestDispatcher(...).forward(...))
        modelAndView.setViewName("/show.jsp");
        return modelAndView;
    }
}
结果展示show.jsp
<%@ page contentType="text/html;charset=UTF-8" language="java" %>

${requestScope.msg}
请求处理流程
1、发起test.do请求
2、tomcat将*.do请求发给DispatcherServlet
3、DispatcherServlet根据springweb.xml查到test.do绑定的方法
4、DispatcherServlet将请求转发给TestController.doTest()
5、框架执行方法,将得到的ModelAndView进行处理,转发到show.jsp
如果前端页面存放在webapp目录下的话,用户可以通过地址栏发起请求非法访问到其他的资源
http://localhost:8080/show.jsp
为了防止用户的恶意访问,可以将除index.html外的资源文件放到WEB-INF目录下,WEB-INF目录是Java Web应用的安全目录,即客户端无法访问,只有服务端可以访问的目录
这样,用户就无法猜测服务器中的资源名称,非法的访问服务器中的资源
在方法中,返回WEB-INF下的资源
modelAndView.setViewName("/WEB-INF/view/show.jsp");
但是,将资源放到了WEB-INF目录下的话,如果WEB-INF下还有很多子目录的话,返回界面时,就需要重复书写多次路径,会白白消耗很多时间
modelAndView.setViewName("/WEB-INF/view/subview/show.jsp");

modelAndView.setViewName("/WEB-INF/view/subview/show.jsp");

modelAndView.setViewName("/WEB-INF/view/subview/show.jsp");
使用视图解析器,简化视图的书写路径
<!-- 视图解析器,使用逻辑名称指定文件 -->
<bean class="org.springframework.web.servlet.view.InternalResourceViewResolver">
    <!-- 前缀:视图文件的路径 -->
    <property name="prefix" value="/WEB-INF/view"></property>

    <!-- 后缀:视图文件的扩展名 -->
    <property name="suffix" value=".jsp"></property>
</bean>
当返回视图时,会自动地加上视图解析器配置的前缀和后缀
modelAndView.setViewName("/show"); // 资源路径为: /WEB-INF/view/show.jsp
modelAndView.setViewName("/otherview/show"); // 资源路径为: /WEB-INF/view/otherview/show.jsp
使用@RequestMapping为请求绑定处理方法,指定一个方法处理请求
@RequestMapping的参数是一个数组,一个方法可以和多个请求绑定,即一个方法可以处理多个请求
@RequestMapping可以放在方法上,表示将请求绑定到方法
/* 为方法绑定请求 */
@RequestMapping({"/some.do", "/other.do"})
public ModelAndView doSome() {
    ...
}
@RequestMapping可以放在类上,表示一个模块名称,下面方法绑定的路径都会自动添加上模块名称,可以更好的管理不同的Controller对象
@RequestMapping("/test")
public class TestController {

    /* 路径前会自动添加上/test这个公共的开头 */
    @RequestMapping({"/test.do", "check.do"})  // {"/test/test.do", "/test/check.do"}
    public ModelAndView doSome() {
        ...
    }

}
通过@RequestMapping的method属性可以指定要处理的请求方式,参数类型为enum
例
RequestMethod.GET 为GET方式
RequestMethod.POST 为POST方式
@RequestMapping("/test")
public class TestController {
    /* 处理GET方式请求 */
    @RequestMapping("/get.do", method=RequestMethod.GET)
    public ModelAndView doSome() { ... }

    /* 处理POST方式请求 */
    @RequestMapping("/add.do", method=RequestMethod.POST)
    public ModelAndView doSome() { ... }
}
加/和不加/
<a href="/add.do"></a>

<a href="login.do"></a>
在jsp、html中使用的地址,都是在前端页面中的地址,都是相对地址
地址分类:
1、绝对地址:带有协议名称的是协议地址(如http:http://www.baidu.com)
2、相对地址:没有协议开头的(如test/add.do、/test/login.do)
相对地址不能独立使用,必须有一个参考地址,通过参考地址+相对地址才能指定资源
访问地址不加 /
请求:test/add.do
点击后,访问的是:http://localhost:8080/myweb/test/add.do
参考地址:http://localhost:8080/myweb/
访问地址加 /
请求:/test/add.do
点击后,访问的是:http://localhost:8080/test/add.do
参考地址:http://localhost:8080
解决方法【待补充】
在项目开发时,一般采用<base> + 相对地址的方式
base标签
HttpServletRequest
HttpServletResponse
HttpSession
请求参数
可以将这四类请求参数直接写到处理方法的形参中,框架会自动为其赋值
@RequestMapping("/test")
public class TestController {
    @RequestMapping("/login.do", method=RequestMethod.GET)
    public ModelAndView doSome(HttpServletRequest request) {
        ModelAndView modelAndView = new ModelAndView();
        String name = request.getParameter("name");
        request.setAttribute("name", name);
        modelAndView.setName("/otherview/show");
    }
}
show.jsp
<%@ page contentType="text/html;charset=utf-8" language="java" %>
欢迎${requestScope.name}登录
在浏览器地址栏发送请求 http://localhost:8080/test/add.do?name=Wsd
可以正常转跳show.jsp,并且显示
欢迎Wsd登录
将参数写在方法形参中,DispatcherServlet会自动从request中根据形参名提取出参数,并进行类型的转换,最后调用方法,并将得到的请求参数作为形参传递到方法中。
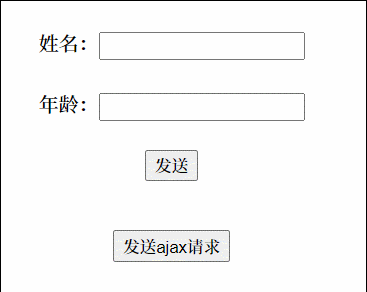
表单发送请求
<form action="/test/login.do">
    姓名:<input type="text" name="name"> <br />
    年龄:<input type="text" name="age"> <br />
    <input type="submit" value="发送">
</form>
将参数作为形式参数写在方法中,注意:参数名称需要一一对应,类型也需要相同
@RequestMapping("/login.do")
// 参数建议使用包装类型,否则可能出现空指针异常
public ModelAndView doTest(String name, Integer age) {
    ModelAndView modelAndView = new ModelAndView();
    modelAndView
            .addObject("name", name)
            .addObject("age", age);

    modelAndView.setViewName("/otherview/show");
    return modelAndView;
}
show.jsp
<%@ page contentType="text/html;charset=UTF-8" language="java" %>
姓名:${requestScope.name}
年龄:${requestScope.age}
运行结果
姓名:Wsd
年龄:21
上述接收参数时,请求参数名称必须要和方法的形参名相同
url:localhost:8080/test/add.do?name=Wsd&age=21
请求参数为name和age
那么,方法的形式参数就必须是name和age,否则就接收不到参数
@RequestMapping("/test")
public class TestController {
    @RequestMapping("/add.do")
    /* 形参名必须和请求参数名一致 */
    public ModelAndView doSome(String name, Integer age) { ... }
}
不相同的话则接收不到参数
public ModelAndView doSome(String userName, Integer userAge) { ... }
接收不到参数,userName和userAge为null
要想使不同的形参也能和请求参数对应的话,使用@RequestParam将其对应起来
public ModelAndView doSome(
    @RequestParam("name") String userName,
    @RequestParam("age") Integer userAge) { ... }
@RequestParam还有一个required属性,默认为true,表示请求url中必须要有此参数
public ModelAndView doSome(
    @RequestParam("name", required = true) String userName,
    @RequestParam("age", required = true) Integer userAge) { ... }
当请求中不含有参数时,会报400错误
url:localhost:8080/test/add.do
当required为false时,表示请求url中可以没有这个参数
public ModelAndView doSome(
    @RequestParam("name", required = false) String userName,
    @RequestParam("age", required = fslse) Integer userAge) { ... }
当发送不带有请求参数的请求时,也不会报错
url:localhost:8080/test/add.do
正常运行,但是参数userName和userAge为null】
除了把请求参数一个一个地写在参数列表逐个接收外,还可以一次性接收多个参数,并将其封装成对象
Controller
@Controller
@RequestMapping("/test")
public class TestController {
    @RequestMapping("/login.do")
    /* 参数类型为一个对象,框架接收参数后,会调用对象的set方法,将参数传递到对象属性中 */
    public ModelAndView doSome(User user) {
        ModelAndView modelAndView = new ModelAndView();
        modelAndView
                .addObject("name", user.getName())
                .addObject("age", user.getAge());
        modelAndView.setViewName("/jsp/show.jsp");
        return modelAndView;
    }
}
User封装类
public class User {

    // 要求属性名和请求参数名要相同
    // 必须要提供et方法,框架会自动调用set方法完成属性赋值
    private String name;
    private Integer age;

    // 注意一定要有set方法
    ...省略set方法
}
show.jsp
<%@ page contentType="text/html;charset=UTF-8" language="java" %>

姓名:${requestScope.name}
<br>
年龄:${requestScope.age}
注意:
1、封装类的参数名一定要和请求参数名相同封
2、装类要有无参构造方法和set方法
发送请求
http://localhost:8080/test/login.do?name=Wsd&age=21
show.jsp
姓名:Wsd
年龄:21
当处理器方法处理完成后,需要转跳到其他资源,而且又要在转跳的资源间传递数据,此时,处理方法返回ModelAndView。注意:返回ModelAndView需要在方法中创建ModelAndView对象
@RequestMapping("/add.do")
public ModelAndView doAdd() {
	ModelAndView modelAndView = new ModelAndView();
	/* ... */
	return modelAndView;
}
在使用时,如果处理方法只是进行页面的转跳,而不需要传递参数的话,则Model部分就多余了;反之,如果只需要传递参数,而不需要进行页面跳转(如ajax),则View部分就多余了。这时,返回ModelAndView就有点大材小用了
如果本次请求只需要进行页面的跳转,这时,使用String最为方便,即返回一个View
使用前需要先配置好视图解析器
视图解析器
<bean class="org.springframework.web.servlet.view.InternalResourceViewResolver">
    <property name="prefix" value="/WEB-INF/jsp/"></property>
    <property name="suffix" value=".jsp"></property>
</bean>
处理方法
@RequestMapping("/other.do")
public String doOther() {
    // 返回一个字符串,即:/WEB-INF/jsp/hello.jsp
    // 框架进行的是forward转发操作
    return "hello";
}
hello.jsp
<%@ page contentType="text/html;charset=UTF-8" language="java" %>
你好,世界!
在浏览器路径中输入,http://localhost:8080/test/other.do时,页面可以进行跳转
你好,世界!
传递数据:
处理方法返回String类型,依然可以手工向request作用域添加数据
@RequestMapping("/other.do")
// 框架调用方法时会自动传递request
public String doOther(HttpServletRequest request) {
	// 手工将数据添加到request作用域
    request.addObject("name", "Wsd");
    // 返回一个字符串,即:/WEB-INF/jsp/hello.jsp
    // 框架进行的是forward转发操作
    return "hello";
}
注意:
如果要返回一个完整的路径,就不能配置视图解析器,否则视图解析器配置的前缀和后缀会拼接在完整路径上
返回字符串数据
如果处理方法上没有@ResponseBody则进行页面的跳转
当有@ResponseBody时,则返回的是字符串类型的数据
@ResponseBody()
@RequestMapping(value = "/show.do")
/* 返回字符串数据 */
public String doString() {
    return "你好,世界";
}
前端接收请求
function send() {
    let xmlHttpRequest = new XMLHttpRequest();
    xmlHttpRequest.onreadystatechange = function () {
        if (xmlHttpRequest.status == 200 && xmlHttpRequest.readyState == 4) {
            let data = xmlHttpRequest.responseText;
            alert(data)
        }
    }
    xmlHttpRequest.open("get", "/test/show.do", true);
    xmlHttpRequest.send();
}
乱码问题
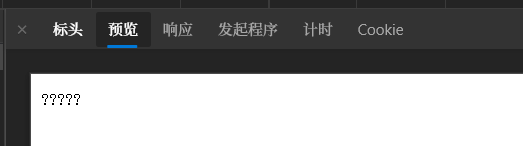
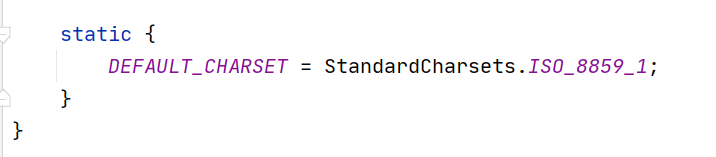
因为添加了@ResponseBody注解,在StringHttpMessageConverter处理String类型数据时,在其内部将编码设置为了ISO_8859_1
响应时,响应头默认编码为ISO-8859-1
Content-Type: text/plain;charset=ISO-8859-1
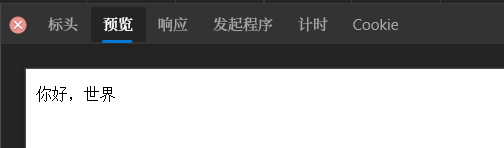
当返回的字符串中含有中文时,需要重新指定responset的contentType属性,可以在@RequestMapping的produces属性中,重新指定响应头的contentType属性,指定数据类型和编码
@ResponseBody()
@RequestMapping(value = "/show.do", produces = {"text/plain;charset=utf-8"})
public String doString() {
    return "你好,世界";
}
void不能表示数据,也不能表示内容。可以用于处理ajax请求(ajax只需要返回数据)
通过应答对象response输出数据
例子:从服务端获取数据,并将数据展示在输入框中
<div class="input">
    <form action="/test/login.do">
        姓名:<input type="text" name="name" id="name" /> <br><br>
        年龄:<input type="text" name="age" id="age" /> <br><br>
        <input type="submit" value="发送" />
    </form>
</div>

<button onclick="send()">发送ajax请求</button>

<script type="text/javascript">
    function send() {
        let xmlHttpRequest = new XMLHttpRequest();
        xmlHttpRequest.onreadystatechange = function () {
            if (xmlHttpRequest.status == 200 && xmlHttpRequest.readyState == 4) {
                // 接收服务器返回结果
                let data = xmlHttpRequest.responseText;
                // 解析JSON字符串
                let res = JSON.parse(data);
                // 将结果展示到表单输入框中
                document.getElementById("name").value = res.name;
                document.getElementById("age").value = res.age;
            }
        }
        xmlHttpRequest.open("get", "/test/write.do", true);
        xmlHttpRequest.send();
    }
</script>
@RequestMapping("/write.do")
public void doWrite(HttpServletResponse response) throws IOException {

    User user = new User("张飞", 43);
    ObjectMapper objectMapper = new ObjectMapper();
    String data = objectMapper.writeValueAsString(user);
    response.setContentType("application/json;charset=utf-8");
    // 返回JSON格式字符串
    response.getWriter().print(data);

}
返回一个对象(封装成对象的数据)响应ajax请求
返回对象,需要使用@ResponseBody,将对象解析为JSON格式
使用步骤
1、在返回前,需要加入JSON工具类库的依赖,SpringMVC默认使用的是jackson
<dependency>
    <groupId>com.fasterxml.jackson.core</groupId>
    <artifactId>jackson-core</artifactId>
    <version>2.11.2</version>
</dependency>
<dependency>
    <groupId>com.fasterxml.jackson.core</groupId>
    <artifactId>jackson-databind</artifactId>
    <version>2.11.2</version>
</dependency>
2、springmvc配置文件要加入<mvc:annotation-driver>注解驱动
3、处理方法上添加@ResponseBody
实现原理:
<mvc:annotation-driver>注解驱动,完成java到json、xml、text等数据格式的转换
添加注解驱动到springmv.xml配置文件后,会自动注册HttpMessageConverter接口的实现类,添加后才会自动注册常用的(对象转JSON)功能实现类
HttpMessageConverter接口:消息转换器,定义了java转为json、xml等数据的方法
添加注解驱动后,自动注册的HttpMessageConverter的实现类
ByteArrayHttpMessageConverter
StringHttpMessageConverter
ResourceHttpMessageConverter
ResourceRegionHttpMessageConverter
SourceHttpMessageConverter
AllEncompassingFormHttpMessageConverter
MappingJackson2HttpMessageConverter			---->	(对象转JSON)
没有添加注解驱动,自动注册的HttpMessageConverter的实现类
ByteArrayHttpMessageConverter
StringHttpMessageConverter
SourceHttpMessageConverter
AllEncompassingFormHttpMessageConverter
上一个例子的另一个版本
只需修改处理方法
@RequestMapping("/write.do")

/* 将处理器方法转为JSON对象后,通过response输出到浏览器 */
@ResponseBody
public User doWrite(HttpServletResponse response) throws IOException {
    User user = new User("张飞", 43);
    return user;
}
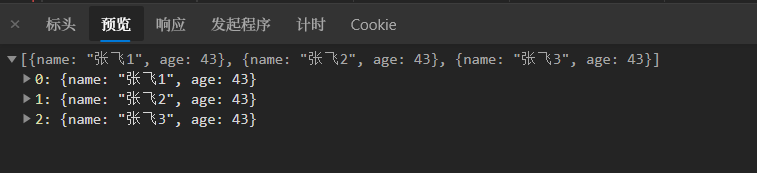
返回JSON数组
还是上面的例子
@RequestMapping("/write.do")
// 将处理器方法转为JSON对象后,通过response输出到浏览器
@ResponseBody
public List<User> doWrite(HttpServletResponse response) throws IOException {
    User user1 = new User("张飞1", 43);
    User user2 = new User("张飞2", 43);
    User user3 = new User("张飞3", 43);
    List<User> users = new ArrayList<>();
    users.add(user1);
    users.add(user2);
    users.add(user3);
    return users;
}
结果
上例中,框架会把返回的User类型,调用ArrayList<HttpMessageConverter>中每个类的canWrite()方法,检查哪个HttpMessageConverter接口的实现类能够处理User类型的数据
2、框架会调用实现类的write(),上例为MappingJackson2HttpMessageConverter的write(),调用Jackson的objectMapper实例,将User对象转为JSON
3、框架调用@ResponseBody,将上一步的结果输出到浏览器
以get方式发送请求,请求参数保存在【请求头】中,在Http请求协议包到达Http服务器之后,首先进行解码【由tomcat进行解码】,tomcat9.x默认使用UTF-8字符集进行解码
以post方式发送请求,请求参数保存在【请求体】中,在Http请求协议包到达Http服务器之后,由请求对象request对二进制内容进行解码,request对象默认使用ISO-8859-1进行解码
使用过滤器可以在Servlet处理请求之前,将请求提前拦下,提前配置需要配置的信息
在Servlet中,需要自定义一个Filter,但是SpringMVC已经提供了一个Filter
在使用前需要将其添加到web.xml文件中
<!-- 说明过滤器,解决Post请求参数乱码的问题 -->
<filter>
    <filter-name>characterEncodingFilter</filter-name>
    <filter-class>org.springframework.web.filter.CharacterEncodingFilter</filter-class>

    <!-- 设置项目中使用的字符编码 -->
    <init-param>
        <param-name>encoding</param-name>
        <param-value>utf-8</param-value>
    </init-param>

    <!-- 强制请求对象request使用encoding字符编码 -->
    <init-param>
        <param-name>forceRequestEncoding</param-name>
        <param-value>true</param-value>
    </init-param>

    <!-- 强制响应对象response使用encoding编码 -->
    <init-param>
        <param-name>forceResponseEncoding</param-name>
        <param-value>true</param-value>
    </init-param>

</filter>
<filter-mapping>
    <filter-name>characterEncodingFilter</filter-name>
    <!-- 所有的请求都先通过过滤器 -->
    <url-pattern>/*</url-pattern>
</filter-mapping>
自己写Filter继承Filter接口也可以实现
public class OneFilter implements Filter {
    @Override
    public void doFilter(ServletRequest servletRequest, ServletResponse servletResponse, FilterChain filterChain) throws IOException, ServletException {
        servletRequest.setCharacterEncoding("utf-8");
        servletResponse.setCharacterEncoding("utf-8");
        filterChain.doFilter(servletRequest, servletResponse);
    }
}
<filter-mapping>
    <filter-name>OneFilter</filter-name>
    <url-pattern>/*</url-pattern>  <!-- 拦截所有的请求 -->
</filter-mapping>
正常情况下,通过浏览器访问静态资源(.js、.html等)会通过tomcat进行访问
因为tomcat提供了一个DefaultServlet,它用来处理静态资源的访问和没有被映射的请求
DefaultServlet的url-pattern为/
当给Dispatcher的url-pattern也配置为/时,它会替代tomcat的DefaultServlet,此时,在访问静态资源就会出现问题,因为Dispatcher默认情况下没有处理静态资源的能力,所以访问静态资源都会出现404
动态资源都是可以访问的,因为TestController控制器对象中有处理请求的处理方法
在springmvc配置文件中加入<mvc:default-servlet-handler>
加入这个标签后,框架会创建控制器对象DefaultServletHttpRequestHandler,这个控制器对象可以把接收的请求转发给tomcat的DefaultServlet
<?xml version="1.0" encoding="UTF-8"?>
<beans xmlns="http://www.springframework.org/schema/beans"
       xmlns:xsi="http://www.w3.org/2001/XMLSchema-instance"
       xmlns:context="http://www.springframework.org/schema/context"
       xmlns:mvc="http://www.springframework.org/schema/mvc"
       xsi:schemaLocation="http://www.springframework.org/schema/beans
       http://www.springframework.org/schema/beans/spring-beans.xsd
       http://www.springframework.org/schema/mvc
       https://www.springframework.org/schema/mvc/spring-mvc.xsd">

    <context:component-scan base-package="controller"></context:component-scan>


    <!-- default-servlet-handler和@Request注解有冲突,加入这个注解可以解决 -->
    <mvc:annotation-driven />

    <mvc:default-servlet-handler />

</beans>
项目中常用的方法
在springmvc配置文件中加入<mvc:resources>
加入这个标签后,框架会创建控制器对象ResourceHttpRequestHandler,这个对象不会依赖tomcat服务器,而是使用框架提供的对象处理静态资源的访问
<!-- 解决和@RequestMapping的冲突 -->
<mvc:annotation-driven />

<!-- mapping:访问静态资源的uri地址 -->
<!-- location:资源文件的位置 -->
<!-- /html/**:表示表示以html开头的请求路径:/html/hello.html、/html/show/show.html -->
<!-- /html/:表示html目录下的所有文件 -->
<mvc:resources mapping="/html/**" location="/html/" />
<mvc:resources mapping="/jsp/**" location="/jsp/"/>
也可以将静态资源都放入到static目录中
这样只需要写条语句
<!-- 解决和@RequestMapping的冲突 -->
<mvc:annotation-driven />

<mvc:resources mapping="/static/**" location="/static/" />
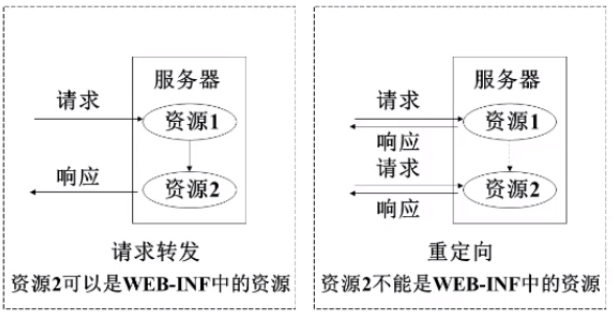
处理完请求后,需要向其他资源进行跳转时,有两种跳转方式:1、请求转发;2、请求重定向
根据要跳转的资源类型,又可以分为:1、跳转到页面;2、跳转到其他Servlet处理
注意:对于请求转发的页面,可以是WEB-INF中的页面;而重定向的页面,是不能是WEB-INF下的页面的,因为重定向相当于用户又发送了一条请求,而WEB-INF下的资源是只能由服务端访问,用户是访问不到的
SpringMVC框架将原来Servlet中的请求转发和重定向操作进行了封装,操作更加简单
Servlet方式实现转发和重定向
forward:请求转发:request.getRequestDispatcher("uri").forward(request, response);

redirect:重定向:response.sendRedirect("uri");
语法
modelAndView.setViewName("forward:视图完整路径");
@RequestMapping("/login.do")
public ModelAndView doLogin(String name, Integer age) {
    ModelAndView modelAndView = new ModelAndView();

    modelAndView
        .addObject("name", name)
        .addObject("age", age);

    // forward不和视图解析器一同使用
    // 即使配置了视图解析器,也不会拼接路径
    modelAndView.setViewName("forward:/WEB-INF/show.jsp");
    return modelAndView;
}
结果展示页面show.jsp
<%@ page contentType="text/html;charset=UTF-8" language="java" %>
姓名:${requestScope.name} <br>
年龄:${requestScope.age}
语法
modelAndView.setViewName("redirect:视图完整路径");
还是转发中的例子,如果换成重定向,发出请求时就会出现404,因为重定向相当于用户通过地址栏又发送了一次请求,用户是没有权限访问WEB-INF目录下的资源的
下面的代码会造成访问不到资源
@RequestMapping("/login.do")
public ModelAndView doLogin(String name, Integer age) {
    ModelAndView modelAndView = new ModelAndView();

    // forward不和视图解析器一同使用
    // 即使配置了视图解析器,也不会拼接路径
    modelAndView.setViewName("redirect:/WEB-INF/show.jsp");
    return modelAndView;
}
因为重定向相当于用户又发送了一次请求,这两次请求是不共享请求包的(即request对象),当发送携带参数的请求时,重定向的页面无法接收到请求
发送携带参数的请求
<%@page contentType="text/html;charset=utf-8" language="java" %>

<form action="test/login.do">
    姓名:<input type="text" name="name"> <br>
    年龄:<input type="text" name="age"> <br>
    <input type="submit" value="发送请求">
</form>
Controller解析重定向
@RequestMapping("/login.do")
public ModelAndView doLogin(String name, Integer age) {
    ModelAndView modelAndView = new ModelAndView();

    // 请求:http://localhost:8080/


    // show.jsp在webapp根目录下
    modelAndView.setViewName("redirect:show.jsp");

    // 浏览器又发送一次请求
    // http://localhost:8080/show.jsp

    return modelAndView;
}
show.jsp数据展示
<%@ page contentType="text/html;charset=UTF-8" language="java" %>

    SHOW.jsp页面
    姓名:${requestScope.name}
    年龄:${requestScope.age}
上一个例子,如果想要和show.jsp进行数据的传递,可以把数据放入到modelAndView对象中,在重定向过程中,会将modelAndView中设置的参数作为重定向的请求参数进行传递
@RequestMapping("/login.do")
    public ModelAndView doLogin(String name, Integer age) {
        ModelAndView modelAndView = new ModelAndView();

        modelAndView
                .addObject("username", name)
                .addObject("userage", age);

        System.out.println(name + "   " + age);

        modelAndView.setViewName("redirect:/show.jsp");
        return modelAndView;
    }
show.jsp接收请求参数
<%@ page contentType="text/html;charset=utf-8" language="java" %>
    SHOW.jsp页面
    姓名:${param.username}
    年龄:${param.userage}
当向发送请求时:/login.do?name=Wsd&age=21
处理方法接收到请求时,会将name和age放入到ModelAndView中,然后进行请求重定向,重定向请求时,会将ModelAndView中的参数作为请求参数进行请求重定向
/show.jsp?username=Wsd&userage=21
又是乱码问题
在进行请求转发时,如果参数带有中文,则重定向时会乱码,其实上例中的真正的重定向的链接是
http://localhost:8080/show.jsp?username=%3F%3F&userage=21
处理方法接收时正常,但是再作为请求参数进行请求重定向时会出现作为乱码
待解决
在java中处理可能出现异常的代码需要使用
try {
    ...
} catch() {
    ...
}
如果代码执行过程中都需要进行异常处理,就会使代码看起来非常的凌乱
SpringMVC框架使用的是同一的,全局的异常处理
把controller中所有异常处理都集中到一个地方
采用aop的思想,将业务逻辑和异常代码分离开,实现解耦合
实现方法:@ExceptionHandler和@ControllerAdvice
异常类,用于手动抛出异常
/* 自定义异常类 */
public class UserException extends Exception{

    public UserException() {
        super();
    }

    public UserException(String message) {
        super(message);
    }
}
public class AgeException extends UserException{

    public AgeException() {
        super();
    }

    public AgeException(String message) {
        super(message);
    }
}
在年龄大于18岁的时候,抛出异常
@RequestMapping("/login.do")
public ModelAndView doLogin(String name, Integer age) throws UserException {

    ModelAndView modelAndView = new ModelAndView();

    // 年龄小于18时,抛出异常
    if (age < 18) {
        throw new AgeException("未成年人禁止进入");
    }

    modelAndView.setViewName("forward:/show.jsp");

    return modelAndView;
}
TestExceptionHandler集中处理方法抛出的异常
/*
* @ControllerAdvice:控制器增强,给控制器增加功能(异常处理)
* 需要在配置文件中指定注解所在的包
*/
@ControllerAdvice
public class TestExceptionHandler {
    /*
     * 处理异常的方法和控制器方法定义相同,可以有多个参数
     *
     * 形参:Exception,表示Controller中抛出的异常对象
     * 通过形参获取发生的异常信息
     *
     * @ExceptionHandler(class):表示异常的类型,当发生此类型异常时,由下面的方法进行处理
     */
    @ExceptionHandler(UserException.class)
    public ModelAndView doAgeException (Exception e) {

        ModelAndView modelAndView = new ModelAndView();

        // 异常发生要处理的逻辑
        // 1、记录异常发生的时间,方法,内容等
        // 2、发生通知,将异常发送给相关人员
        // 3、用户提示

        modelAndView.addObject("msg", "用户未满18岁禁止进入");
        modelAndView.addObject("tips", e);

        modelAndView.setViewName("UserException");

        return modelAndView;
    }

    /**
     * 处理UserException之外的异常
     */
    @ExceptionHandler
    public ModelAndView doOtherException (Exception e) {
        ModelAndView modelAndView = new ModelAndView();
        modelAndView.addObject("tips", e);
        modelAndView.setViewName("defaultException");
        return modelAndView;
    }
}
UserException.jsp显示错误页面
<%@ page contentType="text/html;charset=UTF-8" language="java" %>
用户年龄异常: <br>
${requestScope.msg} <br>
${requestScope.tips}
配置文件
<!-- 注解驱动 -->
<mvc:annotation-driven />

<context:component-scan base-package="handler" />
当年龄小于18时,会转到错误界面
用户年龄异常: 用户未满18岁禁止进入
exception.AgeException: 未成年人禁止进入
拦截器和过滤器侧重点不同
过滤器:过滤请求参数,判断合法性以及设置编码字符集等
拦截器:拦截请求,实现了HandlerInterceptor的类都是拦截器
拦截器执行时间:
1、请求处理方法执行之前被拦截
2、请求处理方法执行之后也会执行拦截器
3、请求完成后也会执行拦截器
public class TestInterceptor implements HandlerInterceptor {

    /**
     * 预处理方法
     * @param request:请求对象
     * @param response:应答对象
     * @param handler:被拦截的控制器对象(TestController)
     * @return true:表示请求通过了拦截器的验证,可以执行控制器方法
     * @return false:请求没有通过拦截器的验证,请求结束
     * @throws Exception
     *
     * 特点:
     *      1、在控制器方法之前执行,用户的请求最先到达此方法
     *      2、在这个方法中可以获取请求信息,可以验证请求合法性,验证用户访问权限等
     */
    @Override
    public boolean preHandle(HttpServletRequest request, HttpServletResponse response, Object handler) throws Exception {
        return false;
    }

    /**
     * 后处理方法
     * @param request
     * @param response
     * @param handler:被拦截的控制器对象(TestController)
     * @param modelAndView:处理方法的返回值
     * @throws Exception
     *
     * 特点:
     *      1、在控制器方法之后执行
     *      2、能够获取到处理器方法的返回值(ModelAndView),可以修改ModelAndView中的数据和视图
     *      3、对结果进行二次修正
     */
    @Override
    public void postHandle(HttpServletRequest request, HttpServletResponse response, Object handler, ModelAndView modelAndView) throws Exception {

    }

    /**
     * 最后执行的方法
     * @param request
     * @param response
     * @param handler:被拦截的处理器对象
     * @param ex:程序中发生的异常
     * @throws Exception
     *
     * 特点:
     *      1、请求处理完成后执行:框架中规定,视图处理完成后,对视图执行了forward,就认为处理完成
     *      2、资源回收,把占用的内存回收
     */
    @Override
    public void afterCompletion(HttpServletRequest request, HttpServletResponse response, Object handler, Exception ex) throws Exception {

    }
}
在配置文件中声明拦截器
<!-- 声明拦截器:多个拦截器被保存在ArrayList集合中,先声明的拦截器先执行,后声明的拦截器后执行 -->
<mvc:interceptors>
    <!-- 一个interceptor就是一个拦截器 -->
    <mvc:interceptor>
        <!-- 指定拦截的uri地址 -->
        <!-- 可以使用**:任意的字符、文件或多级目录和目录中的文件 -->
        <!-- /test/**:表示所有以/test开头的请求,都会被拦截器所拦截 -->
        <!-- /代表根:http://localhost:8080/ -->
        <mvc:mapping path="/test/**"/>
        <bean class="handler.TestInterceptor" />
    </mvc:interceptor>
</mvc:interceptors>
在配置文件中声明两个拦截器
<!-- 声明拦截器 -->
<mvc:interceptors>
    <!-- 一个interceptor就是一个拦截器 -->
    <mvc:interceptor>
        <!-- 指定拦截的uri地址 -->
        <!-- 可以使用**:任意的字符、文件或多级目录和目录中的文件 -->
        <!-- /test/**:表示所有以/test开头的请求,都会被拦截器所拦截 -->
        <!-- /代表根:http://localhost:8080/ -->
        <mvc:mapping path="/test/**"/>
        <bean class="handler.TestInterceptor" />
    </mvc:interceptor>
    <mvc:interceptor>
        <mvc:mapping path="/test/**"/>
        <bean class="handler.TestInterceptor2" />
    </mvc:interceptor>
</mvc:interceptors>
拦截器执行顺序
拦截器1返回true、拦截器2返回true
11111111111--preHandle()执行
222222222--preHandle()执行
===============================>TestController.doLoding()<执行=======================
222222222--postHandler()执行
11111111111--postHandler()执行
222222222--afterCompletion()执行
11111111111--afterCompletion()执行
拦截器1返回true、拦截器2返回false
11111111111--preHandle()执行
222222222--preHandle()执行
11111111111--afterCompletion()执行
拦截器1返回false、拦截器2返回false | true
11111111111--preHandle()执行
多个拦截器拦截一个请求,只要有一个拦截器的preHander()返回了false,控制器方法都不会执行
| 区别 | 过滤器 | 拦截器 |
|---|---|---|
| 接口 | Filter |
HandlerInterceptor |
| 来源 | servlet | 框架 |
| 功能 | 设置request、response的参数,对数据进行过滤 | 验证请求,可以截断请求 |
| 执行时间 | 先 | 后 |
| 创建 | tomcat服务器创建对象 | springmvc容器创建对象 |
| 执行时间点 | 一个 | 三个 |
| 侧重点 | servlet请求响应 | 处理方法执行 |
登录:把用户信息放到session中
退出:将信息从session中删除
拦截器:从session中获取用户的登录数据,验证能否访问系统资源
标签:efault 业务逻辑 ppi 注册 writer method 解码 难度 Fix
原文地址:https://www.cnblogs.com/wsd413/p/14508886.html