标签:void load 注解 hat auto 命名 虚拟 turn 属性
Java 注解(Annotation)又称 Java 标注,是 JDK5.0 引入的一种注释机制。
Java 语言中的类、方法、变量、参数和包等都可以被标注。和 Javadoc 不同,Java 标注可以通过反射获取标注内容。在编译器生成类文件时,标注可以被嵌入到字节码中。Java 虚拟机可以保留标注内容,在运行时可以获取到标注内容 。 当然它也支持自定义 Java 标注。
Spring支持使用注解的方式配置bean和注入属性依赖关系,可以极大的减少XML配置文件的数量,特别是在Spirng Boot 和 Spring Cloud中,基本上都是使用注解来使用内置和自定义的bean对象,对开发人员而言,减少了繁琐的配置。
Component源码
/**
 * Indicates that an annotated class is a "component".
 * Such classes are considered as candidates for auto-detection
 * when using annotation-based configuration and classpath scanning.
 *
 * <p>Other class-level annotations may be considered as identifying
 * a component as well, typically a special kind of component:
 * e.g. the {@link Repository @Repository} annotation or AspectJ‘s
 * {@link org.aspectj.lang.annotation.Aspect @Aspect} annotation.
 */
@Target(ElementType.TYPE)
@Retention(RetentionPolicy.RUNTIME)
@Documented
@Indexed
public @interface Component {
	/**
	 * The value may indicate a suggestion for a logical component name,
	 * to be turned into a Spring bean in case of an autodetected component.
	 * @return the suggested component name, if any (or empty String otherwise)
	 */
	String value() default "";

}
通过阅读Component注解我们得知
Component注解是作用于Class类上的,同时它在运行期有效(有一些注解是在编译时有效,比如一些编译插件lombak)
@Indexed是Spirng5.0出来的,用于编译译处理,加快Spring启动速度
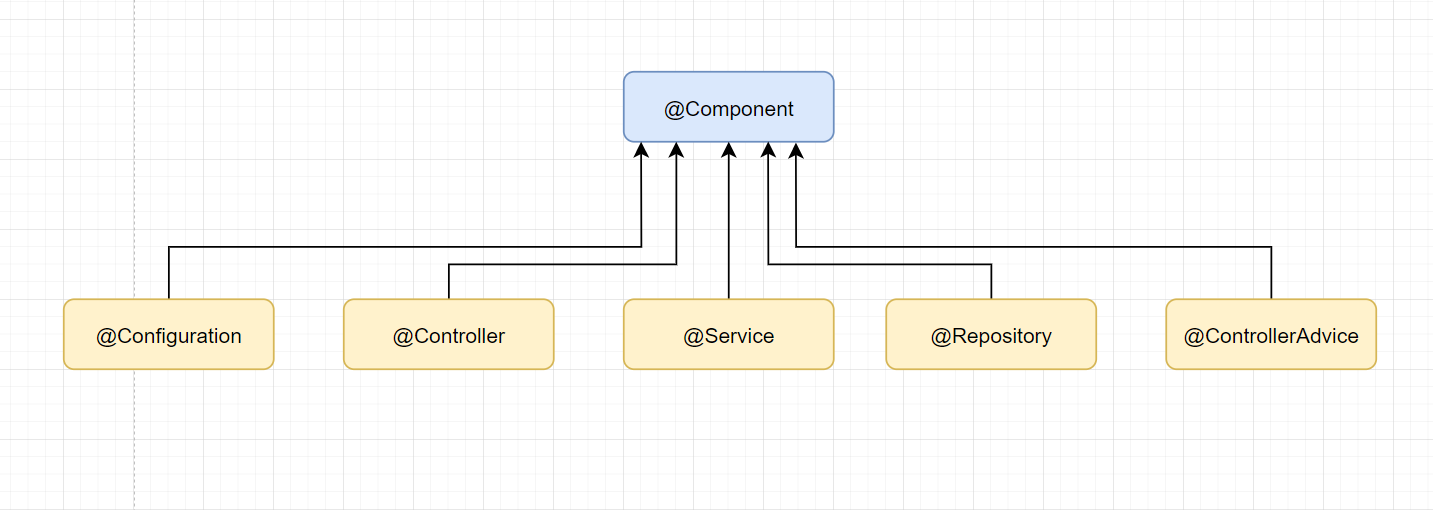
通过查看其它bean组件注解(Configuration、Controller、Service、Repository等)的源码,我们发现这些能够标识bean组件的注解都是被Component注解了的
所以我们可以认为,Configuration等注解实际上都是Component的派生注解
@Target(ElementType.TYPE)
@Retention(RetentionPolicy.RUNTIME)
@Documented
@Component
public @interface Configuration {
	@AliasFor(annotation = Component.class)
	String value() default "";
	boolean proxyBeanMethods() default true;

}
这是因为Spring在处理这些注解的时候都对标注在注解上的元注解进行了递归的处理,所有也就有了Component的派生性
通过这一点我们也可以利用Component的派生性,自定义一个由我们自己命名的注解
需求:实现一个能够被spring识别的标注bean组件的注解,被这个注解标注了的bean是单例
实现SingletonComponent
@Target(ElementType.TYPE)
@Retention(RetentionPolicy.RUNTIME)
@Documented
//标注bean为单例bean
@Scope("singleton")
@Component
public @interface SingletonComponent {
    //让这里的value值对应到Component中的value值,可以定义bean名称
    @AliasFor(annotation = Component.class, attribute = "value")
    String value() default "";
}
使用SingletonComponent
@SingletonComponent("xxstudent")
public class Student {
    public Student() {
        this.name = "xxxx" + new Random().nextInt();
    }
    private String name;

    public String getName() {
        return name;
    }

    public void setName(String name) {
        this.name = name;
    }

    @Override
    public String toString() {
        return "Student{" +
                "name=‘" + name + ‘\‘‘ +
                ‘}‘;
    }
}
测试
    public static void main(String[] args) {
        AnnotationConfigApplicationContext applicationContext = new AnnotationConfigApplicationContext(Student.class);
        Object xx1student = applicationContext.getBean("xxstudent");
        if (xx1student instanceof Student) {
            Student student = (Student) xx1student;
            System.out.println(student);
        }

        Object xx2student = applicationContext.getBean("xxstudent");
        if (xx2student instanceof Student) {
            Student student = (Student) xx2student;
            System.out.println(student);
        }
    }
输出
Student{name=‘xxxx289881135‘}
Student{name=‘xxxx289881135‘}
可以看到:通过名称已经能够获取到bean对象了,同时这个对象也是单例的对象。
标签:void load 注解 hat auto 命名 虚拟 turn 属性
原文地址:https://www.cnblogs.com/yanchuanbin/p/14610844.html