标签:style blog http io ar color os 使用 sp
第一步:右键项目->MyEclipse->添加Hibernate组件,指定数据库连接配置如下(src/hibernate.cfg.xml)(需要在mysql中设置wait_timeout变量延长连接保持时间)
<?xml version=‘1.0‘ encoding=‘UTF-8‘?>
<!DOCTYPE hibernate-configuration PUBLIC
          "-//Hibernate/Hibernate Configuration DTD 3.0//EN"
          "http://hibernate.sourceforge.net/hibernate-configuration-3.0.dtd">

<!-- Generated by MyEclipse Hibernate Tools.                   -->
<hibernate-configuration>

<session-factory>
    <property name="hbm2ddl.auto">update</property>
    <property name="dialect">
        org.hibernate.dialect.MySQLDialect
    </property>
    <property name="connection.url">
        jdbc:mysql://127.0.0.1:3306/test
    </property>
    <property name="connection.username">root</property>
    <property name="connection.password">rootpwd</property>
    <property name="connection.driver_class">
        com.mysql.jdbc.Driver
    </property>
    <property name="myeclipse.connection.profile">smartecs</property>
    <mapping resource="com/smartecs/dao/Account.hbm.xml" />

</session-factory>

</hibernate-configuration>
src/applicationContext.xml自动添加配置如下,需要将mysql-connector-{version}-java-bin.jar添加到项目的classpath中
<?xml version="1.0" encoding="UTF-8"?>
<beans
    xmlns="http://www.springframework.org/schema/beans"
    xmlns:xsi="http://www.w3.org/2001/XMLSchema-instance"
    xmlns:p="http://www.springframework.org/schema/p"
    xsi:schemaLocation="http://www.springframework.org/schema/beans http://www.springframework.org/schema/beans/spring-beans-3.0.xsd">


    <bean id="sessionFactory"
        class="org.springframework.orm.hibernate3.LocalSessionFactoryBean">
        <property name="configLocation"
            value="classpath:hibernate.cfg.xml">
        </property>
    </bean>
</beans>
第二步:创建ORM映射(可使用MyEclipse Hibernate Tool生成持久化类,可参照这里),src/com/smartecs/dao里的文件如下
package com.smartecs.dao;

import javax.persistence.Entity;
import javax.persistence.GeneratedValue;
import javax.persistence.Id;

@Entity
public class Account {
    @Id
    @GeneratedValue
    private int id;

    private String username;

    private String password;

    protected Account() {
    }
    public Account(String username, String password) {
        super();
        this.username = username;
        this.password = password;
    }
    public int getId() {
        return id;
    }
    public void setId(int id) {
        this.id = id;
    }
    public String getUsername() {
        return username;
    }
    public void setUsername(String username) {
        this.username = username;
    }
    public String getPassword() {
        return password;
    }
    public void setPassword(String password) {
        this.password = password;
    }
}
Account.hbm.xml文件如下
<?xml version="1.0" encoding="utf-8"?>
<!DOCTYPE hibernate-mapping PUBLIC "-//Hibernate/Hibernate Mapping DTD 3.0//EN"
"http://hibernate.sourceforge.net/hibernate-mapping-3.0.dtd">
<!--
    Mapping file autogenerated by MyEclipse Persistence Tools
-->
<hibernate-mapping>
    <class name="com.smartecs.dao.Account" table="account">
        <!-- 必须先定义<id>元素,后定义<property>元素 -->
        <id name="id" type="java.lang.Integer">
            <column name="id" />
            <!-- 主键的生成方式 -->
            <generator class="increment" />
        </id>
        <!-- name属性,类型为String,对应的数据库中的列为name,长度为20 -->
        <property name="username" type="java.lang.String">
            <column name="username" length="100" />
        </property>
        <property name="password" type="java.lang.String">
            <column name="passwd" length="100" />
        </property>
    </class>
</hibernate-mapping>
第三步:测试代码:
Session session = HibernateSessionFactory.getSession();
Transaction tx = session.beginTransaction();
Account account = new Account("ciaos", "ciaospwd");
try {
    session.save(account);
    tx.commit();
} catch (Exception e) {
    tx.rollback();
    e.printStackTrace();
}finally{
    session.close();
}
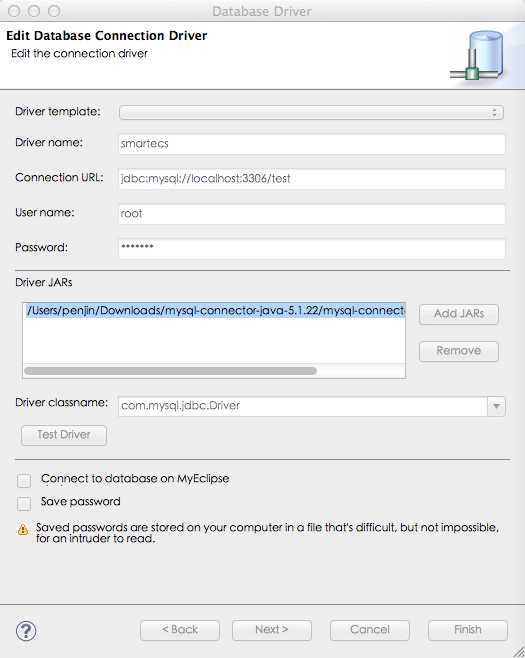
附,JDBC驱动配置如下
数据库中表结构如下:
CREATE TABLE `account` (
  `id` int(11) NOT NULL AUTO_INCREMENT,
  `username` varchar(100) DEFAULT NULL,
  `passwd` varchar(100) DEFAULT NULL,
  PRIMARY KEY (`id`)
) ENGINE=MyISAM AUTO_INCREMENT=2 DEFAULT CHARSET=latin1
标签:style blog http io ar color os 使用 sp
原文地址:http://www.cnblogs.com/ciaos/p/4119705.html