标签:
废话不多说,直接开始步骤!
1.创建一个Dynamic Web Project
2.在WEB-INF包下的lib文件夹中引入相关jar
commons-logging-1.1.1.jar
jstl.jar
spring-aop-4.0.0.RELEASE.jar
spring-beans-4.0.0.RELEASE.jar
spring-context-4.0.0.RELEASE.jar
spring-core-4.0.0.RELEASE.jar
spring-expression-4.0.0.RELEASE.jar
spring-web-4.0.0.RELEASE.jar
spring-webmvc-4.0.0.RELEASE.jar
standard.jar
3.编写web.xml文件---该文件配置SpringMVC的主控制器DispatcherServlet,该主控负责拦截请求,并将请求分发给handler控制器
<?xml version="1.0" encoding="UTF-8"?>
<web-app xmlns:xsi="http://www.w3.org/2001/XMLSchema-instance" xmlns="http://java.sun.com/xml/ns/javaee" xsi:schemaLocation="http://java.sun.com/xml/ns/javaee http://java.sun.com/xml/ns/javaee/web-app_2_5.xsd" id="WebApp_ID" version="2.5">
  <display-name>SpringMVC</display-name>
  <welcome-file-list>
    <welcome-file>index.jsp</welcome-file>
  </welcome-file-list>

  <!-- The front controller of this Spring Web application, responsible for handling all application requests -->
    <servlet>
        <servlet-name>springDispatcherServlet</servlet-name>
        <servlet-class>org.springframework.web.servlet.DispatcherServlet</servlet-class>
        <init-param>
            <param-name>contextConfigLocation</param-name>
            <param-value>classpath:springmvc.xml</param-value>
        </init-param>
        <load-on-startup>1</load-on-startup>
    </servlet>

    <!-- Map all requests to the DispatcherServlet for handling -->
    <servlet-mapping>
        <servlet-name>springDispatcherServlet</servlet-name>
        <url-pattern>/</url-pattern>
    </servlet-mapping>

</web-app>
4.编写springmvc-servlet.xml---该文件必须配置注解自动扫描包(否则注解无法使用),还必须配置视图解析器等等
<?xml version="1.0" encoding="UTF-8"?>
<beans xmlns="http://www.springframework.org/schema/beans"
    xmlns:xsi="http://www.w3.org/2001/XMLSchema-instance"
    xmlns:context="http://www.springframework.org/schema/context"
    xmlns:mvc="http://www.springframework.org/schema/mvc"
    xsi:schemaLocation="http://www.springframework.org/schema/mvc http://www.springframework.org/schema/mvc/spring-mvc-4.0.xsd
        http://www.springframework.org/schema/beans http://www.springframework.org/schema/beans/spring-beans.xsd
        http://www.springframework.org/schema/context http://www.springframework.org/schema/context/spring-context-4.0.xsd">


    <context:component-scan base-package="com.jesse"></context:component-scan>

    <bean class="org.springframework.web.servlet.view.InternalResourceViewResolver">
        <property name="prefix" value="/WEB-INF/"></property>
        <property name="suffix" value=".jsp"></property>
    </bean>

    <mvc:default-servlet-handler/>
    <mvc:annotation-driven></mvc:annotation-driven>
</beans>
5.创建三个包,如以下图所实
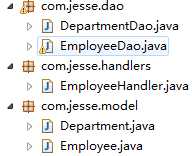
说明:由于还没整合mybatis,所以先创建一些静态数据,只要方便操作就可以
以下是三个包中的代码:
package com.jesse.model;

public class Employee {

    private Integer id;
    private String lastName;
    private String email;
    private Integer gender;
    private Department department;

    public Integer getId() {
        return id;
    }

    public void setId(Integer id) {
        this.id = id;
    }

    public String getLastName() {
        return lastName;
    }

    public void setLastName(String lastName) {
        this.lastName = lastName;
    }

    public String getEmail() {
        return email;
    }

    public void setEmail(String email) {
        this.email = email;
    }

    public Integer getGender() {
        return gender;
    }

    public void setGender(Integer gender) {
        this.gender = gender;
    }

    public Department getDepartment() {
        return department;
    }

    public void setDepartment(Department department) {
        this.department = department;
    }

    @Override
    public String toString() {
        return "Employee [id=" + id + ", lastName=" + lastName + ", email="
                + email + ", gender=" + gender + ", department=" + department
                + "]";
    }

    public Employee(Integer id, String lastName, String email, Integer gender,
            Department department) {
        super();
        this.id = id;
        this.lastName = lastName;
        this.email = email;
        this.gender = gender;
        this.department = department;
    }

    public Employee() {
        // TODO Auto-generated constructor stub
    }
}
package com.jesse.model;

public class Department {

    private Integer id;
    private String departmentName;

    public Department() {
        // TODO Auto-generated constructor stub
    }

    public Department(int i, String string) {
        this.id = i;
        this.departmentName = string;
    }

    public Integer getId() {
        return id;
    }

    public void setId(Integer id) {
        this.id = id;
    }

    public String getDepartmentName() {
        return departmentName;
    }

    public void setDepartmentName(String departmentName) {
        this.departmentName = departmentName;
    }

    @Override
    public String toString() {
        return "Department [id=" + id + ", departmentName=" + departmentName
                + "]";
    }

}
package com.jesse.dao;

import java.util.Collection;
import java.util.HashMap;
import java.util.Map;

import org.springframework.beans.factory.annotation.Autowired;
import org.springframework.stereotype.Repository;

import com.jesse.model.Department;
import com.jesse.model.Employee;

@Repository
public class EmployeeDao {

    private static Map<Integer, Employee> employees = null;

    @Autowired
    private DepartmentDao departmentDao;

    static{
        employees = new HashMap<Integer, Employee>();

        employees.put(1001, new Employee(1001, "E-AA", "aa@163.com", 1, new Department(101, "D-AA")));
        employees.put(1002, new Employee(1002, "E-BB", "bb@163.com", 1, new Department(102, "D-BB")));
        employees.put(1003, new Employee(1003, "E-CC", "cc@163.com", 0, new Department(103, "D-CC")));
        employees.put(1004, new Employee(1004, "E-DD", "dd@163.com", 0, new Department(104, "D-DD")));
        employees.put(1005, new Employee(1005, "E-EE", "ee@163.com", 1, new Department(105, "D-EE")));
    }

    private static Integer initId = 1006;

    public void save(Employee employee){
        if(employee.getId() == null){
            employee.setId(initId++);
        }

        employee.setDepartment(departmentDao.getDepartment(employee.getDepartment().getId()));
        employees.put(employee.getId(), employee);
    }

    public Collection<Employee> getAll(){
        return employees.values();
    }

    public Employee get(Integer id){
        return employees.get(id);
    }

    public void delete(Integer id){
        employees.remove(id);
    }
    public void update(Integer id,Employee employee){
        Employee emp = employees.get(id);
        emp = employee;
    }
}
package com.jesse.dao;

import java.util.Collection;
import java.util.HashMap;
import java.util.Map;

import org.springframework.stereotype.Repository;

import com.jesse.model.Department;

@Repository
public class DepartmentDao {

    private static Map<Integer, Department> departments = null;

    static{
        departments = new HashMap<Integer, Department>();

        departments.put(101, new Department(101, "D-AA"));
        departments.put(102, new Department(102, "D-BB"));
        departments.put(103, new Department(103, "D-CC"));
        departments.put(104, new Department(104, "D-DD"));
        departments.put(105, new Department(105, "D-EE"));
    }

    public Collection<Department> getDepartments(){
        return departments.values();
    }

    public Department getDepartment(Integer id){
        return departments.get(id);
    }

}
6.首先先创建index.jsp,用于跳转显示所有数据(查询)
<a href="query">query</a>
以上代码在我们运行时显示query,只要我们点击,就会跳转到控制器中调用使用@RequestMapping("query")修饰的方法
@Controller
public class EmployeeHandler {

    @Autowired
    private EmployeeDao employeeDao;

    /*
    @Autowired
    private DepartmentDao departmentDao;
    */

    /**
     * 查询
     */
    @RequestMapping("query")
    public String query(Map<String,Object> map){
        map.put("allEmployees", employeeDao.getAll());
        return "list";
    }
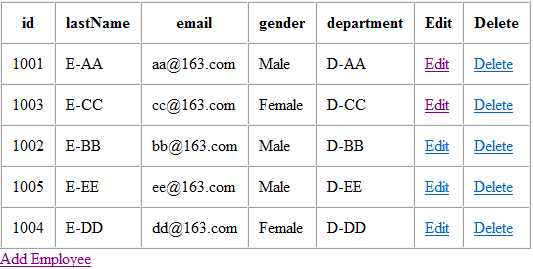
根据视图解析器的配置,当调用该方法后会跳转/WEB-INF/list.jsp页面,现在就来编写list.jsp页面,以让我们看到所有数据
<%@ page language="java" contentType="text/html; charset=ISO-8859-1"
    pageEncoding="ISO-8859-1"%>
<%@ taglib prefix="c" uri="http://java.sun.com/jsp/jstl/core" %>
<!DOCTYPE html PUBLIC "-//W3C//DTD HTML 4.01 Transitional//EN" "http://www.w3.org/TR/html4/loose.dtd">
<html>
<head>
<meta http-equiv="Content-Type" content="text/html; charset=ISO-8859-1">
<title>Insert title here</title>
</head>
<body>
    <table border="1" cellpadding="10" cellspacing="0">
        <tr>
            <th>id</th>
            <th>lastName</th>
            <th>email</th>
            <th>gender</th>
            <th>department</th>
            <th>Edit</th>
            <th>Delete</th>
        </tr>
        <c:forEach items="${requestScope.allEmployees}" var="emp">
            <tr>
                <td>${emp.id}</td>
                <td>${emp.lastName}</td>
                <td>${emp.email}</td>
                <td>${emp.gender==0?‘Female‘:‘Male‘}</td>
                <td>${emp.department.departmentName}</td>
                <td><a href="edit/${emp.id}">Edit</a></td>
                <td><a href="delete/${emp.id}">Delete</a></td>
            </tr>
        </c:forEach>
    </table>
    <a href="readyData">Add Employee</a>
</body>
</html>
查询就写好了,让大家一起来看显示的结果,界面有点粗糙,但是是练习,所有漂亮美观与否无关紧要,把握时间才重要!
7.添加数据
在上图中,只要一点击Add Employee,就会跳转到添加页面,我们要做成以下图例的样子:
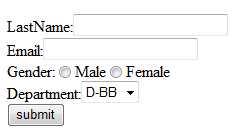
从上图看出,Department是下拉框,这意味着值必须从DepartmentDao取,所以我们得通过handler来取值
@RequestMapping("readyData")
    public String readyData(Map<String,Object> map){
        map.put("department", departmentDao.getDepartments());
        map.put("employee", new Employee());
        //map.put("actionType", "add");
        return "addPage";
    }
创建一个addPage.jsp的页面
<%@ page language="java" contentType="text/html; charset=ISO-8859-1"
    pageEncoding="ISO-8859-1"%>
<%@ taglib prefix="form" uri="http://www.springframework.org/tags/form" %>
<%@ taglib prefix="c" uri="http://java.sun.com/jsp/jstl/core" %>
<%@page import="java.util.Map"%>
<%@page import="java.util.HashMap"%>
<!DOCTYPE html PUBLIC "-//W3C//DTD HTML 4.01 Transitional//EN" "http://www.w3.org/TR/html4/loose.dtd">
<html>
<head>
<meta http-equiv="Content-Type" content="text/html; charset=ISO-8859-1">
<title>Insert title here</title>
<%
String path = request.getContextPath();
String basePath = request.getScheme()+"://"+request.getServerName()+":"+request.getServerPort()+path+"/";
%>
<!DOCTYPE html PUBLIC "-//W3C//DTD HTML 4.01 Transitional//EN" "http://www.w3.org/TR/html4/loose.dtd">
<html>
<head>
<base href="<%=basePath%>">
</head>
<body>
    <form:form action="add"  method="post" modelAttribute="employee">
        <form:hidden path="id"/>
        LastName:<form:input path="lastName"/><br>
        Email:<form:input path="email"/><br>
        <%
            Map<String,String> gender = new HashMap();
            gender.put("0", "Female");
            gender.put("1","Male");
            request.setAttribute("gender",gender);
        %>
        Gender:<form:radiobuttons path="gender" items="${gender}"/><br>
        Department:<form:select path="department.id" items="${department}" itemValue="id" itemLabel="departmentName">
        </form:select><br>
        <input type="submit" value="submit">
    </form:form>
</body>
</html>
也许大家注意到了,为什么方法中要存放一个空的Employee对象--->map.put("employee", new Employee()); 而addPage.jsp表单标签中也使用了该属性modelAttribute="employee",原因在于回显数据的功能,它认为我们肯定在更新数据时都要回显数据,所以必须有一个对象和表单内的属性一一对应,一个没对应都会异常,由于我们是添加数据,而不是回显数据,所有传入一个空的对象即可,当submit后,就会去寻找以下方法:
@RequestMapping("add")
    public String addEmployee(Employee employee){
        employeeDao.save(employee);
        return "redirect:/query";
    }
添加成功就重定向到查询结果集页面
8.删除数据
删除数据只要在方法中传入要删除数据的id,即可删除
在结果集点击Delete后,直接调用以下方法:
@RequestMapping(value="delete/{id}",method=RequestMethod.GET)
    public String delete(@PathVariable("id") Integer id){
        employeeDao.delete(id);
        return "redirect:/query";
    }
同样的是删除成功后重定向到查询结果集页面
9.更新数据,也是整个增删改成最繁琐的,涉及到回显数据,以及@ModelAttribute的使用等等
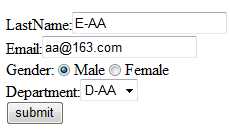
在结果集点击Edit,跳转到修改数据页面,该页面之前是添加数据的页面,不同得是之前传的employee对象new出来的一个空对象,而现在传的employee是已查询出来的一个对象
回显数据:
@RequestMapping("edit/{id}")
    public String updateEmployee(@PathVariable("id") Integer id,
            Map<String,Object> map){
        map.put("employee", employeeDao.get(id));
        map.put("actionType", "update");
        map.put("department", departmentDao.getDepartments());
        return "addPage";
    }
说明:map中key值为employee的对象,是通过@PathVariable("id")获得的,就相当于根据id来获取结果集中的某一条记录,然后将该记录放入map中,并且这条记录必须和刚才的添加页面的modelAttribute="employee"的值是对应的,也就是表单标签具备回显功能,只要这两个值对应,自动把那条记录传入进来,结果为:
但是一个问题来了,更新页面其实是使用的之前的添加页面,而action值为add,这时需要进行修改,否则提交的都是add方法
在add方法和updateEmployee方法都放上一个actionType作为判断依据:
map.put("actionType", "update");
map.put("actionType","add");
然后再提交页面进行判断:
<form:form action="${requestScope.actionType==‘add‘?‘add‘:‘update‘}"  method="post" modelAttribute="employee">
        <form:hidden path="id"/>
        LastName:<form:input path="lastName"/><br>
        Email:<form:input path="email"/><br>
        <%
            Map<String,String> gender = new HashMap();
            gender.put("0", "Female");
            gender.put("1","Male");
            request.setAttribute("gender",gender);
        %>
        Gender:<form:radiobuttons path="gender" items="${gender}"/><br>
        Department:<form:select path="department.id" items="${department}" itemValue="id" itemLabel="departmentName">
        </form:select><br>
        <input type="submit" value="submit">
    </form:form>
如果传入进来的actionType是update,调用控制器方法更新:
@RequestMapping("update")
    public String update(@RequestParam(value="id") Integer id,Employee employee){
        employeeDao.update(id, employee);
        return "redirect:/query";
    }
必须要注意的是:
必须使用@ModelAttribute编写一个方法,在update调用前查询出数据,然后将要更新的值直接更新,不更新的值保持之前查询数来的值,比如:
Employee[name=spring age=10 salary=2000]这时如果只更新salary的值,我们想要的结果如下:
Employee[name=spring age=10 salary=3000]
@ModelAttribute
    public void solvePro(@RequestParam(value="id",required=false)Integer id,
            Map<String,Object> map){
        if (id != null) {
            map.put("employee", employeeDao.get(id));
        }
    }
缺少以上方法,那更新结果就变成:
Employee[name=null age=null salary=3000]
整个增删改成的过程就是这样,可能表述的不是很清楚,欢迎提出您的困惑!
标签:
原文地址:http://www.cnblogs.com/Json1208/p/4332539.html