标签:
传统模式下,一般利用servlet+jsp来完成前后台的交互,但是现在随着技术的进步,利用rest总线作为数据访问一种方式成为一种流行。本片博文主要利用Jersey搭建rest服务,并且利用mybatis作为数据库访问方式构建一个从前台到后台交互并且实现数据持久化的一个完整架构。
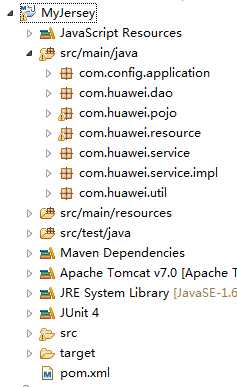
1,首先构建一个maven web项目,项目结构如下:
其中pom.xml文件中的dependency如下:
<dependencies>
        <!--jersey -->
        <dependency>
            <groupId>org.glassfish.jersey.containers</groupId>
            <artifactId>jersey-container-servlet-core</artifactId>
            <version>2.0</version>
        </dependency>

        <!--JAXB API -->
        <dependency>
            <groupId>javax.xml.ws</groupId>
            <artifactId>jaxws-api</artifactId>
            <version>2.1</version>
        </dependency>

        <!-- Json支持 -->
        <dependency>
            <groupId>org.codehaus.jackson</groupId>
            <artifactId>jackson-core-asl</artifactId>
            <version>1.9.12</version>
        </dependency>
        <dependency>
            <groupId>org.codehaus.jackson</groupId>
            <artifactId>jackson-mapper-asl</artifactId>
            <version>1.9.12</version>
        </dependency>
        <dependency>
            <groupId>org.codehaus.jackson</groupId>
            <artifactId>jackson-jaxrs</artifactId>
            <version>1.9.12</version>
        </dependency>
        <dependency>
            <groupId>log4j</groupId>
            <artifactId>log4j</artifactId>
            <version>1.2.14</version>
        </dependency>
        <dependency>
            <groupId>junit</groupId>
            <artifactId>junit</artifactId>
            <version>3.8.1</version>
            <scope>test</scope>
        </dependency>
        <dependency>
            <groupId>net.sf.json-lib</groupId>
            <artifactId>json-lib</artifactId>
            <version>2.3</version>
        </dependency>
        <dependency>
            <groupId>org.springframework</groupId>
            <artifactId>spring-core</artifactId>
            <version>3.2.4.RELEASE</version>
        </dependency>
        <dependency>
            <groupId>commons-dbcp</groupId>
            <artifactId>commons-dbcp</artifactId>
            <version>1.2.2</version>
        </dependency>
        <dependency>
            <groupId>org.springframework</groupId>
            <artifactId>spring-context</artifactId>
            <version>3.2.4.RELEASE</version>
        </dependency>
        <dependency>
            <groupId>org.springframework</groupId>
            <artifactId>spring-jdbc</artifactId>
            <version>3.2.4.RELEASE</version>
        </dependency>
        <dependency>
            <groupId>org.aspectj</groupId>
            <artifactId>aspectjweaver</artifactId>
            <version>1.8.5</version>
        </dependency>
        <dependency>
            <groupId>mysql</groupId>
            <artifactId>mysql-connector-java</artifactId>
            <version>5.1.6</version>
        </dependency>
        <dependency>
            <groupId>org.mybatis</groupId>
            <artifactId>mybatis-spring</artifactId>
            <version>1.2.0</version>
        </dependency>
        <dependency>
            <groupId>org.mybatis</groupId>
            <artifactId>mybatis</artifactId>
            <version>3.3.0</version>
        </dependency>
    </dependencies>
    <build>
        <finalName>MyJersey</finalName>
        <plugins>
            <plugin>
                <artifactId>maven-compiler-plugin</artifactId>
                <configuration>
                    <source>1.6</source>
                    <target>1.6</target>
                </configuration>
            </plugin>
            <plugin>
                <groupId>org.codehaus.mojo</groupId>
                <artifactId>tomcat-maven-plugin</artifactId>
                <configuration>
                    <warFile>target/jerseywstest.war</warFile>
                </configuration>
            </plugin>
        </plugins>
    </build>
2,下面创建pojo对象,我们以Student这个类作为我们这个项目的主导bean,代码如下:
package com.huawei.service.impl;

import java.util.List;

import com.huawei.dao.StudentDao;
import com.huawei.pojo.Student;
import com.huawei.service.StudentService;

public class StudentServiceImpl implements StudentService {

    private StudentDao studentDao;

    public StudentDao getStudentDao() {
        return studentDao;
    }
    public void setStudentDao(StudentDao studentDao) {
        this.studentDao = studentDao;
    }
    @Override
    public int countAll() {
        return this.studentDao.countAll();
    }
    @Override
    public List<Student> getAllStudents() {
        return studentDao.getAllStudents();
    }
}
接下来是数据访问层StudentDao:
package com.huawei.dao;

import java.util.List;

import com.huawei.pojo.Student;

public interface StudentDao {
    public int countAll();
    public List<Student> getAllStudents();
}
下面创建业务接口以及对应实现:
package com.huawei.service;

import java.util.List;

import com.huawei.pojo.Student;

public interface StudentService {
    public int countAll();
    public List<Student> getAllStudents();
}
实现类:
package com.huawei.service.impl;

import java.util.List;

import com.huawei.dao.StudentDao;
import com.huawei.pojo.Student;
import com.huawei.service.StudentService;

public class StudentServiceImpl implements StudentService {

    private StudentDao studentDao;


    public StudentDao getStudentDao() {
        return studentDao;
    }


    public void setStudentDao(StudentDao studentDao) {
        this.studentDao = studentDao;
    }


    @Override
    public int countAll() {
        return this.studentDao.countAll();
    }


    @Override
    public List<Student> getAllStudents() {
        return studentDao.getAllStudents();
    }

}
3,为了容易获取spring的配置文件中定义的业务bean,我们定义一个ServiceUtil类作为获取业务bean的工具类.
package com.huawei.util;

import org.springframework.context.ApplicationContext;
import org.springframework.context.support.ClassPathXmlApplicationContext;

import com.huawei.service.StudentService;

public class ServiceUtil {

    public static ApplicationContext context = new ClassPathXmlApplicationContext("applicationContext.xml");

    public static StudentService getStudentService(){
        StudentService service = (StudentService)context.getBean("studentService");
        return service;
    }

}
4,下面我们定义能够通过rest访问的资源类,该资源类主要调用业务层定义的服务,完成相关业务构建,具体代码如下:
package com.huawei.resource;


import java.util.List;

import javax.ws.rs.GET;
import javax.ws.rs.Path;
import javax.ws.rs.Produces;
import javax.ws.rs.core.MediaType;

import org.apache.log4j.Logger;

import com.huawei.pojo.Student;
import com.huawei.service.StudentService;
import com.huawei.util.ServiceUtil;

@Path("/students")
public class StudentResource {

    private static Logger logger = Logger.getLogger(StudentResource.class);

    @GET
    @Path("/getStudentJson")
    @Produces({MediaType.APPLICATION_JSON })
    public Student getStudent() {
        Student stu = new Student();
        stu.setDept("huawei");
        stu.setId(100);
        stu.setName("liushaocun");
        return stu;
    }

    @GET
    @Path("/getAllStudents")
    @Produces({MediaType.APPLICATION_JSON })
    public List<Student> getAllStudents(){
        StudentService service = ServiceUtil.getStudentService();
        List<Student> list = service.getAllStudents();
        return list;
    }

}
5,applicationContext.xml文件作为spring的配置文件,可以放在src/main/resource资源包下,可以利用ClassPathXmlApplicationContext方法获取该配置文件,配置文件内容如下:
<?xml version="1.0" encoding="UTF-8" ?>
<beans xmlns="http://www.springframework.org/schema/beans"
    xmlns:xsi="http://www.w3.org/2001/XMLSchema-instance" xmlns:p="http://www.springframework.org/schema/p"
    xmlns:context="http://www.springframework.org/schema/context"
    xmlns:aop="http://www.springframework.org/schema/aop" xmlns:tx="http://www.springframework.org/schema/tx"
    xsi:schemaLocation="http://www.springframework.org/schema/beans
       http://www.springframework.org/schema/beans/spring-beans-3.0.xsd
       http://www.springframework.org/schema/context
       http://www.springframework.org/schema/context/spring-context-3.0.xsd
       http://www.springframework.org/schema/tx
       http://www.springframework.org/schema/tx/spring-tx-3.0.xsd
       http://www.springframework.org/schema/aop
       http://www.springframework.org/schema/aop/spring-aop-3.0.xsd">

    <!-- 扫描类包,将标注Spring注解的类自动转化Bean,同时完成Bean的注入 -->
    <context:component-scan base-package="com.lsc.SpringJDBC" />

    <!-- 配置数据源 -->
    <bean id="dataSource" class="org.apache.commons.dbcp.BasicDataSource"
        destroy-method="close" p:driverClassName="com.mysql.jdbc.Driver"
        p:url="jdbc:mysql://localhost:3306/sampledb" p:username="root"
        p:password="405424" />

    <bean id="sqlSessionFactory" class="org.mybatis.spring.SqlSessionFactoryBean">
        <property name="configLocation" value="classpath:MyBatis-Configuration.xml"></property>
        <property name="dataSource" ref="dataSource" />
    </bean>

    <bean id="studentDao" class="org.mybatis.spring.mapper.MapperFactoryBean">
        <property name="mapperInterface" value="com.huawei.dao.StudentDao"></property>
        <property name="sqlSessionFactory" ref="sqlSessionFactory"></property>
    </bean>

    <bean id="studentService" class="com.huawei.service.impl.StudentServiceImpl">
        <property name="studentDao" ref="studentDao"></property>
    </bean>

</beans>
6,mybatis配置文件以及StudentDao数据访问层对应的Mybatis的Mapper文件如下:
Mybatis-configuration.xml
<?xml version="1.0" encoding="UTF-8" ?>
<!DOCTYPE configuration PUBLIC "-//mybatis.org//DTD Config 3.0//EN"
"http://mybatis.org/dtd/mybatis-3-config.dtd">
<configuration>
    <mappers>
        <mapper resource="StudentDaoMapper.xml"/>
    </mappers>
</configuration>
StudentDaoMapper.xml
<?xml version="1.0" encoding="UTF-8" ?>
<!DOCTYPE mapper PUBLIC "-//mybatis.org//DTD Mapper 3.0//EN" "http://mybatis.org/dtd/mybatis-3-mapper.dtd">
<mapper namespace="com.huawei.dao.StudentDao">
    <select id="countAll" resultType="int">
        select count(*) from student;
    </select>

    <resultMap type="com.huawei.pojo.Student" id="t_student">
        <id column="id" property="id" />
        <result column="id" property="id" />
        <result column="name" property="name" />
        <result column="dept" property="dept" />
    </resultMap>

    <select id="getAllStudents" resultMap="t_student">
        select * from student;
    </select>
</mapper>
7,我们还要为Jersey定义一个resource的容器配置文件APIApplication.java,主要是服务定义的Resource在该容器内进行注册:
package com.config.application;

import org.codehaus.jackson.jaxrs.JacksonJsonProvider;
import org.glassfish.jersey.filter.LoggingFilter;
import org.glassfish.jersey.server.ResourceConfig;

import com.huawei.resource.HelloResource;
import com.huawei.resource.RegisterResource;
import com.huawei.resource.StudentResource;

public class APIApplication extends ResourceConfig{
    public APIApplication() {
        //加载Resource
        register(HelloResource.class);
        register(StudentResource.class);
        register(RegisterResource.class);

        //注册数据转换器
        register(JacksonJsonProvider.class);
        // Logging.
        register(LoggingFilter.class);
    }
}
8,最后我们还需要在WEB-INF下面的web.xml文件进行相关定义,定义如下:
<!DOCTYPE web-app PUBLIC
 "-//Sun Microsystems, Inc.//DTD Web Application 2.3//EN"
 "http://java.sun.com/dtd/web-app_2_3.dtd" >

<web-app>
  <display-name>Archetype Created Web Application</display-name>
  <servlet>
    <servlet-name>JerseyServlet</servlet-name>
    <servlet-class>org.glassfish.jersey.servlet.ServletContainer</servlet-class>
    <init-param>
        <param-name>javax.ws.rs.Application</param-name>
        <param-value>com.config.application.APIApplication</param-value>
    </init-param>

    <load-on-startup>1</load-on-startup>
</servlet>
<servlet-mapping>
    <servlet-name>JerseyServlet</servlet-name>
    <url-pattern>/services/*</url-pattern>
</servlet-mapping>
</web-app>
9,然后可以在webapp定义相关网页文件,可以通过ajax访问StudentResource中的路径获取相关数据。
标签:
原文地址:http://www.cnblogs.com/liusc0424/p/4614649.html