标签:
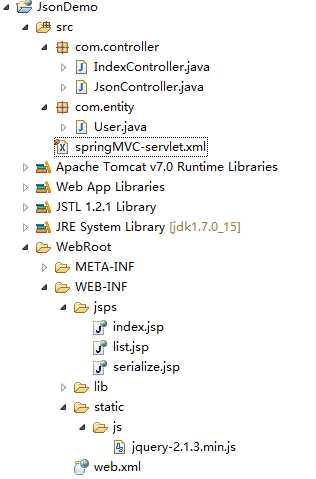
这里用的是spring4.1.4,jquery2.1.3,其它环境为:myeclipse2014,tomcat7,jdk7


 1 <?xml version="1.0" encoding="UTF-8"?>
 2 <beans xmlns="http://www.springframework.org/schema/beans"
 3 xmlns:context="http://www.springframework.org/schema/context" xmlns:p="http://www.springframework.org/schema/p"
 4 xmlns:mvc="http://www.springframework.org/schema/mvc" xmlns:xsi="http://www.w3.org/2001/XMLSchema-instance"
 5 xsi:schemaLocation="http://www.springframework.org/schema/beans
 6 http://www.springframework.org/schema/beans/spring-beans-4.1.xsd
 7 http://www.springframework.org/schema/context
 8 http://www.springframework.org/schema/context/spring-context.xsd
 9 http://www.springframework.org/schema/mvc
10 http://www.springframework.org/schema/mvc/spring-mvc-4.1.xsd">
11
12 <!-- 启用注解 -->
13 <mvc:annotation-driven />
14
15 <!-- 配置默认首页 -->
16 <mvc:view-controller path="/" view-name="index"/>
17
18 <!-- 处理对静态资源的访问请求 -->
19 <mvc:resources location="/WEB-INF/static/js/" mapping="/js/**"/>
20
21 <!-- 扫描controller注解 -->
22 <context:component-scan base-package="com.controller" />
23
24 <!-- 解析视图 -->
25 <bean
26 class="org.springframework.web.servlet.view.InternalResourceViewResolver">
27 <property name="viewClass"
28 value="org.springframework.web.servlet.view.JstlView" />
29 <property name="prefix" value="/WEB-INF/jsps/" />
30 <property name="suffix" value=".jsp" />
31 </bean>
32
33 </beans>
<?xml version="1.0" encoding="UTF-8"?>
<web-app xmlns:xsi="http://www.w3.org/2001/XMLSchema-instance"
xmlns="http://java.sun.com/xml/ns/javaee"
xsi:schemaLocation="http://java.sun.com/xml/ns/javaee http://java.sun.com/xml/ns/javaee/web-app_3_0.xsd"
id="WebApp_ID" version="3.0">
<display-name>JsonDemo</display-name>

<servlet>
<servlet-name>springMVC</servlet-name>
<servlet-class>org.springframework.web.servlet.DispatcherServlet</servlet-class>
<init-param>
<param-name>contextConfigLocation</param-name>
<param-value>classpath*:springMVC-servlet.xml</param-value>
</init-param>
<load-on-startup>1</load-on-startup>
</servlet>

<servlet-mapping>
<servlet-name>springMVC</servlet-name>
<url-pattern>/</url-pattern>
</servlet-mapping>
</web-app>
public class User
{
private Integer id;
private String username;
private String password;
private String address;

//getter and setter
}
<table id="tab">
<tr>
<th>Id</th>
<th>username</th>
<th>password</th>
<th>address</th>
</tr>
</table>
 1 $(document).ready(
 2 function() {
 3 //当页面载入完成后,通过$.post方法从后台获取到list数据,并将它们插入到表格中
 4 //data是后台返回的json字符串,statusText为error或者success
 5 $.post("user/list", function(data, statusText) {
 6
 7 for (var i = 0; i < data.length; i++) {
 8 var temp = "<tr>";
 9 temp += "<td>" + data[i].id + "</td><td>"
10 + data[i].username + "</td><td>"
11 + data[i].password + "</td><td>"
12 + data[i].address + "</td>";
13 $(‘#tab‘).append(temp + "</tr>");
14 }
15
16 }, "json");
17 });
 1 @Controller
 2 @RequestMapping("/user")
 3 public class JsonController
 4 {
 5 @RequestMapping("/list")
 6 public String getAllUser(Model model)
 7 {
 8 return "list";
 9 }
10
11 @RequestMapping(value = "/list", method = RequestMethod.POST)
12 @ResponseBody
13 public String userListJson(Model model)
14 {
15 Gson gson = new Gson();
16 String str = gson.toJson(createUserList(5));
17 return str;
18 }
19 //创建5个用户
20 private List<User> createUserList(Integer count)
21 {
22 List<User> result = new ArrayList<User>();
23 for (int i = 1; i <= count; i++)
24 {
25 User user = new User();
26 user.setId(i);
27 user.setUsername("user" + i);
28 user.setPassword("admin" + i);
29 user.setAddress(i + "地区");
30 result.add(user);
31 }
32 return result;
33 }
34 }
<form id="test">
<table>
<tr>
<th>Id</th>
<td><input type="text" name="id"></td>
</tr>
<tr>
<th>username</th>
<td><input type="text" name="username"></td>
</tr>
<tr>
<th>password</th>
<td><input type="text" name="password"></td>
</tr>
<tr>
<th>address</th>
<td><select name="address">
<option value="beijing">北京</option>
<option value="shanghai">上海</option>
<option value="guangzhou">广州</option>
</select></td>
</tr>
</table>
</form>
<button id="btn1">添加</button>
<table id="tab">
<tr>
<th>Id</th>
<th>username</th>
<th>password</th>
<th>address</th>
</tr>
</table>
                //当用户点击id为btn1的按钮时,通过serializeArray()方法获取到表单中的数据,然后通过$.each将
//这些数据封装成json对象,最后使用JSON.stringify()方法将json对象转换成json字符串并发送给后台
$(‘#btn1‘).click(
function() {
var str = $(‘#test‘).serializeArray();
var sendData = {};
$.each(str, function() {
if (this.value == null) {
sendData[this.name] = ‘‘;
} else {
sendData[this.name] = this.value;
}

});
$.ajaxSetup({
contentType : ‘application/json‘
});
//同上
$.post("user/add", JSON.stringify(sendData),
function(data, statusText) {
var temp = "<tr>";
temp += "<td>" + data.id + "</td><td>"
+ data.username + "</td><td>"
+ data.password + "</td><td>"
+ data.address + "</td>";
$(‘#tab‘).append(temp + "</tr>");

}, "json");
});
1 @RequestMapping(value = "/add", method = RequestMethod.POST)
2 @ResponseBody
3 public String getJsonMsg(@RequestBody User user)
4 {
5 System.out.println(user.getId() + "|" + user.getUsername() + "|"
6 + user.getPassword() + "|" + user.getAddress());
7 return new Gson().toJson(user);
8 }


标签:
原文地址:http://www.cnblogs.com/fange666/p/4725026.html