标签:

Apache CXF =Celtix + XFire,Apache CXF 的前身叫 Apache CeltiXfire,现在已经正式更名为 Apache CXF 了,以下简称为 CXF。CXF 继承了 Celtix 和 XFire 两大开源项目的精华,提供了对 JAX-WS 全面的支持,并且提供了多种 Binding 、DataBinding、Transport 以及各种 Format 的支持,并且可以根据实际项目的需要,采用代码优先(Code First)或者 WSDL 优先(WSDL First)来轻松地实现 Web Services 的发布和使用。Apache CXF已经是一个正式的Apache顶级项目。
Apache CXF 是一个开源的Services 框架,CXF 帮助您利用 Frontend 编程 API 来构建和开发 Services ,像 JAX-WS 。这些 Services 可以支持多种协议,比如:SOAP、XML/HTTP、RESTful HTTP 或者 CORBA ,并且可以在多种传输协议上运行,比如:HTTP、JMS 或者 JBI,CXF 大大简化了 Services 的创建,同时它继承了 XFire 传统,一样可以天然地和 Spring 进行无缝集成。
我们使用MyEclipse集成开发环境学习CXF。
首先是服务接口:
这里的接口需要使用Annotation @WebService 描述,接口中的方法如果有参数,需要使用@WebParam来修饰,并使用属性name来定义名字,不然发布后,参数会使用默认的args0…
[java] view plaincopyprint?
package ws;
import javax.jws.WebService;
import ws.medo.User;
public interface HelloWorld {
public User sayHello(String name,User user);
}
package ws;

import javax.jws.WebService;

import ws.medo.User;

@WebService
public interface HelloWorld {

	public User sayHello(String name,User user);

}
接下来写一个接口的实现类:
[java] view plaincopyprint?
package ws.impl;
import javax.jws.WebService;
import ws.HelloWorld;
import ws.medo.Cat;
import ws.medo.User;
@WebService (endpointInterface = "ws.HelloWorld",serviceName="HelloGT")
public class HelloWorldImpl implements HelloWorld{
@Override
public User sayHello(String name, User user) {
System.out.println(user.getName());
user.getList().add(new Cat("1"));
user.getList().add(new Cat("2"));
return user;
}
}
package ws.impl;

import javax.jws.WebService;

import ws.HelloWorld;
import ws.medo.Cat;
import ws.medo.User;

@WebService(endpointInterface = "ws.HelloWorld",serviceName="HelloGT")
public class HelloWorldImpl implements HelloWorld{

	@Override
	public User sayHello(String name, User user) {
		System.out.println(user.getName());

		user.getList().add(new Cat("1"));
		user.getList().add(new Cat("2"));
		return user;
	}

}
在WEB-INF文件夹下新建一个beans.xml。
这是一个Spring的配置文件,首先要导入几个cxf使用的xml文件,然后定义我们刚才写好的服务。
[html] view plaincopyprint?
<?xml version="1.0" encoding="UTF-8"?>
<beans xmlns="http://www.springframework.org/schema/beans"
	xmlns:xsi="http://www.w3.org/2001/XMLSchema-instance" xmlns:jaxws="http://cxf.apache.org/jaxws"
	xsi:schemaLocation="
http://www.springframework.org/schema/beans http://www.springframework.org/schema/beans/spring-beans.xsd
http://cxf.apache.org/jaxws http://cxf.apache.org/schemas/jaxws.xsd">

	<import resource="classpath:META-INF/cxf/cxf.xml" />
	<import resource="classpath:META-INF/cxf/cxf-extension-soap.xml" />
	<import resource="classpath:META-INF/cxf/cxf-servlet.xml" />

	<bean id="service1" class="ws.impl.HelloWorldImpl"></bean>

	<jaxws:endpoint id="hello" implementor="#service1" address="/HelloWorldService" />


</beans>
<?xml version="1.0" encoding="UTF-8"?> <beans xmlns="http://www.springframework.org/schema/beans" xmlns:xsi="http://www.w3.org/2001/XMLSchema-instance" xmlns:jaxws="http://cxf.apache.org/jaxws" xsi:schemaLocation=" http://www.springframework.org/schema/beans http://www.springframework.org/schema/beans/spring-beans.xsd http://cxf.apache.org/jaxws http://cxf.apache.org/schemas/jaxws.xsd"> <import resource="classpath:META-INF/cxf/cxf.xml" /> <import resource="classpath:META-INF/cxf/cxf-extension-soap.xml" /> <import resource="classpath:META-INF/cxf/cxf-servlet.xml" /> <bean id="service1" class="ws.impl.HelloWorldImpl"></bean> <jaxws:endpoint id="hello" implementor="#service1" address="/HelloWorldService" /> </beans>
我们来看一下web.xml的配置
[html] view plaincopyprint?
<?xml version="1.0" encoding="UTF-8"?>
<web-app version="2.5" xmlns="http://java.sun.com/xml/ns/javaee"
	xmlns:xsi="http://www.w3.org/2001/XMLSchema-instance"
	xsi:schemaLocation="http://java.sun.com/xml/ns/javaee
	http://java.sun.com/xml/ns/javaee/web-app_2_5.xsd">
	<listener>
		<listener-class>org.springframework.web.context.ContextLoaderListener</listener-class>
	</listener>

	<context-param>
		<param-name>contextConfigLocation</param-name>
		<param-value>/WEB-INF/beans.xml</param-value>
	</context-param>

	<servlet>
		<servlet-name>HelloWorldService</servlet-name>
		<servlet-class>org.apache.cxf.transport.servlet.CXFServlet</servlet-class>
		<load-on-startup>1</load-on-startup>
	</servlet>
	<servlet-mapping>
		<servlet-name>HelloWorldService</servlet-name>
		<url-pattern>/services/*</url-pattern>
	</servlet-mapping>


	<welcome-file-list>
		<welcome-file>index.jsp</welcome-file>
	</welcome-file-list>
</web-app>
<?xml version="1.0" encoding="UTF-8"?> <web-app version="2.5" xmlns="http://java.sun.com/xml/ns/javaee" xmlns:xsi="http://www.w3.org/2001/XMLSchema-instance" xsi:schemaLocation="http://java.sun.com/xml/ns/javaee http://java.sun.com/xml/ns/javaee/web-app_2_5.xsd"> <listener> <listener-class>org.springframework.web.context.ContextLoaderListener</listener-class> </listener> <context-param> <param-name>contextConfigLocation</param-name> <param-value>/WEB-INF/beans.xml</param-value> </context-param> <servlet> <servlet-name>HelloWorldService</servlet-name> <servlet-class>org.apache.cxf.transport.servlet.CXFServlet</servlet-class> <load-on-startup>1</load-on-startup> </servlet> <servlet-mapping> <servlet-name>HelloWorldService</servlet-name> <url-pattern>/services/*</url-pattern> </servlet-mapping> <welcome-file-list> <welcome-file>index.jsp</welcome-file> </welcome-file-list> </web-app>
将项目成功部署到Tomcat后,启动Tomcat,访问
http://localhost:8080/Cxf_webService/services,会看到如图 3所示的页面
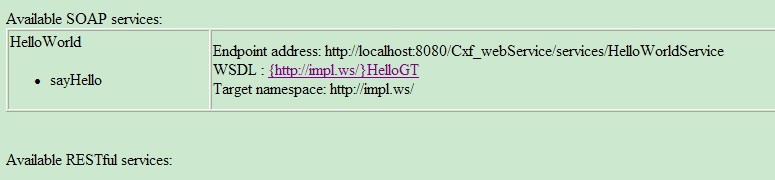
ok 服务器端就打工告成了。。。。。。。。。。。。。。。。。。。。。。。。。。。。。。。。。。。。。。。。。。
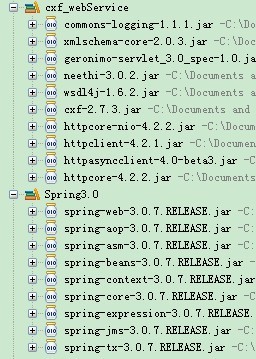
1,首先创建客户端项目,然后同上导入jar包,无需spring的
2,获取服务服务接口类(类似于C/C++中的.h头文件)
1) 安装cxf,设置环境变量,如:D:/Apache/apache-cxf-2.2.4;同时,PATH后加上“;%CXF_HOME%/bin”(可选)。wsdl2java的用法如下:
wsdl2java –p 包名 –d 目录名 wsdl路径
如:wsdl2java –p demo.service.client –d e:/src htt://localhost:8080/helloWorld?wsdl
-p 指定其wsdl的命名空间,也就是要生成代码的包名
-d 指定要产生代码所在目录
-client 生成客户端测试web service的代码
-server 生成服务器启动web service的代码
-impl 生成web service的实现代码
-ant 生成build.xml文件
-compile 生成代码后编译
-quient 静默模式,不输出警告与错误信息
-all 生成所有开始端点代码:types,service proxy,service interface, server mainline, client mainline, implementation object, and an Ant build.xml file.
2) 执行wsdl2java批处理程序,如:
wsdl2java -p cxf.test -d d:/src -server http://localhost:8080/CXFTomcat/services/ HelloWorld?wsdl
3) 将java接口类导入项目。
上一步生成的java类文件很多,一般的应用中只要将说明接口的那个类文件导入项目即可,如上例生成的HelloWorld.java文件。
注意:有些版本拷贝后,类中的super()会出错,要加上-frontend jaxws21
本实例的//wsdl2java -frontend jaxws21 –p gt.client –d e:\myeclipse\Cxf_Client\src http://localhost:8080/Cxf_webService/services/HelloWorldService?wsdl
拷贝完毕后如下图:

3,调用类
[java] view plaincopyprint?
import gt.client.HelloGT;
import gt.client.HelloWorld;
import gt.client.User;


public class ClientStartMain {
//wsdl2java -frontend jaxws21 –p gt.client –d e:\myeclipse\Cxf_Client\src http://localhost:8080/Cxf_webService/services/HelloWorldService?wsdl
	public static void main(String[] args)
	{
		HelloGT gt=new HelloGT();
		HelloWorld hello=gt.getHelloWorldImplPort();
		User user=new User();
		user.setName("123");
		//System.out.println(hello.sayHello("1",user));
		System.out.println(hello.sayHello("1",user).getList().size()+":"+hello.sayHello("1",user).getList().get(0).getName());
	}


}
import gt.client.HelloGT;
import gt.client.HelloWorld;
import gt.client.User;
public class ClientStartMain {
//wsdl2java -frontend jaxws21 –p gt.client –d e:\myeclipse\Cxf_Client\src http://localhost:8080/Cxf_webService/services/HelloWorldService?wsdl
public static void main(String[] args)
{
HelloGT gt=new HelloGT();
HelloWorld hello=gt.getHelloWorldImplPort();
User user=new User();
user.setName("123");
//System.out.println(hello.sayHello("1",user));
System.out.println(hello.sayHello("1",user).getList().size()+":"+hello.sayHello("1",user).getList().get(0).getName());
}
}
打印内容如下:
2013-2-23 13:03:35 org.apache.cxf.service.factory.ReflectionServiceFactoryBean buildServiceFromWSDL
信息: Creating Service {http://impl.ws/}HelloGT from WSDL: http://localhost:8080/Cxf_webService/services/HelloWorldService?wsdl
2:1
ok 客户端也ok了
标签:
原文地址:http://my.oschina.net/sniperLi/blog/494323