标签:
接下来,我们要做的是团购界面的设计,最张要实现的效果图及项目结构图
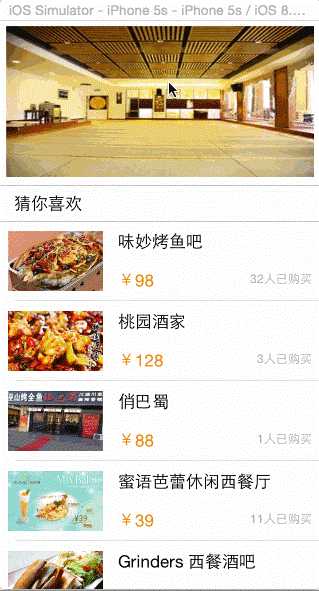
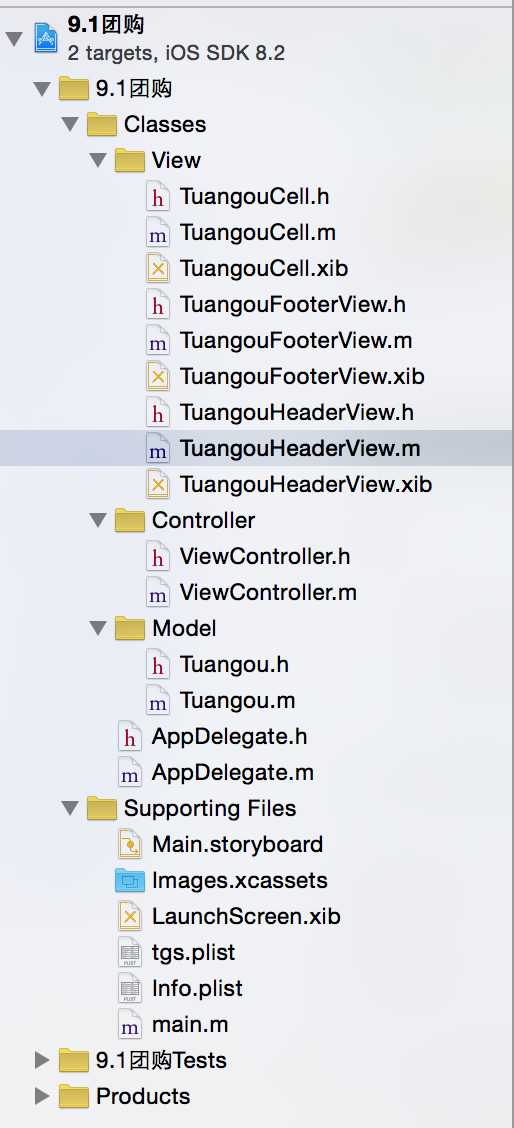
思路:
Tuangou.h
//
//  Tuangou.h
//  9.1团购
//
//  Created by jiangys on 15/9/16.
//  Copyright (c) 2015年 uxiaoyuan. All rights reserved.
//

#import <Foundation/Foundation.h>

@interface Tuangou : NSObject
/** 标题 */
@property (nonatomic, copy) NSString *title;

/** 价格 */
@property (nonatomic, copy) NSString *price;

/** 购买人数 */
@property (nonatomic, copy) NSString *buyCount;

/** 图片 */
@property (nonatomic, copy) NSString *icon;

-(instancetype)initWithDict:(NSDictionary *)dict;
+(instancetype)tuangouWithDit:(NSDictionary *)dict;
@end
Tuangou.m
#import "Tuangou.h"

@implementation Tuangou

-(instancetype)initWithDict:(NSDictionary *)dict
{
    if (self=[super init]) {
        [self setValuesForKeysWithDictionary:dict];
    }
    return self;
}

+(instancetype)tuangouWithDit:(NSDictionary *)dict
{
    return [[self alloc] initWithDict:dict];
}

@end
使用xib封装一个view的步骤
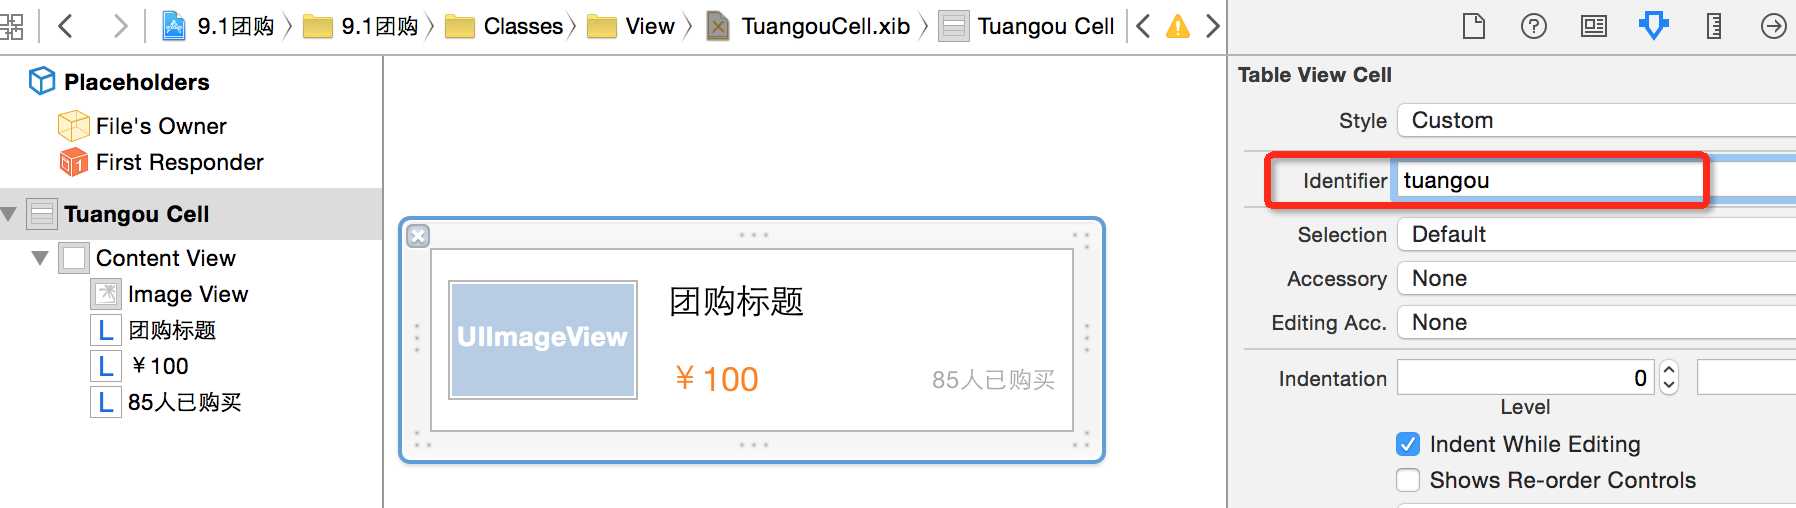
说明:cell 大小为320*80,图片为95*60。注意要设置identifier为tuangou,为了从缓存中记取cell使用。
Tuangou.h
#import <UIKit/UIKit.h>
@class Tuangou;

@interface TuangouCell : UITableViewCell

/**
 *  通过一个tableView来创建一个cell
 */
+ (instancetype)cellWithTableView:(UITableView *)tableView;

/** 团购模型 */
@property (nonatomic, strong) Tuangou *tuangou;
@end
TuangouCell.m
#import "TuangouCell.h"
#import "Tuangou.h"

@interface TuangouCell()
//将xib中的控件 和 自定义类的.m文件 进行连线
@property (weak, nonatomic) IBOutlet UIImageView *iconView;
@property (weak, nonatomic) IBOutlet UILabel *titleView;
@property (weak, nonatomic) IBOutlet UILabel *priceView;
@property (weak, nonatomic) IBOutlet UILabel *buyCountView;

@end

@implementation TuangouCell

//提供一个类方法返回一个创建好的自定义view(屏蔽从xib加载的过程)
+ (instancetype)cellWithTableView:(UITableView *)tableView
{
    static NSString *ID = @"tuangou";
    TuangouCell *cell = [tableView dequeueReusableCellWithIdentifier:ID];
    if (cell == nil) {
        // 从xib中加载cell
        cell = [[[NSBundle mainBundle] loadNibNamed:@"TuangouCell" owner:nil options:nil] lastObject];
    }
    return cell;
}

//重写模型属性的setter方法,在这里将模型数据展示到对应的子控件上面
- (void)setTuangou:(Tuangou *)tuangou
{
    _tuangou = tuangou;

    // 1.图片
    self.iconView.image = [UIImage imageNamed:tuangou.icon];

    // 2.标题
    self.titleView.text = tuangou.title;

    // 3.价格
    self.priceView.text = [NSString stringWithFormat:@"¥%@", tuangou.price];

    // 4.购买数
    self.buyCountView.text = [NSString stringWithFormat:@"%@人已购买", tuangou.buyCount];
}

@end
Main.storyboard里拉入一个TableView,并设置ViewController为dataSouce数据源。
ViewController.m
#import "ViewController.h"
#import "Tuangou.h"
#import "TuangouCell.h"

@interface ViewController ()<UITableViewDataSource>
@property (weak, nonatomic) IBOutlet UITableView *tableView;

/** 数据源 */
@property (nonatomic, strong) NSMutableArray *tgs;

@end

@implementation ViewController

- (void)viewDidLoad {
    [super viewDidLoad];
    // Do any additional setup after loading the view, typically from a nib.
    self.tableView.rowHeight=80;
}

/**
 *  数据的懒加载
 */
-(NSMutableArray *)tgs
{
    if(_tgs==nil)
    {
        NSString *path=[[NSBundle mainBundle] pathForResource:@"tgs.plist" ofType:nil];
        NSArray *dictArray=[NSArray arrayWithContentsOfFile:path];

        NSMutableArray *tgArray=[NSMutableArray array];
        for (NSDictionary *dict in dictArray) {
            Tuangou *tg=[Tuangou tuangouWithDit:dict];
            [tgArray addObject:tg];
        }
        _tgs=tgArray;
    }
    return _tgs;
}

/**
 *  一共有多少行数据
 */
-(NSInteger)tableView:(UITableView *)tableView numberOfRowsInSection:(NSInteger)section
{
    return self.tgs.count;
}

/**
 *  每一行显示怎样的cell
 */
-(UITableViewCell *)tableView:(UITableView *)tableView cellForRowAtIndexPath:(NSIndexPath *)indexPath
{
    // 1.创建cell
    TuangouCell *cell = [TuangouCell cellWithTableView:tableView];

    // 2.给cell传递模型数据
    cell.tuangou = self.tgs[indexPath.row];
    return cell;
}

/**
 *  隐藏状态栏
 */
- (BOOL)prefersStatusBarHidden
{
    return YES;
}
@end
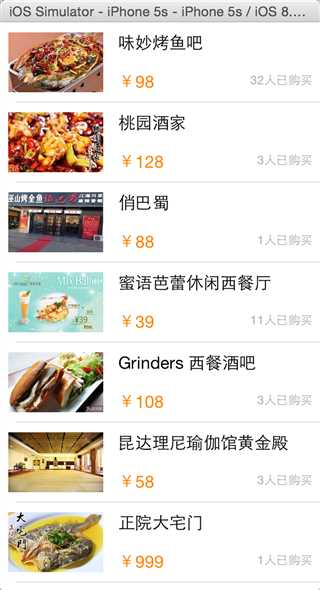
这样,运行起来,就看到数据已经加载了,效果:
建立TuangouFooterView.xib
说明:UIView的大小为320*44。Button 为300*35 。View下面封装了菊花和Lable,设置Hidden为Yes。
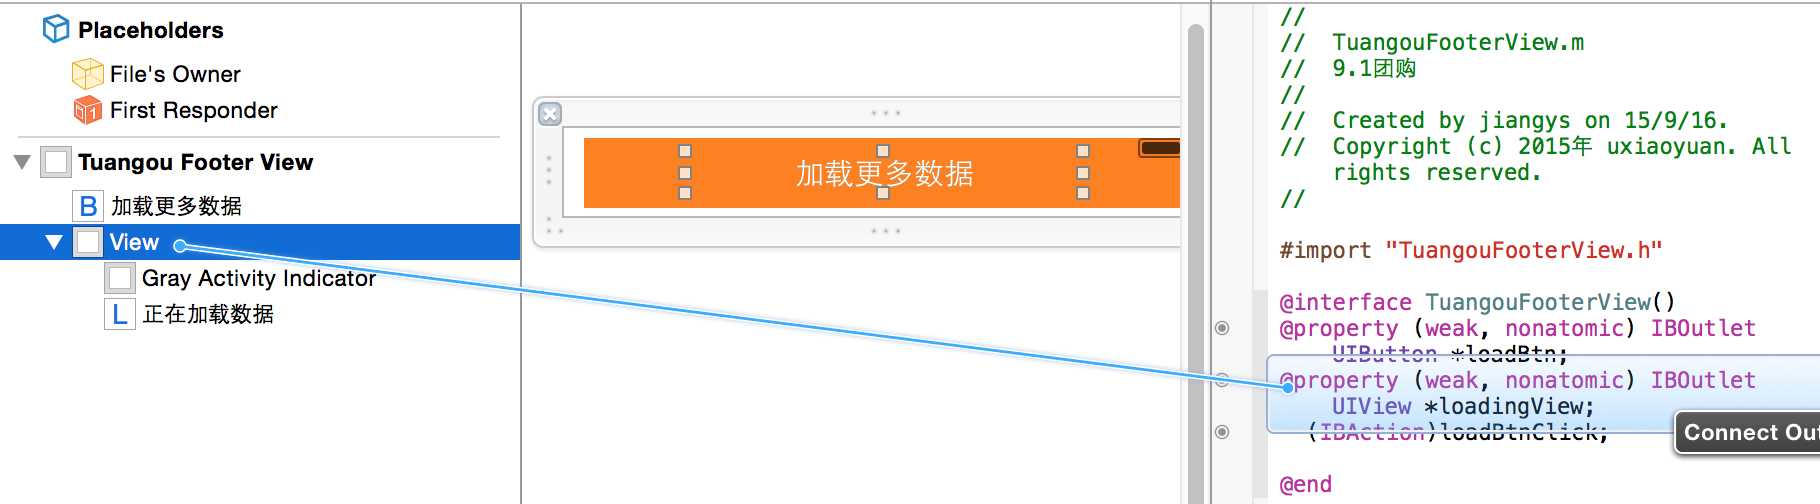
新建一个xib根对象的Class ,并定义代理。
TuangouFooterView.h
#import <UIKit/UIKit.h>
@class TuangouFooterView;

@protocol TuangouFooterViewDelegate <NSObject>

@optional
-(void)tuangouFooterDidClickedLoadBtn:(TuangouFooterView *)tuangouFooterView;

@end
@interface TuangouFooterView : UIView
/**
 *  快速创建一个footerView对象
 */
+ (instancetype)footerView;

// 要使用weak,避免循环引用
@property(nonatomic,weak) id<TuangouFooterViewDelegate> delegate;
@end
TuangouFooterView.m
#import "TuangouFooterView.h"

@interface TuangouFooterView()
@property (weak, nonatomic) IBOutlet UIButton *loadBtn;
@property (weak, nonatomic) IBOutlet UIView *loadingView;
- (IBAction)loadBtnClick;

@end

@implementation TuangouFooterView

+ (instancetype)footerView
{
    return [[[NSBundle mainBundle] loadNibNamed:@"TuangouFooterView" owner:nil options:nil] lastObject];
}

/**
 *  点击"加载"按钮
 */
- (IBAction)loadBtnClick {
    // 1.隐藏加载按钮
    self.loadBtn.hidden = YES;

    // 2.显示"正在加载"
    self.loadingView.hidden = NO;

    // 3.显示更多的数据
    // GCD ,1s后执行时面的代码
    dispatch_after(dispatch_time(DISPATCH_TIME_NOW, (int64_t)(1.0 * NSEC_PER_SEC)), dispatch_get_main_queue(), ^{ // 通知代理,先判断是否有实现代理的方法。
        if ([self.delegate respondsToSelector:@selector(tuangouFooterDidClickedLoadBtn:)]) {
            [self.delegate tuangouFooterDidClickedLoadBtn:self];
        }

        // 4.显示加载按钮
        self.loadBtn.hidden = NO;

        // 5.隐藏"正在加载"
        self.loadingView.hidden = YES;
    });
}
@end
ViewController.m就很简单了,实现TuangouFooterViewDelegate代理。
@interface ViewController ()<UITableViewDataSource,TuangouFooterViewDelegate>
设置代理
- (void)viewDidLoad {
    [super viewDidLoad];
    // Do any additional setup after loading the view, typically from a nib.
    self.tableView.rowHeight=80;

    TuangouFooterView *footerView=[TuangouFooterView footerView];
    footerView.delegate=self;// 设置当前footerView为代理
    self.tableView.tableFooterView=footerView;
}
实现里面的代理方法
/**
 *  加载更多的数据
 */
- (void)tuangouFooterDidClickedLoadBtn:(TuangouFooterView *)tuangouFooterView
{
#warning 正常开发:发送网络请求给远程的服务器
    // 1.添加更多的模型数据
    Tuangou *tg = [[Tuangou alloc] init];
    tg.icon = @"ad_01";
    tg.title = @"新增加的团购数据..";
    tg.price = @"100";
    tg.buyCount = @"0";
    [self.tgs addObject:tg];

    // 2.刷新表格(告诉tableView重新加载模型数据, 调用tableView的reloadData)
    [self.tableView reloadData];
}
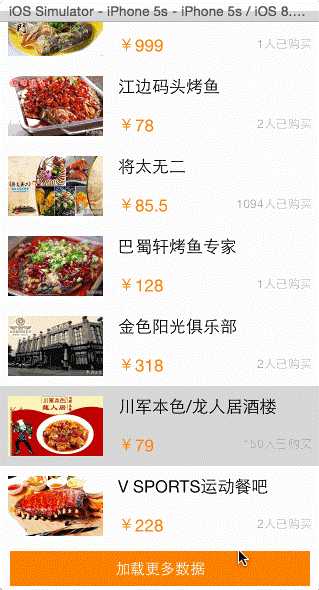
效果:
使用delegate的步骤
1.先搞清楚谁是谁的代理(delegate)2.定义代理协议,协议名称的命名规范:控件类名 + Delegate3.定义代理方法
- 代理方法一般都定义为@optional
- 代理方法名都以控件名开头
- 代理方法至少有1个参数,将控件本身传递出去
4.设置代理(delegate)对象 (比如myView.delegate = xxxx;)代理对象遵守协议代理对象实现协议里面该实现的方法5.在恰当的时刻调用代理对象(delegate)的代理方法,通知代理发生了什么事情(在调用之前判断代理是否实现了该代理方法)
新建一个TuangouHeaderView.xib
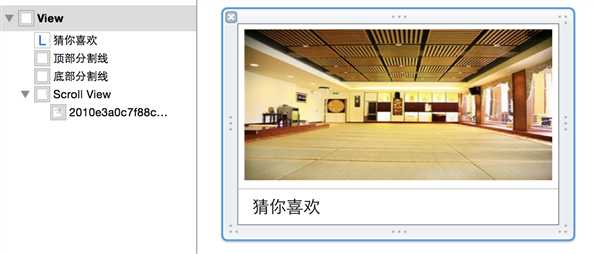
说明:分割线使用的是UIView,宽为320,高为1,Background 设置为灰色,Alpha 设置为0.5 。
TuangouHeaderView.h
#import <UIKit/UIKit.h>

@interface TuangouHeaderView : UIView
+ (instancetype)headerView;
@end
TuangouHeaderView.m
#import "TuangouHeaderView.h"

@interface TuangouHeaderView()

@end

@implementation TuangouHeaderView

+ (instancetype)headerView
{
    return [[[NSBundle mainBundle] loadNibNamed:@"TuangouHeaderView" owner:nil options:nil] lastObject];
}

/**
 *  当一个对象从xib中创建初始化完毕的时候就会调用一次
 */
- (void)awakeFromNib
{
    // 在这里面添加图片轮播器
}

@end
当然,这一块可以使用幻灯,幻灯的效果请参考:http://www.cnblogs.com/jys509/p/4811509.html
最终效果

源代码下载:点击下载
标签:
原文地址:http://www.cnblogs.com/jys509/p/4814929.html