标签:
仿微信图片选择器:
一、项目整体分析:
1. Android加载图片的3个目标:
(1)尽可能的去避免内存溢出。
a. 根据图片的显示大小去压缩图片
b. 使用缓存对我们图片进行管理(LruCache)
(2)用户操作UI控件必须充分的流畅。
a. getView里面尽可能不去做耗时的操作(异步加载 + 回调显示)
(3)用户预期显示的图片尽可能的快(图片的加载策略的选择,一般选择是LIFO)。
a. LIFO
2. 定义一个Imageloader完成上面1中的3个目标:
Imageloader
getView()
{
url -> Bitmap
url -> LruCache 查找
->找到返回
->找不到 url -> Task -> TaskQueue且发送一个通知去提醒后台轮询线程。
}
•Task ->run() {根据url加载图片:
1. 获得图片显示的大小
2. 使用Options对图片进行压缩
3. 加载图片且放入LruCache
}
•后台轮询线程
TaskQueue ->Task ->将Task交给线程池去执行(执行run方法)
一般情况下:(我们没有采用,效率低)
new Thread() {
run() {
while(true) {}
}
}.start();
这里这种场景,采用Handler + looper + Message:
二、代码实践-图片缓存、获取、展示
1. 打开Eclipse,新建一个Android工程,命名为"Imageloader",如下:
2. 新建一个包"com.himi.imageloader.util",编写一个图片加载工具类,如下:
ImageLoader.java,如下:
  1 package com.himi.imageloader.util;
  2
  3 import java.lang.reflect.Field;
  4 import java.util.LinkedList;
  5 import java.util.concurrent.ExecutorService;
  6 import java.util.concurrent.Executors;
  7 import java.util.concurrent.Semaphore;
  8
  9 import android.annotation.SuppressLint;
 10 import android.graphics.Bitmap;
 11 import android.graphics.BitmapFactory;
 12 import android.graphics.BitmapFactory.Options;
 13 import android.os.Handler;
 14 import android.os.Looper;
 15 import android.os.Message;
 16 import android.util.DisplayMetrics;
 17 import android.util.LruCache;
 18 import android.view.ViewGroup.LayoutParams;
 19 import android.widget.ImageView;
 20
 21 /**
 22  * 图片加载类
 23  * 这个类使用单例模式
 24  * @author hebao
 25  *
 26  */
 27 public class ImageLoader {
 28     private static ImageLoader mInstance;
 29     /**
 30      * 图片缓存的核心对象
 31      *      管理我们所有图片加载的所需的内存
 32      */
 33     private LruCache<String, Bitmap> mLruCache;
 34     /**
 35      * 线程池
 36      *      执行一些我们加载图片的任务
 37      */
 38     private ExecutorService mThreadPool;
 39     /**
 40      * 线程池中默认线程数
 41      */
 42     private static final int DEAFULT_THREAD_COUNT = 1;
 43
 44     /**
 45      * 队列的调度方式
 46      */
 47     private Type mType = Type.LIFO;
 48     /**
 49      * 任务队列
 50      *         任务队列提供给线程池取任务的
 51      */
 52     private LinkedList<Runnable> mTaskQueue;
 53     /**
 54      * 后台轮询线程
 55      */
 56     private Thread mPoolThread;
 57     /**
 58      * 后台轮询线程的handler
 59      */
 60     private Handler mPoolThreadHandler;
 61     /**
 62      * UI线程的handler
 63      * 用于:更新ImageView
 64      */
 65     private Handler mUIHandler;
 66     /**
 67      * mPoolThreadHandler的信号量,防止使用mPoolThreadHandler的时候其本身没有初始化完毕,报空指针异常
 68      */
 69     private Semaphore mSemaphorePoolThreadHandler = new Semaphore(0);
 70     /**
 71      * 任务线程信号量,保证线程池真正做到LIFO
 72      */
 73     private Semaphore mSemaphoreThreadPool;
 74
 75     /**
 76      *
 77      * 调度方式
 78      *FIFO:先入先出
 79      *LIFO:后入先出
 80      */
 81
 82     public enum Type  {
 83         FIFO,LIFO;
 84     }
 85
 86
 87     private ImageLoader(int threadCount, Type type) {
 88         init(threadCount, type);
 89     }
 90
 91     /**
 92      * 初始化操作
 93      * @param threadCount
 94      * @param type
 95      */
 96     private void init(int threadCount, Type type) {
 97         //后台轮询线程初始化
 98         mPoolThread = new Thread() {
 99             @Override
100             public void run() {
101                 Looper.prepare();
102                 mPoolThreadHandler = new Handler() {
103                     @Override
104                     public void handleMessage(Message msg) {
105                         //线程池取出一个任务进行执行
106                         mThreadPool.execute(getTask());
107                         try {
108                             mSemaphoreThreadPool.acquire();
109                         } catch (InterruptedException e) {
110                             // TODO 自动生成的 catch 块
111                             e.printStackTrace();
112                         }
113                     }
114                 };
115                 //释放一个信号量
116                 mSemaphorePoolThreadHandler.release();
117                 //Looper不断进行轮询
118                 Looper.loop();
119             };
120         };
121         mPoolThread.start();
122
123         //获取我们应用的最大可用内存
124         int maxMemory = (int) Runtime.getRuntime().maxMemory();
125         int cacheMemory = maxMemory / 8;
126         //图片缓存初始化
127         mLruCache = new LruCache<String, Bitmap>(cacheMemory) {
128             /**
129              * 测量每一个Bitmap图片的大小
130              */
131             @Override
132             protected int sizeOf(String key, Bitmap value) {
133                 // 每一个Bitmap图片的大小 = 每一行字节数 * 高度
134                 return value.getRowBytes() * value.getHeight();
135             }
136         };
137
138         //创建线程池
139         mThreadPool = Executors.newFixedThreadPool(threadCount);
140         mTaskQueue = new LinkedList<Runnable>();
141         mType = type;
142
143         //初始化信号量
144         mSemaphoreThreadPool = new Semaphore(threadCount);
145     }
146
147     /**
148      * 从任务队列中取出一个方法
149      * @return
150      */
151     private Runnable getTask() {
152         if(mType == Type.FIFO) {
153             return mTaskQueue.removeFirst();
154         }else if(mType == Type.LIFO) {
155             return mTaskQueue.removeLast();
156         }
157         return null;
158     }
159
160
161     public static ImageLoader getInstance() {
162         if(mInstance == null) {
163             synchronized (ImageLoader.class) {
164                 if(mInstance == null) {
165                     mInstance = new ImageLoader(DEAFULT_THREAD_COUNT, Type.LIFO);
166                 }
167             }
168
169         }
170         return mInstance;
171     }
172
173     public static ImageLoader getInstance(int threadCount, Type type) {
174         if(mInstance == null) {
175             synchronized (ImageLoader.class) {
176                 if(mInstance == null) {
177                     mInstance = new ImageLoader(threadCount, type);
178                 }
179             }
180
181         }
182         return mInstance;
183     }
184
185
186     /**
187      * 根据path为ImageView是设置图片
188      * @param path
189      * @param imageView
190      */
191     public void loadImage(final String path, final ImageView imageView ) {
192         imageView.setTag(path);//设置Tag主要是为了校验,防止图片的混乱
193         if(mUIHandler == null) {
194             mUIHandler = new Handler() {
195                 @Override
196                 public void handleMessage(Message msg) {
197                     //获取得到图片,为imageview回调设置图片
198                     ImgBeanHolder holder = (ImgBeanHolder) msg.obj;
199                     Bitmap bm = holder.bitmap;
200                     ImageView imageview = holder.imageView;
201                     String path = holder.path;
202                     /**
203                      * 将path和getTag存储路径进行比较
204                      * 如果不比较,就会出现我们滑动到第二张图片,但是显示的还是第一张的图片
205                      * 这里我们绑定imageview和path就是为了防止这种情况
206                      */
207                     if(imageview.getTag().toString().equals(path)) {
208                         imageview.setImageBitmap(bm);
209                     }
210
211                 };
212             };
213         }
214         //根据path在缓存中获取bitmap
215         Bitmap bm = getBitmapFromLruCache(path);
216         if(bm != null) {
217             refreashBitmap(path, imageView, bm);
218         } else {//内存中没有图片,加载图片到内存
219             addTasks(new Runnable() {
220                 public void run() {
221                     /**加载图片
222                      *  图片的压缩
223                      */
224                     //1. 获得图片需要显示的大小
225                     ImageSize imageSize = getImageViewSize(imageView);
226                     //2. 压缩图片
227                     Bitmap bm = decodeSampleBitmapFromPath(path,imageSize.width,imageSize.height);
228                     //3. 把图片加载到缓存 (一定要记得)
229                     addBitmapToLruCache(path,bm);
230                     refreashBitmap(path, imageView, bm);
231                     //每次线程任务加载完图片,之后释放一个信号量,即:信号量-1,此时就会寻找下一个任务(根据FIFO/LIFO不同的策略取出任务)
232                     mSemaphoreThreadPool.release();
233                 }
234
235             });
236         }
237     }
238
239
240     public void refreashBitmap(final String path,
241             final ImageView imageView, Bitmap bm) {
242         Message message = Message.obtain();
243         ImgBeanHolder holder = new ImgBeanHolder();
244         holder.bitmap = bm;
245         holder.path = path;
246         holder.imageView = imageView;
247
248         message.obj = holder;
249         mUIHandler.sendMessage(message);
250     }
251
252     /**
253      * 将图片加入缓存LruCache
254      * @param path
255      * @param bm
256      */
257     private void addBitmapToLruCache(String path, Bitmap bm) {
258         if(getBitmapFromLruCache(path) == null) {
259             if(bm != null) {
260                 mLruCache.put(path, bm);
261             }
262         }
263
264     }
265
266
267     /**
268      * 根据图片需要显示的宽和高,对图片进行压缩
269      * @param path
270      * @param width
271      * @param height
272      * @return
273      */
274     private Bitmap decodeSampleBitmapFromPath(String path,
275             int width, int height) {
276         //获取图片的宽和高,但是不把图片加载到内存中
277         BitmapFactory.Options options = new BitmapFactory.Options();
278         options.inJustDecodeBounds =true;//不把图片加载到内存中
279         BitmapFactory.decodeFile(path, options);
280
281         options.inSampleSize = caculateInSampleSize(options,width, height);//计算获取压缩比
282         //使用获取到的inSampleSize再次解析图片
283         options.inJustDecodeBounds =false;//加载图片到内存
284         Bitmap bitmap = BitmapFactory.decodeFile(path, options);
285
286
287         return bitmap;
288     }
289
290
291     /**
292      *根据需求的宽和高,以及图片实际的宽和高,计算inSampleSize
293      * @param options
294      * @param width
295      * @param height
296      * @return inSampleSize 压缩比
297      */
298     private int caculateInSampleSize(Options options, int reqWidth, int reqHeight) {
299         int width = options.outWidth;
300         int height = options.outHeight;
301
302         int inSampleSize = 1;
303         if(width>reqWidth || height > reqHeight) {
304             int widthRadio = Math.round(width*1.0f / reqWidth);
305             int heightRadio = Math.round(height*1.0f / reqHeight);
306
307             inSampleSize = Math.max(widthRadio, heightRadio);
308         }
309
310         return inSampleSize;
311     }
312
313     /**
314      * 根据ImageView获取适当的压缩的宽和高
315      * @param imageView
316      * @return
317      */
318     protected ImageSize getImageViewSize(ImageView imageView) {
319         ImageSize imageSize = new ImageSize();
320         DisplayMetrics displayMetrics = imageView.getContext().getResources().getDisplayMetrics();
321         LayoutParams lp = imageView.getLayoutParams();
322
323         int width = imageView.getWidth();//获取imageview的实际宽度
324         if(width<=0) {
325             width = lp.width;//获取imageview在layout中声明的宽度
326         }
327         if(width<=0) {
328             width = getImageViewFieldValue(imageView, "mMaxWidth");//利用反射,检测获得最大值
329         }
330         if(width<=0) {
331             width = displayMetrics.widthPixels;
332         }
333
334
335         int height = imageView.getHeight();//获取imageview的实际高度
336         if(height<=0) {
337             height = lp.height;//获取imageview在layout中声明的高度
338         }
339         if(height<=0) {
340             height = getImageViewFieldValue(imageView, "mMaxHeight");//利用反射,检测获得最大值
341         }
342         if(height<=0) {
343             height = displayMetrics.heightPixels;
344         }
345
346         imageSize.width = width;
347         imageSize.height = height;
348         return imageSize;
349     };
350
351 /**
352  *
353  * 通过反射获取imageview的某个属性值
354  * @param object
355  * @param fieldName
356  * @return
357  * 由于方法getMaxHeight是API16以上的才能使用,这里我们用反射使用这个方法
358  */
359 private static int getImageViewFieldValue(Object object, String fieldName) {
360     int value=0;
361         try {
362             Field field = ImageView.class.getDeclaredField(fieldName);
363             field.setAccessible(true);
364
365             int fieldValue = field.getInt(object);
366             if (fieldValue > 0 && fieldValue < Integer.MAX_VALUE) {
367                 value = fieldValue;
368             }
369         } catch (Exception e) {
370             // TODO 自动生成的 catch 块
371             e.printStackTrace();
372         }
373     return value;
374 }
375
376 /**
377  * 添加任务到任务队列,交给线程池执行
378  * @param runnable
379  */
380     @SuppressLint("NewApi")
381     private synchronized void addTasks(Runnable runnable) {//synchronized同步代码,防止多个线程进来出现死锁
382         mTaskQueue.add(runnable);
383         //if(mPoolThreadHandler == null) wait();
384         //确保我们在使用mPoolThreadHandler之前,我们初始化完毕mPoolThreadHandler(不为空),这里引入信号量
385         try {
386             if(mPoolThreadHandler == null) {
387                 mSemaphorePoolThreadHandler.acquire();
388             }
389         } catch (InterruptedException e) {
390             // TODO 自动生成的 catch 块
391             e.printStackTrace();
392         }
393         mPoolThreadHandler.sendEmptyMessage(0x110);
394
395
396     }
397
398
399     /**
400      * 根据path在缓存中获取bitmap
401      * @param key
402      * @return
403      */
404     private Bitmap getBitmapFromLruCache(String key) {
405         // TODO 自动生成的方法存根
406         return mLruCache.get(key);
407     }
408
409     /**
410      * 压缩图片之后的宽和高
411      * @author Administrator
412      *
413      */
414     private class ImageSize {
415         int width;
416         int height;
417     }
418
419     private class ImgBeanHolder {
420         Bitmap bitmap;
421         ImageView imageView;
422         String path;
423     }
424
425 }
三、代码实践-UI、UI适配器
1. 布局文件设计,首先我们从美工那边获得布局设计需要的图片,如下:

来到activity_main.xml,如下:
 1 <RelativeLayout xmlns:android="http://schemas.android.com/apk/res/android"
 2     xmlns:tools="http://schemas.android.com/tools"
 3     android:layout_width="match_parent"
 4     android:layout_height="match_parent"
 5     tools:context="com.himi.imageloader.MainActivity" >
 6
 7     <!--
 8      android:numColumns="3" 设置显示的列数
 9      android:stretchMode="columnWidth" 缩放与列宽大小同步
10      android:cacheColorHint="@android:color/transparent" 自定义GridView拖动背景色
11      android:listSelector="@android:color/transparent" 选中item,item显示透明
12     -->
13
14     <GridView
15         android:id="@+id/id_gridView"
16         android:layout_width="match_parent"
17         android:layout_height="match_parent"
18         android:cacheColorHint="@android:color/transparent"
19         android:horizontalSpacing="3dp"
20         android:listSelector="@android:color/transparent"
21         android:numColumns="3"
22         android:stretchMode="columnWidth"
23         android:verticalSpacing="3dp" />
24     <RelativeLayout
25         android:layout_width="match_parent"
26         android:layout_height="50dp"
27         android:layout_alignParentBottom="true"
28         android:background="#ee000000"
29         android:clipChildren="true"
30         android:id="@+id/id_bottom_ly"
31         >
32         <TextView
33             android:id="@+id/id_dir_name"
34             android:layout_width="wrap_content"
35             android:layout_height="wrap_content"
36             android:layout_alignParentLeft="true"
37             android:layout_centerVertical="true"
38             android:paddingLeft="10dp"
39             android:text="所有图片"
40             android:textColor="@android:color/white"
41             />
42          <TextView
43             android:id="@+id/id_dir_count"
44             android:layout_width="wrap_content"
45             android:layout_height="wrap_content"
46             android:layout_alignParentRight="true"
47             android:layout_centerVertical="true"
48             android:paddingRight="10dp"
49             android:text="100张"
50             android:textColor="@android:color/white"
51             />
52
53     </RelativeLayout>
54
55
56 </RelativeLayout>
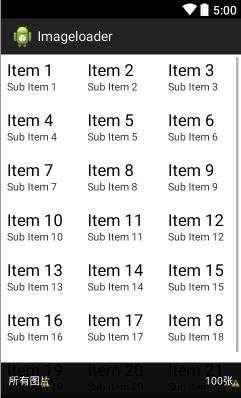
显示布局效果如下:
标签:
原文地址:http://www.cnblogs.com/hebao0514/p/4910190.html