标签:
给出一个简单的例子,讲述模板渲染的基础功能
在nodejs中使用express框架,默认的是ejs和jade渲染模板,以下是以ejs模板进行解析
1、ejs 模板安装
npm install ejs
目录安装好了之后,如何调用了,如下所示:
app.set("view engine","ejs");
2、默认的ejs模板只支持ejs为扩展名的文件,如果需要用html方式去书写,需要修改模板引擎,也就是express的engine函数
3、engine注册模板引擎的函数,处理指定的后缀名文件。
//修改模板文件的后缀名为html
app.set("view engine","html");
//运行ejs模板
app.engine( ‘.html‘, require( ‘ejs‘ ).__express );
现在直接给一个渲染模板的例子:
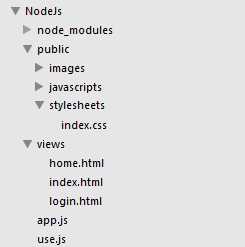
1、在项目的目录下添加一个放静态文件的目录public以及放视图的文件夹views
2、在public目录下在添加三个存放js、css、img的目录,相应取名为javascripts、stylesheets、images。
3、在views中新建index.html,login.html,home.html三个页面
index.html文件内容如下:

<html>
<header>
        <title>首页</title>
        <link href="/stylesheets/index.css" rel="stylesheet">
    </header>
<body>
    <div class="divMsg" style="text-align: center;">
        <h2>欢迎来到首页</h2>
        <form action="#" role="form">
           <div style="">
             <input type="button" value="登录">
           </div>
        </form>
    </div>
    <nav id="nav" class="nav-entry">
        <div class="row">
            <div class="col col-33">
                <a id="c_hotel" title="酒店">酒店</a>
            </div>
             <div class="col col-33">
                <a id="c_hotel_international" title="海外酒店">海外酒店</a>
                <a id="c_hotel_sale" title="特惠酒店">特惠酒店</a>
            </div>
             <div class="col col-33">
                <a id="c_group" title="团购">团购</a>
                <a id="c_hotel_inn" title="客栈 公寓">客栈<span class="point">.</span>公寓</a>
            </div>
        </div>
    </nav>
    <div class="pic-banner">
        <ul>
            <li>
            <a><img src="//webresource.c-ctrip.com/ResCRMOnline/R5/html5/images/zzz_pic_salead01.png" alt=""></a>
            </li>
            <li>
                <a><img src="http://images3.c-ctrip.com/rk/apph5/C1/201601/app_home_ad24_744_288.png" class="js_bottom" alt=""></a>
            </li>
        </ul>
    </div>
</body>
</html>
4、在stylesheets中新建index.css
index.css内容如下:
.row {
    display: -webkit-box;
    display: -webkit-flex;
    display: -moz-box;
    display: -moz-flex;
    display: -ms-flexbox;
    display: flex;
    width: 100%;
    -webkit-box-sizing: border-box;
    -moz-box-sizing: border-box;
    box-sizing: border-box
}

.col {
    -webkit-box-flex: 1;
    -webkit-flex: 1;
    -moz-box-flex: 1;
    -moz-flex: 1;
    -ms-flex: 1;
    flex: 1;
    display: block;
    width: 100%;
    -webkit-box-sizing: border-box;
    -moz-box-sizing: border-box;
    box-sizing: border-box
}

.col-33,.col-34 {
    -webkit-box-flex: 0;
    -webkit-flex: 0 0 33.3333%;
    -moz-box-flex: 0;
    -moz-flex: 0 0 33.3333%;
    -ms-flex: 0 0 33.3333%;
    flex: 0 0 33.3333%;
    max-width: 33.3333%
}

.nav-entry {
    padding: 5px;
    font-size: 15px
}

.nav-entry .row {
    margin-bottom: 5px;
    height: 6em
}

.nav-entry .row:last-of-type {
    margin-bottom: 0
}

.nav-entry .col {
    border-left: 1px solid #fff;
    border-bottom: 1px solid #fff;
    height: 100%
}

.nav-entry .col a {
    height: 50%
}

.nav-entry .row:nth-child(1) .col a {
    background-color: #ff697a
}

.nav-entry .row:nth-child(2) .col a {
    background-color: #3d98ff
}

.nav-entry .row:nth-child(3) .col a {
    background-color: #44c522
}

.nav-entry .row:nth-child(4) .col a {
    background-color: #fc9720
}

.nav-entry .row:nth-child(1) .col:first-of-type a,.nav-entry .row:nth-child(2) .col:first-of-type a,.nav-entry .row:nth-child(3) .col:first-of-type a {
    height: 100%
}

.nav-entry .col a+a {
    border-top: 1px solid #fff
}

.nav-entry .col:first-of-type a {
    border-top-left-radius: 5px;
    border-bottom-left-radius: 5px
}

.nav-entry .col:last-of-type a:nth-child(1) {
    border-top-right-radius: 5px
}

.nav-entry .col:last-of-type a:nth-child(2) {
    border-bottom-right-radius: 5px
}

.nav-entry .row:nth-child(4) .col:first-of-type a:nth-child(1) {
    border-bottom-left-radius: 0
}

.nav-entry .row:nth-child(4) .col:first-of-type a:nth-child(2) {
    border-top-left-radius: 0
}

.nav-entry .col>a {
    position: relative;
    display: block;
    font-size: 1em;
    color: #fff;
    text-shadow: 0 2px 1px rgba(0,0,0,.2);
    text-align: center;
    line-height: 3em;
    box-sizing: border-box;
    overflow: hidden
}

.nav-entry .col>a em {
    font-style: normal;
    display: block;
    position: absolute;
    top: 50%;
    left: 50%;
    -webkit-transform: translate(-50%,-50%);
    -ms-transform: translate(-50%,-50%);
    -o-transform: translate(-50%,-50%);
    transform: translate(-50%,-50%);
    white-space: nowrap
}

.nav-entry .row:nth-child(1) .col:first-of-type a:after,.nav-entry .row:nth-child(2) .col:first-of-type a:after,.nav-entry .row:nth-child(3) .col:first-of-type a:after,.nav-entry .wallet,.nav-entry .ico_shadow {
    position: absolute;
    bottom: 10px;
    left: 50%;
    content: "";
    background: url(//pic.c-ctrip.com/h5/home/un_ico_home_v66.png) 0 0 no-repeat;
    -webkit-background-size: 104px 326px;
    background-size: 104px 326px
}

.nav-entry li .ico_shadow {
    bottom: -12px;
    left: 0;
    width: 104px;
    height: 82px;
    background-position: 0 -30px
}

.nav-entry .row:nth-child(1) .col:first-of-type a:after {
    width: 40px;
    height: 33px;
    margin-left: -20px;
    background-position: 0 -130px
}

.nav-entry .row:nth-child(2) .col:first-of-type a:after {
    bottom: 15px;
    width: 43px;
    height: 28px;
    margin-left: -23px;
    background-position: -50px -120px
}

.nav-entry .row:nth-child(3) .col:first-of-type a:after {
    width: 35px;
    height: 43px;
    margin-left: -18px;
    background-position: 0 -180px
}

.nav-entry .wallet {
    bottom: 0;
    left: 0;
    width: 104px;
    height: 16px;
    text-align: center;
    line-height: 1.2;
    font-style: normal;
    font-size: 9px;
    color: #FF5F08;
    z-index: 3;
    background: url(//pic.c-ctrip.com/h5/home/tag_summer.png) 0 0 no-repeat;
    -webkit-background-size: 104px 17px;
    background-size: 104px 17px
}

.pic-banner {
    margin: 0 5px 5px 5px;
    -webkit-box-sizing: border-box;
    box-sizing: border-box
}

.pic-banner ul {
    display: table;
    width: 100%;
    border: 1px solid #d8d8d8;
    border-radius: 5px
}

.pic-banner li {
    -webkit-box-sizing: border-box;
    box-sizing: border-box;
    display: table-cell;
    width: 50%
}

.pic-banner li:first-child {
    border-right: 1px solid #d8d8d8
}

.pic-banner img {
    width: 100%;
    min-height: 59px;
    vertical-align: middle
}

.pic-banner li:first-of-type a img {
    border-top-left-radius: 5px;
    border-bottom-left-radius: 5px
}

.pic-banner li:last-of-type a img {
    border-top-right-radius: 5px;
    border-bottom-right-radius: 5px
}
在项目下新建app.js、内容如下:
var express=require("express");

var path=require("path");
var ejs=require(‘ejs‘);
var app=express();

app.set("views",path.join(__dirname,"views"));
app.set("view engine","html");
app.use(express.static(require(‘path‘).join(__dirname, ‘public‘)));

app.engine(".html",ejs.__express);

app.get("/",function(req,res){
    res.render("index");
});


app.listen(8088);
render函数对模板进行渲染
格式为:res.render(view,[locals],callback);
参数view就是模板的文件名callback用来处理返回的渲染后的字符串,options、callback可省略,在渲染模板时locals可为其模板传入变量值,在模板中就可以调用所传变量了,在后面我们会讲述具体使用方法,也可先自行使用看其效果
备注:
在html文件中引用css的路径需要注意,例如index.html引用index.css样式代码为:
<link href="/stylesheets/index.css" rel="stylesheet">
为什么不从public目录开始了?那是因为代码中设置了启动静态文件的目录
app.use(express.static(require(‘path‘).join(__dirname, ‘public‘)));
代表从public目录下去查找静态资源,所以引入css不需要从public开始
目录结构如下图:
运行app.js,在浏览器输入地址http://127.0.0.1:8088/ 便可以看到浏览器加载了index.html网页的内容。
标签:
原文地址:http://www.cnblogs.com/alice626/p/5149138.html
