标签:
上一篇文章最后结束在RootViewImpl.setView()函数,这个函数之后发生了什么事情,我们接着分析。
1. RootViewImpl简介
ViewRootImpl作为视图层次中的顶层,实现了View和WindowManager之间需要的协议,与SystemServer进程的WindowManagerService有交互,具体实现了WindowManagerGlobal内部的大部分功能。
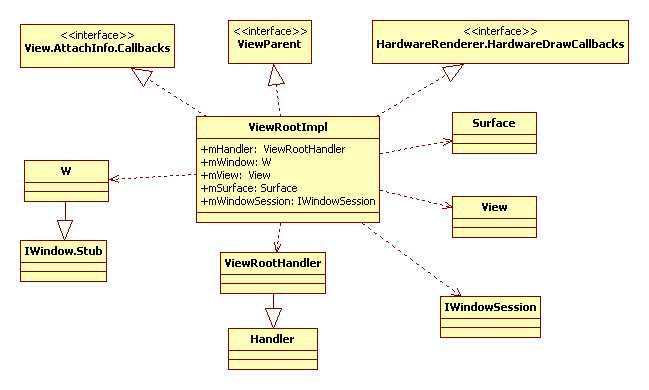
1.1 ViewRootImpl的定义:
public final class ViewRootImpl implements ViewParent,
        View.AttachInfo.Callbacks, HardwareRenderer.HardwareDrawCallbacks {
    ......
    final IWindowSession mWindowSession;
    final W mWindow;                //W继承于IWindow.Stub类。
    View mView;                     // 由setView()函数赋值。
    private final Surface mSurface = new Surface();       //mSurface可能存在多线程访问,需要加锁保护。
    ......
    public ViewRootImpl(Context context, Display display) {
        ......
        mWindowSession = WindowManagerGlobal.getWindowSession();
        mWindow = new W(this);
        ......
    }
}
mWindowSession将被用于建立Activity的ViewRootImpl和WindowManagerService的关系。创建代码如下:
getWindowSession()@WindowManagerGlobal.java
public static IWindowSession getWindowSession() {
    synchronized (WindowManagerGlobal.class) {
        if (sWindowSession == null) {
            try {
                InputMethodManager imm = InputMethodManager.getInstance();
                IWindowManager windowManager = getWindowManagerService(); //得到WindowMangerService的Binder代理.
                sWindowSession = windowManager.openSession(imm.getClient(), imm.getInputContext());  ///openSession操作是一个使用Binder通信的跨进程调用。
                ......
            } catch (RemoteException e) {
                ......
            }
        }
        return sWindowSession;
    }
}
getWindowManagerService()@WindowManagerGlobal.java
public static IWindowManager getWindowManagerService() {
    synchronized (WindowManagerGlobal.class) {
        if (sWindowManagerService == null) {
            sWindowManagerService = IWindowManager.Stub.asInterface(ServiceManager.getService("window"));
        }
        return sWindowManagerService;
    }
}
openSession()@WindowManagerService.java
public IWindowSession openSession(IInputMethodClient client,
            IInputContext inputContext) {
    ......
    Session session = new Session(this, client, inputContext);
    return session;
}
可以看到,通过WindowManagerService.openSession()获得一个Session对象。类Session继承于IWindowSession.Stub,并实现了IBinder接口。它支持Binder通信,并属于Bn端,即响应请求的服务端。
1.2 ViewRootImpl与WindowManagerService的关系
ViewRootImpl通过mWindowSession(IWindowSession)与WMS进程进行跨进程通信。
ViewRootImpl的mWindow是基于Binder通信的类,而且W是IWindow的Bn端,用于响应请求。
它们之间属于跨进程通信,关系如下图:
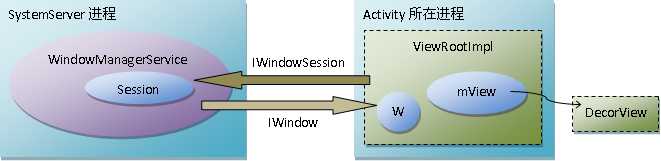
每个APP进程都会和WMS建立一个IWindowSession会话,APP进程利用这个会话与WMS通信。WMS利用IWindow进行事件通知,每当发生一些事件(按键触摸事件)时,WMS就会告诉某个IWindow.
事件分发大致流程:
(1) WMS所在的SystemServer进程接收到按键事件。
(2) WMS找到UI位于屏幕顶端的进程所对应的IWindow对象,这个是Bp端对象。
(3) 调用这个IWindow对象的dispatchKey。 IWindow对象的Bn端位于ViewRootImpl中,ViewRootImpl根据内部View的位置信息找到真正处理这个事件的View,最后调用dispatchKey函数完成事件处理。
每个按键事件都会被转化成一个消息,由系统将这个消息加入到对应进程的消息队列中。该进程在处理消息派发时,根据消息的句柄找到对应的Window,进而由Window处理掉这个消息。
2. RootViewImpl.setView()函数
setView()@RootViewImpl.java
public void setView(View view, WindowManager.LayoutParams attrs, View panelParentView) {
    synchronized (this) {
        if (mView == null) {
            mView = view;                 //传进来的view是PhoneWindow的DecorView,保存起来。
            mViewLayoutDirectionInitial = mView.getRawLayoutDirection();
            mFallbackEventHandler.setView(view);
            mWindowAttributes.copyFrom(attrs);
            ......
            mSoftInputMode = attrs.softInputMode;         // InputMode可以影响输入法弹出时视图应该怎么显示。
            ......
            mAdded = true;
            int res;     /* = WindowManagerImpl.ADD_OKAY; */
            //在被加到WindowManager之前调度第一次layout,确保收到系统事件之前重新进行了布局。
            requestLayout();

            if ((mWindowAttributes.inputFeatures
                        & WindowManager.LayoutParams.INPUT_FEATURE_NO_INPUT_CHANNEL) == 0) {
                mInputChannel = new InputChannel();          //创建InputChannel对象
            }
            try {
                mOrigWindowType = mWindowAttributes.type;
                mAttachInfo.mRecomputeGlobalAttributes = true;
                collectViewAttributes();
                res = mWindowSession.addToDisplay(mWindow, mSeq, mWindowAttributes,            //注意第一个参数是mWindow. 继承IWindow.Stub类。
                             getHostVisibility(), mDisplay.getDisplayId(),
                             mAttachInfo.mContentInsets, mInputChannel);
            } catch (RemoteException e) {
                ......
            }

            // 创建InputQueue和WindowInputEventReceiver与窗口输入事件相关的对象。
            if (mInputChannel != null) {
                if (mInputQueueCallback != null) {
                    mInputQueue = new InputQueue();
                    mInputQueueCallback.onInputQueueCreated(mInputQueue);
                }
                mInputEventReceiver = new WindowInputEventReceiver(mInputChannel, Looper.myLooper());
            }

            mAddedTouchMode = (res & WindowManagerGlobal.ADD_FLAG_IN_TOUCH_MODE) != 0;  // 根据res设置touch mode。
            mAppVisible = (res & WindowManagerGlobal.ADD_FLAG_APP_VISIBLE) != 0;       // 根据res设置visible属性。
            ......
        }
    }
}
3. performTraversals()函数
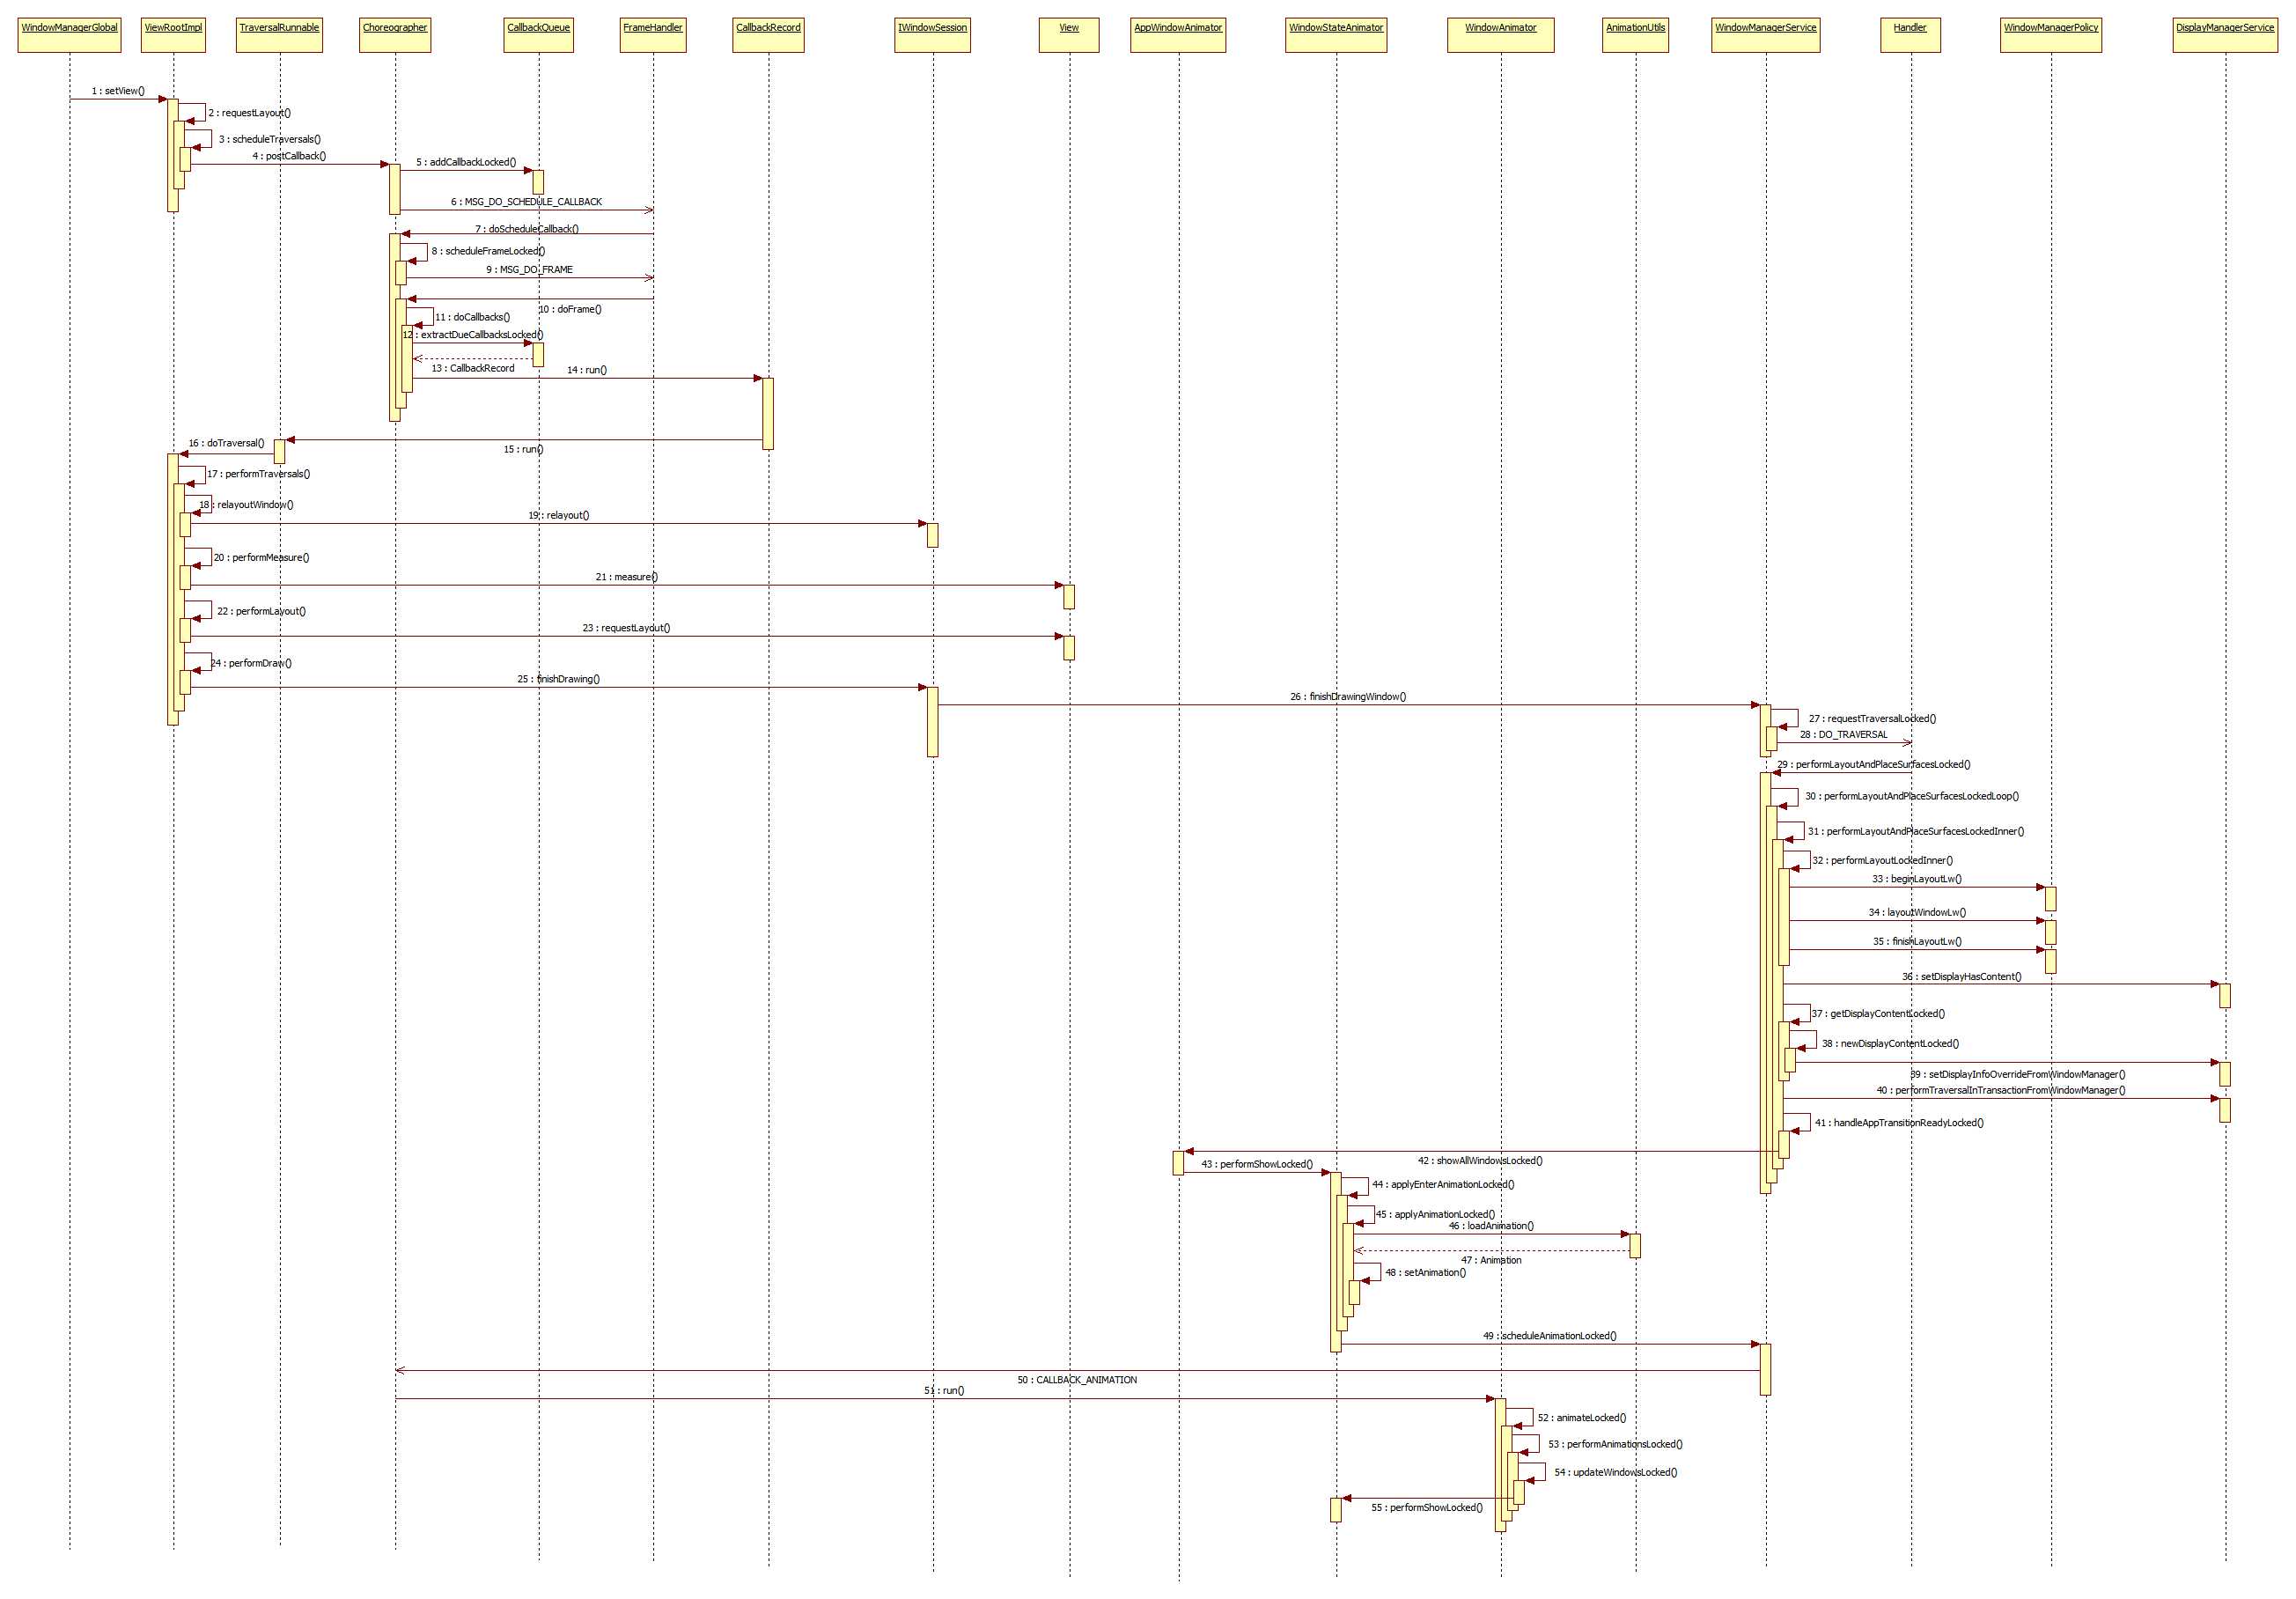
requestLayout()函数的功能就是触发UI绘制。结合时序图。调用3至调用15,是消息发送传递及Callback设置过程。最后会由TraversalRunnable的run函数中调用RootViewImpl.doTraversal()函数去调用performTraversals()开始进行UI绘制。
performTraversals()函数很复杂,我们先专注于时序图展示的内容。
performTraversals()@RootViewImpl.java
private void performTraversals() {
    ......
    final View host = mView;

    if (mFirst || windowShouldResize || insetsChanged ||
              viewVisibilityChanged || params != null) {
        ......
try {
......
relayoutResult = relayoutWindow(params, viewVisibility, insetsPending);
}
......
if (!mStopped) { boolean focusChangedDueToTouchMode = ensureTouchModeLocally( (relayoutResult&WindowManagerGlobal.RELAYOUT_RES_IN_TOUCH_MODE) != 0); if (focusChangedDueToTouchMode || mWidth != host.getMeasuredWidth() || mHeight != host.getMeasuredHeight() || contentInsetsChanged) { int childWidthMeasureSpec = getRootMeasureSpec(mWidth, lp.width); //获取测量模式。lp.width和lp.height在创建ViewGroup实例时等于MATCH_PARENTint childHeightMeasureSpec = getRootMeasureSpec(mHeight, lp.height); // Ask host how big it wants to be performMeasure(childWidthMeasureSpec, childHeightMeasureSpec); // 根据测量模式进行测量。 ......
layoutRequested = true; } } } final boolean didLayout = layoutRequested && !mStopped; boolean triggerGlobalLayoutListener = didLayout || attachInfo.mRecomputeGlobalAttributes; if (didLayout) { performLayout(lp, desiredWindowWidth, desiredWindowHeight); // By this point all views have been sized and positioned ...... } ...... boolean cancelDraw = attachInfo.mTreeObserver.dispatchOnPreDraw() || viewVisibility != View.VISIBLE; if (!cancelDraw && !newSurface) { if (!skipDraw || mReportNextDraw) { ......
performDraw(); } }
...... }
3.1 relayoutWindow()函数
relayoutWindow()@ViewRootImpl.java
private int relayoutWindow(WindowManager.LayoutParams params, int viewVisibility,
                           boolean insetsPending) throws RemoteException {
    ......
    // 调用WMS的relayout函数。通过该函数修改一个window的参数,提供新的参数,它将返回屏幕上window的新的一帧(忽略位置),和该window的surface。如果window当前是隐藏的,那么surface是无效的,否则就可以使用它来画window的内容。
    int relayoutResult = mWindowSession.relayout(
                             mWindow,  // 需要修改参数的window
                             mSeq,     // 排序的序列号
                             params,   // 要应用到window的新参数
                             (int) (mView.getMeasuredWidth() * appScale + 0.5f), //window想要的宽
                             (int) (mView.getMeasuredHeight() * appScale + 0.5f), //window想要的高
                             viewVisibility, // window的root view的可见性
                             insetsPending ? WindowManagerGlobal.RELAYOUT_INSETS_PENDING : 0,
                             mWinFrame, // outFrame, 放着屏幕上新position/size的Rect
                             mPendingOverscanInsets,
                             mPendingContentInsets,
                             mPendingVisibleInsets,
                             mPendingConfiguration,
                             mSurface  // 存放新显示surface的对象。
                         );
    ......
    return relayoutResult;
}
3.2 performMeasure()
在执行performMesure()时,需要传入测量模式,这里简单介绍下MeasureSpec。MeasureSpec封装了从父view传 给子view的布局要求,每个MeasureSpec代表对宽度或高度的要求。每个MeasureSpec值由大小和模式组成,高16位表示mode,低 16位表示size,即父view的size。
MeasureSpec有三种可能的模式:
UNSPECIFIED: 父view没有强加任何限制给子view,子view可以有它想要的size。
EXACTLY:父view决定子view的确切size,子view将被指定这些边界,而忽视它想要的size.
AT_MOST: 父view对子view没有限制,子view可以获得它自己指定的size。
对于DecorView来说,mode一般为EXACTLY,size为屏幕的宽高。
看下父view中是如何得到MeasureSpec的:
getRootMeasureSpec()@ViewRootImpl.java
// 根据layout params计算window中root view的MeasureSpec.
// windowSize: window可用的宽或高
// window的宽或高的layout params.
private static int getRootMeasureSpec(int windowSize, int rootDimension) {
    int measureSpec;
    switch (rootDimension) {
        case ViewGroup.LayoutParams.MATCH_PARENT:
            // Window can‘t resize. Force root view to be windowSize.
            // MeasureSpec.EXACTLY: 父控件决定子控件的确切大小,子控件与父控件一样大,子控件要求的大小被忽视。
            measureSpec = MeasureSpec.makeMeasureSpec(windowSize, MeasureSpec.EXACTLY);
            break;
        case ViewGroup.LayoutParams.WRAP_CONTENT:
            // Window can resize. Set max size for root view.
            // MeasureSpec.AT_MOST:子控件的大小可以为它指定的大小。
            measureSpec = MeasureSpec.makeMeasureSpec(windowSize, MeasureSpec.AT_MOST);
            break;
        default:
            // Window wants to be an exact size. Force root view to be that size.
            measureSpec = MeasureSpec.makeMeasureSpec(rootDimension, MeasureSpec.EXACTLY);
            break;
    }
    return measureSpec;
}
performMeasure()@ViewRootImpl.java
private void performMeasure(int childWidthMeasureSpec, int childHeightMeasureSpec) {
    Trace.traceBegin(Trace.TRACE_TAG_VIEW, "measure");
    try {
         mView.measure(childWidthMeasureSpec, childHeightMeasureSpec);     // 调用mView的measure。
    } finally {
         Trace.traceEnd(Trace.TRACE_TAG_VIEW);
    }
}
measure()@View.java
// 这个函数计算出view的大小,然后设置实际的宽和高。每个view的实际宽高都是由父view和自身共同决定的。
// 实际测量工作在onMeasure()函数中执行,子类也能重载onMesure()函数实现对自身的测量。
public final void measure(int widthMeasureSpec, int heightMeasureSpec) {  // final方法,子类不可以重写
    ......if ((mPrivateFlags & PFLAG_FORCE_LAYOUT) == PFLAG_FORCE_LAYOUT ||
            widthMeasureSpec != mOldWidthMeasureSpec ||
            heightMeasureSpec != mOldHeightMeasureSpec) {

        // first clears the measured dimension flag
        mPrivateFlags &= ~PFLAG_MEASURED_DIMENSION_SET;

        resolveRtlPropertiesIfNeeded();

        int cacheIndex = (mPrivateFlags & PFLAG_FORCE_LAYOUT) == PFLAG_FORCE_LAYOUT ? -1 :
                mMeasureCache.indexOfKey(key);
        if (cacheIndex < 0 || sIgnoreMeasureCache) {
            // 调用onMeasure方法, 测量自己,这个调用需要重新设置measured dimension flag。
            onMeasure(widthMeasureSpec, heightMeasureSpec);
            mPrivateFlags3 &= ~PFLAG3_MEASURE_NEEDED_BEFORE_LAYOUT;
        }
        ......
        // flag not set, setMeasuredDimension() was not invoked, we raise
        // an exception to warn the developer
        if ((mPrivateFlags & PFLAG_MEASURED_DIMENSION_SET) != PFLAG_MEASURED_DIMENSION_SET) {
            // 子类重写onMeausre方法的时,必须调用setMeasuredDimension或者super.onMeasure方法,不然就会走到这里报错。
            // setMeasuredDimension中回去改变mPrivateFlags的值
            throw new IllegalStateException("onMeasure() did not set the"
                    + " measured dimension by calling"
                    + " setMeasuredDimension()");
        }

        mPrivateFlags |= PFLAG_LAYOUT_REQUIRED;
    }

    mOldWidthMeasureSpec = widthMeasureSpec;
    mOldHeightMeasureSpec = heightMeasureSpec;

    mMeasureCache.put(key, ((long) mMeasuredWidth) << 32 |
            (long) mMeasuredHeight & 0xffffffffL); // suppress sign extension
}
onMeasure()@View.java
// 提供view和它的内容的测量宽高,应该由子类重写这个函数来提供准确有效的测量值。这个函数的两个参数都是由父view传过来的,代表父view的规格。
// 子类重写这个函数的时候必须调用setMeasuredDimension()保存这个view的测量宽和高,确保测量的宽和高至少是view的最小宽高。
protected void onMeasure(int widthMeasureSpec, int heightMeasureSpec) {
    setMeasuredDimension(getDefaultSize(getSuggestedMinimumWidth(), widthMeasureSpec),
                         getDefaultSize(getSuggestedMinimumHeight(), heightMeasureSpec));
}
setMeasuredDimension()@View.java
// 设置测量结果及flags.
protected final void setMeasuredDimension(int measuredWidth, int measuredHeight) {
    boolean optical = isLayoutModeOptical(this);
    if (optical != isLayoutModeOptical(mParent)) {
        Insets insets = getOpticalInsets();
        int opticalWidth  = insets.left + insets.right;
        int opticalHeight = insets.top  + insets.bottom;
        measuredWidth  += optical ? opticalWidth  : -opticalWidth;
        measuredHeight += optical ? opticalHeight : -opticalHeight;
    }
    // 赋值给mMeasuredWidth,getMeasuredWidth()函数返回的就是这个值。
    // measure的目的就是对view树中的每个view的mMeasuredWidth和mMesuredHeight赋值。这两个值被赋值,该view的测量工作才算结束。
    mMeasuredWidth = measuredWidth;
    mMeasuredHeight = measuredHeight;

    // 设置flag, 这就是重写onMeasure方法时如果不调用setMeasuredDimension方法时, measure会抛出异常的原因。
    mPrivateFlags |= PFLAG_MEASURED_DIMENSION_SET;
}
View,ViewGroup,FrameLayout,DecorView的关系如下:

DecorView.onMesure()@PhoneWindow.java
protected void onMeasure(int widthMeasureSpec, int heightMeasureSpec) {
    final DisplayMetrics metrics = getContext().getResources().getDisplayMetrics();
    final boolean isPortrait = metrics.widthPixels < metrics.heightPixels;

    final int widthMode = getMode(widthMeasureSpec);
    final int heightMode = getMode(heightMeasureSpec);

    boolean fixedWidth = false;
    if (widthMode == AT_MOST) {
        final TypedValue tvw = isPortrait ? mFixedWidthMinor : mFixedWidthMajor;
        if (tvw != null && tvw.type != TypedValue.TYPE_NULL) {
            final int w;
            if (tvw.type == TypedValue.TYPE_DIMENSION) {
                w = (int) tvw.getDimension(metrics);
            } else if (tvw.type == TypedValue.TYPE_FRACTION) {
                w = (int) tvw.getFraction(metrics.widthPixels, metrics.widthPixels);
            } else {
                w = 0;
            }
            if (w > 0) {
                final int widthSize = MeasureSpec.getSize(widthMeasureSpec);
                widthMeasureSpec = MeasureSpec.makeMeasureSpec(Math.min(w, widthSize), EXACTLY);
                fixedWidth = true;
            }
        }
    }

    if (heightMode == AT_MOST) {
        final TypedValue tvh = isPortrait ? mFixedHeightMajor : mFixedHeightMinor;
        if (tvh != null && tvh.type != TypedValue.TYPE_NULL) {
            final int h;
            if (tvh.type == TypedValue.TYPE_DIMENSION) {
                h = (int) tvh.getDimension(metrics);
            } else if (tvh.type == TypedValue.TYPE_FRACTION) {
                h = (int) tvh.getFraction(metrics.heightPixels, metrics.heightPixels);
            } else {
                h = 0;
            }
            if (h > 0) {
                final int heightSize = MeasureSpec.getSize(heightMeasureSpec);
                heightMeasureSpec = MeasureSpec.makeMeasureSpec(Math.min(h, heightSize), EXACTLY);
            }
        }
    }

    super.onMeasure(widthMeasureSpec, heightMeasureSpec);    // 调用FrameLayout.onMeasure().
    int width = getMeasuredWidth();
    boolean measure = false;

    widthMeasureSpec = MeasureSpec.makeMeasureSpec(width, EXACTLY);
    if (!fixedWidth && widthMode == AT_MOST) {
        final TypedValue tv = isPortrait ? mMinWidthMinor : mMinWidthMajor;
        if (tv.type != TypedValue.TYPE_NULL) {
            final int min;
            if (tv.type == TypedValue.TYPE_DIMENSION) {
                min = (int)tv.getDimension(metrics);
            } else if (tv.type == TypedValue.TYPE_FRACTION) {
                min = (int)tv.getFraction(metrics.widthPixels, metrics.widthPixels);
            } else {
                min = 0;
            }

            if (width < min) {
                widthMeasureSpec = MeasureSpec.makeMeasureSpec(min, EXACTLY);
                measure = true;
            }
        }
    }

    if (measure) {
        super.onMeasure(widthMeasureSpec, heightMeasureSpec);
    }
}
onMesure()@FrameLayout.java
protected void onMeasure(int widthMeasureSpec, int heightMeasureSpec) {
    int count = getChildCount();         // 获得子view的数目

    final boolean measureMatchParentChildren =
               MeasureSpec.getMode(widthMeasureSpec) != MeasureSpec.EXACTLY ||
               MeasureSpec.getMode(heightMeasureSpec) != MeasureSpec.EXACTLY;
    mMatchParentChildren.clear();

    int maxHeight = 0;
    int maxWidth = 0;
    int childState = 0;

    for (int i = 0; i < count; i++) {    // 测量每个子View
        final View child = getChildAt(i);
        if (mMeasureAllChildren || child.getVisibility() != GONE) {
            measureChildWithMargins(child, widthMeasureSpec, 0, heightMeasureSpec, 0);
            final LayoutParams lp = (LayoutParams) child.getLayoutParams();
            maxWidth = Math.max(maxWidth, child.getMeasuredWidth() + lp.leftMargin + lp.rightMargin);
            maxHeight = Math.max(maxHeight, child.getMeasuredHeight() + lp.topMargin + lp.bottomMargin);
            childState = combineMeasuredStates(childState, child.getMeasuredState());
            if (measureMatchParentChildren) {
                if (lp.width == LayoutParams.MATCH_PARENT || lp.height == LayoutParams.MATCH_PARENT) {
                    mMatchParentChildren.add(child);
                }
            }
        }
    }

    // Account for padding too
    maxWidth += getPaddingLeftWithForeground() + getPaddingRightWithForeground();
    maxHeight += getPaddingTopWithForeground() + getPaddingBottomWithForeground();

    // Check against our minimum height and width
    maxHeight = Math.max(maxHeight, getSuggestedMinimumHeight());
    maxWidth = Math.max(maxWidth, getSuggestedMinimumWidth());

    // Check against our foreground‘s minimum height and width
    final Drawable drawable = getForeground();
    if (drawable != null) {
        maxHeight = Math.max(maxHeight, drawable.getMinimumHeight());
        maxWidth = Math.max(maxWidth, drawable.getMinimumWidth());
    }

    // 设置自己的size, 即ViewGroup的size. 可以看到,它的size由父view及子view共同决定。
    setMeasuredDimension(resolveSizeAndState(maxWidth, widthMeasureSpec, childState),
                         resolveSizeAndState(maxHeight, heightMeasureSpec, childState << MEASURED_HEIGHT_STATE_SHIFT));

    count = mMatchParentChildren.size();
    if (count > 1) {   // 对于match parent的child进行测量。
        for (int i = 0; i < count; i++) {
            final View child = mMatchParentChildren.get(i);
            final MarginLayoutParams lp = (MarginLayoutParams) child.getLayoutParams();
            int childWidthMeasureSpec;
            int childHeightMeasureSpec;

            if (lp.width == LayoutParams.MATCH_PARENT) {
                childWidthMeasureSpec = MeasureSpec.makeMeasureSpec(getMeasuredWidth() -
                           getPaddingLeftWithForeground() - getPaddingRightWithForeground() -
                           lp.leftMargin - lp.rightMargin,
                           MeasureSpec.EXACTLY);
            } else {
                childWidthMeasureSpec = getChildMeasureSpec(widthMeasureSpec,
                           getPaddingLeftWithForeground() + getPaddingRightWithForeground() +
                           lp.leftMargin + lp.rightMargin,
                           lp.width);
            }

            if (lp.height == LayoutParams.MATCH_PARENT) {
                childHeightMeasureSpec = MeasureSpec.makeMeasureSpec(getMeasuredHeight() -
                           getPaddingTopWithForeground() - getPaddingBottomWithForeground() -
                           lp.topMargin - lp.bottomMargin,
                           MeasureSpec.EXACTLY);
            } else {
                childHeightMeasureSpec = getChildMeasureSpec(heightMeasureSpec,
                           getPaddingTopWithForeground() + getPaddingBottomWithForeground() +
                           lp.topMargin + lp.bottomMargin,
                           lp.height);
            }
            child.measure(childWidthMeasureSpec, childHeightMeasureSpec);
        }
    }
}
measureChildWithMargins()@ViewGroup.java
// 要求view的一个child测量自己,同时考虑MeasureSpec要求和padding和margins.
protected void measureChildWithMargins(View child, int parentWidthMeasureSpec, int widthUsed,
    int parentHeightMeasureSpec, int heightUsed) {
    // 获取子view的LayoutParams
    final MarginLayoutParams lp = (MarginLayoutParams) child.getLayoutParams();
    // 调整MeasureSpec,通过传进来的父view的MeasureSpec及子view自身的LayoutParams,共同决定子view的MeasureSpec.
    final int childWidthMeasureSpec = getChildMeasureSpec(parentWidthMeasureSpec,
                                       mPaddingLeft + mPaddingRight + lp.leftMargin + lp.rightMargin
                                       + widthUsed, lp.width);
    final int childHeightMeasureSpec = getChildMeasureSpec(parentHeightMeasureSpec,
                                       mPaddingTop + mPaddingBottom + lp.topMargin + lp.bottomMargin
                                       + heightUsed, lp.height);
     // 调用子view的measure(),又重新开始上面measure的流程。子view的measure()中会回调子view的onMeasure()函数。
    child.measure(childWidthMeasureSpec, childHeightMeasureSpec);
}
getChildMeasureSpec()@ViewGroup.java
public static int getChildMeasureSpec(int spec, int padding, int childDimension) {
    //获取parent view的mode和size
    int specMode = MeasureSpec.getMode(spec);
    int specSize = MeasureSpec.getSize(spec);
    //parent size与padding的差值(即parent中除去padding后剩余的大小),若小于0则直接返回0.
    int size = Math.max(0, specSize - padding);

    int resultSize = 0;
    int resultMode = 0;

    switch (specMode) {  //根据parent mode进行处理
        // Parent has imposed an exact size on us
        case MeasureSpec.EXACTLY:
            if (childDimension >= 0) {
                // 若child的layout_width或者layout_height在xml或者代码中指定了大于等于0的值,
                // 则设置child的size值为指定的值,mode为EXACTLY.
                resultSize = childDimension;
                resultMode = MeasureSpec.EXACTLY;
            } else if (childDimension == LayoutParams.MATCH_PARENT) {
                // Child wants to be our size. So be it.
                // 若child的layout_width或者layout_height在xml或者代码中指定为MATCH_PARENT,
                // 则设置child的size值为size,mode为EXACTLY.
                resultSize = size;
                resultMode = MeasureSpec.EXACTLY;
            } else if (childDimension == LayoutParams.WRAP_CONTENT) {
                // Child wants to determine its own size. It can‘t be bigger than us.
                // 若child的layout_width或者layout_height在xml或者代码中指定为WRAP_CONTENT,
                // 则设置child的size值为指定的值,mode为AT_MOST.
                resultSize = size;
                resultMode = MeasureSpec.AT_MOST;
            }
            break;

        // Parent has imposed a maximum size on us
        // 下面两个分支类似
        case MeasureSpec.AT_MOST:
           ......break;
        // Parent asked to see how big we want to be
        case MeasureSpec.UNSPECIFIED:
            ......break;
    }
    //使用mode和size生成MeasureSpec返回。
    return MeasureSpec.makeMeasureSpec(resultSize, resultMode);
}
可以看到,getChildMeasureSpec()是通过其父view提供的MeasureSpec参数得到specMode和specSize,然后根据计算出来的specMode以及子view的childDimension(layout_width或layout_height)来计算自身的measureSpec,如果其本身包含子视图,则计算出来的measureSpec将作为调用其子视图measure函数的参数,同时也作为自身调用setMeasuredDimension()的参数,如果其不包含子视图则默认情况下最终会调用onMeasure的默认实现,并最终调用到setMeasuredDimension()。
performMeasure()小结:
(1) mView.measure() , 即调用View.measure()方法。
(2) View.measure()内部调用onMeasure()方法,因为这里的mView是DecorView,调用的是DecorView.onMeasure(), 这个函数内部调用super.onMeasure()。因为DecorView继承于FrameLayout,所以super.onMeasure()即调用FrameLayout的onMeasure()方法。
(3) FrameLayout.onMeasure()对每个子view进行遍历测量,对每个子view调用measureChildWithMargins()方法测量子view。
(4) measureChildWithMargins()内部调用getChildMeasureSpec()计算出传给子view的MeasureSpec,并调用子view的measure()方法。
(5) FrameLayout.onMeasure()中根据父view及(3)测量出来的子view的MeasureSpec信息调用setMeasuredDimension()设置自身的size。
(6) 使用View的getMeasuredWidth()和getMeasuredHeight()方法来获取view测量的宽高,必须保证这两个方法在onMeasure流程之后被调用才能返回有效值。
(7) ViewGroup的子类必须要求LayoutParams继承于MarginLayoutParams,否则无法使用layout_margin参数。
3.3 performLayout()
performLayout()@ViewRootImpl.java
private void performLayout(WindowManager.LayoutParams lp, int desiredWindowWidth,
        int desiredWindowHeight) {
    mLayoutRequested = false;
    mScrollMayChange = true;
    mInLayout = true;

    final View host = mView;

    Trace.traceBegin(Trace.TRACE_TAG_VIEW, "layout");
    try {
        // 把performMeasure测量的结果传入layout()函数
        host.layout(0, 0, host.getMeasuredWidth(), host.getMeasuredHeight());

        mInLayout = false;
        ......
    } finally {
        Trace.traceEnd(Trace.TRACE_TAG_VIEW);
    }
    mInLayout = false;
}
这个函数内调用mView.layout()方法,而ViewGroup中重写了layout()方法,并调用了super.layout(), 即View.layout()。
layout()@View.java
// 给view及它的子孙的size及position赋值。
// 这是布局机制的第二阶段(第一阶段是measuring)。在这个阶段,每个父view都会调用其所有子view的layout()来放置它们。
// 子类中不应该重载这个方法,若子类中有children, 则该子类应该重载onLayout()函数,在这个函数中调用每个child的layout.
public void layout(int l, int t, int r, int b) {
    ......int oldL = mLeft;
    int oldT = mTop;
    int oldB = mBottom;
    int oldR = mRight;

    // 这部分是判断这个View的大小是否已经发生了变化,来判断是否需要重新layout。判断的方式就是通过将l,t,r,b参数传给setFrame()赋值给
    // mLeft,mTop, mRight,mBottom。
    // isLayoutModeOptical(): 如果mParent是一个使用可见范围进行编排的ViewGroup, 返回true.
    boolean changed = isLayoutModeOptical(mParent) ?
            setOpticalFrame(l, t, r, b) : setFrame(l, t, r, b);

    if (changed || (mPrivateFlags & PFLAG_LAYOUT_REQUIRED) == PFLAG_LAYOUT_REQUIRED) {
        // 调用onLayout方法
        onLayout(changed, l, t, r, b);
        mPrivateFlags &= ~PFLAG_LAYOUT_REQUIRED;
        ......
    }

    mPrivateFlags &= ~PFLAG_FORCE_LAYOUT;
    mPrivateFlags3 |= PFLAG3_IS_LAID_OUT;
}
我们先来看View的onLayout()方法,
onLayout()@View.java
protected void onLayout(boolean changed, int left, int top, int right, int bottom) {
}
这是一个空方法,这是因为Layout需要ViewGroup来控制进行。
再来看ViewGroup的onLayout()方法:
protected abstract void onLayout(boolean changed, int l, int t, int r, int b);
onLayout在ViewGroup中是个抽象方法,所以ViewGroup的子类都需要实现该方法。FrameLayout继承于ViewGroup,我们来看下FrameLayout.onLayout()的实现。
onLayout()@FrameLayout.java
protected void onLayout(boolean changed, int left, int top, int right, int bottom) {
    layoutChildren(left, top, right, bottom, false /* no force left gravity */);
}

void layoutChildren(int left, int top, int right, int bottom,
                              boolean forceLeftGravity) {
    final int count = getChildCount();

    final int parentLeft = getPaddingLeftWithForeground();
    final int parentRight = right - left - getPaddingRightWithForeground();

    final int parentTop = getPaddingTopWithForeground();
    final int parentBottom = bottom - top - getPaddingBottomWithForeground();

    mForegroundBoundsChanged = true;

    for (int i = 0; i < count; i++) {
        final View child = getChildAt(i);
        if (child.getVisibility() != GONE) {
            // 获取子view的LayoutParams
            final LayoutParams lp = (LayoutParams) child.getLayoutParams();
            // measure过程计算处理的子view的宽高
            final int width = child.getMeasuredWidth();
            final int height = child.getMeasuredHeight();

            int childLeft;
            int childTop;

            int gravity = lp.gravity;
            if (gravity == -1) {
                gravity = DEFAULT_CHILD_GRAVITY;
            }

            final int layoutDirection = getLayoutDirection();
            final int absoluteGravity = Gravity.getAbsoluteGravity(gravity, layoutDirection);
            final int verticalGravity = gravity & Gravity.VERTICAL_GRAVITY_MASK;
            // 根据absoluteGravity计算childLeft
            switch (absoluteGravity & Gravity.HORIZONTAL_GRAVITY_MASK) {
                case Gravity.CENTER_HORIZONTAL:
                    childLeft = parentLeft + (parentRight - parentLeft - width) / 2 +
                    lp.leftMargin - lp.rightMargin;
                    break;
                case Gravity.RIGHT:
                    if (!forceLeftGravity) {
                        childLeft = parentRight - width - lp.rightMargin;
                        break;
                    }
                case Gravity.LEFT:
                default:
                    childLeft = parentLeft + lp.leftMargin;
            }
            // 根据verticalGravity计算childTop
            switch (verticalGravity) {
                case Gravity.TOP:
                    childTop = parentTop + lp.topMargin;
                    break;
                case Gravity.CENTER_VERTICAL:
                    childTop = parentTop + (parentBottom - parentTop - height) / 2 +
                    lp.topMargin - lp.bottomMargin;
                    break;
                case Gravity.BOTTOM:
                    childTop = parentBottom - height - lp.bottomMargin;
                    break;
                default:
                    childTop = parentTop + lp.topMargin;
            }
            //调用子child的layout方法设置child的位置。
            child.layout(childLeft, childTop, childLeft + width, childTop + height);
        }
    }
}
FrameLayout.onLayout()函数也展示了一般的自定义ViewGroup重载onLayout函数的实现方式。onLayout()函数的目的就是确定子view们在父view中的具体位置,通常做法是用一个for循环调用每个子view的layout(l, t, r, b)函数,传入不同的l,t,r,b值确定子view的位置。
performLayout()小结:
(1) 调用host.layout(), 即View.layout()。
(2) View.layout()中调用setFrame()或者setOpticalFrame()赋值给View的mLeft,mTop,mRight,mBottom变量并判断位置是否变化,若变化则调用onLayout()。
(3) 因为host是mView就是DecorView,也就是FrameLayout的子类,所以实际上是FrameLayout.onLayout()被调用。
(4) 在FrameLayout.onLayout()函数中遍历每个子view, 并调用每个子view的layout()设置子view的位置。
(5) View.layout()函数可以被重载,ViewGroup.layout不能被重载,ViewGroup的onLayout为abstract的,子类必须重载实现自己的位置逻辑。
(6) measure()过程的结果是得到每个view的measuredWidth和measuredHeight,layout()过程的结果是得到每个view的mLeft,mTop,mRight,mBottom.这些值都是相对于父view而言的。
(7) layout_XXX的布局属性都是针对包含子view的ViewGroup的,当对一个没有父容器的view设置相关layout_XXX属性是没有意义的。
(8) 使用View的getWidth()和getHeight()方法来获取view测量的宽高时,必须保证这两个方法在onLayout流程之后被调用才能返回有效值。
3.4 performDraw()
performDraw()@ViewRootImpl.java
private void performDraw() {
    if (mAttachInfo.mDisplayState == Display.STATE_OFF && !mReportNextDraw) {
        return;
    }

    final boolean fullRedrawNeeded = mFullRedrawNeeded;
    mFullRedrawNeeded = false;

    mIsDrawing = true;
    Trace.traceBegin(Trace.TRACE_TAG_VIEW, "draw");
    try {
        // 开始draw
        draw(fullRedrawNeeded);
    } finally {
        mIsDrawing = false;
        Trace.traceEnd(Trace.TRACE_TAG_VIEW);
    }
    ......
}
draw()@ViewRootImpl.java
private void draw(boolean fullRedrawNeeded) {
    Surface surface = mSurface;
    if (!surface.isValid()) {
        return;
    }
    ......if (!dirty.isEmpty() || mIsAnimating) {
        if (attachInfo.mHardwareRenderer != null && attachInfo.mHardwareRenderer.isEnabled()) {
            ......
            attachInfo.mHardwareRenderer.draw(mView, attachInfo, this, animating ? null : mCurrentDirty);   // 使用硬件绘制
        } else {
            ......// 使用软件进行绘制。
            if (!drawSoftware(surface, attachInfo, yoff, scalingRequired, dirty)) {
                return;
            }
        }
    }

    if (animating) {
        mFullRedrawNeeded = true;
        scheduleTraversals();    // 如果在动画中,重新发送绘制消息
    }
}
drawSoftware()@ViewRootImpl.java
private boolean drawSoftware(Surface surface, AttachInfo attachInfo, int yoff,
                             boolean scalingRequired, Rect dirty) {
    // 使用软件渲染绘制。
    Canvas canvas;
    try {
        int left = dirty.left;
        int top = dirty.top;
        int right = dirty.right;
        int bottom = dirty.bottom;

        canvas = mSurface.lockCanvas(dirty);    //从mSurface中lock一块Canvas. The dirty rectangle can be modified by Surface.lockCanvas()
        //no inspection Constant Conditions
        if (left != dirty.left || top != dirty.top || right != dirty.right ||
                        bottom != dirty.bottom) {
            attachInfo.mIgnoreDirtyState = true;
        }
            // TODO: Do this in native
        canvas.setDensity(mDensity);
    } catch (Surface.OutOfResourcesException e) {
        handleOutOfResourcesException(e);
        return false;
    } catch (IllegalArgumentException e) {
        // Don‘t assume this is due to out of memory, it could be
        // something else, and if it is something else then we could
        // kill stuff (or ourself) for no reason.
        mLayoutRequested = true;    // ask wm for a new surface next time.
        return false;
    }

    try {
        // 如果该位图格式包含alpha通道,需要在绘制之前把它清除。这样child就可以在透明背景下重新合成绘制。
        // 如果使用了偏移,需要清理偏移不会出现的区域,以免垃圾遗留在空白区域上。
        if (!canvas.isOpaque() || yoff != 0) {
            canvas.drawColor(0, PorterDuff.Mode.CLEAR);
        }

        dirty.setEmpty();
        mIsAnimating = false;
        attachInfo.mDrawingTime = SystemClock.uptimeMillis();
        mView.mPrivateFlags |= View.PFLAG_DRAWN;

        try {
            canvas.translate(0, -yoff);
            if (mTranslator != null) {
                mTranslator.translateCanvas(canvas);
            }
            canvas.setScreenDensity(scalingRequired ? mNoncompatDensity : 0);
            attachInfo.mSetIgnoreDirtyState = false;

            mView.draw(canvas);          // 调用View.draw()由view自己在canvas上进行绘制。

            drawAccessibilityFocusedDrawableIfNeeded(canvas);
        } finally {
            if (!attachInfo.mSetIgnoreDirtyState) {
                // Only clear the flag if it was not set during the mView.draw() call
                attachInfo.mIgnoreDirtyState = false;
            }
        }
    } finally {
        try {
            surface.unlockCanvasAndPost(canvas);    // unlock canvas
        } catch (IllegalArgumentException e) {
            mLayoutRequested = true;    // ask wm for a new surface next time.
            //noinspection ReturnInsideFinallyBlock
            return false;
        }
    }
    return true;
}
draw()@View.java
// 在给定的canvas上手动渲染view及所有子view.这个函数被调用之前,该view必须已经完整走了一遍layout.
// 当实现一个view时,应该实现onDraw()而不是重载这个函数。如果要重载这个函数,调用super.draw()。
public void draw(Canvas canvas) {
    if (mClipBounds != null) {
        canvas.clipRect(mClipBounds);
    }
    final int privateFlags = mPrivateFlags;
    final boolean dirtyOpaque = (privateFlags & PFLAG_DIRTY_MASK) == PFLAG_DIRTY_OPAQUE &&
                                (mAttachInfo == null || !mAttachInfo.mIgnoreDirtyState);
    mPrivateFlags = (privateFlags & ~PFLAG_DIRTY_MASK) | PFLAG_DRAWN;

    /*
     * Draw traversal performs several drawing steps which must be executed
     * in the appropriate order:
     *      1. Draw the background
     *      2. If necessary, save the canvas‘ layers to prepare for fading
     *      3. Draw view‘s content
     *      4. Draw children
     *      5. If necessary, draw the fading edges and restore layers
     *      6. Draw decorations (scrollbars for instance)
     */

    // Step 1, draw the background, if needed
    int saveCount;

    if (!dirtyOpaque) {
        final Drawable background = mBackground;  // 获取xml中通过android:background属性或者代码中setBackgroundColor(),setBackgroundResource()等进行赋值的背景Drawable.
        if (background != null) {
            final int scrollX = mScrollX;
            final int scrollY = mScrollY;
            // 根据layout过程确定的view的位置设置背景绘制区域。
            if (mBackgroundSizeChanged) {
                background.setBounds(0, 0,  mRight - mLeft, mBottom - mTop);
                mBackgroundSizeChanged = false;
            }

            if ((scrollX | scrollY) == 0) {
                background.draw(canvas);    // 调用Drawble.draw()完成绘制工作。
            } else {
                canvas.translate(scrollX, scrollY);
                background.draw(canvas);
                canvas.translate(-scrollX, -scrollY);
            }
        }
    }

    // skip step 2 & 5 if possible (common case)
    final int viewFlags = mViewFlags;
    boolean horizontalEdges = (viewFlags & FADING_EDGE_HORIZONTAL) != 0;
    boolean verticalEdges = (viewFlags & FADING_EDGE_VERTICAL) != 0;
    if (!verticalEdges && !horizontalEdges) {                         // 没有边缘效果
        // Step 3, draw the content
        if (!dirtyOpaque)  onDraw(canvas);  // 对view的内容进行绘制

        // Step 4, draw the children
        dispatchDraw(canvas);   // 对当前所有子view进行绘制,如果当前的view没有子view,就不需要绘制。// Step 6, draw decorations (scrollbars). scroolbars第一次唤醒时进行绘制。
        // 注意,每一个view都是有水平和垂直滚动条的,只是大多数情况不显示而已。
        onDrawScrollBars(canvas);

        if (mOverlay != null && !mOverlay.isEmpty()) {
            mOverlay.getOverlayView().dispatchDraw(canvas);
        }

        // we‘re done...
        return;
    }
    ......
}
View.onDraw()方法是一个空方法,而ViewGroup也没有重写该方法,需要子类去实现具体的onDraw()逻辑,这是因为每个view的内容是各不相同的。
View.dispatchDraw()是一个空函数,有子view时才进行绘制,看下在ViewGroup中的实现。
dispatchDraw()@ViewGroup.java
protected void dispatchDraw(Canvas canvas) {
    final int count = mChildrenCount;
    final View[] children = mChildren;
    int flags = mGroupFlags;
    ......
if ((flags & FLAG_USE_CHILD_DRAWING_ORDER) == 0) {
        for (int i = 0; i < count; i++) {
            final View child = children[i];
            if ((child.mViewFlags & VISIBILITY_MASK) == VISIBLE || child.getAnimation() != null) {
                more |= drawChild(canvas, child, drawingTime);
            }
        }
    } else {
        for (int i = 0; i < count; i++) {
            final View child = children[getChildDrawingOrder(count, i)];
            if ((child.mViewFlags & VISIBILITY_MASK) == VISIBLE || child.getAnimation() != null) {
                more |= drawChild(canvas, child, drawingTime);
            }
        }
    }

    // Draw any disappearing views that have animations
    if (mDisappearingChildren != null) {
        final ArrayList<View> disappearingChildren = mDisappearingChildren;
        final int disappearingCount = disappearingChildren.size() - 1;
        // Go backwards -- we may delete as animations finish
        for (int i = disappearingCount; i >= 0; i--) {
            final View child = disappearingChildren.get(i);
            more |= drawChild(canvas, child, drawingTime);
        }
    }
    ......// mGroupFlags might have been updated by drawChild()
    flags = mGroupFlags;

    if ((flags & FLAG_INVALIDATE_REQUIRED) == FLAG_INVALIDATE_REQUIRED) {
        invalidate(true);
    }
    ......
}
drawChild()@ViewGroup.java
protected boolean drawChild(Canvas canvas, View child, long drawingTime) {
    return child.draw(canvas, this, drawingTime);  //调用View.draw(),child的绘制重新走上面流程。
}
performDraw()小结:
(1) View默认不会绘制内容的,需要子类自己去实现实际的绘制。
(2) View的绘制是利用onDraw()函数传入的Canvas进行的。
(3) 看源码中有很多关于动画的逻辑,需要区分View动画和ViewGroup布局动画。View动画是指View自身的动画,可以通过setAnimation()进行设置。ViewGroup布局动画是针对ViewGroup显示内部子view时设置的动画,可以在xml文件中对ViewGroup设置layoutAnimation属性。
(4) 子view在获取canvas的剪切区时不用关注padding,padding会被自动处理掉。
(5) 默认情况下子ViewGroup.drawChild()的顺序与子view被添加的顺序一致,可以通过ViewGroupDrawingOrder()函数提供不同的顺序。
3.5 View.invalidate()和View.postInvalidate()介绍
上一篇文章中,ViewGroup.addView()调用了invalidate()函数,现在来介绍下这个函数的内容。
3.5.1 View.invalidate()的作用
invalidate()的作用是废止整个view,如果这个view是可见的,那么在将来某个时间点onDraw()会被调用。这个函数必须在UI线程中调用,在非UI线程可以调用postInvalidate()。
这个函数有三种具体实现:
(1) void invalidate(boolean invalidateCache) : 完整的废止会将drawing cache一起废止, 当view的内容或者dimensions不变的时候,这个函数可以设置不废止cache。
(2) void invalidate(Rect dirty) : 标记由dirty定义的区域为需要绘制的区域。
(3) void invalidate(int l, int t, int r, int b) : 标记由rect(l,t,r,b)定义的区域,dirty rect的坐标是相对于view的。
3.5.2 常见会引起invalidate()调用的原因
(1) 直接调用invalidate()方法请求重新draw,只会绘制调用者本身。
(2) 调用setSelection()方法请求重新draw,只会绘制调用者本身。
(3) 调用setVisibility()方法, 当view的状态从INVISIBLE变成VISIBLE时会间接调用invalidate方法,从而绘制该view。当view的状态从 INVISIBLEVISIBLE变为GONE状态时会间接调用requestLayout和invalidate()方法,同时由于view树大小发生 了变化,所以会请求measure过程以及draw过程,同样只绘制需要重新绘制的view。
(4) 调用setEnabled()方法请求重新draw,不会重新绘制任何view包括该调用者本身。
(5) 调用requestFocus()方法请求view树的draw过程,只绘制需要重绘的view。
3.5.3 invalidate()源码分析
View.invalidate()会调用父view的invalidateChild()函数,实际上调用的是ViewGroup.invalidateChild()函数。
invalidateChild()@ViewGroup.java
public final void invalidateChild(View child, final Rect dirty) {
    ViewParent parent = this;
    ......
    do {
        ......
        parent = parent.invalidateChildInParent(location, dirty);  //层层循环向上调用,知道ViewRootImpl返回null.
        ......
    } while (parent != null);
    ......
}
invalidateChild()实际上是一个从当前view向上父view回溯的过程。每一层的父view都将自己的显示区域与传入的dirty Rect做交集。
invalidateChild()函数调用最后会传到ViewRootImpl.invalidateChindInParent()。
invalidateChindInParent()@ViewRootImpl
public ViewParent invalidateChildInParent(int[] location, Rect dirty) {
    checkThread();
    ......
    final Rect localDirty = mDirty;
    ......
    localDirty.union(dirty.left, dirty.top, dirty.right, dirty.bottom);   // 融合dirty rect与当前的rect.
    ......
    scheduleTraversals();          // 回到上文第3点, 会异步触发执行performTraversals()。
    ......
    return null;
}
ViewRootImpl.invalidateChindInParent()直接返回null,也就是ViewGroup.invalidateChild()中do-while循环结束的条件。
调用invalidate()的实质就是从当前view层层上传到父级,直到ViewRootImpl触发scheduleTraversals()函数,整个view树重新走一遍上面的绘制流程。
3.5.4 postInvalidate()函数
View.invalidate()是在UI线程里运行的,在其它线程中只能调用View.postInvalidate(),该函数最终会通过ViewRootImpl类的handler发送MSG_INVALIDATE消息,最终又在UI线程中执行View.invalidate()。
4. addToDisplay()@Session.java
通过addToDisplay()将window对象添加到WMS中,WMS将管理这个window。
public int addToDisplay(IWindow window, int seq, WindowManager.LayoutParams attrs,
    int viewVisibility, int displayId, Rect outContentInsets, InputChannel outInputChannel) {
    // 调用WindowManagerService的addWindow()函数
    return mService.addWindow(this, window, seq, attrs, viewVisibility, displayId,
            outContentInsets, outInputChannel);
}
addWindow()@WindowManagerService.java
public int addWindow(Session session, IWindow client, int seq,
            WindowManager.LayoutParams attrs, int viewVisibility, int displayId,
            Rect outContentInsets, InputChannel outInputChannel) {
    ......
    WindowState win = null;
    ......
    // 创建一个WindowState, WMS中维护的是WindowState对象.
    win = new WindowState(this, session, client, token,
                    attachedWindow, appOp[0], seq, attrs, viewVisibility, displayContent);
    ......
    win.attach();    // 调用WindowState.attach()函数。
    mWindowMap.put(client.asBinder(), win);
    ......
    return res;
}
attach()@WindowState.java
void attach() {
    mSession.windowAddedLocked();
}
windowAddedLocked()@Session.java
void windowAddedLocked() {
    if (mSurfaceSession == null) {
        mSurfaceSession = new SurfaceSession();  //创建SurfaceSeesion对象
        mService.mSessions.add(this);
    }
    mNumWindow++;
}
(时序图中调用26以后就是在WindowManagerService中与底层交互,控制底层显示实际内容了,在本文中暂不考虑)
Activity启动(2)----setView之后(View的绘制过程)
标签:
原文地址:http://www.cnblogs.com/Jackwen/p/5135900.html