标签:
Hue是一个开源的Apache Hadoop UI系统,最早是由Cloudera Desktop演化而来,由Cloudera贡献给开源社区,它是基于Python Web框架Django实现的。通过使用Hue我们可以在浏览器端的Web控制台上与Hadoop集群进行交互来分析处理数据,例如操作HDFS上的数据,运行MapReduce Job等等。很早以前就听说过Hue的便利与强大,一直没能亲自尝试使用,下面先通过官网给出的特性,通过翻译原文简单了解一下Hue所支持的功能特性集合:
默认基于轻量级sqlite数据库管理会话数据,用户认证和授权,可以自定义为MySQL、Postgresql,以及Oracle
基于文件浏览器(File Browser)访问HDFS
基于Hive编辑器来开发和运行Hive查询
支持基于Solr进行搜索的应用,并提供可视化的数据视图,以及仪表板(Dashboard)
支持基于Impala的应用进行交互式查询
支持Spark编辑器和仪表板(Dashboard)
支持Pig编辑器,并能够提交脚本任务
支持Oozie编辑器,可以通过仪表板提交和监控Workflow、Coordinator和Bundle
支持HBase浏览器,能够可视化数据、查询数据、修改HBase表
支持Metastore浏览器,可以访问Hive的元数据,以及HCatalog
支持Job浏览器,能够访问MapReduce Job(MR1/MR2-YARN)
支持Job设计器,能够创建MapReduce/Streaming/Java Job
支持Sqoop 2编辑器和仪表板(Dashboard)
支持ZooKeeper浏览器和编辑器
支持MySql、PostGresql、Sqlite和Oracle数据库查询编辑器
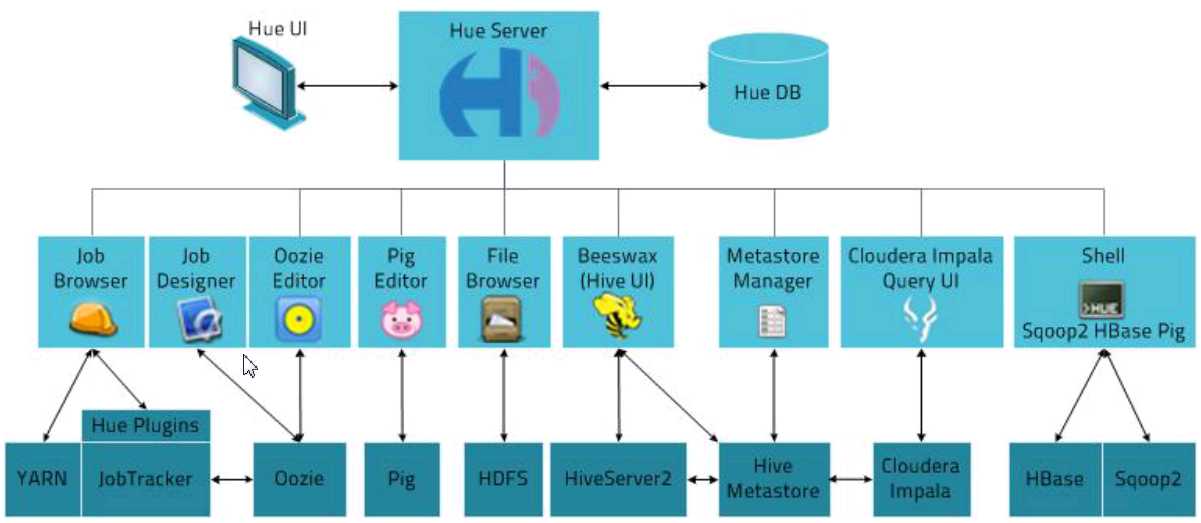
Hue的架构:
hue官网:http://gethue.com/
配置文档:http://archive.cloudera.com/cdh5/cdh/5/hue-3.7.0-cdh5.3.6/manual.html#_install_hue
源码:https://github.com/cloudera/hue
这里我们直接用下载Hue:http://archive.cloudera.com/cdh5/cdh/5/hue-3.7.0-cdh5.3.6.tar.gz
需要连接互联网
修改虚拟机网络配置
安装系统包
yum install ant asciidoc cyrus-sasl-devel cyrus-sasl-gssapi gcc gcc-c++ krb5-devel libtidy libxml2-devel libxslt-devel openldap-devel python-devel sqlite-devel openssl-devel mysql-devel gmp-devel
在实际安装的时候,sqlite-devel不能从镜像下载,这里我是用了手动下载tar包,安装编译:
下载地址: http://www.sqlite.org/sqlite-autoconf-3070500.tar.gz
tar zxf sqlite-autoconf-3070500.tar.gz
cd sqlite-autoconf-3070500
./configure
make
sudo make install
编译Hue
tar zxf hue-3.7.0-cdh5.3.6.tar.gz /opt/cdh5/
cd /opt/cdh5/hue-3.7.0-cdh5.3.6/
make apps
配置Hue
secret_key=jFE93j;2[290-eiw.KEiwN2s3[‘d;/.q[eIW^y#e=+Iei*@Mn<qW5o
# Webserver listens on this address and port
http_host=hadoop
http_port=8888
# Time zone name
time_zone=Asia/Shanghai
启动Hue
${HUE_HOME}/build/env/bin/supervisor
打开hue的浏览器页面:hadoop:8888
Hue与Hadoop集成时,需要配置启动HDFS中的webHDFS,在hdfs-site.xml增加下面配置:
<property>
  <name>dfs.webhdfs.enabled</name>
  <value>true</value>
</property>
此外,还需要配置Hue访问HDFS用户权限,在core-site.xml中配置:
<property>
    <name>hadoop.http.staticuser.user</name>
    <value>hadoop</value>
</property>

<property>
  <name>hadoop.proxyuser.hue.hosts</name>
  <value>*</value>
</property>
<property>
  <name>hadoop.proxyuser.hue.groups</name>
  <value>*</value>
</property>
完成上述配置后,需重启HDFS。
配置Hue
[[hdfs_clusters]]
  # HA support by using HttpFs

  [[[default]]]
  fs_defaultfs=hdfs://hadoop:8020

  # Directory of the Hadoop configuration
  hadoop_conf_dir=/opt/cdh5/hadoop-2.5.0-cdh5.3.6/etc/hadoop

  # This is the home of your Hadoop HDFS installation.
  hadoop_hdfs_home=/opt/cdh5/hadoop-2.5.0-cdh5.3.6

  # Use this as the HDFS Hadoop launcher script
  hadoop_bin=/opt/cdh5/hadoop-2.5.0-cdh5.3.6/bin

# Configuration for YARN (MR2)
# ------------------------------------------------------------------------
[[yarn_clusters]]

  [[[default]]]
  # Enter the host on which you are running the ResourceManager
   resourcemanager_host=hadoop

  # The port where the ResourceManager IPC listens on
   resourcemanager_port=8032

  # Whether to submit jobs to this cluster
  submit_to=True

  # URL of the ResourceManager API
   resourcemanager_api_url=http://hadoop:8088

  # URL of the ProxyServer API
   proxy_api_url=http://hadoop:8088

  # URL of the HistoryServer API
   history_server_api_url=http://hadoop:19888
重启Hue服务。这里我们可以通在远程cmd中运行hive,在Hue中查看任务运行状况
hive-site.xml:
注:metastore应该作为一个服务起来,然后让客户端去连接这个服务,去读mysql数据库里面的数据,可以参考hive官网上的Administrator Documentation中的Setting Up MetaStore
<property>
  <name>hive.metastore.uris</name>
  <value>thrift://hadoop:9083</value>
  <description>Thrift URI for the remote metastore. Used by metastore client to connect to remote metastore.</description>
</property>
配置完成以后,需启动服务: nohup {$HIVE_HOME}/bin/hive --service metastore &
nohup {$HIVE_HOME}/bin/hiveserver2 &
hue.ini
# Host where HiveServer2 is running.
# If Kerberos security is enabled, use fully-qualified domain name (FQDN).
hive_server_host=hadoop

# Port where HiveServer2 Thrift server runs on.
hive_server_port=10000

# Hive configuration directory, where hive-site.xml is located
hive_conf_dir=/opt/cdh5/hive-0.13.1-cdh5.3.6/conf

# Timeout in seconds for thrift calls to Hive service
server_conn_timeout=120
注:重新启动hive和hue以后,可能在hue中运行sql时会出现错误,因为权限问题,hue登陆的用户和hdfs上创建表的用户不相同,这个时候需要用hadoop的命令在后台做出更改bin/hdfs dfs -R o+x /xx
在hue.ini中配置Hue本身的数据库SQLite
[[[sqlite]]]
# Name to show in the UI.
nice_name=SQLite

# For SQLite, name defines the path to the database.
name=/opt/cdh5/hue-3.7.0-cdh5.3.6/desktop/desktop.db

# Database backend to use.
engine=sqlite
在hue.ini中配置Mysql数据库
# Name to show in the UI.
nice_name="My SQL DB"
## nice_name=MySqlDB
# For MySQL and PostgreSQL, name is the name of the database.
# For Oracle, Name is instance of the Oracle server. For express edition
# this is ‘xe‘ by default.
## name=db_track

# Database backend to use. This can be:
# 1. mysql
# 2. postgresql
# 3. oracle
engine=mysql

# IP or hostname of the database to connect to.
host=hadoop

# Port the database server is listening to. Defaults are:
# 1. MySQL: 3306
# 2. PostgreSQL: 5432
# 3. Oracle Express Edition: 1521
port=3306

# Username to authenticate with when connecting to the database.
user=root

# Password matching the username to authenticate with when
# connecting to the database.
password=123456
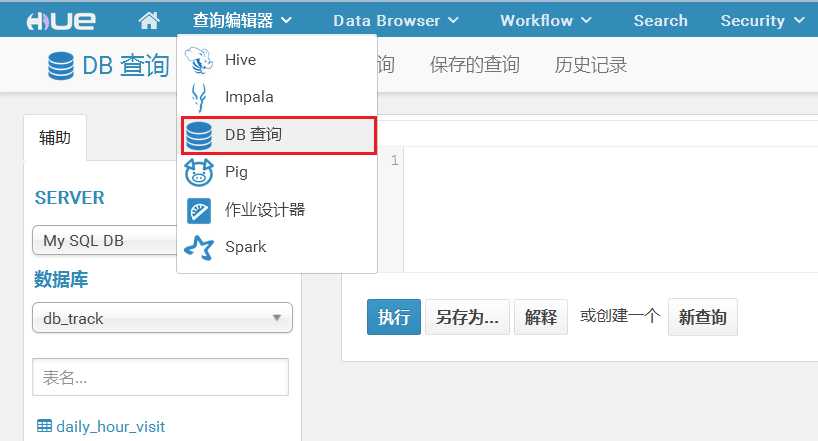
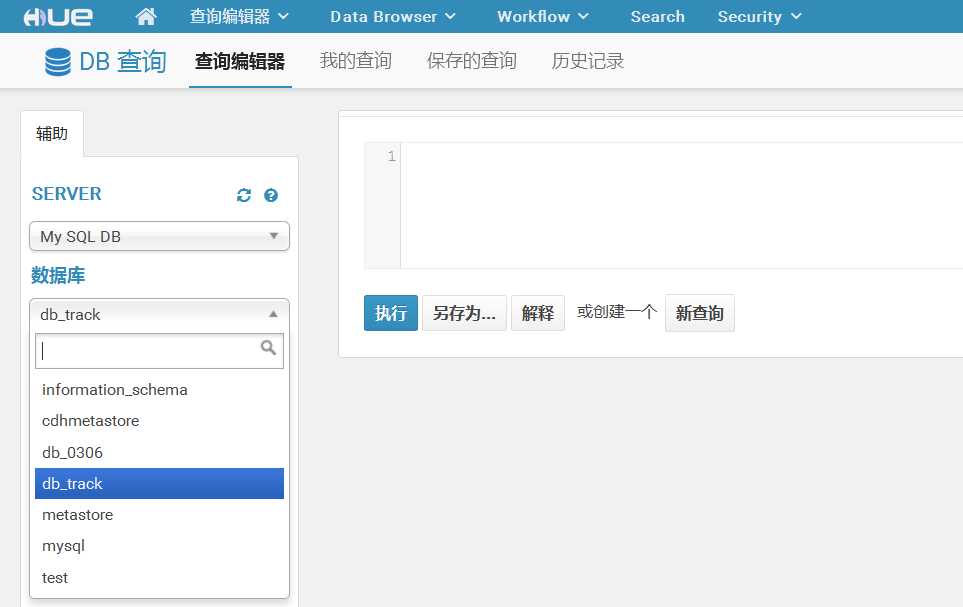
重启hue服务,可以在页面中看到配置的数据库了:
标签:
原文地址:http://www.cnblogs.com/raymoc/p/5343549.html