标签:des style blog http color os io 2014
服务器配置
第一步:服务器选择;
我选的是新浪的 http://sae.sina.com.cn/ ,具体如何配置就不用细说了,就相当于租用一台服务器一样
第二步:上传代码;共三个件,分别是index.php,oauth2.php,redirectUri.php
index.php 代码如下:
<?php
/**
	微信公众平台
*/


define("TOKEN", "weixin");//与管理平台的TOKEN设置一致
$wechatObj = new wechatCallbackapiTest();
$wechatObj->responseMsg();

class wechatCallbackapiTest
{
	public function valid()//验证接口用,管理平台后台设置的时候请调用此方法进行验证
    {
        $echoStr = $_GET["echostr"];

        if($this->checkSignature()){
        	echo $echoStr;
        	exit;
        }
    }

    public function responseMsg()//接受用户信息并返回图文信息
    {

		$postStr = $GLOBALS["HTTP_RAW_POST_DATA"];

		if (!empty($postStr)){

              	$postObj = simplexml_load_string($postStr, ‘SimpleXMLElement‘, LIBXML_NOCDATA);

                $fromUsername = $postObj->FromUserName;
                $toUsername = $postObj->ToUserName;
                $keyword = trim($postObj->Content);
                $time = time();
				//加载图文模版
				$picTpl = "<xml>
							<ToUserName><![CDATA[%s]]></ToUserName>
							<FromUserName><![CDATA[%s]]></FromUserName>
							<CreateTime>%s</CreateTime>
							<MsgType><![CDATA[%s]]></MsgType>
							<ArticleCount>1</ArticleCount>
							<Articles>
							<item>
							<Title><![CDATA[%s]]></Title>
							<Description><![CDATA[%s]]></Description>
							<PicUrl><![CDATA[%s]]></PicUrl>
							<Url><![CDATA[%s]]></Url>
							</item>
							</Articles>
							<FuncFlag>1</FuncFlag>
							</xml> ";

              		$msgType = "news";
					$title = "标题:关注回复";
					$data  = date(‘Y-m-d‘);
					$desription = "内容:谢谢关注,这里只是测试!";
					$image = "http://m.baidu.com/static/index/l.gif";

                    $turl="http://meapp.sinaapp.com/oauth2.php"; //这里需要改为你的域名
                	$resultStr = sprintf($picTpl, $fromUsername, $toUsername, $time, $msgType, $title,$desription,$image,$turl);
                	echo $resultStr;


        }else {
        	echo "请输入任意文字!";
        	exit;
        }
    }

	//封装的验证
	private function checkSignature()
	{
        $signature = $_GET["signature"];
        $timestamp = $_GET["timestamp"];
        $nonce = $_GET["nonce"];

		$token = TOKEN;
		$tmpArr = array($token, $timestamp, $nonce);
		sort($tmpArr);
		$tmpStr = implode( $tmpArr );
		$tmpStr = sha1( $tmpStr );

		if( $tmpStr == $signature ){
			return true;
		}else{
			return false;
		}
	}
}

?>
oauth2.php
<?php
$strappid="wx0000000000"; //微信APPID
$gourl=urlencode("http://meapp.sinaapp.com/redirectUri.php");//这里的域名换成自己的
echo "<h1>";
echo "<a href=‘https://open.weixin.qq.com/connect/oauth2/authorize?appid=$strappid&redirect_uri=$gourl&response_type=code&scope=snsapi_userinfo&state=1#wechat_redirect‘>点击这里获取用户信息</a>";
echo "</h1>";

?>
redirectUri.php
<?php
if (isset($_GET[‘code‘])){
$appid = "你的appid";
$secret = "你的secret";
$code = $_GET["code"];
$get_token_url = ‘https://api.weixin.qq.com/sns/oauth2/access_token?appid=‘.$appid.‘&secret=‘.$secret.‘&code=‘.$code.‘&grant_type=authorization_code‘;
$ch = curl_init();
curl_setopt($ch,CURLOPT_URL,$get_token_url);
curl_setopt($ch,CURLOPT_HEADER,0);
curl_setopt($ch, CURLOPT_RETURNTRANSFER, 1 );
curl_setopt($ch, CURLOPT_CONNECTTIMEOUT, 10);
$res = curl_exec($ch);
curl_close($ch);
$json_obj = json_decode($res,true);
//根据openid和access_token查询用户信息
$access_token = $json_obj[‘access_token‘];
$openid = $json_obj[‘openid‘];
$get_user_info_url = ‘https://api.weixin.qq.com/sns/userinfo?access_token=‘.$access_token.‘&openid=‘.$openid.‘&lang=zh_CN‘;
$ch = curl_init();
curl_setopt($ch,CURLOPT_URL,$get_user_info_url);
curl_setopt($ch,CURLOPT_HEADER,0);
curl_setopt($ch, CURLOPT_RETURNTRANSFER, 1 );
curl_setopt($ch, CURLOPT_CONNECTTIMEOUT, 10);
$res = curl_exec($ch);
curl_close($ch);
//解析json
$user_obj = json_decode($res,true);
$_SESSION[‘user‘] = $user_obj;
print_r($user_obj);
}else{
    echo "NO CODE";
}
echo "<hr>";
echo "更详细请到http://mp.weixin.qq.com/wiki/index.php?title=%E7%BD%91%E9%A1%B5%E6%8E%88%E6%9D%83%E8%8E%B7%E5%8F%96%E7%94%A8%E6%88%B7%E5%9F%BA%E6%9C%AC%E4%BF%A1%E6%81%AF"
?>
微信配置
第一步:申请微信公众测试号,用微信扫一扫即可:
http://mp.weixin.qq.com/debug/cgi-bin/sandbox?t=sandbox/login
第二步:配置测试号
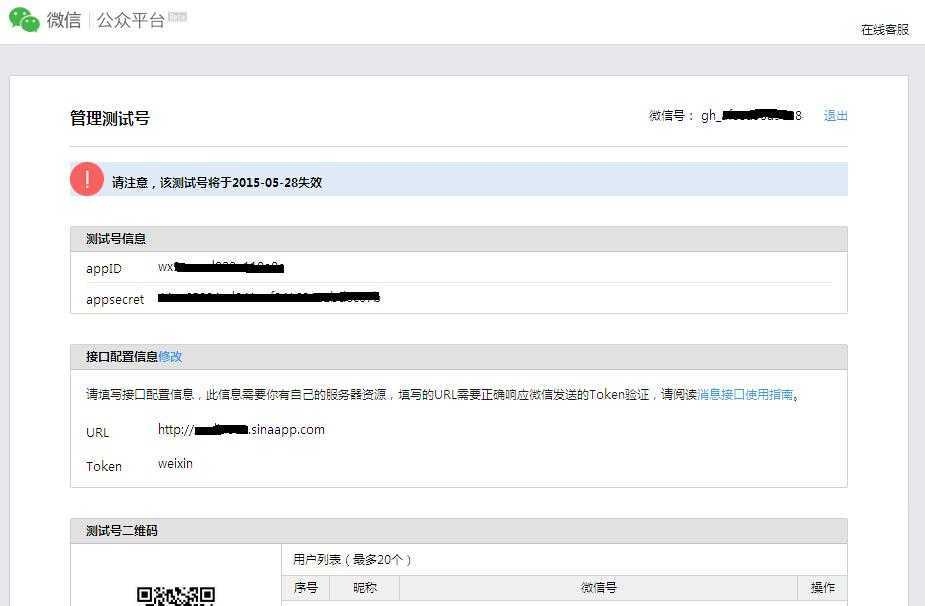
接口配置信息
输入URL 如:http://meapp.sinaapp.com
输入Token 如:weixin
第三步:oauth2授权配置
点oauth2.0网页授权 后面的 修改
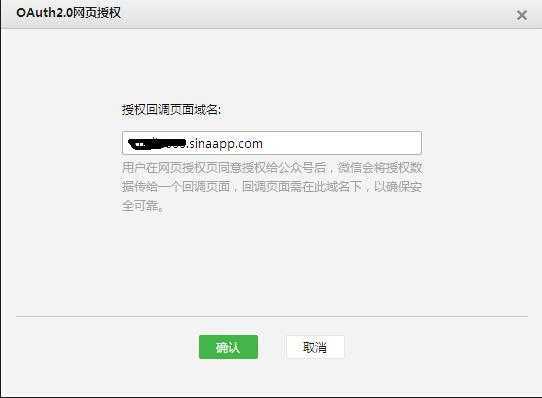
授权回调页面域名:输入meapp.sinaapp.com (注意:这里不加http://,如果加http://会出现 redirect_uri 错误)
第四步:扫描测试号二维码,看看是不是可以了,简单吧!
微信开发关注回复 oauth2(1),布布扣,bubuko.com
标签:des style blog http color os io 2014
原文地址:http://www.cnblogs.com/20078888/p/3873143.html