标签:
dom对象详解--style对象
style对象
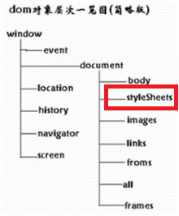
style对象和document对象下的集合对象styleSheets有关系,styleSheets是文档中所有style对象的集合,这里讲解的重点是style对象,styleSheets不是重点。
style对象定义:Represents the current settings of all possible inline styles for agiven element,即表示当前元素的样式设置。
例,可拖动的窗口
<!DOCTYPE html>
<html>
<head>
    <meta charset="UTF-8">
    <title>document示例--可拖动的DIV</title>
    <script type="text/javascript">
        var x = 0, y = 0, x1 = 0, y1 = 0;
        var moveable = false;
        var index = 20000;
        //开始拖动
        //onmousedown 某个鼠标按键被按下
        function startDrag(obj, evt) {
            //这行代码又是什么意思???
            e = evt ? evt : window.event;
            //wo艹,更加看不懂这段代码再搞什么飞机了???
            if(!window.captureEvents) {
                obj.setCapture();
            } else {
                window.captureEvents(Event.MOUSEMOVE|Event.MOUSEUP);
            }
            var win = obj.parentNode;//取得父窗体(父窗体就是该div得上一级div)
            win.style.zIndex = ++index;//设置父窗体的z轴值(又关z轴什么啊!!!)
            x = e.clientX;//取得当前鼠标的X坐标
            y = e.clientY;//取得当前鼠标的Y坐标
            //将父窗体的距浏览器左边界的距离转换为NUMBER
            x1 = parseInt(win.style.left.substring(0, win.style.left.indexOf("p")));
            ////将父窗体的距浏览器右边界的距离转换为NUMBER
            y1 = parseInt(win.style.top.substring(0, win.style.top.indexOf("p")));
            moveable = true;
        }
        //拖动
        //onmousemove 鼠标被移动
        function drag(obj, evt) {
            //这行代码又是什么意思???
            e = evt ? evt : window.event;
            if(moveable) {
                var win = obj.parentNode;
                win.style.left = (x1 + e.clientX - x) + "px";
                win.style.top = (y1 + e.clientY - y) + "px";
            }
        }
        //停止拖动
        //onmouseup 鼠标按键被松开
        function stopDrag(obj) {
            //wo艹,更加看不懂这段代码再搞什么飞机了???
            if(moveable) {
                if(!window.captureEvents) {
                    obj.releaseCapture();
                } else {
                    window.releaseEvents(Event.MOUSEMOVE|Event.MOUSEUP);
                }
            }
            moveable = false;
        }
    </script>
</head>
<body>
    <div style="left: 154px; top: 100px; position: absolute; width: 200px; height: 200px; background-color: #99CCFF; z-index: 200;">
        <div id="title" onmousedown="startDrag(this, event)" onmousemove="drag(this, event)" onmouseup="stopDrag(this)" style="width: 195px; height: 20px;background-color: #330033; top: 0px; left: 0px; position: absolute; font-size: 12px; color: #ffffff; z-index: 200; padding-top: 5px; padding-left: 5px; cursor: hand;">
            浮动窗口
        </div>
        实例
    </div>
</body>
</html>
style对象不是针对某一个html元素,而是对所有的html元素而言的,也就是说,我们可以通过document.getElementById("id").style.property="值",来控制网页文档的任何一个元素(对象)的样式,当然这个很重要的。
js通过style对象把css结合起来的,所以html dom学习时要有css的基础。
style对象常用的函数和属性可参考http://www.w3school.com.cn/jsref/dom_obj_style.asp。
例,background属性的使用示例——坦克转向(一次加载一个背景图,通过显示该背景图的不同部分,实现转向的效果)
准备素材:

代码如下:
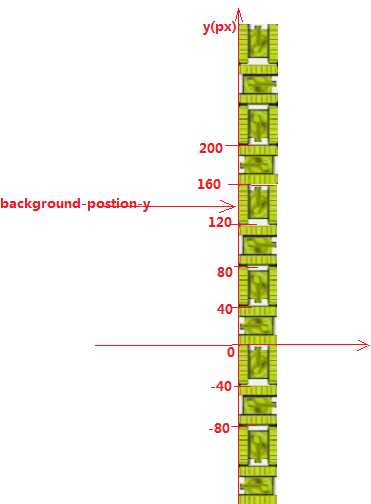
<!DOCTYPE html>
<html>
<head>
    <meta charset="UTF-8">
    <title>Document</title>
    <script type="text/javascript">
        function change(obj) {
            if(obj.value == "上") {
                tank.style.backgroundPositionY="0px";
            } else if(obj.value == "右") {
                tank.style.backgroundPositionY="120px";
            } else if(obj.value == "下") {
                tank.style.backgroundPositionY="80px";
            } else if(obj.value == "左") {
                tank.style.backgroundPositionY="40px";
            }
        }
    </script>
</head>
<body>
    <div id="tank" style="background-position-y: -40px; background-image: url(‘itank.jpg‘); width: 40px; height: 40px;" ></div>
    <input type="button" value="上" onclick="change(this)" />
    <input type="button" value="右" onclick="change(this)" />
    <input type="button" value="下" onclick="change(this)" />
    <input type="button" value="左" onclick="change(this)" />
</body>
</html>
对background-position-y的理解(图示):
例,搜狐频道切换效果。
搜狐div.css:(写css是做麻烦的,痛中之痛,自己写绝对懵逼!!!)
body{
    font-size:12px;
}

.div1{
    width:126px;
    height:156px;
}

.navi{
    width:21px;
    height:156px;
    float:left;
}

.navi ul{
    padding:0px;
    margin-left:0px;
    margin-top:0px;
    float:left;
}

.navi ul li{
    list-style-type:none;
    width:21px;
    height:38px;
    margin-top:3px;
    text-align:center;
    padding-top:10px;
    background-color:silver;
    float:left;
}

.zs,.rz,.cg{
    width:100px;
    height:156px;
    margin-left:4px;
    float:left;
}

.zs ul,.rz ul,.cg ul{
    padding:0px;
    margin-top:2px;
    margin-left:0px;
    float:left;
}

.zs ul li,.rz ul li,.cg ul li{
    list-style-type:none;
    margin-top:0px;
    margin-left:2px;
    line-height:19px;
    float:left;
}

.rz,.cg{
    /*visibility:hidden;*/
    display:none;
}
仿搜狐div切换.html(JS代码倒还简单):
<!DOCTYPE html>
<html>
<head>
    <meta charset="UTF-8">
    <title>搜狐频道切换效果</title>
    <link rel="stylesheet" type="text/css" href="搜狐div.css">
    <script type="text/javascript">
        //onmouseover 鼠标移到某元素之上
        function change(val, obj) {
            obj.style.backgroundColor = "#FFC12D";
            if(val == "zs") {
                zs.style.display = "block";
                rz.style.display = "none";
                cg.style.display = "none";
            } else if(val == "rz") {
                zs.style.display = "none";
                rz.style.display = "block";
                cg.style.display = "none";
            } else if(val == "cg") {
                zs.style.display = "none";
                rz.style.display = "none";
                cg.style.display = "block";
            }
        }
        //onmouseout 鼠标从某元素移开
        function change2(obj) {
            obj.style.backgroundColor = "silver";
        }
    </script>
</head>
<body>
    <div class="div1">
    <!--导航DIV-->
    <div class="navi">
        <ul>
            <li id="zsli" onmouseover="change(‘zs‘, this)" onmouseout="change2(this)">招生</li>
            <li id="rzli" onmouseover="change(‘rz‘, this)" onmouseout="change2(this)">热招</li>
            <li id="cgli" onmouseover="change(‘cg‘, this)" onmouseout="change2(this)">出国</li>
        </ul>
    </div>
    <!--超链接DIV3个-->
    <div id="zs" class="zs">
        <ul>
            <li><a href=‘#‘>招生招生招生招生</a></li>
            <li><a href=‘#‘>招生招生招生招生</a></li>
            <li><a href=‘#‘>招生招生招生招生</a></li>
            <li><a href=‘#‘>招生招生招生招生</a></li>
            <li><a href=‘#‘>招生招生招生招生</a></li>
            <li><a href=‘#‘>招生招生招生招生</a></li>
            <li><a href=‘#‘>招生招生招生招生</a></li>
            <li><a href=‘#‘>招生招生招生招生</a></li>
        </ul>
    </div>
    <div id="rz" class="rz" >
        <ul>
            <li><a href=‘#‘>热招热招热招热招</a></li>
            <li><a href=‘#‘>热招热招热招热招</a></li>
            <li><a href=‘#‘>热招热招热招热招</a></li>
            <li><a href=‘#‘>热招热招热招热招</a></li>
            <li><a href=‘#‘>热招热招热招热招</a></li>
            <li><a href=‘#‘>热招热招热招热招</a></li>
            <li><a href=‘#‘>热招热招热招热招</a></li>
            <li><a href=‘#‘>热招热招热招热招</a></li>
        </ul>
    </div>
    <div id="cg" class="cg">
        <ul>
            <li><a href=‘#‘>出国出国出国出国</a></li>
            <li><a href=‘#‘>出国出国出国出国</a></li>
            <li><a href=‘#‘>出国出国出国出国</a></li>
            <li><a href=‘#‘>出国出国出国出国</a></li>
            <li><a href=‘#‘>出国出国出国出国</a></li>
            <li><a href=‘#‘>出国出国出国出国</a></li>
            <li><a href=‘#‘>出国出国出国出国</a></li>
            <li><a href=‘#‘>出国出国出国出国</a></li>
        </ul>
    </div>
</div>
</body>
</html>
标签:
原文地址:http://www.cnblogs.com/yerenyuan/p/5398498.html