标签:
本文讲解如何在GNU Radio中添加用户开发的信号处理模块,译文如有不当之处可参考原文地址:http://gnuradio.microembedded.com/outoftreemodules
利用用户自定义的功能模块扩展GNU Radio。
This article borrows heavily from the original (but very outdated) "How to write a block?" written by Eric Blossom.
外部模块(Out-of-tree Module)是不存在与GNU Radio源代码树的GNU Radio组件。通常,用户自己扩展GNU Radio的功能模块,被称作外部模块。一般我们不会向实际的GNU Radio源代码树中添加东西,除非你是想把他上传给发开者们整合使用。添加外部模块既允许你维护你自己的代码,并且延续主代码的功能。
很多这样的外部模块由CGRAN主持,这个一个关于GNU Radio的智囊团。如果你开发了非常nice的东西,请将他提交到CGRAN!
spectral estimation toolbox是外部模块的一个例子,它的谱估计功能扩展了GNU Radio。安装之后,在GRC(GNU Radio Companion)中你会拥有更多的模块(blocks)可以使用,其特性和原有的模块一样。然而,它是有很多开发者共同开发的。
有很多工具,脚本和文档可以作为第三方程序或者作为GNU Radio的一部分。
2.1 gr-how-to-write-a-block
这里有一个已经实现了的外部模块的例子,它作为GNU Radio源代码树的一部分。如果你跟随本文的教程,你就会成功得到一个名为gr-howto-write-a-block的模块。总之,如果你想知道你的模块应该张什么样子,这是一个很好的参考。
因为经历测试和维护之后,它会作为GNU Radio树的一部分。GNU Radio的当前版本将需要更新模块结构。
2.2 gr_modtool - The swiss army knife of module editing
开发一个GNU Radio模块的时候,涉及很多单调和枯燥的工作:样板代码,makefile文件编写等。gr_modtool作为一个脚本,目的是使所有的文件都自动生成,如编写makefile文件,使用模板等,并且尽可能的为开发者做很多工作,这样开发者就只可以直接开始DSP的编程工作了。
需要注意的是:gr_modtool在你看到的代码上做了很多假设,越是你自己定制的,或者有特定变化的,gr_modtool使用的就变得越少,但是它可能是编写一个新模块最好的开端。
gr_modtool 在GNU Radio代码树中是可用的,并且它是被默认安装的。
2.3 Cmake, make. etc.
在GNU Radio中使用cmake来作为系统的构建,因此build一个模块需要你安装cmake(最常见的是make,但是也可以使用Eclipse或者MS Visual Studio)。
在下面的教程中,我们将使用名为howto的模块。第一步是创建这个模块。
利用gr_modtool是一个非常简单的方式。无论你想要在那里创建新模块,只需要在命令行输入命令(这应该是GNU Radio源代码树以外),然后继续:
1 hao@hao:~$ gr_modtool newmod howto
2 Creating out-of-tree module in ./gr-howto... Done.
3 Use ‘gr_modtool add‘ to add a new block to this currently empty module.
如果一切顺利,你会在主文件夹下得到一个名为gr-howto的文件目录。
我们可以看看gr-howto文件目录的组成。
1 hao@hao:~$ cd gr-howto/
2 hao@hao:~/gr-howto$ ls
3 apps  cmake  CMakeLists.txt  docs  examples  grc  include  lib  python  swig
它由多个子目录组成,凡是用C/C++(或者其他非python语言)写的程序都将放在lib/文件夹中。对于C++文件我们通常只有头文件放在include/文件夹中(如果它们是接口),或者放在lib/文件夹中(如果它们只有在编译时用到,在安装之后用不到,如*_impl.h文件,你会在接下来的教程中看到里面有些什么)。
当然python写的程序将进入python/文件夹下,这包括未安装的测试单元和已安装的python模块。
你可能已经知道,虽然GNU Radio的模块是用C++写的,但是它可以在python中调用。这是通过SWIG (the simplified wrapper and interface generator)的帮助,这是一个简化包装和接口生成器,它会自动创建链接代码来实现这一点。SWIG需要一些指令来完成这些事情,这些指令在swig/的子目录中。
除非你为你的模块做一些更好的事情,一般你将不需要去swig/的子目录。gr_modtool将会为我们处理所有的这一切。
如果你想让你的模块在GNU Radio companion(the graphical UI for GNU Radio)中也是可用的,你需要在grc/文件夹中添加.xml描述文件。
docs/文件夹中包含一些说明,如何从C++文件和python文件中提取文件的说明(我们使用Doxygen和Sphinx来完成),并确保它们可以在python代码中有效。当然,你可以添加自定义的文件在这里。
最后,在apps/的子目录中包含一些完整的安装到系统的应用程序(包括在GRC中执行,和单独的执行的文件)。
一些模块还包括文件夹examples/,作为文件的附录,用来保存例子。其他开发者简单直接的看例子里面的block如何使用。
这个构建系统还带来了一些其他的独立的包:Cmakelist.txt文件(其中一个是存在于每一个子目录)和cmake/的文件夹。你可以无视后者,因为它主要是用于cmake如何找到GNU Radio的库等的一些说明。为了确保你的模块构建正确,Cmakelist.txt这个文件需要做很多修改。
对于我们第一个例子,我们创建一个用于对浮点信号的求平方的模块。此模块将接受一个浮点输入流并产生一个浮点输出流。也就是说对于每个输入的浮点信号,将其平方后输出。
下面的命名规则,我们将使用包名howto作为前缀,并命名这个模块为howto_square_ff,因为他的输入输出都是float型。
我们要整理这个模块,把我们写好的其他东西放到里面,最终放到howto Python中。这样就可以用Python来访问它。
1 import howto
2 sqr = howto.square_ff()
5.1 Creating the files
第一步是创建一个空文件,并且编辑Cmakelist.txt。gr_modtool会再次帮我们完成这个工作。运行:
 1 hao@hao:~/gr-howto$ gr_modtool add -t general square_ff
 2 GNU Radio module name identified: howto
 3 Language: C++
 4 Block/code identifier: square_ff
 5 Enter valid argument list, including default arguments:
 6 Add Python QA code? [Y/n]
 7 Add C++ QA code? [y/N]
 8 Adding file ‘lib/square_ff_impl.h‘...
 9 Adding file ‘lib/square_ff_impl.cc‘...
10 Adding file ‘include/howto/square_ff.h‘...
11 Editing swig/howto_swig.i...
12 Adding file ‘python/qa_square_ff.py‘...
13 Editing python/CMakeLists.txt...
14 Adding file ‘grc/howto_square_ff.xml‘...
15 Editing grc/CMakeLists.txt...
在命令行中我们指定要添加一个模块,他的类型是general(但是我们也不知道模块的类型是什么),并且它叫做square_ff。类型有一下几种可选:‘sink‘, ‘source‘, ‘sync‘, ‘decimator‘, ‘interpolator‘, ‘general‘, ‘tagged_stream‘, ‘hier‘, ‘noblock‘。然后gr_modtool会问你是否需要参数(这里不需要,所以令他为空)?是否添加Python 测试文件(默认为Yes)?是否添加C++测试文件(默认为no)?
现在,你可以看看Cmakelist.txt的不同和gr_modtool做了些什么,你还可以看到添加了许多新文件,如果你想要你的模块能够工作,现在必须来编辑这些文件。
5.2 Test Driven Programming
我们可以直接运行刚才写的C++代码,但是作为一个高度发展的程序我们必须要先编写测试代码,毕竟我们有一个良好的习惯。取一个的浮点流作为输入,再取一个的浮点流作为输出。输出应该是输入的平方。
这很简单,我们打开python文件夹下的qa_square_ff.py,我们将编写这个文件如下:
 1 from gnuradio import gr, gr_unittest
 2 from gnuradio import blocks
 3 import howto_swig as howto
 4
 5 class qa_square_ff (gr_unittest.TestCase):
 6     def setUp (self):
 7         self.tb = gr.top_block ()
 8
 9     def tearDown (self):
10         self.tb = None
11
12     def test_001_square_ff(self):
13         src_data = (-3, 4, -5.5, 2, 3)
14         expected_result = (9, 16, 30.25, 4, 9)
15         src = blocks.vector_source_f(src_data)
16         sqr = howto.square_ff()
17         dst = blocks.vector_sink_f()
18         self.tb.connect(src, sqr)
19         self.tb.connect(sqr, dst)
20         self.tb.run()
21         result_data = dst.data()
22         self.assertFloatTuplesAlmostEqual(expected_result, result_data, 6)
23
24 if __name__ == ‘__main__‘:
25     gr_unittest.run(qa_square_ff, "qa_square_ff.xml")
gr_unittest是一个扩展的标准Python模块单元测试。gr_unittest增加了对检查浮点和复数的元组的近似相等的支持。unittest使用Python的反射机制来发现所有运行的方法和运行它们。unittest包装每次调用test_*来匹配建立和拆除的调用。
当我们运行测试,在这种秩序中gr_unittest.main要调用setUP, test_001_square_ff, 和tearDown。
test_001_square_ff构建了一个graph,包含三个节点(分别是:source, signal processing block, sink)。 blocks.vector_source_f(src_data)作为信号源。howto.square_ff是我们正在测试的模块。blocks.vector_sink_f是howto.square_ff的输出。
在run()方法下运行graph,直到所有的模块完成各自的工作。最后,我们检查的src_data经过square_ff输出的结果与我们所期望的结果是否一致。
注意,这样的测试通常称为在安装模块之前的测试。这意味着我们需要一些类似的代码,以能够加载模块时测试。cmake可以适当的改变PYTHONPATH。此外这个文件中的第3行的意思是导入howto_swig并给它起个别名叫howto。
为了让CMake的实际知道这个测试存在,gr_modtool修改python文件夹的CMakeLists.txt如下:
1 ########################################################################
2 # Handle the unit tests
3 ########################################################################
4 include(GrTest)
5
6 set(GR_TEST_TARGET_DEPS gnuradio-howto)
7 set(GR_TEST_PYTHON_DIRS ${CMAKE_BINARY_DIR}/swig)
8 GR_ADD_TEST(qa_howto ${PYTHON_EXECUTABLE} ${CMAKE_CURRENT_SOURCE_DIR}/qa_howto.py)
5.3 Build Tree vs. Install Tree
当您运行cmake的时候,你通常运行在一个单独的目录(如build/),这就是构建树。安装的路径是$prefix/lib/$pythonversion/dist-packages,$prefix是无论你在哪里(通常是/usr/local/)进行cmake的配置和-DCMAKE_INSTALL_PREFIX的开关。
在编译过程中,该库将被复制到build目录,只有在安装过程中,文件安装到安装目录,从而使GNU Radio能够应用我们提供的模块。我们写的应用程序,使它们在访问安装目录中的代码和库。在另一方面,我们希望在构建树(build tree)中运行测试程序,这样可以在安装之前发现问题。
5.4 The C++ code(part 1)
现在,我们已经有了一个测试案例(test case),让我们写的C++代码。所有的信号处理块都继承自gr::block或者gr::block的子类。gr_modtool已经为我们提供了三个文件定义块:
lib/square_ff_impl.h
lib/square_ff_impl.cc
include/howto/square_ff.h
我们要做的就是修改他们。
首先,我们来看看我们的头文件。因为我们正在编写的块就是这么简单,所以我们没有必要真正改变他们(在include文件夹加入头文件往往是相当完整的运行gr_modtool后,除非我们需要添加一些公共方法,如赋值方法,即getter和setter)。并且我们需要在lib/square_ff_impl.cc中将头文件中声明的方法实现。
自动生成的square_ff_impl.cc文件内容如下:
 1 /* -*- c++ -*- */
 2 /*
 3  * Copyright 2016 <+YOU OR YOUR COMPANY+>.
 4  *
 5  * This is free software; you can redistribute it and/or modify
 6  * it under the terms of the GNU General Public License as published by
 7  * the Free Software Foundation; either version 3, or (at your option)
 8  * any later version.
 9  *
10  * This software is distributed in the hope that it will be useful,
11  * but WITHOUT ANY WARRANTY; without even the implied warranty of
12  * MERCHANTABILITY or FITNESS FOR A PARTICULAR PURPOSE.  See the
13  * GNU General Public License for more details.
14  *
15  * You should have received a copy of the GNU General Public License
16  * along with this software; see the file COPYING.  If not, write to
17  * the Free Software Foundation, Inc., 51 Franklin Street,
18  * Boston, MA 02110-1301, USA.
19  */
20
21 #ifdef HAVE_CONFIG_H
22 #include "config.h"
23 #endif
24
25 #include <gnuradio/io_signature.h>
26 #include "square_ff_impl.h"
27
28 namespace gr {
29   namespace howto {
30
31     square_ff::sptr
32     square_ff::make()
33     {
34       return gnuradio::get_initial_sptr
35         (new square_ff_impl());
36     }
37
38     /*
39      * The private constructor
40      */
41     square_ff_impl::square_ff_impl()
42       : gr::block("square_ff",
43               gr::io_signature::make(<+MIN_IN+>, <+MAX_IN+>, sizeof(<+ITYPE+>)),
44               gr::io_signature::make(<+MIN_OUT+>, <+MAX_OUT+>, sizeof(<+OTYPE+>)))
45     {}
46
47     /*
48      * Our virtual destructor.
49      */
50     square_ff_impl::~square_ff_impl()
51     {
52     }
53
54     void
55     square_ff_impl::forecast (int noutput_items, gr_vector_int &ninput_items_required)
56     {
57         /* <+forecast+> e.g. ninput_items_required[0] = noutput_items */
58     }
59
60     int
61     square_ff_impl::general_work (int noutput_items,
62                        gr_vector_int &ninput_items,
63                        gr_vector_const_void_star &input_items,
64                        gr_vector_void_star &output_items)
65     {
66         const <+ITYPE*> *in = (const <+ITYPE*> *) input_items[0];
67         <+OTYPE*> *out = (<+OTYPE*> *) output_items[0];
68
69         // Do <+signal processing+>
70         // Tell runtime system how many input items we consumed on
71         // each input stream.
72         consume_each (noutput_items);
73
74         // Tell runtime system how many output items we produced.
75         return noutput_items;
76     }
77
78   } /* namespace howto */
79 } /* namespace gr */
gr_modtool提示我们需要在<++>的地方添加我们需要的代码,如43行44行。首先修改构造函数(41~45行)如下:构造函数本来就是空的,因为square求平方不需要构造函数初始化。唯一有兴趣的部分是输入和输出签名的定义:在输入端,我们有1个端口,允许浮点数输入。输出端口同理。
1 square_ff_impl::square_ff_impl()
2 : gr::block("square_ff",
3       gr::io_signature::make(1, 1, sizeof(float)),
4       gr::io_signature::make(1, 1, sizeof(float)))
5 {
6     //empty constructor
7 }
修改54~58行代码如下:
1 square_ff_impl::forecast (int noutput_items, gr_vector_int &ninput_items_required)
2 {
3     /* <+forecast+> e.g. ninput_items_required[0] = noutput_items */
4     nintput_items_required[0] = noutput_items;
5 }
forecast()是一个函数,它告诉调度器产生noutput_items个输出items需要从输入多少items。在本例中,输入输出的items数量是相同的。
index 0表示这是用于第一端口(port),但是我们只有一个端口。当一个模块有很多端口(port)时需要用下标指明端口(port)。
通常在大多数block中都有不同的forecast()函数,举例来说,你可以看看gr::block, gr::sync_block, gr::sync_decimator和gr::sync_interpolator是怎么来定义默认的forecast()统计rate change和history。
最后,还有general_work(),在头文件中声明它是纯虚函数,所以我们一定要重写。
 1 int
 2 square_ff_impl::general_work (int noutput_items,
 3                    gr_vector_int &ninput_items,
 4                    gr_vector_const_void_star &input_items,
 5                    gr_vector_void_star &output_items)
 6 {
 7     const float *in = (const float *) input_items[0];
 8     float *out = (float *) output_items[0];
 9
10     // Do <+signal processing+>
11     // Tell runtime system how many input items we consumed on
12     // each input stream.
13     for(int i = 0; i<noutput_items; ++i) {
14       out[i] = in[i] * in[i];
15     }
16     consume_each (noutput_items);
17
18     // Tell runtime system how many output items we produced.
19     return noutput_items;
20 }
这里分别有一个指针指向输入缓冲区和输出缓冲区,for循环可以将输入缓冲区的平方复制到输出缓冲区。
5.5 Using CMake
如果您以前从未使用CMake,这是很好的时间来进行尝试。一个在命令行中看到的以CMake为基础的项目的典型的工作流程是这样的:
1 $ mkdir build
2 $ cd build/
3 $ cmake ../   #告诉CMake,它的所有配置文件为一目录了
4 $ make        #start builfing(应该在前一节之后工作)
在我们的模块的目录中有一个新的目录build/。所有的编译等在这里完成,所以实际的源代码树不是充斥着临时文件。如果我们改变任何的CMakeLists.txt文件,我们应该重新运行cmake ../(不过当你下一次运行make,cmake的检测这些变化并且自动返回)。具体运行过程如下:
 1 hao@hao:~/gr-howto$ mkdir build
 2 hao@hao:~/gr-howto$ cd build/
 3 hao@hao:~/gr-howto/build$ cmake ../
 4 -- The CXX compiler identification is GNU 4.8.4
 5 -- The C compiler identification is GNU 4.8.4
 6 -- Check for working CXX compiler: /usr/bin/c++
 7 -- Check for working CXX compiler: /usr/bin/c++ -- works
 8 -- Detecting CXX compiler ABI info
 9 -- Detecting CXX compiler ABI info - done
10 -- Check for working C compiler: /usr/bin/cc
11 -- Check for working C compiler: /usr/bin/cc -- works
12 -- Detecting C compiler ABI info
13 -- Detecting C compiler ABI info - done
14 -- Build type not specified: defaulting to release.
15 -- Boost version: 1.55.0
16 -- Found the following Boost libraries:
17 --   filesystem
18 --   system
19 -- Found PkgConfig: /usr/bin/pkg-config (found version "0.26")
20 -- checking for module ‘cppunit‘
21 --   found cppunit, version 1.13.1
22 -- Found CPPUNIT: /usr/lib/x86_64-linux-gnu/libcppunit.so;dl
23 -- Found Doxygen: /usr/bin/doxygen (found version "1.8.6")
24 Checking for GNU Radio Module: RUNTIME
25 -- checking for module ‘gnuradio-runtime‘
26 --   found gnuradio-runtime, version 3.7.5.1
27  * INCLUDES=/usr/local/include
28  * LIBS=/usr/local/lib/libgnuradio-runtime.so;/usr/local/lib/libgnuradio-pmt.so
29 -- Found GNURADIO_RUNTIME: /usr/local/lib/libgnuradio-runtime.so;/usr/local/lib/libgnuradio-pmt.so
30 GNURADIO_RUNTIME_FOUND = TRUE
31 -- Found SWIG: /usr/bin/swig2.0 (found version "2.0.11")
32 -- Found PythonLibs: /usr/lib/x86_64-linux-gnu/libpython2.7.so (found suitable version "2.7.6", minimum required is "2")
33 -- Found PythonInterp: /usr/bin/python2 (found suitable version "2.7.6", minimum required is "2")
34 -- Looking for sys/types.h
35 -- Looking for sys/types.h - found
36 -- Looking for stdint.h
37 -- Looking for stdint.h - found
38 -- Looking for stddef.h
39 -- Looking for stddef.h - found
40 -- Check size of size_t
41 -- Check size of size_t - done
42 -- Check size of unsigned int
43 -- Check size of unsigned int - done
44 -- Performing Test HAVE_WNO_UNUSED_BUT_SET_VARIABLE
45 -- Performing Test HAVE_WNO_UNUSED_BUT_SET_VARIABLE - Success
46 -- Configuring done
47 -- Generating done
48 -- Build files have been written to: /home/hao/gr-howto/build
49 hao@hao:~/gr-howto/build$ make
50 Scanning dependencies of target gnuradio-howto
51 [  6%] Building CXX object lib/CMakeFiles/gnuradio-howto.dir/square_ff_impl.cc.o
52 Linking CXX shared library libgnuradio-howto.so
53 [  6%] Built target gnuradio-howto
54 Scanning dependencies of target test-howto
55 [ 13%] Building CXX object lib/CMakeFiles/test-howto.dir/test_howto.cc.o
56 [ 20%] Building CXX object lib/CMakeFiles/test-howto.dir/qa_howto.cc.o
57 Linking CXX executable test-howto
58 [ 20%] Built target test-howto
59 Scanning dependencies of target _howto_swig_doc_tag
60 [ 26%] Building CXX object swig/CMakeFiles/_howto_swig_doc_tag.dir/_howto_swig_doc_tag.cpp.o
61 Linking CXX executable _howto_swig_doc_tag
62 [ 26%] Built target _howto_swig_doc_tag
63 Scanning dependencies of target howto_swig_swig_doc
64 [ 33%] Generating doxygen xml for howto_swig_doc docs
65 [ 40%] Generating python docstrings for howto_swig_doc
66 [ 40%] Built target howto_swig_swig_doc
67 Scanning dependencies of target _howto_swig_swig_tag
68 [ 46%] Building CXX object swig/CMakeFiles/_howto_swig_swig_tag.dir/_howto_swig_swig_tag.cpp.o
69 Linking CXX executable _howto_swig_swig_tag
70 [ 46%] Built target _howto_swig_swig_tag
71 [ 53%] Generating howto_swig.tag
72 Scanning dependencies of target howto_swig_swig_2d0df
73 [ 60%] Building CXX object swig/CMakeFiles/howto_swig_swig_2d0df.dir/howto_swig_swig_2d0df.cpp.o
74 Linking CXX executable howto_swig_swig_2d0df
75 Swig source
76 [ 60%] Built target howto_swig_swig_2d0df
77 Scanning dependencies of target _howto_swig
78 [ 66%] Building CXX object swig/CMakeFiles/_howto_swig.dir/howto_swigPYTHON_wrap.cxx.o
79 Linking CXX shared module _howto_swig.so
80 [ 66%] Built target _howto_swig
81 Scanning dependencies of target pygen_swig_387be
82 [ 73%] Generating howto_swig.pyc
83 [ 80%] Generating howto_swig.pyo
84 [ 80%] Built target pygen_swig_387be
85 Scanning dependencies of target pygen_python_54f4d
86 [ 86%] Generating __init__.pyc
87 [ 93%] Generating __init__.pyo
88 [ 93%] Built target pygen_python_54f4d
89 Scanning dependencies of target pygen_apps_9a6dd
90 [ 93%] Built target pygen_apps_9a6dd
91 Scanning dependencies of target doxygen_target
92 [100%] Generating documentation with doxygen
93 [100%] Built target doxygen_target
5.6 Let‘s try that -- running make test
因为我们的C++代码之前写过测试代码(QA code),马上就可以看到,如果我们编写的模块是正确的。
我们用make test运行我们的测试(调用cmake和make之后,在build/目录中运行此命令)。这将调用一个shell脚本设置PYTHONPATH环境变量,以便我们的测试使用我们的代码和库的构建树版本。然后运行其中的文件名格式为qa_*.py名称的所有文件,并报告这些文件的成功或失败。
在后面有很多操作来使用我们没有安装的代码版本(看cmake/目录中一个简单的动作。)
如果你完成了square_ff模块,这应该能正常运行:
 1 hao@hao:~/gr-howto/build$ make test
 2 Running tests...
 3 Test project /home/hao/gr-howto/build
 4     Start 1: test_howto
 5 1/2 Test #1: test_howto .......................   Passed    0.00 sec
 6     Start 2: qa_square_ff
 7 2/2 Test #2: qa_square_ff .....................   Passed    0.11 sec
 8
 9 100% tests passed, 0 tests failed out of 2
10
11 Total Test time (real) =   0.11 sec
如果事情在测试期间出现故障,我们可以挖得更深一些。当我们运行make test,我们实际上调用CMake的程序ctest,其中有许多选项,我们可以传递给它的更详细信息。比如我写程序的时候,把assertFloatTuplesAlmostEqual错误拼写成assertFloatTuplesAmostEqual,如果我们只是运行make test,甚至只是CTEST,我们会得到这样的:
 1 hao@hao:~/gr-howto/build$ ctest
 2 Test project /home/hao/gr-howto/build
 3     Start 1: test_howto
 4 1/2 Test #1: test_howto .......................   Passed    0.00 sec
 5     Start 2: qa_square_ff
 6 2/2 Test #2: qa_square_ff .....................***Failed    0.11 sec
 7
 8 50% tests passed, 1 tests failed out of 2
 9
10 Total Test time (real) =   0.11 sec
11
12 The following tests FAILED:
13       2 - qa_square_ff (Failed)
14 Errors while running CTest
要了解我们qa_square_ff测试发生了什么事,我们运行cmake -V -R square。‘-V‘标志为我们提供了详细的输出和“-R”标志是一个正则表达式只运行那些匹配的测试。
 1 hao@hao:~/gr-howto/build$ ctest -V -R square
 2 UpdateCTestConfiguration  from :/home/hao/gr-howto/build/DartConfiguration.tcl
 3 UpdateCTestConfiguration  from :/home/hao/gr-howto/build/DartConfiguration.tcl
 4 Test project /home/hao/gr-howto/build
 5 Constructing a list of tests
 6 Done constructing a list of tests
 7 Checking test dependency graph...
 8 Checking test dependency graph end
 9 test 2
10     Start 2: qa_square_ff
11
12 2: Test command: /bin/sh "/home/hao/gr-howto/build/python/qa_square_ff_test.sh"
13 2: Test timeout computed to be: 9.99988e+06
14 2: E
15 2: ======================================================================
16 2: ERROR: test_001_t (__main__.qa_square_ff)
17 2: ----------------------------------------------------------------------
18 2: Traceback (most recent call last):
19 2:   File "/home/hao/gr-howto/python/qa_square_ff.py", line 46, in test_001_t
20 2:     self.assertFloatTuplesAmostEqual( expected_result, result_data, 6 )
21 2: AttributeError: ‘qa_square_ff‘ object has no attribute ‘assertFloatTuplesAmostEqual‘
22 2:
23 2: ----------------------------------------------------------------------
24 2: Ran 1 test in 0.002s
25 2:
26 2: FAILED (errors=1)
27 1/1 Test #2: qa_square_ff .....................***Failed    0.11 sec
28
29 0% tests passed, 1 tests failed out of 1
30
31 Total Test time (real) =   0.11 sec
32
33 The following tests FAILED:
34       2 - qa_square_ff (Failed)
35 Errors while running CTest
第21行提示没有assertFloatTuplesAmostEqual属性,我们返回修改重新make test。这可以利用测试信息,反复修改我们的模块和测试程序,直到测试通过。
我们也可以只用print 语句在可能出错的地方输出变量的值,如print expected_result和print result_data去比较他们是否相等,这更容易理解这个问题。
5.7 More C++ code (but better) - Subclasses for common patterns
gr::block允许极大的灵活性,对于输入流的消费和生产输出流。熟练使用forecast()和consume()来建立变速率的模块(即输入输出的items不相等)。构造一个每个输入端口以不同的速率消耗items并且每个输出端口以不同的速率产生items的模块是可以实现的。
另一方面,信号处理模块的输入速率和输出速率之间的具有固定的关系是很常见的。很多都是1:1,而另一些则1:N或N:1的关系。你一定会想到在前面的模块的general_work()函数中存在这样一个问题:如果消耗的items的数量等于产生的items的数量,为什么还需要我再次告诉GNU Radio他们是相等的?
另一个常见的需求是需要检查多个输入样本,以产生一个输出样本。这是正交的输入和输出速率之间的关系。例如,一个非抽取,非内插FIR滤波器需要检查N个输入样本来产生每一个输出样本,其中N是抽头的滤波器的数目。然而,它仍然是消耗一个输入items以产生一个输出items。我们称这个概念history,但你也可以把它看成“look-ahead”。如下图所示:每次移动一个宽度为N的窗口,用这个N个items产生一个items。
gr::sync_block继承自gr::block并实现了一个1:1的可选的history。既然我们知道了输入到输出的速度,某些简化是可能的。从实现者的观点看,主要的变化是,我们定义了一个work()方法,而不是general_work()。work()具有一个稍微不同的调用顺序;它省略了不必要的ninput_items参数,并安排consume_each()被我们调用。
1 /*!
2  * \brief Just like gr_block::general_work, only this arranges to
3  *  call consume_each for you.
4  *
5  * The user must override work to define the signal processing code
6  */
7 virtual int work (int noutput_items,
8                   gr_vector_const_void_star &input_items,
9                   gr_vector_void_star &output_items) = 0;
让我们来添加一个继承gr::sync_block模块square2_ff并调用它。首先,我们编辑qa_square_ff.py增加另一个测试:
 1 def test_002_square2_t (self):
 2     # set up fg
 3     src_data = (-3, 4, -5.5, 2, 3)
 4     expected_result = (9, 16, 30.25, 4, 9)
 5     src = blocks.vector_source_f( src_data )
 6     sqr = howto.square2_ff( )#注意此处的square2
 7     dst = blocks.vector_sink_f( )
 8     self.tb.connect( src, sqr )
 9     self.tb.connect( sqr, dst )
10     self.tb.run ()
11     # check data
12     result_data = dst.data( )
13     self.assertFloatTuplesAlmostEqual( expected_result, result_data, 6 )
你可以看到它和以前的测试完全一样,只是此处换成了square2_ff。
然后我们使用gr_modtool添加模块文件,跳过QA代码,因为刚才我们已经写好测试函数了。
 1 hao@hao:~/gr-howto$ gr_modtool add -t sync square2_ff
 2 GNU Radio module name identified: howto
 3 Language: C++
 4 Block/code identifier: square2_ff
 5 Enter valid argument list, including default arguments:
 6 Add Python QA code? [Y/n] n
 7 Add C++ QA code? [Y/n] n
 8 Adding file ‘lib/square2_ff_impl.h‘...
 9 Adding file ‘lib/square2_ff_impl.cc‘...
10 Adding file ‘include/howto/square2_ff.h‘...
11 Editing swig/howto_swig.i...
12 Adding file ‘grc/howto_square2_ff.xml‘...
13 Editing grc/CMakeLists.txt...
在square2_ff_impl.cc构造函数中完成与前面相同的方法,除了父类被变为gr::sync_block。修改后的square2_ff_impl.cc如下:
 1 /* -*- c++ -*- */
 2 /*
 3  * Copyright 2016 <+YOU OR YOUR COMPANY+>.
 4  *
 5  * This is free software; you can redistribute it and/or modify
 6  * it under the terms of the GNU General Public License as published by
 7  * the Free Software Foundation; either version 3, or (at your option)
 8  * any later version.
 9  *
10  * This software is distributed in the hope that it will be useful,
11  * but WITHOUT ANY WARRANTY; without even the implied warranty of
12  * MERCHANTABILITY or FITNESS FOR A PARTICULAR PURPOSE.  See the
13  * GNU General Public License for more details.
14  *
15  * You should have received a copy of the GNU General Public License
16  * along with this software; see the file COPYING.  If not, write to
17  * the Free Software Foundation, Inc., 51 Franklin Street,
18  * Boston, MA 02110-1301, USA.
19  */
20
21 #ifdef HAVE_CONFIG_H
22 #include "config.h"
23 #endif
24
25 #include <gnuradio/io_signature.h>
26 #include "square2_ff_impl.h"
27
28 namespace gr {
29   namespace howto {
30
31     square2_ff::sptr
32     square2_ff::make()
33     {
34       return gnuradio::get_initial_sptr
35         (new square2_ff_impl());
36     }
37
38     /*
39      * The private constructor
40      */
41     square2_ff_impl::square2_ff_impl()
42       : gr::sync_block("square2_ff",
43               gr::io_signature::make(1, 1, sizeof(float)),
44               gr::io_signature::make(1, 1, sizeof(float)))
45     {}
46
47     /*
48      * Our virtual destructor.
49      */
50     square2_ff_impl::~square2_ff_impl()
51     {
52     }
53
54     int
55     square2_ff_impl::work(int noutput_items,
56               gr_vector_const_void_star &input_items,
57               gr_vector_void_star &output_items)
58     {
59         const float *in = (const float *) input_items[0];
60         float *out = (float *) output_items[0];
61
62         // Do <+signal processing+>
63         for(int i = 0; i<noutput_items; ++i) {
64             out[i] = in[i] * in[i];
65         }
66         // Tell runtime system how many output items we produced.
67         return noutput_items;
68     }
69
70   } /* namespace howto */
71 } /* namespace gr */
work()函数是真正的区别(同时,我们没有一个forecast()函数了)。下一节将更详细的介绍它。
这给了我们一些东西让我们少出错少写代码,如果模块history需要大于1,请在构造函数中调用set_history()或任何时间的要求的变化。
gr::sync_block提供了一个forecast版本用来处理的history 要求。
gr::sync_decimator是一个继承gr::sync_block并且实现N:1带有可选history的模块。
gr::sync_interpolator是一个继承gr::sync_block并且实现1:N带有可选history的模块。
有了这些知识,应当明确的是,howto_square_ff应该是一个没有history的gr_sync_block。
现在,返回build/目录,并运行make,因为gr_modtool在CMakeList.txt中添加了square2_ff所需的代码,cmake自动重新运行,接下来我们执行make。
再次运行make test将产生与qa_square_ff.py一样不会失败的测试结果。
5.8 Inside the work() function
如果您使用的是sync block(包括decimator和interpolator),这是怎样由gr_modtool产生的代码的框架:
 1 int
 2 my_block_name::work(int noutput_items,
 3                     gr_vector_const_void_star &input_items,
 4                     gr_vector_void_star &output_items)
 5 {
 6     const float *in = (const float *) input_items[0];
 7     float *out = (float *) output_items[0];
 8
 9     // Do <+signal processing+>
10
11     // Tell runtime system how many output items we produced.
12     return noutput_items;
13 }
因此,鉴于history,vectors,multiple input ports等,然而这是真的你所需要的?是的!因为同步模块有一个固定的输出输入速率,所有你需要知道的是输出items的数量,从而可以计算需要使用多少输入items。
5.9 Making your blocks available in GRC
您现在可以安装您的模块,但它不会提供给GRC。这是因为gr_modtool无法在你写一个模块之前创建有效的xml文件。当你调用gr_modtool加载生成的xml代码只是一些框架代码。一旦你写完模块,gr_modtool有一个功能,以帮助您建立您的xml代码。对于HOWTO例子,运行下面的两条命令自动生成xml程序。
 1 hao@hao:~/gr-howto$ gr_modtool makexml square_ff
 2 GNU Radio module name identified: howto
 3 Warning: This is an experimental feature. Don‘t expect any magic.
 4 Searching for matching files in lib/:
 5 Making GRC bindings for lib/square_ff_impl.cc...
 6 Overwrite existing GRC file? [y/N] y
 7 hao@hao:~/gr-howto$ gr_modtool makexml square2_ff
 8 GNU Radio module name identified: howto
 9 Warning: This is an experimental feature. Don‘t expect any magic.
10 Searching for matching files in lib/:
11 Making GRC bindings for lib/square2_ff_impl.cc...
12 Overwrite existing GRC file? [y/N] y
生成的xml文件如下(两个文件除了name属性不同,其他一样,这里只给出一个):
 1 <block>
 2   <name>Square ff</name>
 3   <key>howto_square_ff</key>
 4   <category>HOWTO</category>
 5   <import>import howto</import>
 6   <make>howto.square_ff()</make>
 7   <sink>
 8     <name>in</name>
 9     <type>float</type>
10   </sink>
11   <source>
12     <name>out</name>
13     <type>float</type>
14   </source>
15 </block>
当然还可以自己修改,如更改名字等。
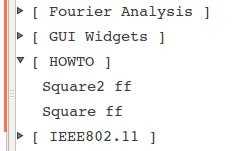
如果你这样做从build/目录用make install命令,您可以在GRC使用该模块。如果GRC已经在运行,你可以点击在GRC工具栏上的“刷新块”按钮;它是在右手边一个蓝色圆形箭头。您现在应该看到在模块树中“HOWT
O”。
5.10 There‘s more: additional gr_block-methods
如果你已经阅读了gr_block documentation(你应该有)你就会注意到有大量方法配置你的block。
下面是一些比较重要的:
set_history()
如果你的块需要的history(即像FIR滤波器),在构造函数中调用set_history()。GNU Radio确保你有一个给定数量的‘old itmes‘可用。
你可以有最小的history是1,也就是说,对于每一个输出的item,则需要1个输入item。如果你选择一个较大的值N,这意味着你的输出item是从当前输入item加上之前的N-1个items计算得到的(即一个输出item对应N个输入items)。
调度器采用这种方法照顾你。如果设置了history 长度为N,在输入缓冲区中的前N个items(包括N-1以前的,即使你已经消耗掉他们)都是有效数据。
forecast()
为了确保正确,系统需要知道在每个输入数组中有多少数据是必需的。如前所述,forecast()方法提供了这个信息,因此你写一个gr::block子类必须重写forecast()(对于sync blocks,这是隐式的)。
默认实现的功能块forecast()表明,输出items的数量和输入items的数量是1:1的关系。这些items的大小是由gr::block的构造函数中gr::io_signature::make定义。输入和输出item的大小,当然可以有所不同,这仍然是一个1:1的关系。当然,如果你有这种关系,你不会想用gr::block!
1 // default implementation:  1:1
2 void
3 gr_block::forecast (int noutput_items,
4                     gr_vector_int &ninput_items_required)
5 {
6     unsigned ninputs = ninput_items_required.size ();
7     for (unsigned i = 0; i < ninputs; i++)
8         ninput_items_required[i] = noutput_items;
9 }
虽然在square_ff实施1:1的工作,但它不不适用于interpolators, decimators, 或者是输出流与输入流具有更为复杂关系的模块。这说明继承gr::sync_block, gr::sync_interpolator或者gr::sync_decimator,而不是继承gr::block,你可以经常避免实现forecast。
set_output_multiple()
当实现你的general_work()例程,它会偶尔方便于运行时系统确保你只要求生产一组是某些特定的值的多个输出项。如果你的算法应用于一个固定大小数据的模块,这是可能需要使用这个函数。在构造函数中调用set_output_multiple()来指定这个要求。默认的output multiple为1。
5.11 Finalizing your work and installing
首先,查看这个清单:
满足上面的条件,你可以继续安装模块,在Linux计算机中意味着回到build/目录中调用make install:
  1 hao@hao:~/gr-howto$ cd build
  2 hao@hao:~/gr-howto/build$ sudo make install  # or make install
  3 [sudo] password for hao:
  4 [ 11%] Built target gnuradio-howto
  5 [ 22%] Built target test-howto
  6 [ 27%] Built target _howto_swig_doc_tag
  7 [ 38%] Built target howto_swig_swig_doc
  8 [ 44%] Built target _howto_swig_swig_tag
  9 [ 66%] Built target howto_swig_swig_2d0df
 10 [ 72%] Built target _howto_swig
 11 [ 83%] Built target pygen_swig_387be
 12 [ 94%] Built target pygen_python_54f4d
 13 [ 94%] Built target pygen_apps_9a6dd
 14 [100%] Built target doxygen_target
 15 Install the project...
 16 -- Install configuration: "Release"
 17 -- Installing: /usr/local/lib/cmake/howto/howtoConfig.cmake
 18 -- Installing: /usr/local/include/howto/api.h
 19 -- Installing: /usr/local/include/howto/square_ff.h
 20 -- Installing: /usr/local/include/howto/square2_ff.h
 21 -- Installing: /usr/local/lib/libgnuradio-howto.so
 22 -- Removed runtime path from "/usr/local/lib/libgnuradio-howto.so"
 23 -- Installing: /usr/local/lib/python2.7/dist-packages/howto/_howto_swig.so
 24 -- Removed runtime path from "/usr/local/lib/python2.7/dist-packages/howto/_howto_swig.so"
 25 -- Installing: /usr/local/lib/python2.7/dist-packages/howto/howto_swig.py
 26 -- Installing: /usr/local/lib/python2.7/dist-packages/howto/howto_swig.pyc
 27 -- Installing: /usr/local/lib/python2.7/dist-packages/howto/howto_swig.pyo
 28 -- Installing: /usr/local/include/howto/howto/swig/howto_swig.i
 29 -- Installing: /usr/local/include/howto/howto/swig/howto_swig_doc.i
 30 -- Installing: /usr/local/lib/python2.7/dist-packages/howto/__init__.py
 31 -- Installing: /usr/local/lib/python2.7/dist-packages/howto/__init__.pyc
 32 -- Installing: /usr/local/lib/python2.7/dist-packages/howto/__init__.pyo
 33 -- Installing: /usr/local/share/gnuradio/grc/blocks/howto_square_ff.xml
 34 -- Installing: /usr/local/share/gnuradio/grc/blocks/howto_square2_ff.xml
 35 -- Installing: /usr/local/share/doc/gr-howto/xml
 36 -- Installing: /usr/local/share/doc/gr-howto/xml/namespacegr_1_1howto.xml
 37 -- Installing: /usr/local/share/doc/gr-howto/xml/namespacegr.xml
 38 -- Installing: /usr/local/share/doc/gr-howto/xml/dir_97aefd0d527b934f1d99a682da8fe6a9.xml
 39 -- Installing: /usr/local/share/doc/gr-howto/xml/compound.xsd
 40 -- Installing: /usr/local/share/doc/gr-howto/xml/index.xsd
 41 -- Installing: /usr/local/share/doc/gr-howto/xml/dir_931aa87cbc005b1171acaaec17b62d81.xml
 42 -- Installing: /usr/local/share/doc/gr-howto/xml/combine.xslt
 43 -- Installing: /usr/local/share/doc/gr-howto/xml/indexpage.xml
 44 -- Installing: /usr/local/share/doc/gr-howto/xml/square__ff__impl_8h.xml
 45 -- Installing: /usr/local/share/doc/gr-howto/xml/group__defs_8dox.xml
 46 -- Installing: /usr/local/share/doc/gr-howto/xml/group__block.xml
 47 -- Installing: /usr/local/share/doc/gr-howto/xml/main__page_8dox.xml
 48 -- Installing: /usr/local/share/doc/gr-howto/xml/dir_d44c64559bbebec7f509842c48db8b23.xml
 49 -- Installing: /usr/local/share/doc/gr-howto/xml/api_8h.xml
 50 -- Installing: /usr/local/share/doc/gr-howto/xml/classgr_1_1howto_1_1square__ff.xml
 51 -- Installing: /usr/local/share/doc/gr-howto/xml/namespacestd.xml
 52 -- Installing: /usr/local/share/doc/gr-howto/xml/classgr_1_1howto_1_1square__ff__impl.xml
 53 -- Installing: /usr/local/share/doc/gr-howto/xml/index.xml
 54 -- Installing: /usr/local/share/doc/gr-howto/xml/square__ff_8h.xml
 55 -- Installing: /usr/local/share/doc/gr-howto/html
 56 -- Installing: /usr/local/share/doc/gr-howto/html/hierarchy.html
 57 -- Installing: /usr/local/share/doc/gr-howto/html/functions_func.html
 58 -- Installing: /usr/local/share/doc/gr-howto/html/ftv2pnode.png
 59 -- Installing: /usr/local/share/doc/gr-howto/html/classgr_1_1howto_1_1square__ff__impl.html
 60 -- Installing: /usr/local/share/doc/gr-howto/html/classgr_1_1howto_1_1square__ff.html
 61 -- Installing: /usr/local/share/doc/gr-howto/html/api_8h.js
 62 -- Installing: /usr/local/share/doc/gr-howto/html/functions.html
 63 -- Installing: /usr/local/share/doc/gr-howto/html/tab_s.png
 64 -- Installing: /usr/local/share/doc/gr-howto/html/ftv2node.png
 65 -- Installing: /usr/local/share/doc/gr-howto/html/namespacegr.html
 66 -- Installing: /usr/local/share/doc/gr-howto/html/navtree.css
 67 -- Installing: /usr/local/share/doc/gr-howto/html/open.png
 68 -- Installing: /usr/local/share/doc/gr-howto/html/nav_f.png
 69 -- Installing: /usr/local/share/doc/gr-howto/html/modules.html
 70 -- Installing: /usr/local/share/doc/gr-howto/html/ftv2ns.png
 71 -- Installing: /usr/local/share/doc/gr-howto/html/square__ff__impl_8h_source.html
 72 -- Installing: /usr/local/share/doc/gr-howto/html/sync_off.png
 73 -- Installing: /usr/local/share/doc/gr-howto/html/navtreeindex0.js
 74 -- Installing: /usr/local/share/doc/gr-howto/html/dynsections.js
 75 -- Installing: /usr/local/share/doc/gr-howto/html/namespacegr_1_1howto.html
 76 -- Installing: /usr/local/share/doc/gr-howto/html/classgr_1_1howto_1_1square__ff__impl-members.html
 77 -- Installing: /usr/local/share/doc/gr-howto/html/square__ff__impl_8h.html
 78 -- Installing: /usr/local/share/doc/gr-howto/html/square__ff_8h.html
 79 -- Installing: /usr/local/share/doc/gr-howto/html/hierarchy.js
 80 -- Installing: /usr/local/share/doc/gr-howto/html/group__block.html
 81 -- Installing: /usr/local/share/doc/gr-howto/html/dir_97aefd0d527b934f1d99a682da8fe6a9.html
 82 -- Installing: /usr/local/share/doc/gr-howto/html/files.html
 83 -- Installing: /usr/local/share/doc/gr-howto/html/jquery.js
 84 -- Installing: /usr/local/share/doc/gr-howto/html/classgr_1_1howto_1_1square__ff.js
 85 -- Installing: /usr/local/share/doc/gr-howto/html/classgr_1_1howto_1_1square__ff__impl.js
 86 -- Installing: /usr/local/share/doc/gr-howto/html/doxygen.css
 87 -- Installing: /usr/local/share/doc/gr-howto/html/dir_931aa87cbc005b1171acaaec17b62d81.html
 88 -- Installing: /usr/local/share/doc/gr-howto/html/resize.js
 89 -- Installing: /usr/local/share/doc/gr-howto/html/ftv2plastnode.png
 90 -- Installing: /usr/local/share/doc/gr-howto/html/nav_h.png
 91 -- Installing: /usr/local/share/doc/gr-howto/html/classgr_1_1howto_1_1square__ff-members.html
 92 -- Installing: /usr/local/share/doc/gr-howto/html/ftv2mo.png
 93 -- Installing: /usr/local/share/doc/gr-howto/html/ftv2link.png
 94 -- Installing: /usr/local/share/doc/gr-howto/html/ftv2vertline.png
 95 -- Installing: /usr/local/share/doc/gr-howto/html/ftv2mlastnode.png
 96 -- Installing: /usr/local/share/doc/gr-howto/html/tab_b.png
 97 -- Installing: /usr/local/share/doc/gr-howto/html/closed.png
 98 -- Installing: /usr/local/share/doc/gr-howto/html/globals.html
 99 -- Installing: /usr/local/share/doc/gr-howto/html/ftv2doc.png
100 -- Installing: /usr/local/share/doc/gr-howto/html/bc_s.png
101 -- Installing: /usr/local/share/doc/gr-howto/html/classgr_1_1howto_1_1square__ff__impl.png
102 -- Installing: /usr/local/share/doc/gr-howto/html/sync_on.png
103 -- Installing: /usr/local/share/doc/gr-howto/html/ftv2mnode.png
104 -- Installing: /usr/local/share/doc/gr-howto/html/globals_defs.html
105 -- Installing: /usr/local/share/doc/gr-howto/html/api_8h.html
106 -- Installing: /usr/local/share/doc/gr-howto/html/namespacegr.js
107 -- Installing: /usr/local/share/doc/gr-howto/html/ftv2blank.png
108 -- Installing: /usr/local/share/doc/gr-howto/html/annotated.js
109 -- Installing: /usr/local/share/doc/gr-howto/html/tab_a.png
110 -- Installing: /usr/local/share/doc/gr-howto/html/ftv2folderclosed.png
111 -- Installing: /usr/local/share/doc/gr-howto/html/index.html
112 -- Installing: /usr/local/share/doc/gr-howto/html/functions_type.html
113 -- Installing: /usr/local/share/doc/gr-howto/html/modules.js
114 -- Installing: /usr/local/share/doc/gr-howto/html/navtree.js
115 -- Installing: /usr/local/share/doc/gr-howto/html/ftv2cl.png
116 -- Installing: /usr/local/share/doc/gr-howto/html/namespacegr_1_1howto.js
117 -- Installing: /usr/local/share/doc/gr-howto/html/annotated.html
118 -- Installing: /usr/local/share/doc/gr-howto/html/tabs.css
119 -- Installing: /usr/local/share/doc/gr-howto/html/api_8h_source.html
120 -- Installing: /usr/local/share/doc/gr-howto/html/dir_d44c64559bbebec7f509842c48db8b23.html
121 -- Installing: /usr/local/share/doc/gr-howto/html/bdwn.png
122 -- Installing: /usr/local/share/doc/gr-howto/html/nav_g.png
123 -- Installing: /usr/local/share/doc/gr-howto/html/main__page_8dox.html
124 -- Installing: /usr/local/share/doc/gr-howto/html/square__ff_8h_source.html
125 -- Installing: /usr/local/share/doc/gr-howto/html/classes.html
126 -- Installing: /usr/local/share/doc/gr-howto/html/classgr_1_1howto_1_1square__ff.png
127 -- Installing: /usr/local/share/doc/gr-howto/html/files.js
128 -- Installing: /usr/local/share/doc/gr-howto/html/group__defs_8dox.html
129 -- Installing: /usr/local/share/doc/gr-howto/html/tab_h.png
130 -- Installing: /usr/local/share/doc/gr-howto/html/doxygen.png
131 -- Installing: /usr/local/share/doc/gr-howto/html/ftv2folderopen.png
132 -- Installing: /usr/local/share/doc/gr-howto/html/ftv2lastnode.png
133 -- Installing: /usr/local/share/doc/gr-howto/html/ftv2splitbar.png
使用Ubuntu你可能还需要调用lddonfig: Ubuntu系统加上这句命令,更新库。否则你会得到无法找到你刚刚安装的库的错误信息。
1 $ sudo ldconfig
自此,用户自定义的模块已经成功安装。
打开GNU Radio,可以在右边看到刚才创建的block,如图:
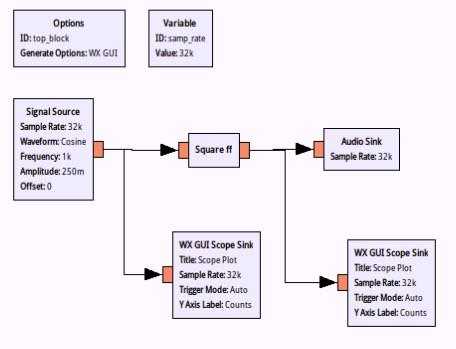
在GRC(GNU Radio companion)中调用刚才编写的block,测试是否正确。信号流图如下:
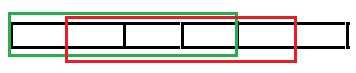
运行信号流图,得到如下波形,图中正弦波的幅值满足平方关系,从而验证了模块的正确性,并且在GRC中是可以使用的。

初学GNU Radio,文中有很多地方翻译出错或者理解出错,恳请大家多多指正。
本文会不定期更新,转载请保留本文链接,以便他人能够看到最新内容,谢谢~
本文链接:http://www.cnblogs.com/moon1992/p/5424677.html
【译】GNU Radio How to write a block 【如何开发用户模块及编写功能块】
标签:
原文地址:http://www.cnblogs.com/moon1992/p/5424677.html