标签:
为富文本添加一个提交按钮,点击按钮可以获取富文本内容。但是在提交前或者提交后我想做一些操作,比如内容校验内容清空等等。
我们直接在该按钮上绑定点击事件同样可以达到目的,但是为了组件化,所以本例打算为提交按钮自定义beforeSubmit、afterSubmit两个事件。
前文说到,事件系统是发布-订阅模式的一个实现,模式给事件发布函数与事件处理函数进行解耦,使得两者无直接调用关系。
简易发布订阅者对象实现如下:
var Event = {
//    _cachePool : {}, 处理函数缓存池不要写在该对象内,因为原型链继承会让子类共享引用类型数据。
    fire : function(type, msg) {
        var fns;
        if(!(fns = this._cachePool[type])) {
            return;
        }
        var len = fns.length;
        for(var i = 0, fn; i < len; i++) {
            fn = fns[i];
            fn.call(this, msg);
        }
    },
    on : function(type, callback) {
        if(!this._cachePool[type]) {
            this._cachePool[type] = [];
        }
        this._cachePool[type].push(callback);
    },
    un : function(type, callback) {
        var fns = this._cachePool[type];
        if(fns) {
            this._cachePool[type] = fns.filter(function(item){//注意兼容,一些低版本Array没有过滤函数
                return item !== callback;
            });
        }
    }
};
这里要去掉缓存池,因为这个对象将是编辑器原型中的一份子,我们希望每个编辑器都有自己一个私有的缓存池,以避免不同编辑器实例监听到相同的事件。
本例编辑器给命令按钮设置图片样式,并且仅实现字体加粗功能:
.editorOut {
    border:1px solid #ccc;
    width:200px;
    height:200px;
    position:relative;
}
.editorTool {
    margin:2px;
    width:100%;
}
.editorFoot {
    margin:2px;
    width:100%;
    position:absolute;
    bottom:0;
}

.editorOut button {
    height:20px;
    width:20px;
    margin:1px;
    border:0px solid #fff;
    cursor:pointer;
    overflow:hidden;
}
.editorOut button.bold{
    background:url(./imgs.svg) 0px 0px;
    background-size:140px 40px;
}
.editorOut button.bold:hover {
    background:url(./imgs.svg) 0px -20px;
    background-size:140px 40px;
}
注:SVG是绘制矢量图的标签(XML)语言,它的特点是不受像素影响。
利用js脚本,动态创建编辑器。
_create函数创建编辑器,它封装了创建编辑器命令块、底部块、输入域等创建的过程。
_createEditor为创建编辑器输入域函数。
_createTool为创建命令块函数。
_createCommandBtn为创建调用编辑器命令的按钮的函数,本例只实现一个按钮。
_createFoot创建底部块函数。
_onbeforeSubmit为启动自定义事件beforesubmit的函数。
_onaftersubmit为启动自定义事件aftersubmit的函数。
_createPrintBtn为创建输出按钮的函数。本例两个自定义事件都在这里启动。
EditorProto = {
    _create : function(id) {
        var editor = this._createEditor(id);
        var tool = this._createTool();
        var button = this._createCommandBtn();
        var foot = this._createFoot();
        var printBtn = this._createPrintBtn();
        this.printBtn = printBtn;
        tool.appendChild(button);
        foot.appendChild(printBtn);
        editor.insertBefore(tool, editor.firstChild);
        editor.appendChild(foot);
        return editor;
    },
    _createEditor : function(id) {
        var editor = document.getElementById(id);
        editor.className = "editorOut";
        editor.contentEditable = true;
        return editor;
    },
    _createTool : function() {
        var tool = document.createElement("div");
        tool.contentEditable = false;
        tool.className = "editorTool";
        return tool;
    },
    _createCommandBtn : function() {
        var button = document.createElement("button");
        button.className = "bold";
        button.title = "加粗";
        button.onclick = function(e) {
            document.execCommand("bold", false, null);
        };
        return button;
    },
    _createFoot : function() {
        var tool = document.createElement("div");
        tool.contentEditable = false;
        tool.className = "editorFoot";
        return tool;
    },
    _onbeforeSubmit : function(e, scope, callback) {
        scope.fire(‘beforesubmit‘, e);
    },
    _onaftersubmit : function(e, scope, callback) {
        scope.fire(‘aftersubmit‘, e);
    },
    _createPrintBtn : function() {
        var button = document.createElement("input"),
            that = this;
        button.type="button"
        button.value = "点击写出";
        button.onmousedown = function(e) {
            that._onbeforeSubmit(e, that);
        };
        button.onmouseup = function(e) {
            that._onaftersubmit(e, that);
        };
        return button;
    }
};
拷贝函数的作用是将Event对象与EditorProto对象糅合到一起。
var copyIf = function(sub, sup, config) {
    for(var p in sup) {
        if(!sub[p]) {
            sub[p] = sup[p];//拷贝
        }
    }
}
为了达到最终new一次创建一个实例的目的,我们需要将编辑器对象加工成构造函数。像ExtJS、JQuery、Mini UI等都有实现自己的extend函数,本例就不单独实现继承函数了。
copyIf(EditorProto, Event);//将Event对象拷贝给EditorProto

function Editor(id) {
    this._cachePool = {};//事件处理函数的缓存池不能放到原型里
    this._create(id);//new 操作构造器的时候,创建编辑器实例
};
Editor.prototype = EditorProto;//原型链继承
HTML里定义两个div,做为两个编辑器的容器。
<div id="editor">print...</div>
<div id="s"></div>
JS里分别在HTML两个div内创建编辑器,并且第一个编辑器绑定两个自定义事件,第二个只绑定一个,测试效果。
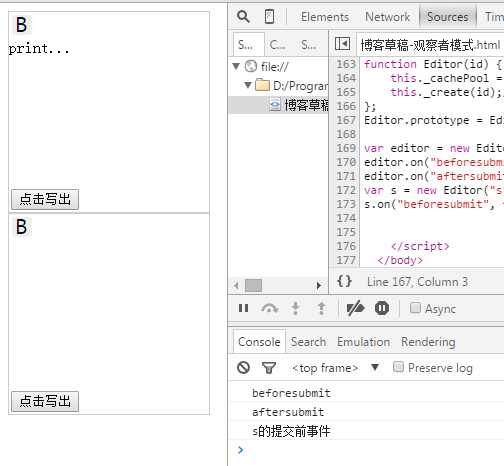
var editor = new Editor("editor");
editor.on("beforesubmit", function() {console.log("beforesubmit");});
editor.on("aftersubmit", function() {console.log("aftersubmit");});

var s = new Editor("s");
s.on("beforesubmit", function() {console.log("s的提交前事件");});
点击第一个编辑器会打印出“beforesubmit”与“aftersubmit”;点击第二个编辑器打印出“s的提交前事件”。
为编辑器创建自定义事件目的达成!
标签:
原文地址:http://www.cnblogs.com/longhx/p/5445816.html